background image

Page N-8

WEATHER  PROTECTION

Repair and Service Manual

Read all of Section B and this section before attempting any procedure. Pay particular attention to all Notices, Cautions, Warnings and Dangers.

B

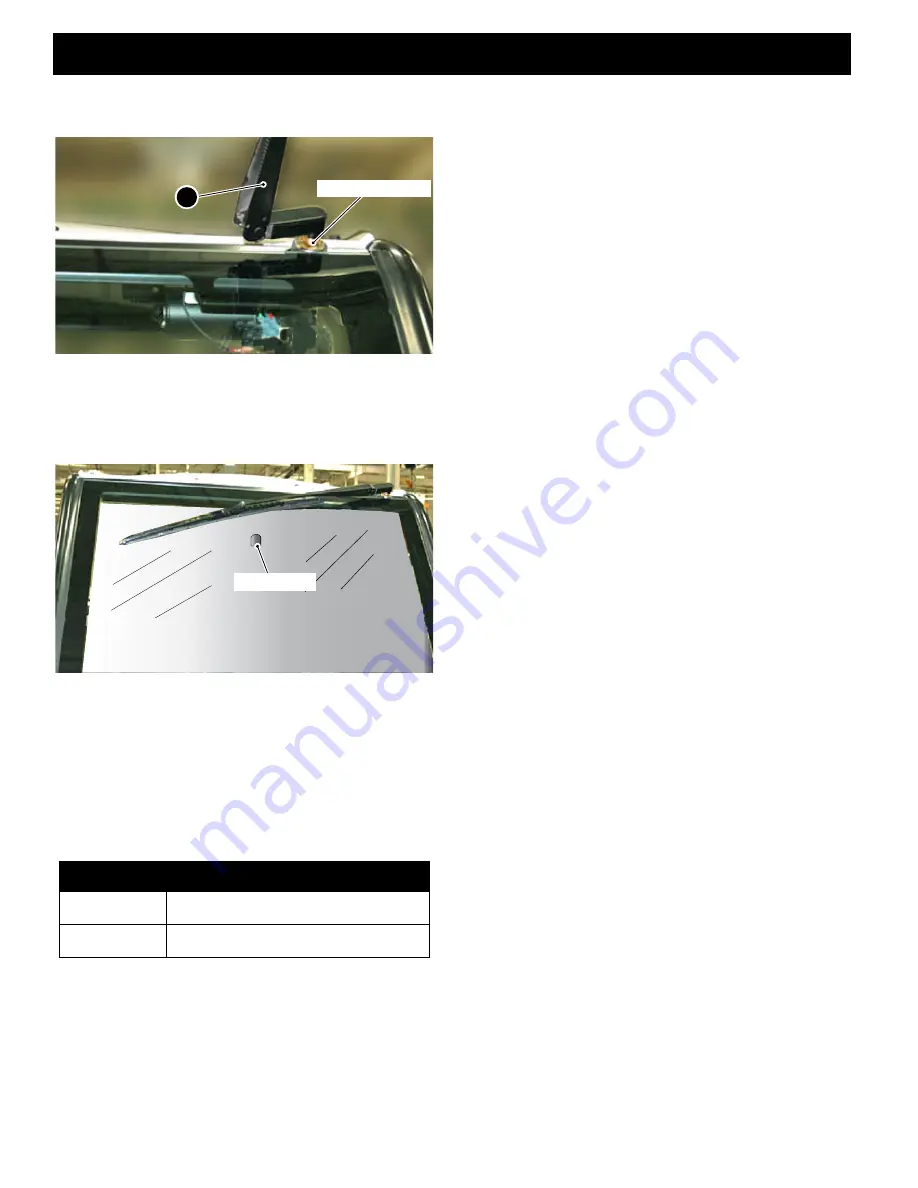
12. Slide wiper arm (1) straight onto the motor pivot shaft 

and lower wiper arm onto the glass.

13. Cycle the wiper system to check the wiper position. 

The wiper arm should park above the mirror mount but 
not off the top of the windshield glass.

14. Cycle the wiper motor again; make sure the blade 

does not hit the side seal or the OPS structure. If the 
wiper blade is not in correct position on the wind-
shield, push the release tab with a flat screwdriver to 
release the wiper arm from the motor pivot shaft, 
adjust to correct position and then slide the wiper arm 
back onto the wiper pivot shaft, cycle the wiper motor 
again and reposition the wiper arm if necessary.

ITEM 

TORQUE SPECIFICATION

4, 11

4-10 in. lbs (0.56-1.12 Nm)

7

26-44 in. lbs (3.3-4.5 Nm)

1

Motor Pivot Shaft

Mirror Mount

Summary of Contents for 2Five

Page 1: ...2Five Electric Repair Service Manual 606779 ISSUED APRIL 2010 REVISED DECEMBER 2012...

Page 2: ...nd a regard for conditions that could be hazardous Improper service or repair may damage the vehi cle or render it unsafe NOTICES CAUTIONS WARNINGS AND DANGERS WASH HANDS AFTER HANDLING Battery posts...

Page 3: ...ously The information contained in this Manual may be revised periodically by E Z GO and therefore is subject to change without notice E Z GO DISCLAIMS LIABILITY FOR ERRORS IN THIS MANUAL and E Z GO S...

Page 4: ...batteries will self discharge over time The rate of self discharge varies depending on the ambient temperature as well as the age and condition of the batteries A fully charged battery will not freez...

Page 5: ...ERAL INFORMATION ROUTINE MAINTENANCE A SAFETY B BODY C WHEELS AND TIRES D ELECTRONIC SPEED CONTROL AC MOTOR E FRONT SUSPENSION F MOTOR MOTOR BRAKE G BATTERIES CHARGING H ON BOARD BATTERY CHARGER I BRA...

Page 6: ...Page iv Repair and Service Manual TABLE OF CONTENTS Notes...

Page 7: ...n the back cover of this publication Attention Customer Care Department E Z GO IS NOT LIABLE FOR ERRORS IN THIS MANUAL E Z GO IS NOT LIABLE FOR INCIDENTAL OR CON SEQUENTIAL DAMAGES THAT RESULT FROM TH...

Page 8: ...ngs before attempting to service vehicle In any product components may eventually fail to perform properly as the result of normal use age wear or abuse It is impossible to anticipate all possible com...

Page 9: ...e performed by trained and qualified personnel follow the manufacturer s maintenance procedures insulate any tools used within the battery area in order to prevent sparks or battery explosion use spec...

Page 10: ...recommended number of occupants for the vehicle bucket seats are designed for one occupant only bench seats are designed for two occupants only The driver and all passengers must wear seat belts one p...

Page 11: ...uckle release button and allow the belt to retract If the belt does not retract check for twists REPORTING SAFETY DEFECTS If you believe that a vehicle has a defect which could cause a crash or could...

Page 12: ...Page x Repair and Service Manual Notes SAFETY INFORMATION Read all of Section B and this section before working on vehicle Pay particular attention to all Notices Cautions Warnings and Dangers...

Page 13: ...5 Initial Service Chart A 2 BRAKE BURNISHING PROCEDURE A 2 TRANSPORTING VEHICLE A 2 Fig 6 Brake Release Wires Under Controller Splash Shield A 3 SERVICING VEHICLE A 3 ROUTINE MAINTENANCE A 3 REAR AXLE...

Page 14: ...i Repair and Service Manual Notes GENERAL INFORMATION ROUTINE MAINTENANCE Read all of section B and this section before working on vehicle Pay particular attention to all Notices Cautions Warnings and...

Page 15: ...sentative on servicing the vehicle in accordance with the Periodic Service Sched ule Service Parts Manuals as well as Repair and Service Manuals are available from a local Distributor an autho rized B...

Page 16: ...In the event that the vehicle will not move in forward or reverse the parking brake can be released using the Run Tow switch located under the seat on the passen ger side With the switch toggled to th...

Page 17: ...ery before removing battery wires Wrap wrenches with vinyl tape to reduce the possibility of a dropped wrench shorting out a battery which could result in an explosion ROUTINE MAINTENANCE This vehicle...

Page 18: ...ble protection Frequent washing with lukewarm or cold water and mild detergent is required to preserve the painted surfaces Occasional cleaning and waxing with non abrasive prod ucts designed for clea...

Page 19: ...the head with 8 8 or 10 9 Unmarked hardware is Grade 2 Fig 10 Torque Specifications and Bolt Grades The above torque values DO NOT apply to Platsite thread forming screw Numbers Must Match ALL TORQUE...

Page 20: ...teries check electrolyte level fill if required C A C A C A C A Brakes check fluid level in master cylinder 3000 mi 5000 km Brakes s mooth o peration o f p edal s topping d istance P P P P P Brakes ag...

Page 21: ...Repair and Service Manual Notes Read all of section B and this section before working on vehicle Pay particular attention to all Notices Cautions Warnings and Dangers GENERAL INFORMATION ROUTINE MAIN...

Page 22: ...Repair and Service Manual Notes GENERAL INFORMATION ROUTINE MAINTENANCE Read all of section B and this section before working on vehicle Pay particular attention to all Notices Cautions Warnings and...

Page 23: ...NCE B 1 BEFORE SERVICING THE VEHICLE B 1 Additional Warnings B 2 Fig 1 Attach Accessory Wires to Battery Pack B 3 BATTERY REMOVAL AND INSTALLATION B 4 Fig 2 Batteries Charger Receptacle Controller B 4...

Page 24: ...Page B ii Repair and Service Manual Notes SAFETY Read all of Section B and this section before working on vehicle Pay particular attention to all Notices Cautions Warnings and Dangers...

Page 25: ...de battery acid and hydrogen gas could result in serious bodily injury to the technician mechanic and bystanders if not treated with utmost caution Be careful not to place hands face feet or body in a...

Page 26: ...terminal Batteries are heavy Use proper lifting techniques when moving them Always lift the battery with a com mercially available battery lifting device Use care not to tip batteries excessively when...

Page 27: ...tery pack This can be done by con necting to the two battery terminals shown in Figure 1 This can be done by connecting to the two battery termi nals shown in the illustration Ref Fig 1 If the acces s...

Page 28: ...evice 1 Rubber Mat 1 When lifting a battery always use all 4 lifting lugs provided Do not attempt to lift a battery with only one strap this may break lifting lugs and result in personal injury or dam...

Page 29: ...ercially available battery carrier straps 2 per battery and a portable lift ing device Remove the three front batteries 1 2 3 one at a time push the rear hold down attachment tab towards the front of...

Page 30: ...ls with a solution of baking soda and water use a wire brush to completely remove corrosion if required 14 Carefully replace the wires on the battery terminals as shown Make sure to reconnect the main...

Page 31: ...position jack stands only in the areas indicated To raise the entire vehicle install the wheel chocks in front and behind each front wheel Center the jack under the rear axle tube next to the differen...

Page 32: ...Page B 8 Repair and Service Manual Notes SAFETY Read all of Section A and this section before working on vehicle Pay particular attention to all Notices Cautions Warnings and Dangers...

Page 33: ...h Guard C 4 Fig 9 Front Splash Guard C 4 Seat Back Assembly C 5 Fig 10 Front Seat Back C 5 Fender Liner C 5 Fig 11 Fender Liner C 5 Fig 12 Controller Splash Shield C 5 Rear Body C 5 Fig 13 Rear Body C...

Page 34: ...Page C ii Repair and Service Manual Notes BODY Read all of Section B and this section before working on vehicle Pay particular attention to all Notices Cautions Warnings and Dangers...

Page 35: ...ries should always be removed before any servicing that could gen erate sparks or repairs that require welding or cutting In general body component replacement can be accom plished with a minimum of s...

Page 36: ...bolts Disconnect the wires for the turn signal lights 4 Pull top of bumper 7 forward and off of the bolts then lift upward to clear the frame channel between the front struts and pull the lower edge...

Page 37: ...Ref Fig 8 Tool LIst Qty Torx Bit T 50IP 1 Torx Bit T 45 1 Torx Bit T 30 1 Torx Bit T 27IP 1 Insulated Wrench 9 16 1 Socket 10 mm 1 Ratchet 1 Torque Wrench in lbs 1 Torque Wrench ft lbs 1 Long Needle N...

Page 38: ...holder aside Disconnect the turn signal flasher unit and the brake switch relay Fig 8 Instrument Panel and Cup Holder 6 Remove four torx screws 20 and flat washers 21 securing the instrument panel alo...

Page 39: ...itio n bef ore tow ing DO NO T alte r or tam per wit h this uni t Un aut hor ize d mo difi cat ion s can res ult in SE RIO US INJ UR Y or dam age to the veh icle and wil l voi d the wa rra nty WA IT...

Page 40: ...ur torx screws 36 and washers 37 from the lower edge of the rear body two on the driver side and two on the passenger side 7 Remove two torx screws 38 from the bagwell floor It is recommended that the...

Page 41: ...oval Replace any worn or damaged hardware with new as required Floorboard Tool LIst Qty Torx Bit T 50 1 Ratchet 1 Insulated Wrench 9 16 1 Torque Wrench ft lbs 1 Before the floorboard can be removed th...

Page 42: ...t brackets to the front seat back support 14 For removal of seat back assembly proceed to step 3 for removal of entire rear facing seat proceed to step 4 3 To remove only the seat back assembly loosen...

Page 43: ...d bolts 28 from the bagwell floor Fig 18 Rear Facing Seat Foot Rest 6 Loosen four hex head bolts 30 Support the rear foot rest 29 before removing the two bolts closest to the rear of the vehicle compl...

Page 44: ...eldmtent 3 the passenger side seat support weldment 4 and the seat belt center front weldment 5 The replacement of frame components will require the removal of the Ops structure The front cowl instrum...

Page 45: ...fer 1 Fine Cut Polish Pad for Buffer 1 Sandpaper 1200 Grit wet or dry 1 Sandpaper 1500 Grit wet or dry 1 Wet Sanding Block 1 Soft Clean Cotton Cloths 1 Clean the area to be repaired with clean clear w...

Page 46: ...roughly clean the surface to be repaired with alco hol and dry 2 Mask the area to be painted common masking tape is adequate prior to repair and use aerosol type touch up paint 3 Apply spray touch up...

Page 47: ...Page C 13 Repair and Service Manual Notes Read all of Section B and this section before attempting any procedure Pay particular attention to all Notices Cautions Warnings and Dangers BODY...

Page 48: ...Page C 14 Repair and Service Manual Notes BODY Read all of Section B and this section before attempting any procedure Pay particular attention to all Notices Cautions Warnings and Dangers...

Page 49: ...ENTS FOR SECTION D SECTION TITLE PAGE NO WHEELS AND TIRES Page D i Repair and Service Manual WHEEL AND TIRE SERVICE D 1 Tire Repair D 1 Wheel Installation D 2 Fig 1 Tire Mounting Cross Sequence for Ti...

Page 50: ...Page D ii Repair and Service Manual Notes WHEELS AND TIRES Read all of Section B and this section before attempting any procedure Pay particular attention to all Notices Cautions Warnings and Dangers...

Page 51: ...For outdoor appli cations with major use on grassy areas the following should be considered On hard turf it is desirable to have a slightly higher inflation pressure On very soft turf a lower pressur...

Page 52: ...en seating of the wheel against the hub Place the wheel spacer in between the wheel and the hub with valve stem to the outside mount the wheel onto the hub Install lug nuts 1 finger tight make sure th...

Page 53: ...Page D 3 Repair and Service Manual Notes Read all of Section B and this section before attempting any procedure Pay particular attention to all Notices Cautions Warnings and Dangers WHEELS AND TIRES...

Page 54: ...Page D 4 Repair and Service Manual Notes WHEELS AND TIRES Read all of Section B and this section before attempting any procedure Pay particular attention to all Notices Cautions Warnings and Dangers...

Page 55: ...onic Speed Control E 1 Fig 2 Christmas Tree Rivet Removal E 1 ACCELERATOR PEDAL ASSEMBLY E 2 Fig 3 Pedal Cover E 2 Fig 4 Accelerator Pedal E 3 SOLENOID REPLACEMENT E 3 Fig 5 Controller Splash Shield C...

Page 56: ...i Repair and Service Manual Notes ELECTRONIC SPEED CONTROL AC MOTOR Read all of Section B and this section before attempting any procedure Pay particular attention to all Notices Cautions Warnings and...

Page 57: ...ed torques are shown in the table in Section A To prevent possible injury or death from bat tery explosion batteries should always be removed before any servicing that could gen erate sparks or repair...

Page 58: ...at 1 Remove four christmas tree rivets securing pedal cover to floorboard 2 Remove pedal cover 3 Remove three torx screws 2 securing accelerator pedal assembly 1 to the floorboard Ref Fig 4 4 Disconne...

Page 59: ...head nuts 10 2 Reconnect the red wire 9 and black wire 8 from harness to solenoid 4 as shown and secure in place with two smaller hex nuts 15 3 Reconnect the red wire 11 from the controller B to ITEM...

Page 60: ...y from the switch 3 Remove three christmas tree rivets 1 securing the controller splash shield 2 to the rear body and to the controller heat sink position splash shield off to one side to allow access...

Page 61: ...d this section before attempting any procedure Pay particular attention to all Notes Cautions Warnings and Dangers B B Fig 8 Solenoid Connections Fig 9 Controller Connections 11 10 4 6 9 13 15 14 8 5...

Page 62: ...ve BL battery terminal Do not over tighten the terminal screw 18 13 Install the solenoid on the controller heat sink using two hex head nuts 10 Reconnect the Red positive battery cable to the front te...

Page 63: ...OLD MAIN WIRE HARNESS Cut orange wire A from motor in main harness and fold piece of wire towards front of vehicle back on itself and tape in place splice remaining end of the orange wire A to orange...

Page 64: ...8 Repair and Service Manual Notes ELECTRONIC SPEED CONTROL AC MOTOR Read all of Section B and this section before attempting any procedure Pay particular attention to all Notes Cautions Warnings and D...

Page 65: ...Hub Assembly F 3 Fig 5 Rotor and Hub F 3 Wheel Bearing Packing F 4 Fig 6 Wheel Bearings F 4 Wheel Bearing Adjustment F 4 Spindle Assembly F 5 Struts F 5 Fig 7 Sub Spindle Strut and A Arm Assemblies F...

Page 66: ...ii Repair and Service Manual Notes FRONT SUSPENSION AND STEERING Read all of Section B and this section before attempting any procedure Pay particular attention to all Notices Cautions Warnings and D...

Page 67: ...ack stands before starting any repair procedure NEVER work on a vehicle that is supported by a jack alone MAINTENANCE Routine maintenance of the front suspension and steer ing consists of Periodic ins...

Page 68: ...rker White 1 Wrench 12 mm Open End 1 Wrench 17 mm 1 Crowfoot Wrench 12 mm 1 Torque Wrench ft lbs 1 Socket 18 mm 1 Ratchet 1 1 Lift the front of the vehicle and support on jack stands as instructed in...

Page 69: ...em the rotor and hub assembly must be replaced See Rotor and Hub section for complete instructions Rotor and Hub Assembly Ref Fig 5 Tool List Qty Socket 1 1 2 1 Ratchet 1 Torque Wrench ft lbs 1 Flat B...

Page 70: ...the bearings with grease It is recommended that a bearing packer attached to a grease gun be used however manual packing is acceptable if done correctly To pack a bearing manually requires that a dab...

Page 71: ...arm 5 Remove hex nut 9 and hex head bolt 8 remove the spindle assembly 4 5 Reassemble in reverse order replace worn or dam aged hardware as required It is recommended that all locking nuts be replaced...

Page 72: ...he front wheel s as described in the Wheels and Tires section of this manual 1 Remove the hex head bolt 11 securing the a arm 13 to the strut 2 Remove bushings 14 16 from a arm being careful to retain...

Page 73: ...e turns Do not remove nut at this time 4 Apply upward pressure to the steering wheel by plac ing a plastic faced hammer against the steering wheel retaining nut Strike the plastic faced hammer sharply...

Page 74: ...the yoke Fig 11 Lower Cross Bolt 3 Remove four torx head screws 9 securing steering column assembly to vehicle frame Fig 12 Steering Column Assembly Screws 4 Loosen the upper cross bolt 10 on the yok...

Page 75: ...l Joint Separator 1 Ball Peen Hammer 1 Inspect rod end or ball joint by grasping the end and checking for vertical motion If the rodmoves up or down this is an indication that the ball joint is worn a...

Page 76: ...ecuring the yoke to the steering box pinion 6 Loosen the upper cross bolt securing the yoke to the intermediate shaft 7 Remove the yoke from the steering box pinion by slid ing it up the intermediate...

Page 77: ...11 Repair and Service Manual Notes Read all of Section B and this section before attempting any procedure Pay particular attention to all Notices Cautions Warnings and Dangers FRONT SUSPENSION AND ST...

Page 78: ...12 Repair and Service Manual Notes FRONT SUSPENSION AND STEERING Read all of Section B and this section before attempting any procedure Pay particular attention to all Notices Cautions Warnings and D...

Page 79: ...NERAL G 1 Fig 1 Motor G 1 SPEED SENSOR G 1 Fig 2 Speed Sensor Removal G 1 Fig 3 Install Speed Sensor G 2 MOTOR G 2 Fig 4 Motor Connections G 2 Fig 5 Motor G 3 Fig 6 Air Blast Cleaning G 3 Fig 7 Motor...

Page 80: ...Page G ii Repair and Service Manual Notes MOTOR MOTOR BRAKE Read all of Section B and this section before attempting any procedure Pay particular attention to all Notices Cautions Warnings and Dangers...

Page 81: ...1 Phillips Screw Driver Bit 1 Torque Wrench in lbs 1 Make sure that the key switch is turned to OFF and the key is removed from the switch Removal 1 Chock the rear wheels of the vehicle 2 Raise and re...

Page 82: ...et 1 Torque Wrench in lbs 1 Extension 3 1 Socket 10 mm 1 Socket 9 16 1 Insulated Wrench 9 16 1 Torx Bit T 27 1 Wheel Chocks 4 1 Chock the rear wheels of the vehicle 2 Raise and remove seat bottom 3 Wi...

Page 83: ...ards the bottom Coat all of the splines The recommended anti seize is Loctite Sil ver grade or equivalent 14 Before installing the motor on the axle apply lubricant 80 molybdenum disulfide paste to th...

Page 84: ...r see safety procedures in SAFETY section of this manual Tool List Qty Ratchet 1 Torque Wrench in lbs 1 Socket 10 mm 1 Socket 9 16 1 Torx Bit T 27 1 Insulated Wrench 9 16 1 Wheel Chocks 4 Removal 1 Ch...

Page 85: ...ts 32 loosely 2 Connect the negative battery cable tighten termi nal hardware to 95 105 in lbs 11 12 Nm 3 Connect the wire harness to the motor brake and turn the key switch to N neutral position Move...

Page 86: ...Page G 6 Repair and Service Manual Notes MOTOR MOTOR BRAKE Read all of Section B and this section before attempting any procedure Pay particular attention to all Notices Cautions Warnings and Dangers...

Page 87: ...e H 3 Cleaning Batteries H 3 Fig 4 Preparing Acid Neutralizing Solution H 3 BATTERY REMOVAL AND INSTALLATION H 4 Fig 5 Battery Tie Down Upright Post H 4 Fig 6 Battery Removal H 4 Fig 7 Install Hold Do...

Page 88: ...age H ii Repair and Service Manual Notes BATTERIES CHARGING Read all of Section B and this section before attempting any procedure Pay particular attention to all Notices Cautions Warnings and Dangers...

Page 89: ...gen gas is explosive Be sure that the key switch is off and all electrical accessories are turned off before starting work on the vehicle Never disconnect a circuit under load at a battery terminal Ba...

Page 90: ...h releases stored chemical energy in the form of electrical energy The chemical reaction takes place faster in warm conditions and slower in cold conditions Temperature is important when conducting te...

Page 91: ...et the requirements of the water purity table Fig 3 Water Purity Table Even if the water is colorless odorless tasteless and fit for drinking the water should be analyzed to see that it does not excee...

Page 92: ...le 4 Using an insulated wrench disconnect and remove all other wires connected to the batteries 5 Remove the two pan head Torx screws one each side securing the battery strap 6 Remove the battery hold...

Page 93: ...mber 4 located at the back of the battery tray 4 making sure that it is positioned as shown 12 Install the battery tie down upright making sure that the offset is locked into the slot in the battery t...

Page 94: ...res cause the chemical reaction to slow down A vehicle that is stored at 90 F 32 C will lose 002 of specific gravity each day If a fully charged battery has a specific gravity of 1 275 and the battery...

Page 95: ...nerated at the DC plug receptacle contacts TROUBLESHOOTING In general troubleshooting will be done for two distinct reasons First a battery that performs poorly and is out side of the manufacturers sp...

Page 96: ...te into the hydrometer several times to permit the thermometer to adjust to the electrolyte temperature and note the reading Examine the color of the electrolyte A brown or gray coloration indicates a...

Page 97: ...age H 9 Repair and Service Manual Read all of Section B and this section before attempting any procedure Pay particular attention to all Notices Cautions Warnings and Dangers B B Fig 13 Hydrometer Tem...

Page 98: ...age H 10 Repair and Service Manual Notes BATTERIES CHARGING Read all of Section B and this section before attempting any procedure Pay particular attention to all Notices Cautions Warnings and Dangers...

Page 99: ...air and Service Manual CHARGER DESCRIPTION I 1 Fig 1 Charger Installation I 1 UNDERSTANDING THE CHARGER I 1 LED DISPLAY INFORMATION I 2 LED Operation Codes I 2 LED Fault Codes I 2 MAINTENANCE INSTRUCT...

Page 100: ...Page I ii Repair and Service Manual Notes BATTERY CHARGER Read all of Section B and this section before attempting any procedure Pay particular attention to all Notices Cautions Warnings and Dangers...

Page 101: ...steering wheel when charging serves as a good reminder to store the cord out of the way when finished with charging The plug can be damaged by driving over or catching the cord on the vehicle when dr...

Page 102: ...roblem with the battery pack voltage not reaching the required nominal level within the maximum time allowed FIVE RED FLASHES Five flashes a pause and then again five flashes and a pause Internal over...

Page 103: ...r carefully and place it so the nut 6 securing the green ground wire to the charger can be removed Installation 8 Connect the green ground wire to the stud on the front flange of the charger and secur...

Page 104: ...Page I 4 Repair and Service Manual Notes BATTERY CHARGER Read all of Section B and this section before attempting any procedure Pay particular attention to all Notices Cautions Warnings and Dangers...

Page 105: ...rake Pad Replacement J 3 Fig 6 Caliper Removal J 3 Fig 7 Anti Rattle Springs J 3 Fig 8 Compress O Ring Side J 3 Rotor Replacement J 3 Spindle Replacement J 4 Brake Pedal Assembly J 4 Fig 9 Pedal Cover...

Page 106: ...Page J ii Repair and Service Manual Notes BRAKES Read all of Section B and this section before attempting any procedure Pay particular attention to all Notices Cautions Warnings and Dangers...

Page 107: ...A R Flashlight 1 Transmission Fluid Funnel 1 The recommended method for removing christmas tree rivets is to slide a notched pry bar under the head of the rivet and press downward on the bar to pull...

Page 108: ...instructions on bleeding the brakes see BLEEDING BRAKES in this section of the manual Adjust the brake cable only after performing steps 1 and 2 above Tool List Qty Locking Pliers 1 Ratchet 1 Socket 9...

Page 109: ...iston once the piston is com pressed it will stay in position until the brake pedal is pressed 7 Compress the side with the O Ring and hold while installing the new pads 7 Once both pads are installed...

Page 110: ...d wrench disconnect the bat tery cable at the negative BL battery ter minal To access the pedal assembly remove the upper rocker panels the lower rocker panels and the floormat refer to page C2 for re...

Page 111: ...pedal cover 21 using new christmas tree rivets 20 replace the floormat and rocker panels Replace any worn or damaged hardware with new as required Bell Crank Bushings Tool List Qty Ratchet 1 Socket 1...

Page 112: ...eads and do not cut new ones Tighten the screws 18 to the specified torque value MASTER CYLINDER REPLACEMENT Tool List Qty Torque Wrench ft lbs 1 Torque Wrench in lbs 1 Ratchet 1 Socket 14 mm 1 Socket...

Page 113: ...fluid into reservoir and bleed system per BLEEDING BRAKES BLEEDING BRAKES Tool List Qty Hose A R Clean Container 1 Brake Fluid DOT 3 A R Wrench 1 4 box end 1 The hydraulic brake system must be free of...

Page 114: ...requires an assistant to pump the brake pedal and keep pressure on the pedal Bleed the brakes using the following procedure a Build pressure in the brake system if possible by slowly pumping the brak...

Page 115: ...Page J 9 Repair and Service Manual Notes Read all of Section B and this section before attempting any procedure Pay particular attention to all Notices Cautions Warnings and Dangers BRAKES...

Page 116: ...Page J 10 Repair and Service Manual Notes BRAKES Read all of Section B and this section before attempting any procedure Pay particular attention to all Notices Cautions Warnings and Dangers...

Page 117: ...se Warning Indicator K 6 Fig 17 Reverse Warning Indicator K 7 Speedometer K 7 Fig 18 Trim Panel Hardware K 7 Fig 19 Speedometer K 7 Fig 20 Main Wiring Harness K 8 Fig 21 Accessory Wiring Harness K 9 A...

Page 118: ...BLE OF CONTENTS FOR SECTION K CONT SECTION TITLE PAGE NO ELECTRICAL COMPONENTS WIRING Page K ii Repair and Service Manual Top Mounted Brake Light Replacement 1 Top Mounted Brake Light Bulb Replacement...

Page 119: ...an insulated wrench disconnect the bat tery cable at the negative BL battery ter minal To access the main wiring harness for replacement it is necessary to remove the OPS upper and lower rocker panels...

Page 120: ...nnect the plug from the rotary position sensor 11 Remove the two Torx head screws that secure the front edge of the rear body and seat support frame to the floorboard 12 Remove the two Torx head screw...

Page 121: ...l lu s tr a ti o n s b e lo w R e m o v e th is p la s ti c c o v e r b y re m o v in g 3 p la s ti c fa s te n e rs S e e il lu s tr a ti o n s b e lo w S e e e m e rg e n c y b ra k e re le a s e in...

Page 122: ...assembly in position on the floorboard and secure with three Torx screws 6 e Connect the wires to the brake pedal rotary posi tion sensor 8 f Place pedal assembly in position on the floorboard and sec...

Page 123: ...B to the back terminal of the solenoid and secure in place using a hex nut 16 Do not over tighten the nut n OLD VEHICLES Connect the green wire 20 from the positive BL battery terminal and the yel lo...

Page 124: ...s to p re v e n t in a d v e rt e n t m o v e m e n t T u rn th e ig n it io n k e y to th e N p o s it io n a n d c h o c k ti re s to p re v e n t in a d v e rt e n t m o v e m e n t R e m o v e th...

Page 125: ...switch 8 with the notch towards the RUN direction 8 Install the upper nut and seal 7 finger tight and torque as specified in the torque table Fig 16 Run Tow Switch 9 Install the splash shield using th...

Page 126: ...t R e m o v e th is p la s ti c c o v e r b y re m o v in g 3 p la s ti c fa s te n e rs S e e il lu s tr a ti o n s b e lo w R e m o v e th is p la s ti c c o v e r b y re m o v in g 3 p la s ti c f...

Page 127: ...MOTOR SENSOR 1 2 3 4 WHT WHITE A B C THROTTLE SENSOR IN LINE FUSE 1 B BATTERY A B C D KEY SWITCH A B WHITE RED WHITE YELLOW RED BLK WHT WHITE A B 1 2 RED CHARGER RECEPTACLE LT BLUE BLACK CONTROLLER RE...

Page 128: ...FUSE 2 INLINE FUSE 1 CAN INTERFACE TEMP SENSOR MOTOR SENSOR SOLENOID COIL B BATTERY FRONT VIEW OF CONNECTOR B POSITIVE BATTERY TO SOLENOID THROTTLE SENSOR KEYSWITCH WHT RED ORG ORG ORG ORG WHT BLK BL...

Page 129: ...BLU WHT BLU WHT BLU WHT BLU WHT BLU WHT GRAY YLW BLK BLK RED GREEN BLK BLK BLK WHT BLK BLK YEL TEMP SENSOR B BATTERY RED RED RED RED BATT GRN GROUND ON BOARD CHARGER GROUND AT BATTERY TRAY BATTERY GRO...

Page 130: ...ted on the Splash Shield covering the Controller a fuse block and a single fuse holder is mounted on a bracket just behind the DC to DC converter REPLACING THE ACCESSORY WIRING HARNESS Tool List Qty N...

Page 131: ...14 Remove the four Torx head screws two on each side that secure the lower edge of the rear body to the floorboard 15 Remove the two Torx head screws from the bagwell that secure the rear body to the...

Page 132: ...uides and connect to the brake light p Connect the DC to DC converter and on board bat tery charger connectors q Install the single fuse holder on the driver s side on the underside of the fuse block...

Page 133: ...th a new one 3 Replace the lens 7 and secure in place with the two phillips head screws 8 Head Light Switch Replacement Tool List Qty Torx Bit 27 IP 1 Ratchet 1 Make sure that the vehicle key switch i...

Page 134: ...up through the bottom of the cup holder and secure the flasher unit to the center of the splash shield tab using a christmas tree rivet 13 Plug the turn signal wire harness connector into the accessor...

Page 135: ...n cover Reinstall the rocker panels and the top portion of the cup holder Horn Replacement Make sure that the vehicle key switch is in the OFF position and the key has been removed The horn is located...

Page 136: ...18 Repair and Service Manual Notes ELECTRICAL COMPONENTS WIRING Read all of Section B and this section before attempting any procedure Pay particular attention to all Notices Cautions Warnings and Da...

Page 137: ...FOR SECTION L SECTION TITLE PAGE NO REAR SUSPENSION Page L i Repair and Service Manual GENERAL L 1 Fig 1 Rear Suspension L 1 SHOCK ABSORBER L 1 Fig 2 Shock Absorber L 2 REAR LEAF SPRING L 2 Fig 3 Rea...

Page 138: ...Page L ii Repair and Service Manual Notes REAR SUSPENSION Read all of Section B and this section before attempting any procedure Pay particular attention to all Notices Cautions Warnings and Dangers...

Page 139: ...shocks and the hardware that connects these items to the axle and to the vehicle frame The removal of the rear axle is covered in the section in this manual titled REAR AXLE SHOCK ABSORBER Ref Fig 2...

Page 140: ...the vehicle Replace any worn or damaged hardware with new as required REAR LEAF SPRING Ref Fig 3 Tool List Qty Wheel Chocks 4 Jack Stands 4 Floor Jack 1 Wrench 15 mm 1 Insulated Wrench 9 16 1 Socket...

Page 141: ...ne bushings 13 and spacer 14 in the leaf spring 16 Position the leaf spring between the shackle plates 12 and install the hex head bolt 15 and nut 11 12 Align the pin on the leaf spring 16 with the ho...

Page 142: ...Page L 4 Repair and Service Manual Notes REAR SUSPENSION Read all of Section B and this section before attempting any procedure Pay particular attention to all Notices Cautions Warnings and Dangers...

Page 143: ...1 Fig 1 Rear Axle M 1 Replacing the Lubricant M 1 Fig 2 Fill Plug M 2 REAR AXLE DISASSEMBLY M 2 Rear Hub M 2 Fig 3 Hub M 3 Axle Shaft Bearing and Seal Removal and Disassembly M 3 Fig 4 Outer Snap Ring...

Page 144: ...Page M ii Repair and Service Manual Notes REAR AXLE Read all of Section B and this section before attempting any procedure Pay particular attention to all Notices Cautions Warnings and Dangers...

Page 145: ...level plane Raise the vehicle in accordance with the instructions provided in Section B of this manual To reduce the possibility of personal injury fol low the lifting procedure in Section B of this m...

Page 146: ...one regardless of the mile age Always wipe the seals and O rings with a light oil before installing To reduce the possibility of personal injury fol low the lifting procedure in Section B of this manu...

Page 147: ...ternal Snap Ring Pliers 1 Slide Hammer E Z GO P N 18753 G1 1 Seal Puller 1 Seal Installer E Z GO P N 18739 G1 1 Ball Peen Hammer 1 Remove the wheel and the hub from the axle 1 Remove the outer snap ri...

Page 148: ...ive the seal into its correct posi tion Fig 8 Seal Installation 7 Install the inner snap ring To prevent damage to the oil seal lightly coat the axle shaft with bearing grease and support the shaft du...

Page 149: ...ethane Bead N 2 Fig 4 Edge Trim Installation N 2 Fig 5 Install Windshield Trim N 3 CANOPY TOP N 3 Fig 6 Canopy Top N 3 OPS Operator Protection System N 4 Fig 7 Goalpost Hardware N 4 Fig 8 Front Access...

Page 150: ...age N ii Repair and Service Manual Notes WEATHER PROTECTION Read all of Section B and this section before attempting any procedure Pay particular attention to all Notices Cautions Warnings and Dangers...

Page 151: ...lying objects The top and windshield are designed for weather protec tion only Removing a windshield is best left to professional auto motive windshield installer WINDSHIELD Tool List Qty Windshield K...

Page 152: ...ed to the outside of the windshield 2 Place the windshield with the outside surface facing downward on a table or pair of stable supports 3 Clean the windshield make sure that the mounting surface and...

Page 153: ...c drive rivets 2 Fig 5 Install Windshield Trim 11 Install the windshield wiper arm if the vehicle is equipped with a windshield wiper motor CANOPY TOP Tool List Qty Socket 10 mm 1 Ratchet 1 Wrench 10...

Page 154: ...to the specified torque value OPS Operator Protection System The entire OPS with the windshield and canopy top may be removed as a single unit Tool List Qty Torque Wrench ft lbs 1 Ratchet 1 Socket 15...

Page 155: ...pport and install the four hex head bolts 11 4 Install the two remaining hex head bolts 9 in the rear legs along with the two remaining nuts 8 5 Tighten the eight bolts to the specified torque value 6...

Page 156: ...cover 12 from the wiper motor 5 Remove the hex nuts 13 and washers from the pivot shaft 14 6 While holding the wiper motor remove the screw 4 securing the wiper motor to the mounting bracket 7 Discon...

Page 157: ...er tight 6 Tighten screw 4 and the hex nut 7 to the specified torque value 7 Connect the black ground wire to the wiper motor Fig 13 Wiper Motor Connections 8 Install the motor cover 12 using the thre...

Page 158: ...mount but not off the top of the windshield glass 14 Cycle the wiper motor again make sure the blade does not hit the side seal or the OPS structure If the wiper blade is not in correct position on t...

Page 159: ...Page N 9 Repair and Service Manual Notes Read all of Section B and this section before attempting any procedure Pay particular attention to all Notices Cautions Warnings and Dangers WEATHER PROTECTION...

Page 160: ...age N 10 Repair and Service Manual Notes WEATHER PROTECTION Read all of Section B and this section before attempting any procedure Pay particular attention to all Notices Cautions Warnings and Dangers...

Page 161: ...DIAGNOSTICS HOW TO USE THE HAND HELD DIAGNOSTIC UNIT O 1 MENUS O 2 Diagnostics Report O 2 Diagnostics Report Real Time O 6 Battery and Warranty O 12 Error Messages O 15 Warning Messages O 15 Course En...

Page 162: ...ii Repair and Service Manual Notes TROUBLESHOOTING AND DIAGNOSTICS Read all of Section B and this section before attempting any procedure Pay particular attention to all Notices Cautions Warnings and...

Page 163: ...tions indented under it The vertical bar along the left side of the display screen moves up and down when buttons 1 or 5 are pressed The length of the bar also changes depending on how many items are...

Page 164: ...___________________________ _______________________________________________________ _______________________________________________________ 3 STATE OF CHARGE displayed as SOC the next line displays th...

Page 165: ...__________________________ MOTOR AND HEAT SINK FUNCTIONS 7 14 7 MOTOR COMMAND SPEED displayed as CMDSPEED the next line displays the speed in RPMs revolutions per minute that is being requested of the...

Page 166: ...AC current in Amps _______________________________________________________ _______________________________________________________ _______________________________________________________ ____________...

Page 167: ...____________________________________ _______________________________________________________ 16 REVERSE SWITCH displayed as REV SWITCH the next line displays the switch position as ON or OFF _________...

Page 168: ...TIONS 20 20 ELECTRIC BRAKE CURRENT displayed as EBRAKECURR the next line displays the brake current as a three place decimal in Amps the brake current displayed below is 3 milliAmps __________________...

Page 169: ..._________________________ _______________________________________________________ 4 CHARGER CONNECTED displayed as CHARCONN the next line displays that the charger is connected by Yes or NO __________...

Page 170: ..._ _______________________________________________________ MOTOR AND HEAT SINK FUNCTIONS 8 15 8 MOTOR COMMAND SPEED displayed as CMDSPEED the next line displays the speed in RPMs revolutions per minute...

Page 171: ..._________ _______________________________________________________ _______________________________________________________ _______________________________________________________ ______________________...

Page 172: ...__________________________________ _______________________________________________________ 17 REVERSE SWITCH displayed as REV SWITCH the next line dis plays the direction selection as ON or OFF ______...

Page 173: ..._____________________________________________________ BRAKE FUNCTIONS 21 23 21 ELECTRIC BRAKE displayed as BRAKE the next line displays the electric brake state as ON or OFF __________________________...

Page 174: ...next line displays the battery pack state of charge in percentage _______________________________________________________ _______________________________________________________ ______________________...

Page 175: ...______ _______________________________________________________ 5 TOTAL MILEAGE OF THE VEHICLE displayed as TOT VEH MILES the next line displays the total mileage of the vehicle in miles in 10ths _____...

Page 176: ..._____________________ _______________________________________________________ _______________________________________________________ 2 TOTAL RUN TIME ON VEHICLE IN MINUTES SINCE THE LAST RECORDED CHA...

Page 177: ...nced unless the L time and CPU time are very close to being equal _______________________________________________________ _______________________________________________________ ______________________...

Page 178: ...__________________________ 3 To STOP the recording make sure that STOP is highlighted and press the enter key button 3 The energy consumed will be dis played on the screen If the key switch is turned...

Page 179: ...__________________________________________ _______________________________________________________ _______________________________________________________ _____________________________________________...

Page 180: ...this controller the con troller is suspect See ACTION 2 1 Replace Motor 2 Replace Controller 12576 DC Bus Timeout 1 DC Bus voltage has not reached 24 volts within 10 sec onds after key switch start 1...

Page 181: ...less than 24 VDC pro ceed to step 3 if it does not fall in this range follow ACTION 3 4 Verify power resistor ohm reading is between 0 2 and 0 5 ohms 5 Remove resistor control module connec tion to c...

Page 182: ...ltaneously selected normally a short condition in either the key switch or wiring 1 Remove key switch with switch in FWD and check A C and A D either A C or A D when tested should read less than 0 1 o...

Page 183: ...nt error is the result of a condition internal to the controller The message can appear in combination with one of the above error mes sages 1 Trouble shoot according to the controller error message d...

Page 184: ...CTION 2 1 Warm vehicle to greater than 20 C 4 F 2 Replace controller Warning Speed ometer code 1005 Heat Sink Temp High 1 Measured heat sink temper ature is greater than 85 C 185 F but less than 115 C...

Page 185: ...r brake Warning Speed ometer code 1007 Throttle Switch Closed 1 If this occurs with the key switch turned on Throttle switch is closed at key start the throttle switch must be opened momentarily befor...

Page 186: ...ry ing to troubleshoot the lighting circuit Example 2 If a problem occurs in the lighting circuit that results in only one of the headlights not working there is no rea son to check battery wiring or...

Page 187: ...he ground connection Any interruption of electricity flow must be corrected whether by repairing or replacing the wire the switch or the accessory POWER SUPPLY Tool List Qty DVOM 1 Check For Loose or...

Page 188: ...26 Repair and Service Manual TROUBLESHOOTING DIAGNOSTICS Read all of this manual to become thoroughly familiar with this vehicle Pay particular attention to all Notices Cautions Warnings and Dangers...

Page 189: ...al GROUNDING REQUIREMENTS P 1 GROUND SYSTEMS P 1 LIGHTINIG PROTECTION REQUIREMENTS P 1 EQUIPMENT FAULT AND PERSONAL SAFETY SYSTEM P 1 GROUND NETWORK REQUIREMENTS P 1 EXTERNAL GROUNDING REQUIREMENTS P...

Page 190: ...Repair and Service Manual Notes LIGHTNING PROTECTION AND GROUNDING Read all of Section B and this section before attempting any procedure Pay particular attention to all Notices Cautions Warnings and...

Page 191: ...ohms cannot be obtained due to high soil resistivity rock formations or other abnormal conditions alternate methods for reducing the resistance to earth must be considered Chemical Treatments No salt...

Page 192: ...24 below grade and be at least 24 away from the struc ture All bends in the conductor shall have a minimum radius of 8 and be no less than 90 degrees Ground Mats In areas where electrodes cannot be dr...

Page 193: ...to all pull boxes junction boxes and power panels In existing facilities where an existing conduit is not large enough to accommodate an additional ground conductor or where a conduit section is insul...

Page 194: ...Repair and Service Manual Notes LIGHTNING PROTECTION AND GROUNDING Read all of Section B and this section before attempting any procedure Pay particular attention to all Notices Cautions Warnings and...

Page 195: ...PAGE NO SPECIFICATIONS Page Q i Repair and Service Manual 2Five TWO PASSENGER VEHICLE SPECIFICATIONS Q 1 2Five FOUR PASSENGER VEHICLE SPECIFICATIONS Q 2 Fig 1 Vehicle Dimensions Q 3 Fig 2 Vehicle Inc...

Page 196: ...Page Q ii Repair and Service Manual Notes SPECIFICATIONS Read all of Section B and this section before attempting any procedure Pay particular attention to all Notices Cautions Warnings and Dangers...

Page 197: ...shion with vinyl cover and hip restraints hand holds SEATING CAPAPCITY Operator and one passenger TOTAL LOAD CAPACITY 800 lbs 363 kg including operator passenger accessories and cargo SPEED Up to 25 m...

Page 198: ...am cushion with vinyl cover and hip restraints hand holds Rear Bench style foam cushion with vinyl cover and hip restraints hand holds SEATING CAPAPCITY Operator and three passengers TOTAL LOAD CAPACI...

Page 199: ...Cautions Warnings and Dangers B B Fig 1 Vehicle Dimensions 107 1 272 cm 65 9 167 4 cm 47 8 121 4 cm AT REAR WHEELS 52 1 132 3 CM SIDE MIRROR TO OUTSIDE REAR WHEEL TWO PASSENGER 71 4 181 4 cm FOUR PAS...

Page 200: ...l of Section B and this section before attempting any procedure Pay particular attention to all Notices Cautions Warnings and Dangers B Fig 2 Vehicle Incline Specifications and Turning Diameter 1 9 7...

Page 201: ...Page Q 5 Repair and Service Manual Notes Read all of Section B and this section before attempting any procedure Pay particular attention to all Notices Cautions Warnings and Dangers SPECIFICATIONS...

Page 202: ...Page Q 6 Repair and Service Manual Notes SPECIFICATIONS Read all of Section B and this section before attempting any procedure Pay particular attention to all Notices Cautions Warnings and Dangers...

Page 203: ...m properly as the result of normal use age wear or abuse It is virtually impossible to anticipate all possible compo nent failures or the manner in which each component may fail Be aware that a vehicl...

Page 204: ...l may not be reproduced in whole or in part without the express permission of E Z GO Division of Textron Inc Technical Communications Department E Z GO Division of Textron Inc 1451 Marvin Griffin Road...

Reviews: