USER MANUAL WEIGHT INDICATOR
E-AF09: PROGRAM VERSION FOR DYNAMIC OR STATIC AXLES WEIGHING WITH INPUT/OUTPUT FUNCTION
3590EKR, 3590EXP, 3590EXT, CPWE, CPWET series indicator
E-AF09_02_16.04_EN_U
Page 1: ...USER MANUAL WEIGHT INDICATOR E AF09 PROGRAM VERSION FOR DYNAMIC OR STATIC AXLES WEIGHING WITH INPUT OUTPUT FUNCTION 3590EKR 3590EXP 3590EXT CPWE CPWET series indicator E AF09_02_16 04_EN_U ...
Page 2: ...TERY LEVEL INDICATION 17 5 4 DISPLAYED DATA 18 5 4 1 LCD DISPLAY CUSTOMIZATION ONLY FOR 3590E INDICATORS 19 5 5 MESSAGES OF THE INSTRUMENT 20 5 5 1 INSIDE THE SET UP OR MENU OR AT START UP 20 5 5 2 IN WEIGHING 21 6 SCALE ZERO FUNCTION 21 7 TARE FUNCTIONS 21 7 1 MANUAL PRESET TARE TO BE SUBTRACTED TO THE TOTAL ACCUMULATED WEIGHT 21 7 2 CALCULATED MANUAL TARE 22 7 3 TARE CANCELLATION 22 7 4 LOCKED U...
Page 3: ...3 1 CONFIGURATION 40 13 2 3 2 WEIGHING PROCEDURE 40 13 3 INPUT OUTPUT AXLE WEIGHING 43 13 3 1 MANUAL AXLE WEIGHING 43 13 3 1 1 CONFIGURATION 43 13 3 1 2 INPUT WEIGHING PROCEDURE 43 13 3 1 3 STARTING OUTPUT WEIGHING THROUGH ID CODE 45 13 3 1 4 STARTING OUTPUT WEIGHING THROUGH LICENSE PLATE 46 13 3 1 5 OUTPUT WEIGHING PROCEDURE 46 13 3 2 AUTOMATIC STATIC AXLE WEIGHING 48 13 3 2 1 CONFIGURATION 48 13...
Page 4: ...ENABLING THE WEIGH 65 13 8 WEIGHT THRESOLDS FOR EXECUTING THE WEIGH 65 13 9 VISUALISATION AND CLEARING OF THE ACCUMULATED TOTALS 65 13 10 PROGRESSIVES 66 13 10 1 PROGRESSIVE DIGITS 66 13 10 2 TICKET PROGRESSIVE 66 13 10 3 LOT PROGRESSIVE 66 14 PRINTOUTS 67 14 1 LINKING OF THE FORMATS TO THE PRINT FUNCTIONS 70 14 1 1 QUICK LINKING OF THE FORMATS 71 14 2 NUMBER OF TICKET COPIES 71 14 3 REPETITION OF...
Page 5: ... dealer from whom it was purchased In any case DISCONNECT THE POWER SUPPLY before taking any action With the 6V rechargeable battery version it has to be completely recharged 12 hours in the first installation of the instrument we RECOMMEND disconnecting the battery if the instrument is not going to be used for more than 30 days In order to avoid the deterioration of the rechargeable battery In st...
Page 6: ...aracters Database of 500 vehicles description of 20 characters plate of 10 characters linked tare SIGNALS 3590E 16 status LEDs Graphic icons on LCD display CPWE Graphic icons on LCD display CPWET 3 way control light Graphic icons on LCD display KEYBOARD Impermeable polycarbonate keyboard with 24 multifunction IP65 protection degree with membrane keys with audible and tactile feedback PARAMETER SET...
Page 7: ...e reseller for the list of the available hardware and software accessories 2 2 SYMBOLS USED Below are the symbols or texts used in the manual to recall the reader s attention and on the instrument to recall the user s attention ATTENTION Only qualified personnel must perform this operation ATTENTION This is referred to working on energized lines only qualified personnel must require or perform thi...
Page 8: ...then release The CPWE instead is automatically turned on as soon as it is powered The display shows Initially a welcome message settable in the TECHNICAL SET UP LoGo StEP TECH MAN REF while the instrument carries out a series of checking and preheating self tests E AF09 XX name of the installed software in which XX identifies the software language XX YY is the software version installed EXECUTION ...
Page 9: ...red the printer is normally maintained in STAND BY and powered only when a printout is needed This function reduces the energy absorbed by the battery when the printer is not being used If in this configuration one should power the printer to change the paper and other maintenance jobs one needs to press in sequence the ENTER and 0 keys during the weighing the LED display shows Prn on Blinking and...
Page 10: ...the numeric input phase it quickly clears the present value TARE ZERO If pressed for an instant it carries out the semiautomatic tare or cancels the value of tare if the gross weight is 0 If pressed at length it clears the displayed gross weight if it s within the percentage configured in the 0 PErC step Fn ENTER In the alphanumeric input phase it confirms the entry made In the menu it allows to e...
Page 11: ...talisation with Input Output function enabled In the numeric or alphanumeric input phase it increments the blinking digit It allows scrolling backwards in the menu steps or in the parameters within a step F8 If pressed for an instant it executes the printing and the zeroing of the partial total In the numeric or alphanumeric input phase it selects the digit to be modified from right to left F9 If ...
Page 12: ...g mode from numeric nuM to characters ChAr In the nuM mode one enters just the numbers while in the ChAr mode one can enter all the characters of a key The last writing mode selected is stored by the instrument C If pressed for an instant it cancels the written characters first the characters that follow the cursor are cancelled than those that precede it one at a time If pressed at length it dele...
Page 13: ...f the linked function Scroll the list with the arrow keys press the C key to exit 4 6 INDICATOR CONNECTED TO REMOTE KEYBOARD It s possible to connect a PC keyboard optional used to emulate the functions of the keys of the indicator The keys are managed in the following way Esc C key If pressed at start up it allows entering in the technical set up In the alphanumeric input it deletes all entered c...
Page 14: ... to remotely control the instrument through one of the following types of remote controls 19 key infrared ir 18 key infrared ir or 6 key radio rd The type of remote control to be used must be selected in the Setup environment in the inF rEd step TECH MAN REF NOTE The infrared remote controls are for indoor use only 4 7 1 19 KEY INFRARED REMOTE CONTROL With this type of remote control the functioni...
Page 15: ...usable remote controls To enable this mode one has to first select RD 6 BR in the inF rEd TECH MAN REF USE OF MORE REMOTE CONTROLS WITH SEVERAL INDICATORS IN THE SAME AREA If one needs to use several indicators in the same area it is possible to combine each remote control to the desired indicator in order to execute the function only on it and therefore avoid emulating the function on all indicat...
Page 16: ...TATUS INDICATORS led pilot lights and or graphic symbols DATA two lines in the 3590E one or two lines in the CPWE depending on the weight zoom function described in the following section See section 5 4 Figure 1 3590E displays Figure 2 CPWE CPWET display CUS MAT VEH PT 1 000kg 1 CUS MAT VEH PT 1 000kg WEIGHT STATUS INDICATORS STATUS INDICATORS DATAS WEIGHT STATUS INDICATORS STATUS INDICATORS DATAS...
Page 17: ...y pilot light off through battery discharged battery 0 Indicates that the weight detected by the weighing system is near zero including the interval of 1 4 1 4 of the scale s division Indicates that the weight is unstable NET Indicates that the weight shown by the LED display is a NET WEIGHT T Indicates that a tare value has been acquired or entered g Indicates that the unit of measure in use is t...
Page 18: ...lue has been acquired A manual tare value has been entered Unit of measure in use ton kilogram gram pounds millilitres or millivolts Active weighing range see section 8 Active scale always 1 Indicates that an axle totalization cycle is in execution Battery charge level see section 5 3 Active during the configuration of the date and time Locked keyboard see section 4 4 In the HELP menu these respec...
Page 19: ...cted Element not selected PT is Preset tare if set to be subtracted from the total accumulated weight see section 13 3 6 During the axle totalization cycle the display will guide the operator to execute the weighing procedure depending on the selected functioning mode Refer to section 13 for details CPWE VISUALISATION WITH NON ACTIVE WEIGHT ZOOM The data is shown on two lines under the weight sect...
Page 20: ...R 3590E INDICATORS On the 3590E models it is possible to customize the data displayed on the LCD display through the print format 99 see the section DISPLAY CUSTOMIZATION TECH MAN REF by using the DiniTools software By pressing in sequence the Fn and F9 keys it s possible to activate the customized visualization The default configuration for this visualization is the following If more than 4 lines...
Page 21: ...ECHNICAL DEFAULT dFLt t parameter of the SET UP environment if not already executed previously and carefully carry out the calibration Er 40 The value 0 is in the range 1 parameter of the calibration one must execute a TECHNICAL DEFAULT dFLt t parameter of the SET UP environment and carefully carry out the calibration Er 41 The value 0 is in the diV 1 parameter of the calibration one must execute ...
Page 22: ...RY C CANCEL PRINTOUT Error during printing press ENTER to restore the printing or C to cancel it and repeat it through the procedure described in section 13 PRINTER ERROR CHECK THE CTS Error during the printing totalisation not possible or printing not executed finished USER PRESS KEY See section 12 6 SCALE ZERO FUNCTION Keep the ZERO key pressed the message Zero appears on the display after which...
Page 23: ...n case of MANUAL TARE the net weight before the scale unloading must be of at least 2 stable divisions If the F5 key is pressed at length it is possible to quickly lock unlock the tare DISPLAY MEANING LoCK LOCKED TARE unLoCK UNLOCKED TARE The setting of the tare may be made also in the TARE LOCK UNLOCK SEtuP tare t parameter of the TECHNICAL SETUP TECH MAN REF 7 5 LIMITATION OF THE TARE FUNCTIONS ...
Page 24: ...e configuration metric data First range capacity first range minimum weigh first range division Second range capacity second range minimum weigh second range division Third range capacity third range minimum weigh third range division NOTES The minimum weigh corresponds to 20 net weight divisions The data of the second and third range appear only if actually configured To display the metric data P...
Page 25: ...specific print macros it s possible to automatically cancel the contents of all the texts right after their printing TECH MAN REF For information on the entry of the alphanumeric texts see section 4 3 ENTERING ALPHANUMERIC TEXT QUICK MODIFICATION OF AN INPUT TEXT It s possible to access directly to the modification of each of the input texts from 0 to 9 by associating to a key the corresponding fu...
Page 26: ...ition if an already occupied position has been selected 4 One should fill in the following fields only the necessary ones are requested by pressing ENTER to confirm DESCRIPTION 1 first description line up to 25 characters DESCRIPTION 2 second description line up to 25 characters DESCRIPTION 3 third description line up to 25 characters NOTE the DESCRIPTION 2 and DESCRIPTION 3 fields request can be ...
Page 27: ...IGHT net weight of the quantity which has entered in the factory in other words the sum of the net weights greater than zero so with the input weight greater than the output weight of all the pairs and of the single weighs carried out TOTAL OUTPUT WEIGHT net weight of the quantity which has left the factory in other words the sum of the net weights less than zero so with the input weight less than...
Page 28: ...mory storage right after the printing TECH MAN REF 11 1 6 ENTRY MODIFICATION AND QUICK SELECTION OF CUSTOMER 000 It s possible to directly enter a temporary memory storage in order to avoid the filling in of the database 1 Press in sequence the 0 NUMERIC and F1 2 The indicator allows directly filling in the memory storage 000 see section 11 1 1 ENTRY for the data to be filled in 3 Upon confirmatio...
Page 29: ...ion if an already occupied position has been selected 4 One should fill in the following fields only the necessary ones are requested press ENTER to confirm DESCRIPTION 1 first description line up to 20 characters DESCRIPTION 2 second description line up to 20 characters NOTE the DESCRIPTION 2 field request can be disabled see F ModE dtb En M FLd step RIF MAN T 5 Restart from point 2 or press C to...
Page 30: ...HT net weight of the quantity which has left the factory in other words the sum of the net weights less than zero so with the input weight less than the output weight of all the pairs and of the single weighs carried out NET TOTAL the net of all transactions TOTAL OUTPUT WEIGHT minus the TOTAL INPUT WEIGHT WEIGHS TOTAL number of weigh pairs input weigh with relative output weigh and of all the sin...
Page 31: ...e filling in of the database 1 Press in sequence the 0 NUMERIC and F2 keys 2 The indicator allows directly filling in the memory storage 000 seeing section 11 2 1 ENTRY for the data to be filled in 3 Upon confirmation with ENTER of the last data the memory storage will automatically be selected NOTES Upon each temporary entry the 000 memory storage will be overwritten By executing an output weigh ...
Page 32: ...late value up to 10 characters DESCRIPTION description line up to 20 characters TARE tare value NOTE the DESCRIPTION and TARE fields request can be disabled see F ModE dtb En V FLd step TECH MAN REF 5 Restart from point 2 or press C to return to weighing 11 3 2 MODIFICATION 1 Press the F3 to access the database 2 Select the storage to be modified a by using the arrow keys b by typing the storage n...
Page 33: ...and of the single weighs carried out NET TOTAL the net of all transactions TOTAL OUTPUT WEIGHT minus the TOTAL INPUT WEIGHT WEIGHS TOTAL number of weigh pairs input weigh with relative output weigh and of all the single weighs carried out 3 Restart from point 2 or press C to return to weighing 11 3 5 SELECTION DESELECTION With no memory storage selected the LCD display shows in the data section se...
Page 34: ...ator allows directly filling in the memory storage 000 seeing section 11 3 1 ENTRY for the data to be filled in 3 Upon confirmation with ENTER of the last data the memory storage will automatically be selected NOTES Upon each temporary entry the 000 memory storage will be overwritten By executing an output weigh the last temporary entry made will always be printed 11 3 7 ALPHABETICAL RESEARCH The ...
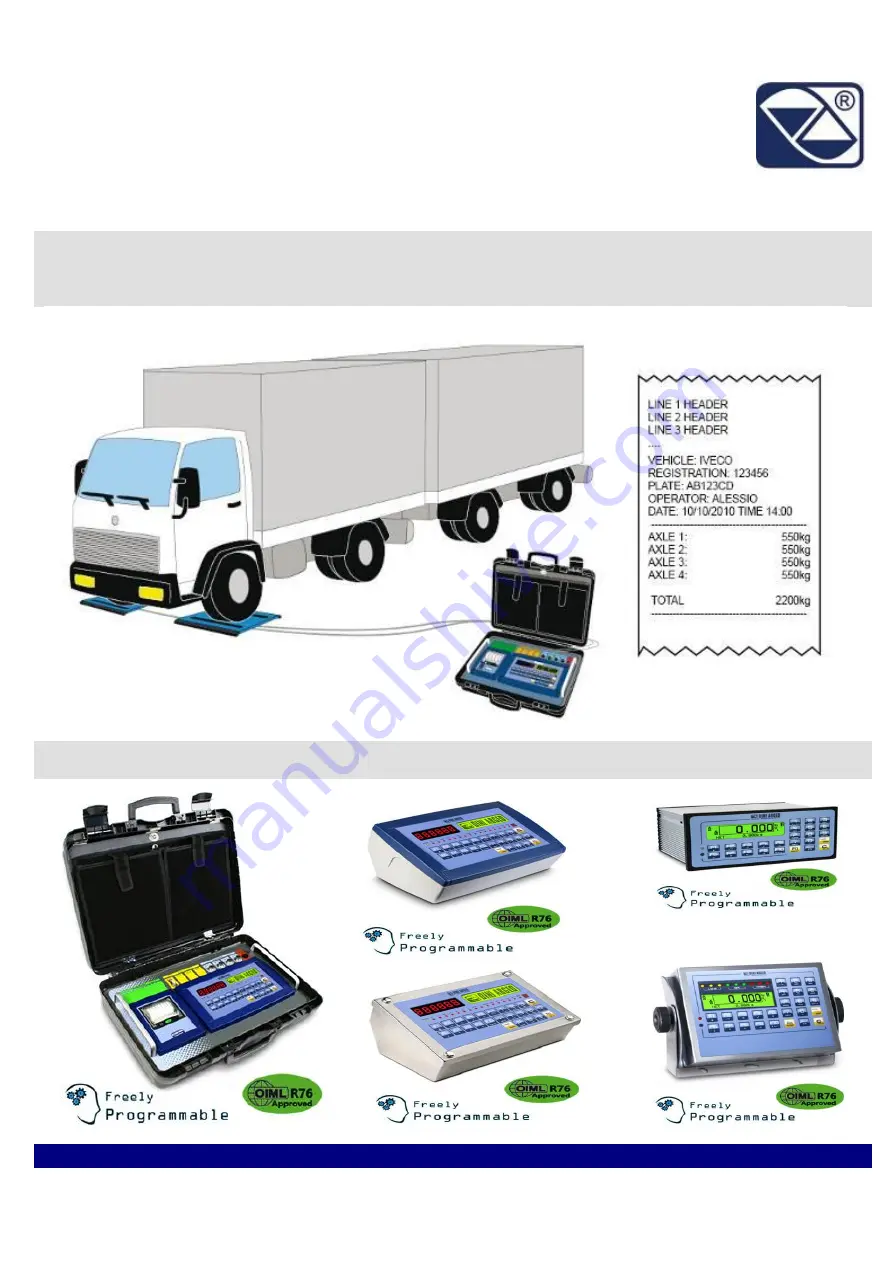
Page 35: ...tions the system foresees two identification methods through ID code or through the LICENSE PLATE of the vehicle The implementation of external modules like the PC keyboard the bar code or badge readers allows to quicken the weighing operations Two functioning modes are available Checking the weight of the vehicle with printing of the axle and overall total weighs Axle totalisation with input outp...
Page 36: ...1 2 WEIGHING PROCEDURE Select if requested the customer material vehicle to be linked to the weigh Drive and stop the first axle of the vehicle on the scale then press F6 key to store the displayed weight The indicator waits for stability and displays the following messages LCD display After the weight of the first axle is acquired the indicator emits a sound and displays for an instant the follow...
Page 37: ...totalize or press C to end the weigh the indicator will display for an instant 3590E LED display LCD display CPWE By pressing C to end the weigh the indicator will display for an instant the figures below Then the indicator executes the cycle end printout and then displays the total of the axles in the weight section see section 5 for a few seconds 3590E LED display LCD display alternatively to CP...
Page 38: ... axles to skip 6 Err En Axle acquisition error enable 7 Tim Out Axle acquisition time out 13 2 2 2 WEIGHING PROCEDURE As soon as the indicator has completely turned on and enters in the weighing status it waits for the first axle the indicator displays 3590E LED display LCD display CPWE In which XXXXXX is the current weight on the scale Select if requested the customer material vehicle to be linke...
Page 39: ... the acquired weight value with unit of measure After that the weight of the first axle has been successfully acquired when the weight goes below the Min Wei step the indicator waits for the second axle waiting the time setted in the tiME W step 3590E LED display LCD display CPWE In which XXXXXX is the current weight on the scale YYYYYY UM is the acquired overall weight value with unit of measure ...
Page 40: ...CD display CPWE Then the indicator executes the end cycle printout and then displays the total of the axles for a few seconds 3590E LED display LCD display alternatively to CPWE alternatively to In which XXXXXX is the acquired overall weight value YYYYYY UM is the acquired overall weight value with unit of measure At this point it remains in this status in this visualization until you ll press the...
Page 41: ...h 8 Tim Out Axle acquisition time out 9 PL Widt Platform width 13 2 3 2 WEIGHING PROCEDURE As soon as the indicator has completely turned on and enters in the weighing status it waits for the first axle and the indicator displays 3590E LED display LCD display CPWE In which XXXXXX is the current weight on the scale Select if requested the customer material vehicle to be linked to the weigh Transit ...
Page 42: ... weight value with unit of measure is an advancement bar which becomes colored proportionally to the time interval set between cycles Transit with the first axle of the vehicle on the scale in the limits of speed setted in the DYN CFG SPEED avoiding braking while transiting on the scale The indicator acquires automatically the axle weight shows the acquired value and asks again for the following a...
Page 43: ... LCD display alternatively to CPWE alternatively to In which XXXXXX is the acquired overall weight value H is the speed calculated YYYYYY UM is the acquired overall weight value with unit of measure At this point it returns to the status of waiting to acquire the first axle see first point AXLES 2 H km h TOT YYYYYY UM AXLES 2 H km h TOT YYYYYY UM total AXLES 2 TOT YYYYYY UM XXXXXX AXLES 2 TOT YYYY...
Page 44: ...e SETUP through the step F ModE totAL WEi MEM It s possible to have the ID code of the input weigh to be always consequential therefore also if an ID lower than the last one stored is available the ID code will follow the ID of the last stored input weigh To enable this function one has to set the F ModE totAL Pro LSt step in the set up on ENABLE 13 3 1 MANUAL AXLE WEIGHING 13 3 1 1 CONFIGURATION ...
Page 45: ...blinking for about 2 seconds and then the current weight on the scale After that the indicator waits for the following axle Drive and stop the next axle of the vehicle on the scale Wait a few instants for the weight stability Press ENTER the indicator acquires the axle weight and asks again for the following axle weigh and then for all the axles which one wants to totalize Press C to end the weigh...
Page 46: ...hing cycle start 13 3 1 3 STARTING OUTPUT WEIGHING THROUGH ID CODE To enable this mode one has to set the step F ModE totAL WEi MEM on Wei Cod in the setup TECH MAN REF Procedure Select if requested the customer material vehicle to be linked to the output weigh Drive and stop the first axle of the vehicle on the scale then it s possible to proceed in two ways 1 Directly type in the ID code and pre...
Page 47: ...ays 1 Enter the License Plate number and press ENTER 2 Press ENTER one enters the menu of the open input weighs LCD display Select the desired weigh using the arrow keys Confirm with ENTER or press C to exit 13 3 1 5 OUTPUT WEIGHING PROCEDURE After having selected the input weigh the indicator waits for the stability then acquire the weight emits a sound and displays for an instant the following m...
Page 48: ...igh and then for all the axles which one has already totalized in input Press C to end the weigh the indicator will display for an instant 3590E LED display LCD display CPWE Then the indicator executes the output cycle end printout and then displays the total of the axles in the weight section see section 5 for a few seconds 3590E LED display LCD display alternatively to CPWE alternatively to XXXX...
Page 49: ... menu of the Set up environment or by a direct function 605 linked to a key See the TECHNICAL MANUAL 1 Min Wei minimum weigh of the axle 2 Stab tm Stability interval 3 tiME W interval between cycles 4 Skip B Beginning axles to skip 5 Skip E Ending axles to skip 6 Err En Axle acquisition error enable 7 Tim Out Axle acquisition time out 13 3 2 2 INPUT WEIGHING PROCEDURE Select if requested the custo...
Page 50: ...r executes the printout if set 3590E LED display LCD display CPWE In which XXXXXX is the acquired weight value blinking for about 2 seconds then the current weight on the scale YYYYYY is the acquired weight value with unit of measure When the weight goes under the minimum weight threshold of the axle the indicator waits for the following axle 3590E LED display LCD display CPWE In which XXXXXX is t...
Page 51: ...hen F9 key is pressed after that the display shows for an instant 3590E LED display LCD display CPWE Then the indicator executes the end cycle printout and then displays the total of the axles for a few seconds 3590E LED display LCD display alternatively to CPWE alternatively to In which XXXXXX is the acquired overall weight value YYYYYY UM is the acquired overall weight value with unit of measure...
Page 52: ... 2 Press F7 one enters the menu of the open input weighs LCD display Select the desired weigh using the arrow keys Confirm with ENTER or press C to exit 13 3 2 4 STARTING OUTPUT WEIGHING THROUGH LICENSE PLATE To enable this mode one has to set the step F ModE totAL WEi MEM on PLAtE in the setup TECH MAN REF Procedure Select if requested the customer material vehicle to be linked to the output weig...
Page 53: ...1 the weight is greater than the minimum weight of the set axle 2 the weight is stable After the weight of the first axle is acquired the indicator emits a sound and displays for an instant the following message 3590E LED display LCD display CPWE In which YYYYYY is the acquired weight value with unit of measure Then the acquired weight blinks for a few seconds and the indicator executes the printo...
Page 54: ...Drive and stop the next axle of the vehicle on the scale Wait a few instants for the weight stability the indicator acquires the axle weight prints the acquired value and asks again for the following axle weigh and then for all the axles which one wants to totalize The cycle ends when the weight is not acquired during the time interval between cycles or when F9 key is pressed after that the displa...
Page 55: ... weighing parameters in the F Mode total StA CFG menu of the Set up environment or by a direct function 605 linked to a key See the TECHNICAL MANUAL 1 Min Wei Minimum weigh of the axle 2 n SMPLS Average weight samples 3 tiME W Interval between cycles 4 Skip B Beginning axles to skip 5 Skip E Ending axles to skip 6 Err En Axle acquisition error enable 7 SPEEd Speed Limit in Km h 8 Tim Out Axle acqu...
Page 56: ...wing message 3590E LED display LCD display CPWE In which YYYYYY is the acquired weight value with unit of measure Then the acquired weight blinks for a few seconds and the indicator executes the printout if set in the corresponds print formats After that the weight of the first axle has been successfully acquired when the weight goes below the Min Wei step the indicator waits for the second axle t...
Page 57: ...the display shows an instant 3590E LED display LCD display CPWE Then the indicator executes the end cycle printout and then displays the total of the axles for a few seconds 3590E LED display LCD display alternatively to CPWE alternatively to In which XXXXXX is the acquired overall weight value H is the speed calculated YYYYYY UM is the acquired overall weight value with unit of measure At this po...
Page 58: ...ble this mode one has to set the step F ModE totAL WEi MEM on PLAtE in the setup TECH MAN REF Procedure Select if requested the customer material vehicle to be linked to the output weigh Press F7 the display shows Then it s possible to proceed in two ways 1 Enter the License Plate number and press ENTER 2 Press ENTER one enters the menu of the open input weighs LCD display Select the desired weigh...
Page 59: ...he weight of the first axle has been successfully acquired when the weight goes below the Min Wei step the indicator waits for the second axle the time setted in the tiME W step 3590E LED display LCD display CPWE In which XXXXXX is the current weight on the scale YYYYYY UM is the acquired overall weight value with unit of measure is an advancement bar which becomes colored in proportion to the set...
Page 60: ... In which XXXXXX is the acquired overall weight value H is the speed calculated YYYYYY UM is the acquired overall weight value with unit of measure At this point it returns in the status of waiting for the input or output weighing cycle start AXLES 2 H km h TOT YYYYYY UM o AXLES 2 H km h TOT YYYYYY UM o tot out AXLES 2 TOT YYYYYY UM o XXXXXX AXLES 2 TOT YYYYYY UM o total WAIT AXLE 3 TOT YYYYYY UM ...
Page 61: ...input weight If there is a tare a SINGLE WEIGH is executed therefore no ID code is occupied See section 13 3 4 If all the 999 memory storages are occupied without executing any output weigh upon the execution of the following input weigh the indicator shows the message WEIGHS MEMORY FINISHED one must execute at least one output weigh in order to free up the memory to be used or cancel all the memo...
Page 62: ...or 13 3 2 3 depending on the acquisition mode To accumulate the weight difference in the total output weight one has to carry out the axle totalization as for the standard input weigh but by pressing the F7 key after having entered a tare value see section 7 the procedure will be as for the input weighing see section 13 3 1 2 13 3 2 2 or 13 3 2 3 depending on the acquisition mode but the weight di...
Page 63: ...NABLE 3590E Visualizations If the vehicle has passed over the maximum speed allowed setted in SPEED step If the vehicle has passed under the minimum speed allowed 1 km h If the vehicle stopped on the platform If the weight has passed the capacity of the scale If the maximum number of axles is reached The instrument is unable to compute the axle weight AXLE ACQUISITION ERROR AXLE ACQUISITION ERROR ...
Page 64: ...on 15 6 it will be disabled 13 4 4 MANAGING AN INPUT FOR THE CYCLE START END The beginning and the end of the weighing cycle can be defined respectively from the enabling and disabling of an external input instead of automatically done by time This can be useful for example if one needs to start the cycle through a photocell placed before the weighing area and stop it with another photocell after ...
Page 65: ...phase are not saved in a permanent manner but are substituted with each start up from the values set in the setup 13 6 ADDITIONAL TARE FUNCTION This function is useful if one wants to calculate the loaded unloaded weight at the net of a tare added to the weight of the vehicle taken into consideration By enabling the function in the F ModE totAL Add tAr step it s possible to have that upon the outp...
Page 66: ...ired key F KEYS step TECH MAN REF it s possible to access the thr Lo menu Minimum Threshold Setting set the lower totalisation threshold and press ENTER NOTES By setting 0 in the maximum threshold it s possible to totalise up to the maximum capacity of the scale By setting 0 in both thresholds the functions are disabled The totalisation field is valid for all totalisation types input output and si...
Page 67: ...umber of settable digits varies from 4 to 16 organised in this way if the actual digits of the total are less than the number of digits set in this step the difference is filled with some spaces if the actual digits are greater than the number of digits set in this step only the ones actually entered are taken into consideration counting from right to left The alignment of the total fields is on t...
Page 68: ...cute the simple weigh TOTALIZATION FIRST AXLE Programmable printout The first axle totalization manual with F6 key or automatic depending on the totalization mode causes the printing of the format linked to the S F 12 function TOTALIZATION NEXT AXLE Programmable printout The next axle totalizations manual with ENTER key or automatic depending on the totalization mode cause the printing of the form...
Page 69: ...ut output weigh with preset tare TOTALIZATION FIRST AXLE Programmable printout The first axle totalization manual with F7 key or automatic depending on the totalization mode causes the printing of the format linked to the S F 12 function function used also in the input axle weighing TOTALIZATION NEXT AXLE Programmable printout The next axle totalizations manual with ENTER key or automatic dependin...
Page 70: ... with the input weight greater than the output weight of all the pairs and of the single weighs carried out TOTAL OUTPUT WEIGHT net weight of the quantity which has left the factory in other words the sum of the net weights less than zero so with the input weight less than the output weight of all the pairs and of the single weighs carried out NET TOTAL the net of all transactions TOTAL OUTPUT WEI...
Page 71: ...ATION NEXT AXLE S F 13 AXLE TOTAL S F 14 INPUT AXLE WEIGHING END S F 06 OUTPUT AXLE WEIGHING REPORT see section 13 3 TOTALIZATION FIRST AXLE F7 input output function enabled S F 12 TOTALIZATION NEXT AXLE S F 13 AXLE TOTAL S F 14 OUTPUT AXLE WEIGHING END S F 07 REPORT OF THE INPUT OUTPUT WEIGHING WITH PRESET TARE see section 13 3 6 TOTALIZATION FIRST AXLE F6 or F7 with Preset Tare input output func...
Page 72: ...Furthermore for some print functions the desired formats can be quickly linked by setting directly the corresponding code function to the desired key F KEYS step TECH MAN REF without having to program the preamble CODE QUICK LINKING FUNCTION PRINT FUNCTION 200 Format linking to the Simple Printout Prn Fmt S F 01 201 Format Linking to the Partial Total Printout SND FMT S F 02 309 Format Linking to ...
Page 73: ... standard formats which automatically will be linked to the available print functions 15 OTHER FUNCTIONS 15 1 DIAGNOSTIC PERIPHERALS Through function 118 combinable with the desired key F KEYS step TECH MAN REF one enables the diagnostic peripherals function The display shows STATUS DESCRIPTION ANALOGUE OUTPUT A O Analogue output value expressed as a percentage OUTPUTS OUT Status of the output non...
Page 74: ...ion case to the current tare value PRESS 2nd F the NET weight on the scale will be used as a second value and the result will be shown for a few seconds on the display To disable the calculator function press the C key 15 3 1 HELP FUNCTION By pressing at length the HELP key it is possible to see the list of the keys used in the calculator function The list is automatically scrolled If one wants to...
Page 75: ...h function 202 combinable with the desired key F KEYS step TECH MAN REF the SET POINT values are entered DISABLING and ENABLING for each configured output The display shows S 1 on relay 1 ENABLING SETPOINT press ENTER enter the weight value with the keyboard and confirm with ENTER use the C key to quickly zero the current value The display shows S 1 oFF relay 1 DISABLING SETPOINT press ENTER enter...
Page 76: ... NET weight on the scale and the accumulated net partial total the entry of the SET POINTS and the specifications are the same as the functioning mode on the gross weight SET POINT ON THE GENERAL TOTAL By selecting this functioning mode in the normal scale mode the relay function is enabled on the sum between the NET weight on the scale and the accumulated net general total the entry of the SET PO...
Page 77: ... the axle acquisition therefore from the surpassing of the minimum axle weight until the axle weight acquisition sound AUTOMATIC AXLE WEIGHT ACQUISITION ERROR In the automatic axle weighing see section 13 2 2 13 2 3 13 3 1 2 and 13 3 1 3 for the relative description in case of error condition see section 13 4 2 the relay remains open and closed intermittently half second open and half second close...
Page 78: ...T POINTS and the specifications are the same as the functioning mode on the gross weight EXCLUSIVE FUNCTIONING MODE By setting the SEtuP outPut r ModE parameter on EXCLuS one configures the exclusive use of the outputs The check is made on all the set outputs starting from the last one OUT16 to the first one OUT1 When one of these is enabled the check on the previous ones is excluded By selecting ...
Page 79: ...e and NOT caused during transport If on site service is requested or necessary for any reason where the instrument is used the Customer will pay for all of the service technician s costs travel time and expenses plus room and board if any The customer pays for shipping costs both ways if the instrument is shipped to the DEALER or manufacturer for repair The WARRANTY is VOIDED if faults occur due t...