


Editing Functions/Funciones de edición
12
2. Gire el mando Data para elegir
los caracteres alfanuméricos
2. Rotate Data Knob to Select
Alpha-numeric Characters
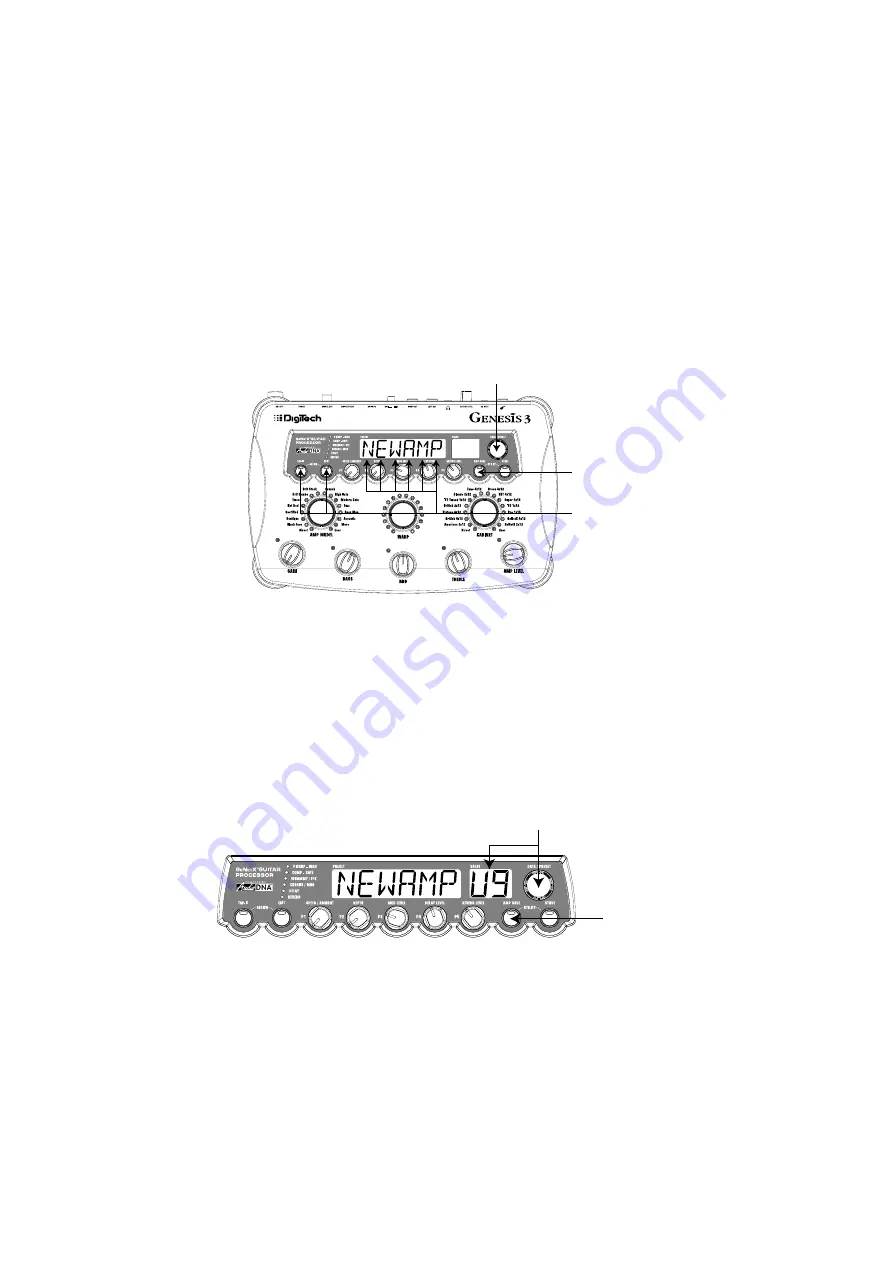
1. Press Amp Save
1. Pulse Amp Save
3. Use Tap-It and Edit Buttons
to Navigate Display
3. Use los botones Tap-It y
Edit para ir desplazándose
por la pantalla
6. Rotate Data Knob
to Select User
Amp Location
Gire el mando Data para
elegir la posición de
amplificador de usuario.
5. Press Amp Save Again
Pulse Amp Save de nuevo
Saving HyperModels™ (Amp Save)
When you have obtained the desired blend of the Green and Red Channels,
you now must perform the Amp Save procedure to create your new
HyperModel™ for future use. This Hypermodel™ can be saved in one of 9
User Hypermodel™ locations.Your new Hypermodel™ can then be selected
for use in either the Green or Red Amp Channel, and can even be Warped again
with any other Factory Amp Model or User Hypermodel™. The Amp Save
procedure is as follows:
1. Press the
AMP SAVE
button once. The
AMP SAVE
button will begin to
flash and the Display will read
NEWAMP
. The
N
of
NEWAMP
will be flashing
indicating that you can now name your HyperModel™.
2. Rotate the
DATA
knob to select the desired alpha-numeric character.
3. Press the
EDIT
button to move to the next character (to the right), or press
the
TAP-IT
button to select the previous character (to the left).
Almacenamiento de HyperModels™ (Amp Save)
Cuando haya conseguido la mezcla perfecta entre los canales verde y rojo,
deberá ejecutar el proceso de almacenamiento de amplificación (Amp Save)
para crear su nuevo HyperModel™ y poder usarlo en el futuro. Este
HyperModel™ puede ser almacenado en una de las 9 posiciones de
HyperModel™ de usuario. Después podrá elegir su nuevo HyperModel™ para
usarlo en el canal verde o rojo, o incluso mezclarlo de nuevo con otro modelo
de amplificador de fábrica o HyperModel™ de usuario. El proceso de
almacenamiento de datos de amplificación es el siguiente:
1. Pulse una vez el botón
AMP SAVE
. El botón comenzará a parpadear y en
la pantalla aparecerá
NEWAMP
La
N
de
NEWAMP
parpadeará para indicar que
ahora puede darle un nombre a su nuevo HyperModel™.
2. Gire el mando
DATA
para elegir el carácter alfanumérico que quiera.
3. Pulse el botón
EDIT
para desplazarse al siguiente carácter (a la derecha), o
el botón
TAP-IT
para elegir el carácter anterior (a la izquierda).
4. Repeat steps 2 and 3 until the desired Hypermodel™ name is shown
in the Display.
5. Press the
AMP SAVE
button again to select one of the 9 User
HyperModel™ locations. If the Genesis3 has any unused
HyperModel™ locations available, the Display will read
EMPTY
U1
.
The
U1
will be flashing indicating that this is the first available location
for your new creation to be stored. If all 9 Hypermodel™ locations
are filled, the Genesis3 will default to the first Hypermodel™ location
and will display the name of Hypermodel™ stored in the number 1
location.
6. Use the
DATA
knob to select the User location where the
Hypermodel™ will be saved. If all locations have been used, the Display
will show the name of the HyperModel™ about to be overwritten.
4. Repita los pasos 2 y 3 hasta que en pantalla tenga el nombre que
quiera para su HyperModel™.
5. Pulse de nuevo el botón
AMP SAVE
para elegir una de las 9
posiciones de HyperModel™ de usuario. Si el Genesis3 dispone de
posiciones de HyperModel™ vacías, en pantalla aparecerá EMPTY
U1.El U1 parpadeará para indicar que esa es la primera posición
disponible para su nueva creación a almacenar. Si las 9 posiciones de
HyperModel™ están ocupadas, el Genesis3 elegirá por defecto la
primera posición HyperModel™ y mostrará el nombre del
HyperModel™ almacenado en ese momento es dicha posición.
6. Use el mando
DATA
para elegir la posición de usuario en la que guardará
el HyperModel™. Si todas las posiciones están ocupadas, la pantalla
mostrará el nombre del HyperModel™ que está a punto de eliminar.
7. Once the desired location has been selected, press the
Amp Save
button
again to complete the Amp Save procedure.
Pressing the
STORE
button at any time during the Amp Save procedure will
abort the process.
Note:
The Amp Save procedure only saves Amp/Cabinet combinations to the
User Hypermodel™ locations. It does not store any changes or the new
Hypermodel™ to the currently selected Preset. See page 14 for
information on storing changes to a Preset.
7. Una vez que haya elegido la posición que quiera, pulse de nuevo el botón
Amp Save para finalizar el proceso de almacenamiento de amplificación.
La pulsación del botón
STORE
en cualquier momento durante el proceso de
almacenamiento hará que dicho proceso sea anulado.
Nota:
El proceso de almacenamiento de datos de amplificación solo guarda las
combinaciones de amplificador / recinto en las posiciones de
HyperModel™ de usuario. No almacena ningún cambio o el nuevo
HyperModel™ en el Preset activo en ese momento.Vea en la página 14
la información acerca del almacenamiento de cambios en un Preset.


