background image

putting it back in the battery compartment with the polarity reversed.

22.2 Low Power Indicator 

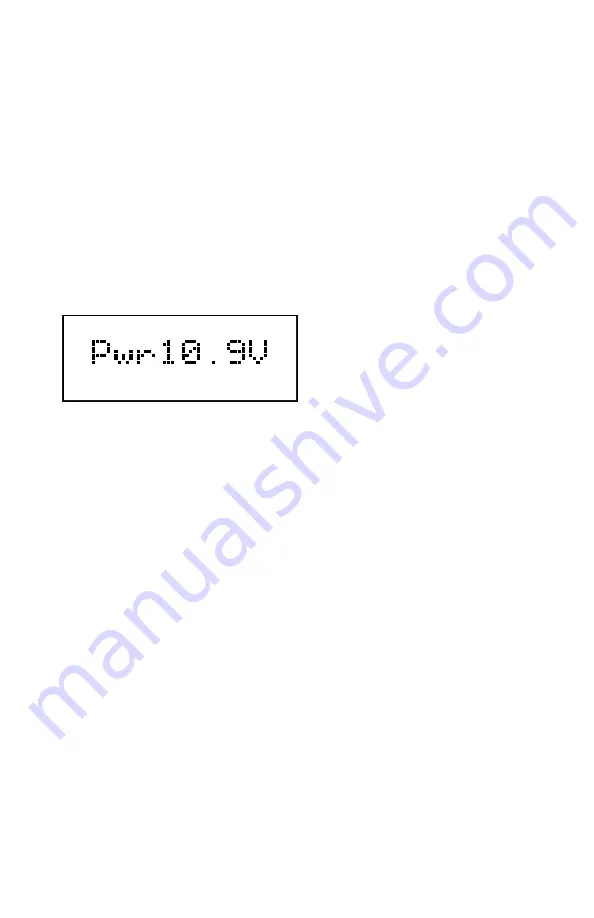
While it is running as a tetherless throttle, the DT400/R automatically checks
the power available to the throttle each time a battery is inserted and each time
it is plugged into or unplugged from LocoNet.  The power from the battery or
from LocoNet will be displayed in the text area of the throttle briefly each time
the throttle is plugged in or is unplugged from LocoNet.

When you plug in to LocoNet the number displayed will be the power provided
by LocoNet.  This value will be between  9 & 15 volts. Other characters will
also be displayed in the LCD depending on which locos are selected and their
speed and direction.

When you insert a battery or unplug
from LocoNet, the value displayed
will be the battery power.  When this
number is less than 6.2 V you may
want to consider changing the battery.
The DT400/R will still continue to

operate reliably for an extended period of time depending on the type battery is
in use. 9 volt alkaline batteries are nearing the end of their life at 6.8 volts, but
7.2 volt NiCad rechargeable batteries may still have lots of life remaining.
Experience will determine how long your DT400/R will operate with the bat-
teries you are using.

72

Summary of Contents for DT400 Series

Page 1: ...hrottles IR Operation with UR90 Radio Operation with UR91 Digitrax Inc 450 Cemetery ST 206 Norcross GA 30071 USA 770 441 7992 Fax 770 441 0759 www digitrax com Digitrax Manuals Instructions are update...

Page 2: ...con 18 4 3 4 Mode Indicator 19 4 3 5 L Left R Right Throttle Display 20 4 3 6 Text Area 20 4 3 7 L R Bar Graph 20 4 3 8 Function Display 21 4 3 9 Track Power Indicator 22 4 3 10 Tetherless Indicator 2...

Page 3: ...2 37 10 2 Controlling Functions On Consisted Locomotives 38 11 0 Multiple Unit Operations 39 11 1 Adding a Locomotive To A Consist 39 11 2 Removing A Loco From A Consist 41 11 3 Nested Consisting 41 1...

Page 4: ...DT400 R 66 21 1 LocoNet ID Change 68 21 2 Tetherless Operation 69 21 2 1 Control Lock 71 22 0 DT400 Battery 71 22 1 Battery Installation 71 22 2 Low Power Indicator 72 22 3 Battery Replacement 73 23 0...

Page 5: ...ill probably have several throttles on your layout if you have more than one person running trains at a time The DT400 is one of our most advanced throttles Universal Panels or Infrared or Radio Recei...

Page 6: ...LocoNet com patible DCC system User friendly Multi line Backlit LCD with easy to read icons and messages Prompts in the display guide you every step of the way To make operation easy and intuitive Du...

Page 7: ...ged in any LocoNet jack on the system 3 DT400 can also be operated tetherless with UR90 Infrared Receiver or UR91 Radio Receiver P R O G B R A I L B P O W E R I N P R O G A R A I L A P O W E R I N G R...

Page 8: ...e battery power available When this number is less than 6 2 volts it s time to consider replacing or recharging your battery See section 22 for more information about using batteries with your DT400 4...

Page 9: ...will prompt you with a screen simi lar to this Press the Y Key and the Track Power Indicator on your DT400 display and on your command station will come on 2 Turn track power off Press the PWR Key th...

Page 10: ...he direction of travel of a DCC equipped loco selected on that throttle for reverse and for forward If you are running an analog loco the direction indicator will only indicate change in track polarit...

Page 11: ...t While the analog loco is sitting still you will hear the characteristic singing caused by the DCC track signal when it is applied to ana log locomotives Once the analog loco is moving this sound wil...

Page 12: ...Knob clockwise slowly to increase the speed of the analog locomotive As the speed increases the locomotive on the track will begin to move Your command station s TRACK STA TUS indicator should change...

Page 13: ...See your Digitrax Starter Set Manual for information about reading back addresses and see your Digitrax Decoder Users Manual for a complete discussion of decoder addressing 3 5 How To Select Run A DCC...

Page 14: ...hs at 0 speed and the text area also at 0 speed for both throttles 6 Use the L Throttle knob to run the DCC equipped locomotive on address 03 As the value in the left display increases the locomo tive...

Page 15: ...concepts of using the DT400 Please read the following sections for more in depth information about other features capa bilities of the DT400 throttle 2 digit address 03 Selected on the L Throttle Runn...

Page 16: ...SWCH Key Press to enter switch mode DISP Key Display Dispatch PROG Key Enter programming mode scroll thru programming modes available EDIT Key Use to edit clock routes etc to status edit decoders FIND...

Page 17: ...that is already moving on either throttle knob that throttle will continue to run the locomotive at the same speed and in the same direction in which it was traveling before being selected to the thro...

Page 18: ...are used to indicate whether an address is available for selection A blinking loco icon means that the address is available for selection and a steady loco icon means that the loco address is current...

Page 19: ...of that loco If nothing is selected there will be no Loco icon and the address area will show SEL The blinking smoke icon indicates which throttle is cur rently active having its function states displ...

Page 20: ...d Digitrax preferred method Ph Programming Physical Register Pd Programming Direct Po Programming Operations Mode Ops Mode programming on the mainline RE Recall Recall one of the last 4 8 or 16 locomo...

Page 21: ...0 127 the display will show two or three digits If a 4 digit address is selected 0128 9983 the display will show all four digits including the leading zero 4 3 6 Text Area The Text Area of the LCD con...

Page 22: ...he active throttle the one with blinking smoke are displayed To view the function status of either throttle simply press the throt tle knob to display the active functions for that throttle Functions...

Page 23: ...our throttle is using either infrared or radio communications 4 3 11 L R Semaphores Cab Signaling The L R Semaphores are used when cab signaling is implemented on the layout More information about sig...

Page 24: ...L or SET SEL Keys for this throttle task 4 7 SWCH Key The SWCH Key is used for entering switch control mode Once this key is pressed you will be prompted to select a switch address and issue a thrown...

Page 25: ...patching loco addresses 4 11 PROG Key The PROG Key is used to enter programming mode and to toggle among the programming modes available for use 4 12 EDIT Key The EDIT Key is used to enter the Edit M...

Page 26: ...h mode In the case of turnout control c closed turnout is set for the main line with routing through the straight leg of the turnout 4 18 EXIT Key The EXIT Key is used to exit the current throttle tas...

Page 27: ...and switch addresses as well as CV values during selection and programming These keys also give direct access to functions 0 12 during normal operation of locos Special number keys The Lamp 0 Key is...

Page 28: ...nd Command Station OFF LINE indicator is off To turn track power on Press the PWR Key the LCD will display a screen similar to this Press the Y Key to turn on track power Press the PWR Key again to ex...

Page 29: ...hile turning on and off functions and operating turnouts If a throttle has a locomotive address selected the associated loco icon and direction indicator will be lit In addition if the smoke above the...

Page 30: ...four digit address and the display will read 0128 6 3 Selecting An Address On A Throttle 1 Choose which Throttle L or R you want to use to run a locomotive Make it the active throttle by turning it a...

Page 31: ...00 appear in the display then use the R throttle knob to dial up a 2 digit address between 00 127 Press any other numeric Key Address 9983 is displayed indicating that this is the highest 4 digit addr...

Page 32: ...of the LCD 8 Use the active throttle knob to run the DCC equipped locomotive on the address you selected As the speed value displayed in the left side of the LCD increases the locomotive on the track...

Page 33: ...l be able to control the speed control and direction of that locomotive Follow the same procedure to Recall a locomotive on the L Throttle by using the L throttle knob 6 5 Stealing Forcing An Address...

Page 34: ...nd commands to the loco Both throttles will show the current speed and direction of the loco motive in their displays Slot following is useful for training new operators The supervisor can steal a loc...

Page 35: ...is loco independently of the consist 8 0 Stop 8 1 Setting A Loco to Zero Speed Turn the Throttle Knob that the loco address is selected on counterclockwise until the speed display shows 00 and the loc...

Page 36: ...wed by Y Key again and the locomotives will start run ning again at the same speed they were running prior to STOP mode To exit PWR mode press the PWR Key or the EXIT Key Global Stop See Section 23 1...

Page 37: ...and then speed up to the commanded speed according to the decoder s pro grammed CV values for deceleration and acceleration You can set up program each decoder with acceleration and deceleration rate...

Page 38: ...n off The top line of the LCD will display the numbers of the functions that are on for the active loco address F1 is labeled with a bell icon to remind you that this is the preferred function for bel...

Page 39: ...unctions 2 Press the LOCO Key again to select the loco address to your throttle The speed value will show cn to remind you that you can only control functions on the loco and not its speed 3 Use the s...

Page 40: ...he MU add is performed All loco addresses in a consist will have the same status as the TOP loco They will all be common in use or idle based on the state of the TOP loco Each loco within a consist ma...

Page 41: ...isplay will prompt you to press the Y Key to add the loco address or the N Key to remove the loco address from the consist controlled by the TOP loco address selected on the R Throttle You will see th...

Page 42: ...ction that it was moving in the consist You can uncouple and run the removed loco as an indepen dent loco again 11 3 Nested Consisting The loco that was selected in the L Throttle to be added to the c...

Page 43: ...If you press the LOCO Key again the throttle will begin flashing the address you just released You can re select that address by pressing the LOCO Key or you can use the throttle knobs or key pad to...

Page 44: ...ort that let you set up a different set of characteristics for each decoder installed in each locomotive Each of these CVs controls a characteristic of the decoder See your decoder manual for a list o...

Page 45: ...splay to 000 Use the DT400 key pad to enter CV Numbers while in Programming Mode Example Key in CV47 Press the 4 Key CV 004 is displayed Press the 7 Key CV 047 is displayed Press the 8 Key CV Returns...

Page 46: ...ming track If you are using operations mode programming the loco you want to program can be anywhere on the layout but it must have a decoder that is capable of ops mode programming installed 2 Press...

Page 47: ...ected to it Ops mode is discussed separately in Section 15 4 3 After a few seconds the LCD will display the last CV and CV Value you programmed If the display does not show Ad2 turn the L Throttle kno...

Page 48: ...ex x26 which will enable the 4 digit address that you just programmed in 128 speed steps with analog mode conversion on Press the Y Key to enable the 4 digit address and automatically set CV29 to the...

Page 49: ...g operations mode programming the loco you want to program can be anywhere on the layout but it must have a decoder that is capable of ops mode programming installed 2 Enter Program Mode by pressing t...

Page 50: ...as you want in a session When you are finished press Press the EXIT Key to quit pro gramming mode and return to normal operations 9 If your command station is a DB150 and you are using any method othe...

Page 51: ...programming mode that will be available unless you plug in to LocoNet IR throttles must be plugged in for Ops Mode How to use Operations Mode Programming 1 Select the DCC loco address that you want to...

Page 52: ...you get a Busy message in response to any programming task the system is temporarily busy and you will have to try the task again until you get a Good response If you get a Fail message in response to...

Page 53: ...ou can read back in PG PH Pd or Po modes with the following restric tions PG Paged Mode no restrictions PH Physical Register Mode can only read CV01 CV08 You should not rely on values in the display f...

Page 54: ...o quit programming mode and return to normal operations Fn Mode You can read back and re program as many CVs and their values as you want in a session When you are finished press Press the EXIT Key to...

Page 55: ...ecoders that do not have 128 speed step capabilities If you can t get a non Digitrax decoder to work on your layout and you are sure you are using the correct address for the decoder you probably need...

Page 56: ...ou press the ENTER Key to complete the status edit process and select the loco on the active throttle the DT400 will prompt you to Steal Y If you want to steal the address press the Y Key to complete...

Page 57: ...he diverging route is set c indicates that the switch is closed for a turnout the mainline route is set If the t or c indicator is flashing it means that the LocoNet Command Station does not know the...

Page 58: ...Key 9 The next time you enter Sw mode the DT400 will remember where you left off start at the last switch address position you accessed 17 0 Edit Fast Clock Routes etc The DT400 throttle can edit syst...

Page 59: ...8 1 17 2 Stop the Fast Clock Setting the clock rate to 00 will stop the fast clock for the entire system at the currently displayed time Fast time will re start when a new non zero rate value is set...

Page 60: ...he text will show a 12 or 24 hour time Use the throttle knobs to dial up the alarm time Press the EDIT Key again to set the fast clock alarm NOTE The fast clock alarm can t be turned off 7 Once the ti...

Page 61: ...you to the problem Note that if a route contains the same switch command more than once and this causes the route to loop back on itself this will also generate a 5 beep route error indication and no...

Page 62: ...is can be any number from 01 through 32 The left side of the bottom row of the display shows which entry within the route you are working with The En entry number can be any number from 01 through 08...

Page 63: ...c closed This display shows Entry 01 Route 11 with turnout address 005 set for closed In this case address 005 is the TOP address for this route because it is Entry 01 for the Route 6 If you wish to m...

Page 64: ...how the DCS100 handles them 18 0 FIND Key Digitrax Transponding On layouts set up for Digitrax transponding with transponders in locos and rolling stock and transponder receivers installed on the layo...

Page 65: ...ll go off 2 Move the command station s MODE switch to the SLEEP posi tion 3 Turn off the power supply to the system N PWR This example shows a DT400 in FIND mode for address 1652 selected on the R Thr...

Page 66: ...on Either way the layout will stop to give you a chance to regain your composure To resume operations where you left off press the PWR Key followed by the Y Key 20 3 Nothing is responding Is track pow...

Page 67: ...it in for repair If all else fails reprogram the decoder address and reset CVs to default values 20 5 Strange Locomotive Lights If you can t control the operation of the lights in your locomotive wit...

Page 68: ...R has detected a radio receiver and that the current LocoNet ID is 01 The throttle has loco address es 03 1280 selected 5 The DT400 R will use the LocoNet ID of the LocoNet it was plugged in to and w...

Page 69: ...h your LocoNet system fast clock when it is plugged in again 21 1 LocoNet ID Change Your DT400 R will log on to the LocoNet ID offered by compatible infrared or radio receiver it sees when plugged in...

Page 70: ...ess the DT400 R operates as a one way transmitter The DT400 R must be plugged into LocoNet to select an available locomotive address After an address is selected on your DT400 R you can unplug from Lo...

Page 71: ...s on the throttle Multiple Unit Operations Consists must be assembled and broken up while the DT400 R is plugged in to LocoNet MU operations are locked out while the DT400 R is running tether less Onc...

Page 72: ...e same time When you are locking the keyboard be sure to press both the Y N Keys AT THE SAME TIME to avoid sending a speed command to the active loco 2 The throttle will display Lock in the display an...

Page 73: ...wer provided by LocoNet This value will be between 9 15 volts Other characters will also be displayed in the LCD depending on which locos are selected and their speed and direction When you insert a b...

Page 74: ...up the following options for each DT400 throttle to customize the way it operates You can choose between ballistic and normal tracking whether the fast clock is displayed by default whether the keys...

Page 75: ...format The x in front of the value lets you know to expect to use hex numbers Pressing the throttle keys will not change to decimal values in this case 4 Use the R or L throttle knob to change the set...

Page 76: ...action 23 1 2 Key Knob Clicks On Off DT400 can be set up to click each time you press a key or turn one of the knobs Some users like to have this auditory feed back and others don t Your DT400 was sh...

Page 77: ...y decoders that are only able to recognize 28 speed steps you can change this setting 23 2 2 Tetherless Operation Mode Each DT400 can be set up with radio capability and or infrared capability enabled...

Page 78: ...nly Enabled x43 128 step decoder Radio Only Enabled x44 28 step FX decoder Radio Only Enabled x47 128 step FX decoder Radio Only Enabled x48 Disable default decoder operation override Radio Only Enabl...

Page 79: ...be set up to run in 12 hour format or 24 hour format 23 3 3 Recall Stack Depth The DT400 recall feature can be set to keep a list of the last 4 8 or 16 addresses that were selected in the throttle 23...

Page 80: ...ur format 4 Yes x0C Off 24 hour format 4 Yes x0D Low intensity 24 hour format 4 Yes x0E Medium intensity 24 hour format 4 Yes x0F High intensity 24 hour format 4 Yes x10 Off 12 hour format 8 No x11 Lo...

Page 81: ...not change this value Table VI DT400 Throttle Option 3 Set Up Choices Continued Op 3 Value Backlight Brightness Clock Format Recall Stack Depth Tether less Release x20 Off 12 hour format 16 No x21 Lo...

Page 82: ...ote that any modifications to the equipment not expressly approved by Digitrax voids the user s authority to operate under and be in compliance with CFR 47 rules as administered by the Federal Communi...

Page 83: ...nties on Digitrax products are limited to refund of purchase price or repair or replacement of Digitrax products at the sole discretion of Digitrax In the event that Digitrax products are not installe...

Page 84: ...decoder status 20 54 76 Direct mode 46 52 direction 5 7 9 10 11 12 13 14 16 17 23 28 29 31 33 36 38 39 40 54 56 69 72 direction indicators 9 17 40 56 DISP Key 24 42 43 52 53 dispatching addresses 42...

Page 85: ...22 39 41 42 43 45 50 66 67 68 69 71 74 76 78 80 81 recall 17 32 releasing an address 42 64 70 route 24 56 57 59 60 62 63 70 routes 59 S S Safety Selection 69 SEL Message 5 7 9 10 12 28 select a loco...

Page 86: ...W W Warranty and Repair 82 Y Y Y Key 23 24 26 28 35 47 49 53 65 71 75 Z Z zero Speed 34 85...

Reviews: