


OPERATOR’S MANUAL
Seed Manager SE®
11001-1359A-200810
INSTALLATION AND SETUP / 7
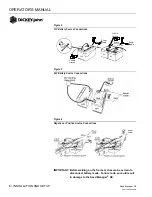
Install the primary (J1) harness from the rear of the console to the tractor
hitch as follows:
1. Route the primary harness from J1 on the console rear to the rear of
the tractor, near the hitch. Route on the side of the tractor opposite the
alternator and spark plugs.
2. Locate the harness to prevent being pinched, cut, or stepped on and
secure it with wire ties.
3. Install or connect an existing ground speed sensor. The ground speed
sensor may be one of three types – radar, reluctance, or Hall Effect. A
radar sensor or reluctance sensor connects directly to the designated
connector on the primary harness. A Hall Effect sensor may require an
adapter harness to connect to the primary harness. Sensor mounting
instructions accompany the sensor. Select the mounting location and
install as the instructions describe.
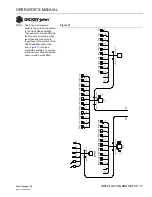
4. Refer to Implement Harness instructions on page 9 to install Module
and Sensor Harnessing.
Power connections should be made last to avoid accidental shorts
during harness installation.
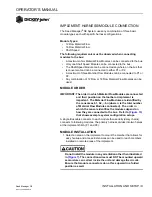
POWER CONNECTION
The Seed Manager
®
SE System operates on 12 volts DC only. The battery
connections on the primary harness consist of two wires, each terminated
with a ring terminal.
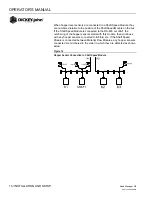
Before making the battery connections, determine the tractor battery
arrangement from Figures 4, 5, and 6.
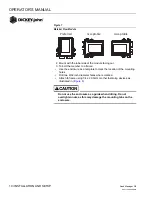
After the 12 volt source is known:
1. Connect the black wire directly to the negative (-) terminal of the
battery.
2. Connect the red wire (containing the fuse link) to the positive (+)
battery terminal.
3. Ensure the connections are clean and tight. Do not route these wires
in close proximity to the existing battery cables.
4. Secure the battery wires with wire ties.
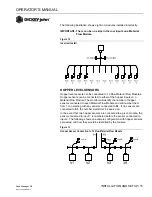
If the tractor battery arrangement differs from that shown or if any
doubt exists about how to connect to the battery, use a volt meter
first. Verify 11 to 14 volts across the battery connection points. On
tractors using two batteries, be sure to make connections to the
grounded battery.
Note:
Due to the power requirements for
the Seed Manager
®
SE system,
the battery connections must be
made directly to the tractor battery.
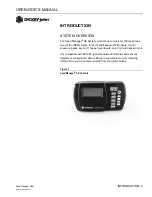
Summary of Contents for seed manager
Page 4: ...OPERATOR S MANUAL Seed Manager SE 11001 1359A 200810 2 SAFETY NOTICES...
Page 6: ...OPERATOR S MANUAL Seed Manager SE 11001 1359A 200810 4 INTRODUCTION...
Page 22: ...OPERATOR S MANUAL Seed Manager SE 11001 1359A 200810 20 INSTALLATION AND SETUP...
Page 46: ...OPERATOR S MANUAL Seed Manager SE 11001 1359A 200810 44 STARTUP...
Page 64: ...OPERATOR S MANUAL Seed Manager SE 11001 1359A 200810 62 SELF TEST ERROR CODES...
Page 70: ...OPERATOR S MANUAL Seed Manager SE 11001 1359A 200810 68 SELF TEST ERROR CODES...


