DT1400 xx xx
56
20170920-V0
Digital (relay) output test
Sequence of operations
8. Keep stepping by pressing
▲
button as long as you see
this menu item:
(
T
est:
D
igital
Out
put = digital
output test).
9. Enter the menu item by pressing the
ENTER
button.
10. You see:
on the display. Meaning L: limit
output (
L
imit), meaning the two underline: first and second
limit outputs are in off state.
11. Pressing the
▲
button, you can switch the outputs on or
off.:
•
: all are switched OFF.
•
: 1. ON; 2., 3., 4. OFF.
•
: 1., 3. OFF; 2., 4. ON.
•
: all are switched ON.
Rel1, Rel2, Rel3, Rel4 yellow indicators on the up side of
the front panel indicate the ON status of the limit outputs.
12. Press the
MENU
button, to exit from the menu item, and
you see this:
.
If you want finish test, continue from part
Exit from menu
item
.
Analog output test
Sequence of operations
13. Keep stepping by pressing
▲
button as long as you see
this menu item:
(
T
est:
A
nalog
Out
put = analog
output test).
14. Enter the menu item by pressing the
ENTER
button.
15. You see this:
(00 mA).
16. Pressing
▲
button you can increese the value of output
current in 1 mA steps in 0 - 20 mA range.
17. Press the
MENU
button, to exit from the menu item, and
you see this:
.
Summary of Contents for DT1400 RL2 IA
Page 1: ...DT1400 xx xx Limit switch Operating Instructions ...
Page 68: ...DT1400 xx xx 68 20170920 V0 10 2 Application example Analog output option ...
Page 69: ...DT1400 xx xx 20170920 V0 69 RL4 option ...
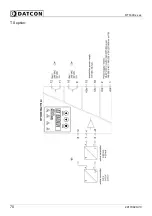
Page 70: ...DT1400 xx xx 70 20170920 V0 TS option ...
Page 71: ...DT1400 xx xx 20170920 V0 71 ...
Page 72: ......

