background image


AP25 Installation and Operating Guide 

 Page 97 


AP25 Installation & Operating Guide  

Document # 9301H79500 Ver. 1.00 

associated with an automation button.  Menus to allow the creation of macros are provided.  A 
Macro is a script used to perform multiple actions (see 4.5.2 Macros, page 104). 

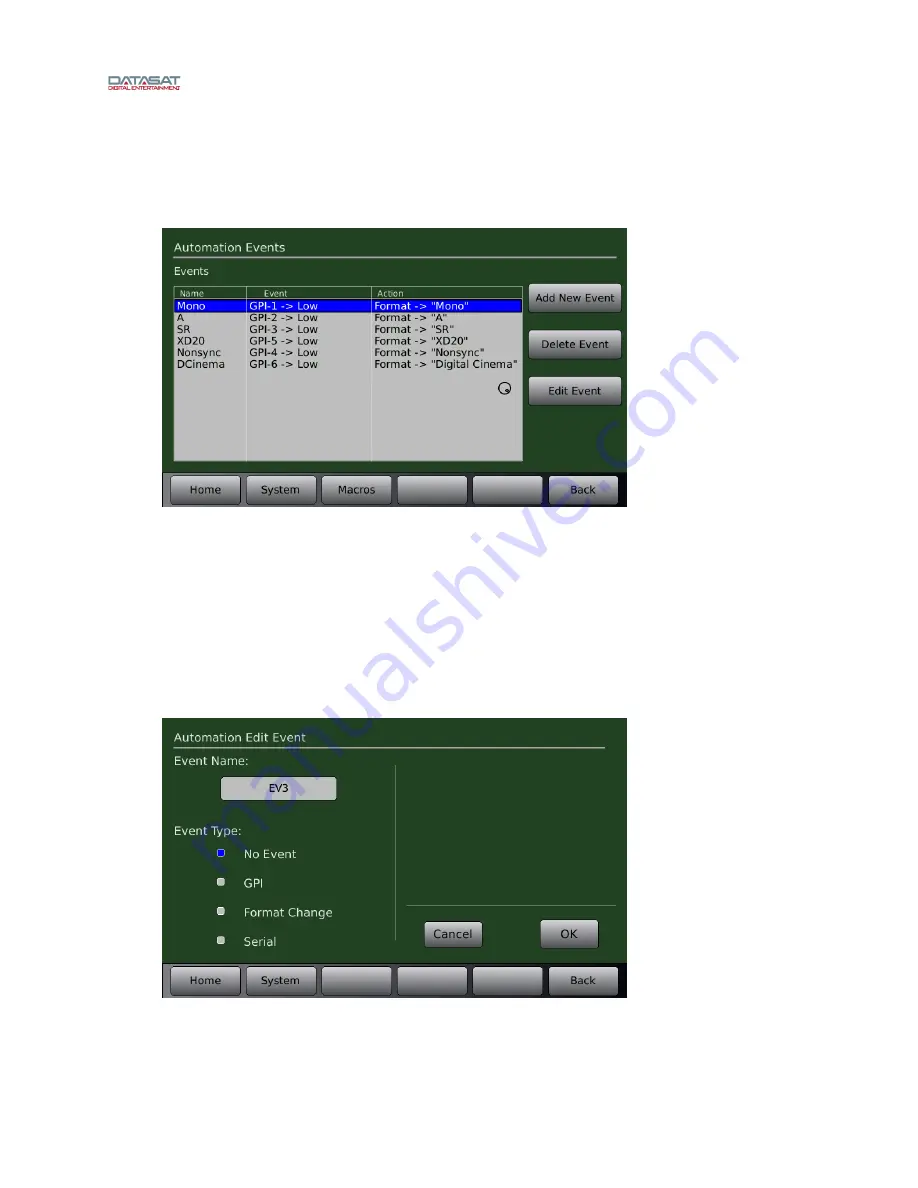
4.5.1  Events  

Menu (System) > Automation > Events 


Figure 78. Automation Events Screen 

Existing events will be displayed in the Automation Events screen.  The front panel adjustment knob 
must be used to move the selection bar to an existing event for editing. The list will scroll when needed 
going past the end when there are more events in the list.  The menu bar contains a “Macros” button to 
allow easy navigation between the Events screen and the Macros screen when building Macros. 

4.5.1.1 

Add New Event 

Selecting the Add New Event button takes you into the “Automation Edit Event” screen and 
automatically assigns a temporary event name, which is added to the event list.   

Menu (System) > Automation > Events > Add New Event 


Figure 79. Automation Edit Event Screen  

Event Name - 

Touching the Event Name box will bring up the keyboard screen and allow editing of 

the event name.  Choose a name that is meaningful. 

Summary of Contents for AP25

Page 1: ...AP25 Audio Processor Installation and Operating Guide Version 1 00 Effective Date February 2018 Document 9301H79500 Datasat Digital Entertainment 4596 Ish Drive 210 Simi Valley CA USA...

Page 2: ...ved The content of this publication is subject to change without notice Datasat Digital Entertainment assumes no obligation to notify you of any changes or updates While Datasat Digital Entertainment...

Page 3: ...nce in which case the user will be required to correct the interference at his own expense Canadian Department of Communications compliance statement This equipment does not exceed Class A limits per...

Page 4: ...NNECTIONS 25 2 5 CHASSIS RACK MOUNTING AND CONNECTION 26 2 5 1 RACK MOUNT RECOMMENDATIONS 26 2 5 2 POWER SUPPLY 27 2 6 NAVIGATING THE MENUS 27 2 7 ABOUT FORMATS 27 2 7 1 CREATING AN AUDIO FORMAT 30 2...

Page 5: ...T 62 4 3 2 STARTUP FORMAT 63 4 3 3 EDIT FORMATS 64 4 3 4 ASSIGN FORMAT BUTTONS 65 4 3 5 INPUT SOURCE 67 4 3 6 FORMAT OPTIONS 69 4 3 7 EQ SETUP 78 4 3 8 CHANNEL PROFILE 85 4 3 9 AUDIO LEVELS 93 4 4 NET...

Page 6: ...setup and other technical functions The third part consists of appendices with technical details such as connector and wiring diagrams NOTE Technical adjustments should only be performed by a qualifie...

Page 7: ...enhanced listener experience For even greater flexibility the AP25 Audio Processor has three product expansion slots that are removable from the back of the unit while racked All internal control and...

Page 8: ...sold or shipped To receive notification about upgrades or bulletins that may become available from time to time please complete the enclosed Warranty Card and mail or fax it to Datasat Digital Enterta...

Page 9: ...NOT USE THE AP25 AUDIO PROCESSOR 1 Grant Subject to your compliance with the terms of this License Datasat Digital Entertainment hereby grants you a non exclusive non transferable revocable limited l...

Page 10: ...OTHER COMMERCIAL DAMAGES OR LOSSES ARISING OUT OF OR RELATED TO YOUR USE OF THE DATASAT DIGITAL ENTERTAINMENT SOFTWARE OR HARDWARE HOWEVER CAUSED REGARDLESS OF THE THEORY OF LIABILITY AND EVEN IF DAT...

Page 11: ...uctions 2 Keep these instructions 3 Heed all warnings 4 Follow all instructions 5 Do not use this apparatus near water 6 Clean only with dry cloth 7 Do not block any ventilation openings Install in ac...

Page 12: ...ted 250 Volts AC 10 Amps with a maximum length of 4 5 M with one end terminated in an IEC 320 attachment plug and the other end terminated in a NEMA 5 15P Plug WARNING To reduce the risk of fire or el...

Page 13: ...AND INDICATORS 15 1 3 POWERING ON THE AP25 PROCESSOR 16 NAVIGATING THROUGH THE MENUS 17 1 4 THE HOME SCREEN 17 1 4 1 ADJUSTING THE FADER 18 1 4 2 BOOTH MONITOR VOLUME 19 1 4 3 MANUAL AUTOMATION 20 1...

Page 14: ...MUTED button If successful the button will change to MUTE and its background color will be gray View monitor settings Touch the MONITOR button The Monitor window will display It will automatically dis...

Page 15: ...omation commands via the popup windows During playback the screen displays information about the content currently being played o Menu Setup mode In menu mode the screen displays menus for viewing and...

Page 16: ...n power switch on the front panel A soft boot pressing the power button on the front panel when power has not been cycled typically takes about 10 seconds While the system is initializing status messa...

Page 17: ...me screen Home Main Fader readout Mute Fader Monitor Volume Control and Mute Automation Manual Control Select Format 8 buttons on bottom of screen Figure 4 Operations Menus 1 4 The Home Screen Figure...

Page 18: ...9 6 13 0 9 5 12 5 9 4 12 0 9 3 11 5 9 2 11 0 9 1 10 5 9 0 10 0 8 9 9 5 8 8 9 0 8 7 8 5 8 6 8 0 8 5 7 5 8 4 7 0 Fader dB 8 3 6 5 8 2 6 0 8 1 5 5 8 0 5 0 7 9 4 5 7 8 4 0 7 7 3 5 7 6 3 0 7 5 2 5 7 4 2 0...

Page 19: ...h the Mute button to mute un mute the booth monitor Touch the Mix button to select a channel and adjust the volume from 0 to 10 See Figure 8 below Touching the Close button will close this screen The...

Page 20: ...it will not power up be sure the rear panel power switch is ON and the unit is plugged into a working AC outlet protected by a surge protector See Powering ON the AP25 Processor page 16 If the AP25 is...

Page 21: ...l fader not functioning Use touch screen work around until fader can be repaired see section 5 2 and contact your theater technician 1 5 1 Over Temperature Alert If the internal temperature of the AP2...

Page 22: ...MAT 30 2 8 FACTORY PRESETS 31 2 8 1 PRESET FORMATS 31 2 8 2 DEFAULT EQ 32 2 8 3 DEFAULT CHANNEL PROFILES 32 2 9 AP25 CONFIGURATION AND SETUP 33 2 9 1 EQUIPMENT REQUIREMENTS 33 2 9 2 SETTING AND ADJUST...

Page 23: ...60 4 3 FORMATS 62 4 3 1 CURRENT AUDIO FORMAT 62 4 3 2 STARTUP FORMAT 63 4 3 3 EDIT FORMATS 64 4 3 4 ASSIGN FORMAT BUTTONS 65 4 3 5 INPUT SOURCE 67 4 3 6 FORMAT OPTIONS 69 4 3 7 EQ SETUP 78 4 3 8 CHANN...

Page 24: ...T Theater Equipment Check Check speakers amplifiers auditorium conditions Theater Equipment Check page 34 Assign channels On AP25 Menu System Format Channel Profile Channel Names Assign Channels on AP...

Page 25: ...lete inventory of system components to minimize problems or questions during installation Additionally save all packing materials until installation is complete in case you need to return parts to the...

Page 26: ...wered amplified speaker in projection booth 8 HDMI Out 1 20 Hearing Impaired Audio Out RCA 9 S PDIF In RCA Female 75 Ohm digital interface connect a DVD player game player or other devices typically f...

Page 27: ...lly switches itself to accommodate AC input between 110 VAC and 220 VAC 2 6 Navigating the Menus When the AP25 is first powered up the home screen main operator menu will appear Selecting the Menu but...

Page 28: ...lar application Each format consists of a set of discrete settings an Input Source Format Options EQ settings and Channel Profile as illustrated below Figure 12 If there are more than 8 formats availa...

Page 29: ...AP25 Installation and Operating Guide Page 29 AP25 Installation Operating Guide Document 9301H79500 Ver 1 00 Figure 12 Global Settings and Format Discrete Settings...

Page 30: ...ign the selected format to a button Input Source screen Select the audio input Format Options screen Set global delay and other options depending on format Channel Profile screen Set channel names aud...

Page 31: ...filters off This EQ set may be used and altered during the theater setup process The default channel profile is Profile1 which includes the default 6 channel assignments and trim values flat See appe...

Page 32: ...ly one option for Default EQ Flat which has EQ filters flat parametric filters disabled and Dirac optimization off Use this format as a starting point to create a new EQ set 2 8 3 Default Channel Prof...

Page 33: ...checkout and adjustment of the AP25 unit requires the following equipment not provided by Datasat Digital Entertainment unless otherwise noted a single microphone or multiplexed microphones connected...

Page 34: ...high and low frequency drivers for each channel are in phase Also check each channel is in phase with the others 2 9 3 2 Amplifiers The gain settings of all of the screen channel amplifiers and surrou...

Page 35: ...at channel will be displayed in the Home screen when it is grey the channel is off and will not be displayed on the Home screen Changing Channel Names To change or assign a name touch a channel name b...

Page 36: ...el 25 Left and 25 Right channels 2 9 6 Verify Channel Assignments in Auditorium On the AP25 select a channel and turn on Pink Noise In the auditorium verify that the Pink Noise output is coming from t...

Page 37: ...e a relatively even response from 100 Hz to 5 Hz See Theater Equipment Check page 34 Figure 16 Suggested Microphone Placement in Theater Using a single microphone is not recommended but if necessary t...

Page 38: ...ifiers try to achieve the baseline levels Set the SPL levels according to the chart below Note that SPL readings should be measured un weighted or C weighted with the meter set to slow Use an RTA to c...

Page 39: ...ne arrangement in the auditorium A typical scenario is four mics feeding into a multiplexer Use the RTA on the AP25 Third Octave EQ screen with the mic or multiplexer plugged into the AP25 rear panel...

Page 40: ...o all cinemas The XCurve is flat to 2k and then rolls off 3dB per octave The Third Octave EQ screen offers three ways to look at the XCurve XCurve is appropriate for both film playback and digital cin...

Page 41: ...ametric EQ on every channel Parametric EQ is an optional adjustment and is in addition to 1 3 Octave EQ It is only available with low frequencies and offers more control than 1 3 Octave EQ The Paramet...

Page 42: ...er EQ with a new name Menu System Formats Audio EQ Setup Edit EQs Figure 21 Copy EQ Settings Use the Copy EQ function accessible from the Edit EQs menu to copy the EQ set Select the Copy EQ From set s...

Page 43: ...for the next screen since many or all the values will be the same Menu System USB Save Restore Save on USB Master Configuration See Saving and Restoring Configuration Files page 56 for more details 2...

Page 44: ...about Formats see About Formats page 27 Assign Channel Names and Vu meters See 4 3 8 3 Channel Names page 86 Set Non sync Level and Non sync Routing See 4 3 6 3 NonSync Level and Routing page 72 See a...

Page 45: ...ight side of the screen should display Current Format Nonsync2 If it is not displayed return to the Audio Format Setup screen by selecting the Format button and selecting Nonsync 2 in the Current Audi...

Page 46: ...AP25 Installation and Operating Guide Page 46 AP25 Installation Operating Guide Document 9301H79500 Ver 1 00...

Page 47: ...AP25 Installation and Operating Guide Page 47 AP25 Installation Operating Guide Document 9301H79500 Ver 1 00...

Page 48: ...AP25 Installation and Operating Guide Page 48 AP25 Installation Operating Guide Document 9301H79500 Ver 1 00...

Page 49: ...AP25 Installation and Operating Guide Page 49 AP25 Installation Operating Guide Document 9301H79500 Ver 1 00...

Page 50: ...AP25 Installation and Operating Guide Page 50 AP25 Installation Operating Guide Document 9301H79500 Ver 1 00...

Page 51: ...g options are available directly from this screen ScreenSaver Time Options include a 10 second delay 1 minute delay or 5 minute delay before screen saver initiates ScreenSaver Mode Disabled Dim Screen...

Page 52: ...y Ch 9 16 to Ch 17 24 The output of channels 9 through 16 will be copied to output channels 17 through 24 for both the Analog output connector and Digital output connector Output channels 17 24 are no...

Page 53: ...nu select format Return to the main screen by selecting Home button Fmt Fdr format fader will now appear on the home screen Figure 24 Setting Fader Level for a Format 1 of 3 2 Next select the desired...

Page 54: ...s now set at 6 5 and will remain so until changed Note If you adjust the fader up down for a selected format but do not do step 4 above to change the Fmt Fdr assignment then when you leave and return...

Page 55: ...screen The highlighted software version will display under Selected on the right side of the screen Once the desired version is confirmed press the Start Update button Note If you select an older ver...

Page 56: ...figurations to a USB drive memory stick You can also save Diagnostic information the system log file for use in troubleshooting the system A master configuration is intended to be a template used to c...

Page 57: ...P25 units This will erase from the USB device any existing MASTER configuration Save Diagnostic Information Save AP25 Diagnostic information to the USB device to facilitate troubleshooting Load AP25 C...

Page 58: ...ering the setup menus and remains in effect until The AP25 is powered cycled One hour passes with no activity The ReLock Setup button is pushed If the password is lost and you cannot access the AP25 c...

Page 59: ...5 System Info From the system Setup screen touch the System Info button The System Info screens are shown below Menu System System Info Figure 32 System Info Screens Use the hyphen key to remove pass...

Page 60: ...nd actual bus voltages for each board It is normal for the actual level to vary slightly from the expected The background color for the expected and actual values will turn red should the actual volta...

Page 61: ...es made internally by the AP25 software as well as user initiated system changes through the touch screen interface You may scroll through the log file using the front panel adjustment knob The log fi...

Page 62: ...be displayed in the bottom left corner of the home screen above the navigation menu This information can be useful for verification of the correct AP25 when connecting through VNC The Screen Theater...

Page 63: ...1H79500 Ver 1 00 Figure 37 Select Current Audio Format 4 3 2 Startup Format The Startup format is the default format selection when the AP25 is powered up Select any defined format or Last Format Touc...

Page 64: ...for a new one Select the format you wish to copy from by selecting it from the dropdown box Then touch the to new Format box to bring up the virtual keyboard and enter a name for the new format Press...

Page 65: ...e Current Assignments listing in the screen above Additionally the audio format will now be assigned to the corresponding button location along the bottom of the Home screen as shown in Figure 41 Note...

Page 66: ...buttons normally available on the Home screen When the Enable More Button is not selected the Home screen will display up to eight assignable format buttons on the bottom of the screen When the Enabl...

Page 67: ...the button again toggles the selection between Digital Ch 1 16 Digital 1 8 Digital Ch 9 16 Digital Ch 1 2 and Digital 9 10 If HDMI is selected touching the HDMI Input button cycles the selection from...

Page 68: ...Center MIC Pre set to Screen Channels Processor Channel 1 2 L R MIC Pre set to Surround Channels Processor Channel 5 6 Ls Rs MIC Pre set to Screen Surround Channels Processor Channel 1 2 5 6 L R Ls Rs...

Page 69: ...e optional Optical Film card H338 is installed see appendix F It also provides feedback on the current Audio format The options on this screen will change according to the currently selected input sou...

Page 70: ...Format Fader feature is that the Format Trim allows you to change the master fader level and keep the relative levels balanced Format Trim may be entered in 0 5 dB increments from 0 dB to 10 dB Fade I...

Page 71: ...hannels Allows the surround channels Ch 5 6 to be copied for output on Rear Surround channels Ch 7 8 This option can be used to fill in the rear when playing a 5 1 DCP Matrix decode surround channels...

Page 72: ...n be sent to Screen channels Left and Right outputs Surround channels Left Surround and Right Surround outputs Screen and surround channels Left and Left Surround Right and Right Surround outputs Matr...

Page 73: ...rix Bass Extension set up a microphone in the auditorium It is best to use a single microphone or if using a multiplexer select single microphone only and connect it to the RTA Select an optical forma...

Page 74: ...el and Routing screen The Mic may be routed either to the Center channel or Left and Right Surrounds Gain may be increased up to 66 dB in 3 dB increments after an initial 9 dB increase from 0 dB Note...

Page 75: ...R C DCP includes VI Select the DCP VI N on pin 8 to AP25 channel 16 This channel becomes a fixed level not affected by fader value Channel 15 becomes unavailable 7 1 DCP Select when playing a 7 1 DS D...

Page 76: ...d output to AP25 channels Out 1 6 L R C Lfe LS RS and HI Out is mixed from DCP In L R C The undefined channels 9 16 are mapped directly to the AP25 channels 9 16 Enable Bass Enhancement Select to add...

Page 77: ...s the signal type changes This occurs automatically within the AP25 Table 14 Decoder Channel Assignments CHANNEL NUMBER CHANNEL NAME 1 Left 2 Right 3 Center 4 LFE 5 Left Surround 6 Right Surround 7 8...

Page 78: ...front left and right channels intact while synthesizing the center and surround channels from the 2 channel source Cinema Neo 6 Cinema creates 6 1 channels from 2 channel movie sources It removes in...

Page 79: ...to EQ box to bring up the virtual keyboard and enter a name for the new EQ Press the Copy button to complete the process or press Cancel to quit Copy Preset to EQ Select a preset EQ setup and use it a...

Page 80: ...Setup Dirac Optimization Figure 56 Dirac Optimization Screen Dirac Live Optimization Enabled Disabled Touching the button will toggle between enabling and disabling the Dirac Optimization Current Slot...

Page 81: ...rtion of the RTA section the current Format and current master fader value are shown In the upper right hand portion the current audio level and the 0 dB reference are displayed Channel Number Selecti...

Page 82: ...should not be modified while the RTA input is in Line Out but LineOut can be used to monitor the effect of the EQ settings currently applied When the input field is set to Mic the RTA selects the Mic...

Page 83: ...Copy EQ a button linking to the Copy Clear EQ screen is provided on the menu bar See 4 3 7 6 Copy Clear EQ below 4 3 7 5 Parametric Equalization Parametric filters allow you to adjust not only the ga...

Page 84: ...he clear function 1 third octave EQ including bass and treble and or 2 parametric filters The text on the right will reflect the selection on the left Select the channel using the dropdown list then t...

Page 85: ...ent Channel Profile Before making changes to the profile always verify that you are in the desired format check the upper right corner of the Channel Profiles screen To select a different profile touc...

Page 86: ...the process or press Cancel to quit Note The Channel Profile name is changed for all Formats that use the Channel Profile Delete Profile Select an existing audio profile from the drop down list on th...

Page 87: ...d by using high pass and low pass filters A high pass filter passes frequencies above a pre determined frequency and attenuates those below This pre determined frequency is called the crossover point...

Page 88: ...off is The conventional values are 6 12 18 and 24 dB As the numbers go up the cut off is steeper Note Set up the crossovers before you run the Dirac software The Dirac software will fine tune the cha...

Page 89: ...its technical specifications Speaker technical specifications can usually be found on the manufacturer s web site In this example we are setting up the AP25 Left channel input 1 for 3 way crossover u...

Page 90: ...Mid Frequency Crossover Setup As shown in Figure 69 set output channel 2 for the mid range driver Make sure the input channel is still set to 1 or left channel remember left channel 1 in the example S...

Page 91: ...1 2kHz the upper range of the speaker for added protection although it was not specified as necessary by the manufacturer The main fader level adjust will change the level on the input channel in this...

Page 92: ...to switch between input output channels 1 8 or 9 16 and notice that the individual channel numbers will change per your selection in the channel boxes Input Delays may be set in 1 millisecond increme...

Page 93: ...ng the pink noise on more than one channel and checking the difference in sound level with an SPL meter or RTA General testing or troubleshooting The technician may diagnose a problem by muting select...

Page 94: ...hannel automatically disables pink noise from the other channels Digital Volume Enable and Offset controls are present When the digital volume is not enabled the master fader will have no effect on th...

Page 95: ...ay To change or enter a value touch the white box under the appropriate label The DNS Server NTP server and log file server can be entered whether using DHCP or Static modes Speed may be set to Auto 1...

Page 96: ...Support for help with troubleshooting Ping Test Use for testing connectivity of the AP25 with a server Select a network device address from the dropdown menu If available the device address should ap...

Page 97: ...lection bar to an existing event for editing The list will scroll when needed going past the end when there are more events in the list The menu bar contains a Macros button to allow easy navigation b...

Page 98: ...0 Automation Edit Event Screen GPI Select an input GPI 1 thru 18 or Projector from the dropdown list under When on the right of the screen Select the signal goes Low or High Select an Action or a Macr...

Page 99: ...olume control can be either Set to a specified value or it can be incremented or decremented Adjust through automation Range is 10 0 to 10 0 in 0 1 increments o Serial A specified string of characters...

Page 100: ...ion will not work as expected if the name does not match exactly If the conditional action occurs and the variable has not been set as TRUE or FALSE the variable is presumed to be FALSE Format Change...

Page 101: ...the Automation Serial page to match the settings used by the external RS232 device See 4 5 5 Automation Serial Port Setup below o The RS232 device must be connected to the Control port on the back of...

Page 102: ...op Cap will be displayed in the text bar If more than the maximum characters have been received then the data is truncated Note Non ASCII characters may be entered by a back slash followed by their he...

Page 103: ...wer switch to reactivate normal operation If the Fire Alert Mode pop up reappears after the restart then GPI 6 must still be low When GPI 6 goes high and the AP25 is restarted from the rear power swit...

Page 104: ...splayed The new Macro name will appear on the list and its Actions list will be blank Touch the box under Actions for macro name Actions may now be added Select Add After to enter the first action Thi...

Page 105: ...age appears to confirm Edit Edit the currently selected event Copy Copy the currently selected event A copy of the selected event will appear below the current event on the list Move Up Move the place...

Page 106: ...button Menu System Automation Buttons Figure 88 Automation Buttons To configure a button touch the button to select it A screen will open that allows both the button title and the event assignment to...

Page 107: ...GPO19 and 20 are outputs only and do not have an input indicator circle The input indicator is white when the signal is high or just unconnected The input indicator turns green when there is a low si...

Page 108: ...ion port will process fader commands using Panastereo compatible command set This is intended to work with preexisting automation systems that support the Panastereo command set Additionally any comma...

Page 109: ...t cloth and non abrasive cleaning solution suitable for cleaning LCD screens 5 2 Troubleshooting The following table provides troubleshooting data for the AP25 PROBLEM SOLUTION The touch screen displa...

Page 110: ...ning your display is complete The system will immediately perform a soft boot to save the new position values NoLock If the source is a digital input and there is no clock signal then the display will...

Page 111: ...You may encounter this message when attempting to upgrade the AP25 operating system software through an internet connection or USB If the message appears when using the internet connection the message...

Page 112: ...e will fail to load The message below will appear and continues to scroll past until power is recycled at the power entry module hard boot mount mounting dev sda1 on tmp usb failed No such device or a...

Page 113: ...0 2 GPIO 2 Format 1 3 GPIO 3 Format 2 4 GPIO 4 Format 3 5 GPIO 5 Format 4 6 GPIO 6 Format 5 7 GPIO 7 Format 6 8 GPIO 8 Format 7 9 GPIO 17 Format Remote Fader Enable 10 GPIO 18 Format MUTE Enable 11 N...

Page 114: ...5 Chassis GND 6 Connected to pin 4 7 Connected to pin 8 8 Connected to pin 7 9 N C N C No connection SERVICE PORT RS232 DB9F Pin Description 1 N C 2 Data out TXD 3 Data in RXD 4 Connected to pin 6 5 C...

Page 115: ...a 1 Shield 6 TMDS Data 1 7 TMDS Data 0 8 TMDS Data 0 Shield 9 TMDS Data 0 HDMI 10 TMDS Clock 11 TMDS Clock Shield 12 TMDS Clock 13 CEC 14 N C 15 DDC Clock 16 DDC Data 17 Ground 18 5 V 19 Hot Plug Dire...

Page 116: ...R 15 Chassis Ground 16 AES 3 4 C LFE 17 AES 5 6 LS RS 18 Chassis Ground 19 AES 7 8 LC RC 20 Chassis Ground 21 N C 22 N C 23 Chassis Ground 24 N C 25 N C N C No connection DIGITAL AUDIO IN CH 9 16 DB2...

Page 117: ...R 15 Chassis Ground 16 AES 3 4 C LFE 17 AES 5 6 LS RS 18 Chassis Ground 19 AES 7 8 LC RC 20 Chassis Ground 21 N C 22 N C 23 Chassis Ground 24 N C 25 N C N C No connection DIGITAL AUDIO OUT CH 9 16 DB...

Page 118: ...on the AP25 end 2 Conductors must be 28 AWG or larger 3 Choose a paired AES EBU Digital Audio Cable such as Belden 7890A To prevent signal degradation cable length should be kept as short as possible...

Page 119: ...16 R E 17 Right 18 L E 19 GND 20 Center 21 N C 22 GND 23 GND 24 Sub 25 N C N C No connection ANALOG AUDIO OUT CH 9 16 DB25M Pin Description 1 ANALOG GND 2 CHANNEL 9 3 CHANNEL 15 4 ANALOG GND 5 CHANNE...

Page 120: ...rd Option Rear panel plug in board PROJECTOR 1 INPUT Optional DB9F Pin Description 1 LT 2 LT RT 3 LT RT 4 RT 5 LT RT 6 LT RT Analog GND 7 N C 8 N C 9 LT RT Analog GND N C No connection PROJECTOR 2 INP...

Page 121: ...AP25 Installation and Operating Guide Version 1 00 Appendix B Interface Wiring Diagrams B 1 Document 9301H79500 Ver 1 00 Appendix B Interface Wiring Diagrams...

Page 122: ...AP25 Installation and Operating Guide Version 1 00 Appendix B Interface Wiring Diagrams B 2 Document 9301H79500 Ver 1 00...

Page 123: ...AP25 Installation and Operating Guide Version 1 00 Appendix B Interface Wiring Diagrams B 3 Document 9301H79500 Ver 1 00...

Page 124: ...AP25 Installation and Operating Guide Version 1 00 Appendix B Interface Wiring Diagrams B 4 Document 9301H79500 Ver 1 00...

Page 125: ...AP25 Installation and Operating Guide Version 1 00 Appendix B Interface Wiring Diagrams B 5 Document 9301H79500 Ver 1 00...

Page 126: ...AP25 Installation and Operating Guide Version 1 00 Appendix B Interface Wiring Diagrams B 6 Document 9301H79500 Ver 1 00...

Page 127: ...AP25 Installation and Operating Guide Version 1 00 Appendix B Interface Wiring Diagrams B 7 Document 9301H79500 Ver 1 00...

Page 128: ...AP25 Installation and Operating Guide Version 1 00 Appendix B Interface Wiring Diagrams B 8 Document 9301H79500 Ver 1 00...

Page 129: ...AP25 Installation and Operating Guide Version 1 00 Appendix C Block Diagrams C 1 Document 9301H79500 Ver 1 00 Appendix C AP25 Wiring and Block Diagrams 3 thru 3 HDMI 2 0 Dolby DTS Decoder...

Page 130: ...IF and 1 coaxial S PDIF Analog Audio Inputs Channels 8 balanced can be connected unbalanced Connector DB25 Female Impedance 10k ohms Sensitivity 300mv RMS Other Analog Audio Inputs Channels 2 stereo s...

Page 131: ...Connector 1 single ended RCA output summed output for the hearing impaired Fixed Level Out 300mV RMS Audio EQ Dirac Live Room Optimization option 16 Channel Dirac Live room optimization Installer kit...

Page 132: ...ed mute and fader inputs External 5v 140mA Management Remote Control RS232 DB9 Female 10 100Mbps Ethernet Can be controlled by smart phone iPad Android based devices via iRule or VNC Crestron Integrat...

Page 133: ...r consumption Hardware Dimensions 3U 19 rackmount standard Imperial 5 25 H x 19 0 W x 15 0 D Shipping Weight 30lbs Metric 13 33 cm H x 48 25 cm W x 38 1 cm D Shipping Weight 13 6kg Regulatory Complian...

Page 134: ...aded to 16 channels by adding the H332 circuit card P N 9030H33200 See page E5 AP25 8 Channel Screens The following screens differ from the standard 16 channel version All other screens are the same a...

Page 135: ...301H79500 Ver 1 00 System Information Screen Figure 3 System Info Screen Menu System System Info The System Info screen will display 8Chan Routing Crossovers Figure 4 Routing Crossovers Screen Menu Sy...

Page 136: ...9301H79500 Ver 1 00 Figure 5 Channel Names Screen Menu System Formats Channel Profile Channel Names Channel selection is limited to 8 channels Channel Delay Screen Figure 6 Channel Delays Screen Menu...

Page 137: ...ystem Formats Input Source Only the Digital Ch 1 8 and Digital Ch 1 2 selections are available Pressing the Digital button will not toggle to other choices The factory default Digital Cinema format is...

Page 138: ...00 Ver 1 00 3rd Octave EQ Screen Figure 9 Third Octave EQ Menu System Formats Audio EQ Setup Third Octave EQ Channel selection is limited to 8 channels Parametric EQ Screen Figure 10 Parametric EQ Men...

Page 139: ...he player This will make your body the same electrical potential as the player and will prevent static discharge It is a good idea to stand on a linoleum or cement floor not carpet when handling the c...

Page 140: ...the AP25 was purchased with the Optical Film Card option from the factory Section F3 Setting up the AP25 menus for Optical formats If the AP25 was purchased with the Optical Film Card option from the...

Page 141: ...gnal Source EQ Set Channel Profile Comments Mono 1 Optical Projector 1 EQ1 Profile1 A 2 Optical Projector 1 EQ1 Profile1 Default is Matrix Decoder and Optical Bass Extension on SR 3 Optical Projector...

Page 142: ...rop down menu of Copy Format From in Figure 3 above DCin is selected to copy Press the to Format box and type in a new format name Mono A Type or SR in Figure 3 above SR has been entered Press the Cop...

Page 143: ...ormat should now appear on the list F3 3 Input Source Selection Select the Input Source button This will open the Input Select screen Each of the optical formats must be set to have Optical selected a...

Page 144: ...en right allows you to enable the matrix decoder or bass extension The right screen also provides a pictorial of the resulting processing done for that format Inputs from the film are on the left The...

Page 145: ...center 5Ls channel 5 is left surround and 6Rs channel 6 is right surround In this example left total LT and right total RT are the inputs Outputs are 1L channel 1 is left 2R channel 2 is right 3C chan...

Page 146: ...e Voltage meter Cotton swabs PC lap top and wireless router to connect into the AP25 using VNC optional Miscellaneous tools needed to make adjustments on projector optics mechanical alignment Test Fil...

Page 147: ...s the adjustment and calibrations remain similar Making adjustments to the film optics will vary depending on the manufacturer it is recommended that a review of the manufacturer s recommended alignme...

Page 148: ...ake adjustments such as Allen Hex Wrenches small screw driver etc On the AP25 select one of the optical formats in the home screen next select Menu System Formats Format Options Film Options Film Setu...

Page 149: ...icator The numbers in the buttons indicate the adjustment made to meet the reference level in dB F4 4 2 Film path check Items needed Buzz Track test film oscilloscope and specific tools required to ma...

Page 150: ...channels The goal is to have both channels at equal level If necessary make adjustments to the solar cell by moving it left or right across the film path to achieve results as seen in Figure 14 Refer...

Page 151: ...h adjustment is shown A projector select button is provided Projector 1 Proj1 and projector 2 Proj2 Pressing the button makes the selection The pattern on the graph shows the azimuth adjustment Connec...

Page 152: ...response Each frequency level should meet reference db on the graph as shown Note the roll off after 12 5 kHz Menu System Formats Format Options Film Options Film Setup Slit Loss EQ Figure 18 Slit Los...

Page 153: ...nput source that is connected to the AP25 rear panel If digital soundtrack for film is not used then keep the selection at None factory default Menu System Formats Format Options Film Options Film Set...

Page 154: ...ble Menu System Formats Format Options Film Options Bass Enh Figure 21 Matrix Bass Extension Gain allows you to set the gain for the optical bass Press the button with the number displayed and rotate...

Page 155: ...Select Surround Delay Enter the desired delay in milliseconds The delay is entered by selecting the Surround Delay box and then dialing in the correct value using the front panel rotary encoder For mo...

Page 156: ...is needed Connect a null modem cable to the Control connector of each AP25 unit AP25 1 AP25 2 When programming format names on each AP25 the format names match exactly as shown in the example above W...

Page 157: ...within this document Ethernet connection to AP25 The RJ45 connector labeled Ethernet on the back of the AP25 can be connected to a network switch or router Once the network parameters are properly se...

Page 158: ...el for as long as the network connection is maintained Not all network commands require a password Inquiry commands such as SYSTEM and IDENTIFY will operate without a password Command Format The gener...

Page 159: ...entify Get system identify information Mostly used in discovery protocol Command IDENTIFY cr Operation Response AP20 space IP space Circuit space Theater space Screen cr Read Parameters AP20 Confirms...

Page 160: ...332 board is not present response will be HEALTH H332VOLTS NA H335VOLTS Returns voltages sensed on H335 board vok ref 1 3v Example response HEALTH H335VOLTS 1 3 13 1 32 vok is 1 if voltages are all wi...

Page 161: ...ID AD R V CS FW FCS H337Out ID AD R V CS FW FCS H338 ID AD R V CS FW FCS HDMI ID AD R V CS FW FCS cr Read Returns a list of boards present and their hardware and PIC f w versions Arguments None Board...

Page 162: ...bottom password labeled Setup Password allows access to setup and configuration level commands The AUTH may be used for either the Operator or Setup level password Parameters Password Operator level...

Page 163: ...ple Send MAC Receive MAC 080077124578 Format Commands 8 Format Selection Command FORMAT space New Format CR Operation Response FORMAT space Format CR Read Write This is used to select a new format or...

Page 164: ...Note Spaces may be used within the name OK Response after macro is found and executed ERR no macro Response if macro does not exist on the AP25 Example Run Macro named Auto1 Send RUNMACRO Auto1 Receiv...

Page 165: ...nmute the AP25 output Parameters New Value 1 to mute 0 to unmute Value Current mute value Example Mute Send MUTED 1 Receive MUTED 1 12 Monitor Level Command MONITORLEVEL space New Value CR Operation R...

Page 166: ...301H79500 Ver 1 00 13 Monitor Mute Command MONITORMUTE space New Value CR Operation Response MONITORMUTE space Value CR Read Write Set or read the AP25 monitor level Parameters New Value 0 unmute or 1...

Page 167: ...XPRESS AND IMPLIED INCLUDING BUT NOT LIMITED TO THE IMPLIED WARRANTIES OF MERCHANTABILITY AND FITNESS FOR A PARTICULAR PURPOSE DDE DOES NOT WARRANT THAT THE FUNCTIONS CONTAINED IN THE SOFTWARE WILL ME...

Page 168: ...cnt strcat StrCmd strcat StrCmd argv cnt AP20Command StrAp20Ip StrCmd StrAp20Password Function AP20Command A socket connection to the AP20 is established to the AP20 IP address using port 14500 Send...

Page 169: ...TUP printf Wrong Password n return 1 else printf Password OK n Send fd StrCmd ReadResponse fd StrCmd close fd Close connection fd 1 return 0 Function Send Sends a command string the AP20 int Send int...

Page 170: ...4 Document 9301H79500 Ver 1 00 int count 0 for int i 0 i RX_BUF_SIZE i read 1 by 1 int ret read fd c 1 if ret 0 printf Count d Error n count close fd fd 1 if ret 1 add to buffer rxBuf count c if c r E...

Reviews: