Fig 10a
Fig 10b
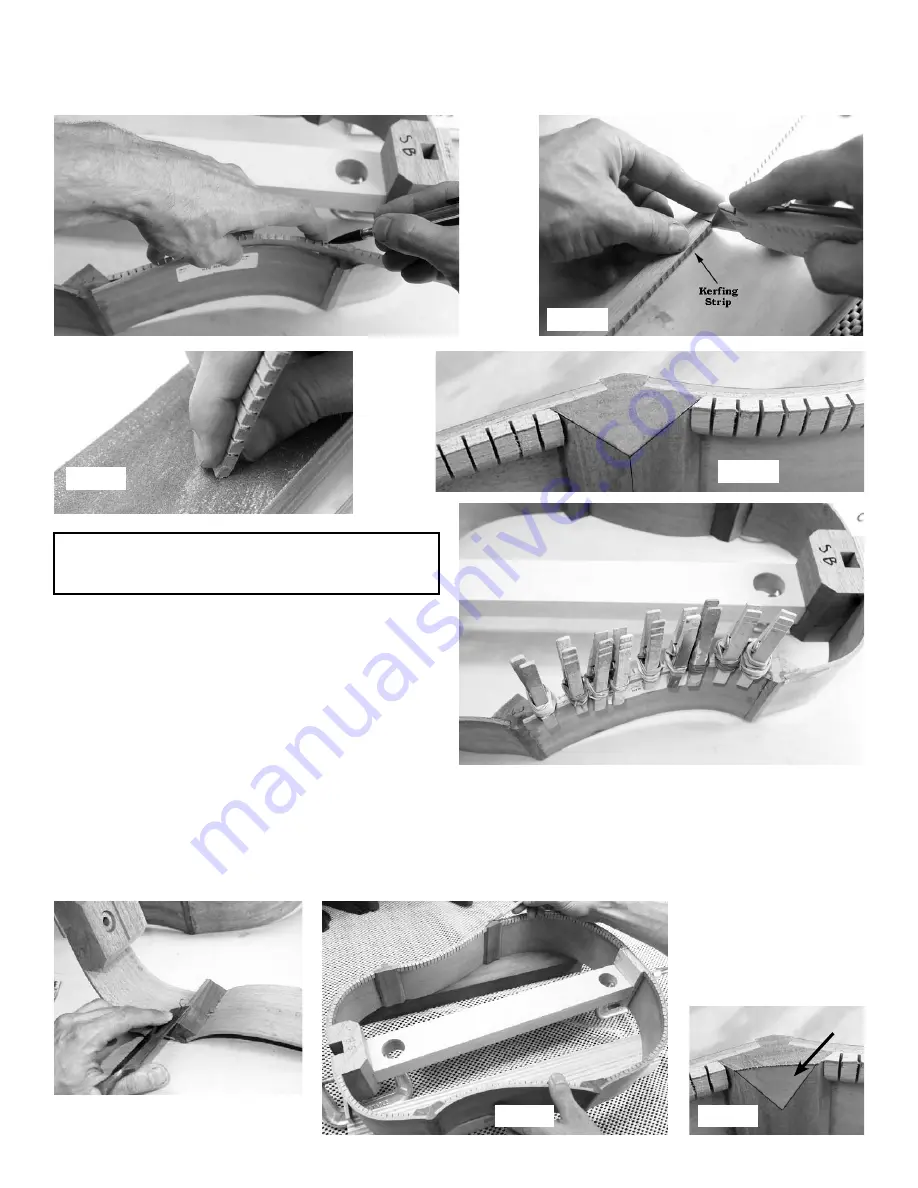
_____10. Flip the instrument over (soundboard edge up) so you can fit kerfing inside the frame. Cut a length of kerfing to fit
between the corners and blocks inside each rib (fig 10a & 10b). We like to cut these strips a little oversize and then sand them
to fit nicely into the corners, as shown in fig 10c and 10d. CAUTION: Be sure to orient the kerfing with the flat side up. level
with the top edge of the ribs.
We use spring-type clothes pins to clamp the kerfing in place
(fig 10e), but you may find some other small clamps to pinch
the parts together while you glue these kerfing strips in place.
If necessary, you can increase the clamping pressure by wrap-
ping rubber bands around the clamps as we have.
Work your way around the soundboard edge of the frame
with the kerfing, but don’t do the back edge yet -- that will
be easier to do later.
Fig 10d
Fig 10e
Fig 10c
_____11.
OPTIONAL:
You can reduce the weight of your guitar a little by trimming off the large inside corners of the corner
blocks, as shown in fig 11a. This step is optional, but it is recommended.
The illustration shows a chisel, but we use a power drum sander to do this job more quickly. You’ll want the corners to be
trimmed so they blend in with the thickness of the kerfing, as shown in fig 11b.
NOTE: If you decide to leave the corner blocks full size, you should at least bevel the tops of the inside corners by sand-
ing them at an angle so they
won’t touch the soundboard
(fig 11c). This helps prevent
cracks in the soundboard
later, and allows for a little
more vibration in the top.
Fig 11a
6.
CHECK-POINT:
You should be installing the kerfing on
the soundboard edge of the frame. You should see “S.B.”
written on the ribs at this edge of the frame all around.
Fig 11b
Fig 11c
bevel
Summary of Contents for PARLOR
Page 36: ......


