


_____33.
OPTIONAL DECORATING:
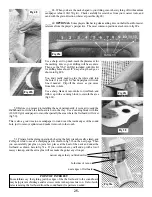
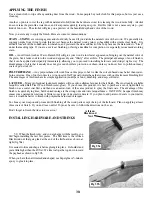
If you have a router, you can install
binding around edges of the guitar. This is not a necessary step, but it adds
a lot to the appearance of the finished instrument. Use our Inlay Router Bit
with the smaller bearing for this operation. Set the depth of cut to match the
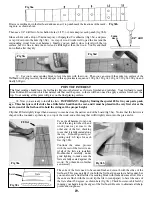
width of the binding strip, as shown in fig 33a.
Use the router to cut a ledge all the way around the top and bottom of
the instrument for inlay strips, working clockwise around the perim-
eter, as before (fig 33c). The roller bearing will prevent the router bit
from cutting too deeply. You may need to go around the instrument
twice, just to make sure the ledges are cut to full depth.
Fig 33a
Fig 33b
Be careful not to
“fall” into the
slot for the tenon
Fig 33c
cutter height matches
width of inlay strip
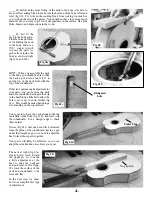
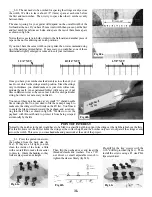
Wet the wood binding in a tub of warm water for just
1-2 minutes before bending it around the guitar.
Fig 33d
Fig 33e
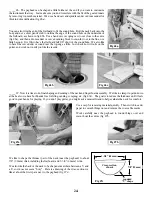
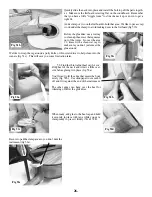
16.
BINDING STRIP
CHISEL
Fig 33f
SANDING
BLOCK
Fig 33g
Make a test cut in a
scrap of wood, and
check the fit of the
binding strip (fig 33b).
Then test-fit again using a sanding block to make small adjustments to the ends until they
are just the way you want them (fig 33g). We like to make mitered joints in the binding
at each corner block (fig 33h), but that can take some extra time. An easier option is to
make “lap” joints instead (fig 33i).
For lap joints you would install the first piece a little longer than necessary and trim it
off after the glue dries, sanding the end to match the next ledge. Then your next piece
can also be longer than
needed, so you just
trim it off and sand it
flush with the outside
edge of the first bind-
ing piece.
MITERED
JOINT
Fig 33h
LAP
JOINT
Fig 33i
Bend one long strip
around the tail end
of the instrument,
holding it in place
with a few pieces
of tape.
Mark the length and
trim it close with a
chisel or razor knife
(figs 33e & 33f).
Summary of Contents for PARLOR
Page 36: ......