


30.
Now you are ready to apply the finish. Here are some recommendations:
STAIN -- STAINS
are coloring agents and should only be used if you dislike the natural color of the wood. We generally dis-
courage people from trying to stain this project because the natural wood grain is so beautiful with a simple clear finish. It is
difficult to mask off the soundboard, for instance, and just stain the sides and back of the body because the stain tends to “bleed”
under the masking tape. If you are a novice at finishing, or facing a deadline for completion, we especially recommend avoiding
stain.
OIL
-- An oil finish (such as Watco Danish Oil) will give your wood a low luster appearance, bringing out the natural color of
the grain, but it tends soak into the wood and appear dry and “thirsty” after awhile. The principal advantage of an oil finish is
that it can be applied and wiped dry immediately, allowing you to proceed to installing hardware (and strings) right away. The
disadvantage of oil is that it usually does not give much surface protection or sheen, unless you know how to polish out many
coats of gun stock oil.
POLYURETHANE
-- Any polyurethane will work fine on this project, but we like the solvent-based ones better than water-
borne versions. One of our favorites is a wipe-on satin Gel Topcoat polyurethane that comes with our Instrument Finishing Kit.
The advantages of this finish are its simple application (no drips or runs), durability, and deep, soft luster.
LACQUER
-- Many professional instrument makers still use nitro-cellulose lacquer for their finish. The most readily available
lacquer is called Deft Clear Wood Finish (semi-gloss). If you choose this product, it is best to purchase a can of liquid Deft to
brush on as a sealer coat first, and then use an aerosol can of the same product to spray the final coats. The advantage of this
finish is its quick drying time, but the disadvantage is the strong odor and toxic lacquer fumes. CAUTION: Lacquer finish may
smear some painted decorations or blister some types of decorative decals. If you plan to add paints or decals to your instru-
ment, it would be better to finish with polyurethane instead of lacquer.
So choose your weapon and proceed with finishing all the wood parts except the top of the fretboard. Plan on applying at least
three coats of finish. If you don’t use our Gel Topcoat, be sure to follow the directions on the can.
Don’t forget to finish the truss rod cover too!
Use a clean cloth to wipe off any sanding dust from the wood. Some people buy tack cloth for this purpose, but we just use a
clean rag.
Another option is to wet the rag with denatured alcohol (from the hardware store) for cleaning the wood more fully. Alcohol
does not raise the grain like water does, and it evaporates quickly, leaving no spots. But this trick is not a necessary step -- just
kind of fun to do. The alcohol will give you a preview of the beautiful depth and color of the wood.
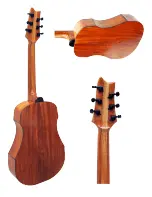
APPLYING THE FINISH
INSTALLING HARDWARE AND STRINGS
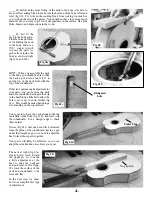
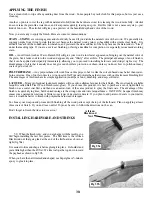
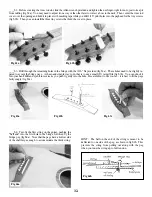
____59. When the finish is dry, and you are happy with the results, you
can begin installing the last few pieces. The first item is the African
Blackwood nut that gets glued at the end of the fretboard, as shown at
right (fig 59a).
It is easiest to trim and shape it before gluing it in place. It should stand
just a little higher than the #0 fret. We like to slope the top down toward
the peghead as shown in fig 59b.
When you have the nut trimmed and shaped, use Superglue or 5-minute
epoxy to glue it in place.
Fig 59a
Fig 59b
African
Blackwood
Nut
Summary of Contents for PARLOR
Page 36: ......


