


31.
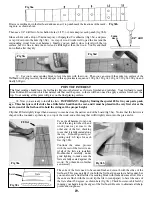
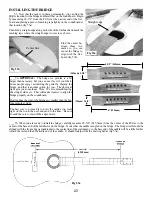
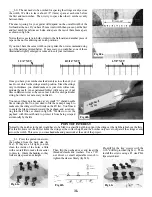
____60. The nut needs to be notched for spacing the strings evenly across
the width. We like to leave about 1/8” (3mm) space at each side before
the first and last notches. Then we try to space the other 4 notches evenly
between them.
The exact spacing for your guitar will depend on the overall width of the
fretboard at the nut. If you have 45 mm total width, then you can put the first
and last notch 3mm from each side, and space the rest of them 8mm apart,
as shown in fig 60a.
Notice that we use tape to hold or ruler to the fretboard, and another piece of
tape on the nut for drawing our notch positions.
If you don’t have the same width on your guitar, then we recommend using
on of the patterns printed below. If necessary, you could have one of these
illustrations slightly enlarged or reduced to suit your instrument.
Fig 60a
1-3/4” NUT
1-13/16” NUT
1-7/8” NUT
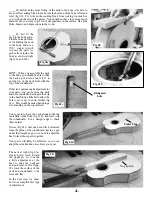
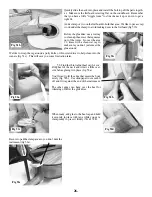
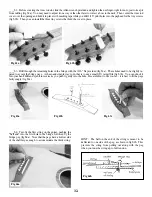
Once you have your notches marked evenly across the nut, you
need to cut slots for the strings at each position. Since the strings
vary in thickness, you should make sure your slots will accom-
modate them all. An experienced luthier will keep a set of nut
files in different sizes so he can cut each slot for each particular
string, but that is not necessary on this kit.
You can cut these notches using a very small “V” shaped needle
file or triangle file. You just need to file them deep enough to
make sure the strings will rest firmly on the #0 fret. You’ll need
to angle the file downward toward the peghead, and avoid cut-
ting into the #0 fret, as shown in fig 60b. We like to cover the
peghead with thin cardboard to protect it from being scraped
accidentally by the file.
POINT OF INTEREST
Normally, the notches in the nut would have to be filed to a specific depth to support the strings at the right height above the frets.
For this kit, however, the #0 fret holds the strings at the correct height, and the notches only serve to separate the strings evenly
across the width. This saves you some headache and guesswork at the end of the project.
Fig 60b
card
board
cover
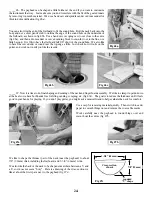
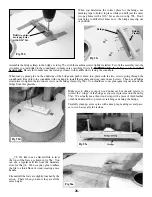
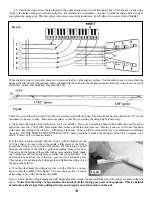
Then flip the peghead over and insert the
threaded sleeves and washers. Use a 716”
nut driver or small adjustable wrench to
tighten the sleeves firmly (fig 61b).
Fig 61a
Fig 61b
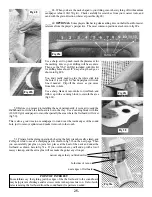
Pre-drill for the tiny screws with the
1/16” drill bit provided (fig 61c). Then
install the screws using a #1 size Phil-
lips screwdriver.
Fig 61c
____61. Press the geared tuners into
the peghead from the back side (fig
61a). If they are a bit tight, you can
clean the inside of the holes a little
with a rat-tail file to make them easier
to press in. Orient the handles so they
look evenly spaced and straight.
Summary of Contents for PARLOR
Page 36: ......


