


4-11
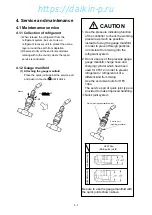
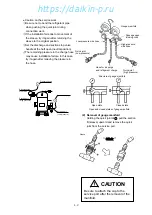
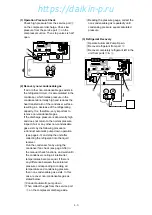
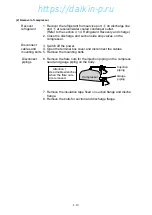
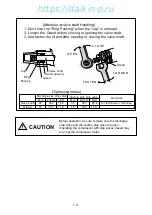
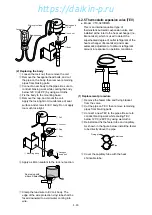
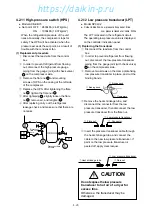
(3) Installation of compressor
Connect
pipings and
fix mounting
bolts
Charge
refrigerant
Connect cables
1. Before connecting pipings, insert and
screw in the mounting bolts slightly.
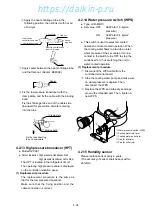
2. Tighten the flare nuts for the injection
piping and gauge piping on the body.
3. Fix the suction and discharge flanges
using with the auxiliary gaskets and the
bolts.
4. Tighten the mounting bolts.
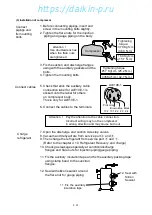
5. Check that stick the auxiliary cable
connection label for LXE10E-1 is
sticked onto the label for others
on compressor body.
This is only for LXE10E-1.
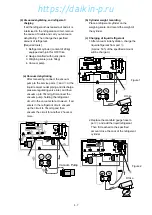
6. Connect the cables to the terminals.
7. Open the discharge and suction side stop valves.
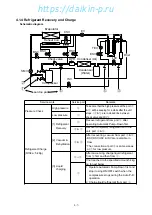
8. Vacuum and dehyadrate from service port
r
and
t
.
9. Then charge the refrigerant from service port
t
and
e
.
(Refer to the chapter 4.1.4 Refrigerant Recovery and charge)
10. Check gas leakage especially at sunction/discharge
flanges and flare nuts for injection piping/gauge piping.
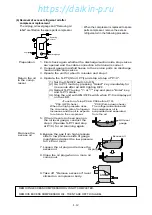
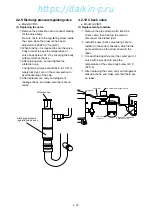
11. Fix the auxiliary insulation tape and fix the auxiliary packing tape
using clamp band to the sunction
flanges.
12. Seal with silicon sealant around
the flare nut for gauge piping.
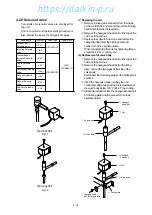
Tightening torque
257 Kgf.cm (25.2 N.m)
435 Kgf.cm ( 42.7 N.m)
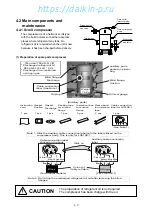
Attention ! Pay the attention to the cable connection.
Incorrect wiring may run the compressor
in wrong direction and may cause burn out.
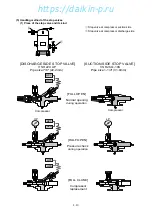
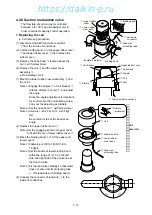
Attention !
Use double wrenches
when the flare nuts
are tightened.
Tightening
torque:
370 Kgf.cm
(36.3 N.m)
160 Kgf.cm
(15.7 N.m)
Compressor
12. Seal with
Silicon
Sealant
11. Fix the auxiliary
insulation tape
Pink Gray
Brown Blue Black
132 131 22 23 24
U
V
W
LXE10E-1
https://daikin-p.ru