345
Parameter
Function
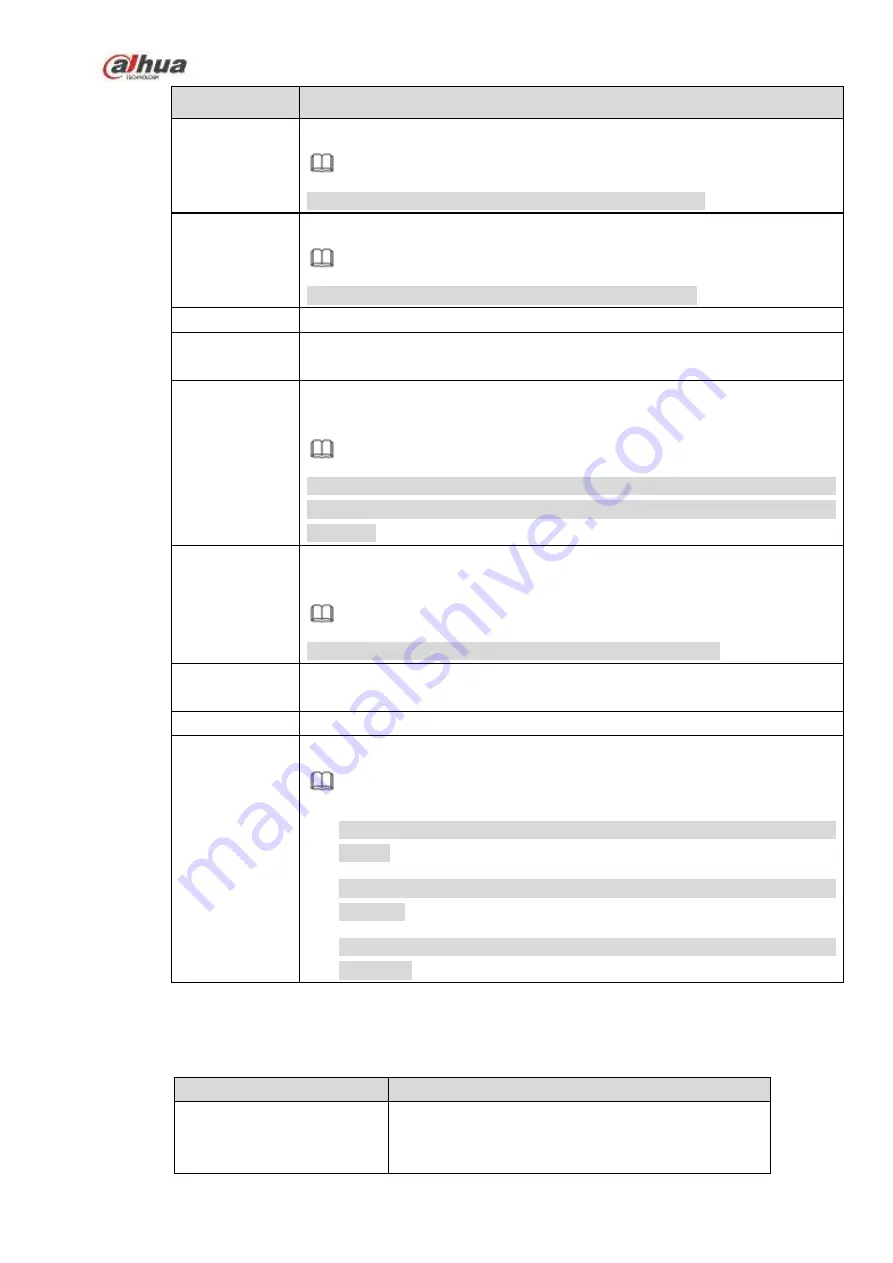
RTSP port
Input RTSP port of the remote device. The default setup is 554.
Note
Skip this item if the manufacture is private or customize.
HTTP port
Input HTTP port of the remote device. The default setup is 80.
Note
Skip this item if the manufacture is private or customize.
TCP port
Input TCP port of the remote device. The default setup is 37777.
User
name/password
The user name and password to login the remote device.
Channel No.
Input channel amount or click the Connect button to get the channel amount
of the remote device.
Note
We recommend click Connect button to get remote device channel amount,
the manual add operation may result in failure if the input channel amount is
not right.
Remote
channel No.
After getting the remote device channel amount, click Setup to select a
channel.
Note
Click to select one or more remote channel numbers here.
Channel
The local channel number you want to add. One channel name has
corresponding one channel number.
Decode buffer
There are three item: realtime, local, fluent.
Service type
There are four items: auto/TCP/UDP/MULTICAST(ONVIF device only)
Note
The default connection mode is TCP if the connection protocol is
private.
There are three items:TCP/UDP/MULTICAST if the connection protocol
is ONVIF.
There are two items: TCP/UDP if the connection protocol is from the
third-party.
Change IP
On the searched devices list, check one or more device(s) at the same time. Click Modify IP button, you
can see the following interface. See Figure 5-24
Please refer to the following sheet for log parameter information.
Parameter
Function
DHCP
Check the box here, system can auto allocate the IP
address. The IP address, subnet mask, default
gateway are reference only.
Summary of Contents for NVR1A-4P Series
Page 1: ...Dahua Network Video Recorder User s Manual V 4 3 0 ...
Page 142: ...128 Figure 3 11 3 6 12 NVR42V 8P Series Please refer to Figure 3 12 for connection sample ...
Page 143: ...129 Figure 3 12 ...
Page 157: ...143 Figure 4 15 Step 2 Click device display edit interface See Figure 4 16 ...
Page 220: ...206 Figure 4 93 Figure 4 94 ...
Page 240: ...226 Figure 4 110 Figure 4 111 Figure 4 112 ...
Page 251: ...237 Figure 4 123 Figure 4 124 ...
Page 253: ...239 Figure 4 126 Click draw button to draw the zone See Figure 4 127 ...
Page 257: ...243 Figure 4 130 Click Draw button to draw a zone See Figure 4 131 Figure 4 131 ...
Page 262: ...248 Figure 4 136 Click draw button to draw the zone See Figure 4 137 ...
Page 275: ...261 Figure 4 148 Figure 4 149 ...
Page 276: ...262 Figure 4 150 Figure 4 151 ...
Page 387: ...373 Figure 5 60 Figure 5 61 ...
Page 388: ...374 Figure 5 62 Figure 5 63 ...
Page 412: ...398 Figure 5 96 Figure 5 97 ...


