background image

1

95

XF

series

Inspection and adjustment

ACCESSORIES

2-3

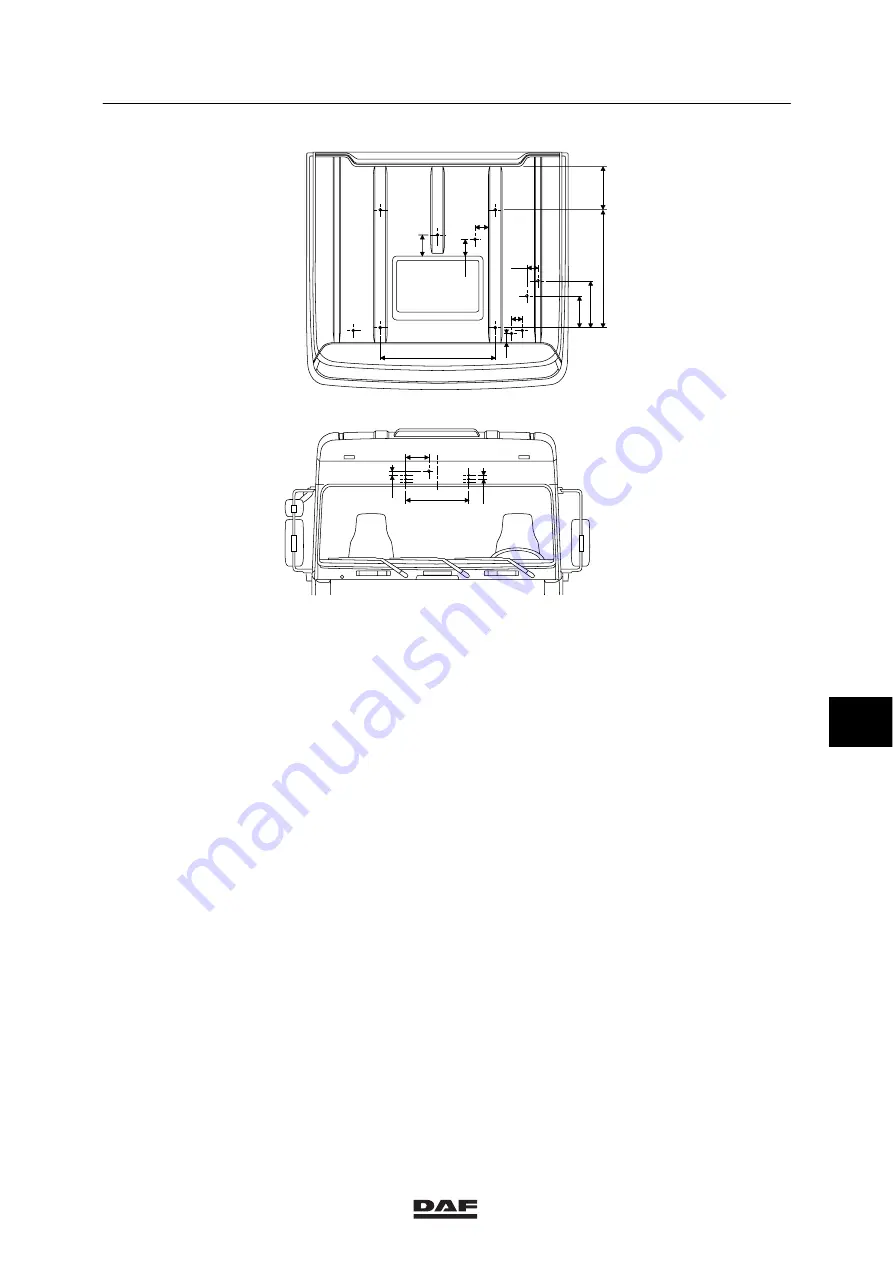
448

90

40

32,5

593

1120

430

105

100

140 

160 

200 

1110

220

600

A

G

H

A

A

E

D

B F

C

C

A

K100475

XH CAB

Legend

A.

Roof spoiler

B.

Cable duct for rotating light

*

C.

Hose duct for air horn

*

D.

Cable duct for satellite aerial

E.

Mounting position for mobile phone aerial

F.

Radio aerial (standard)

G.

Cable duct for CB aerial

H.

Cable duct for roof spotlights

*

*

Reverse for RHD models

8

0209

Summary of Contents for 95XF

Page 1: ... 95XF series CONTENTS TECHNICAL DATA DIAGNOSTICS INTERNAL CAB COMPONENTS CAB HEATING EXTERNAL CAB COMPONENTS CAB SUSPENSION CAB TILTING GEAR SEATS ACCESSORIES PREWAX TREATMENT ᓻ 200345 1 2 3 4 5 6 7 8 9 10 ...

Page 2: ......

Page 3: ...htening torques 1 16 200345 2 CAB SUSPENSION 2 1 200345 2 1 General 2 1 200345 2 2 Tightening torques 2 2 200345 3 CAB TILTING GEAR 3 1 200345 3 1 General 3 1 200345 3 2 Tightening torques 3 1 200345 3 3 Filling capacities 3 1 200345 4 SEATS 4 1 200345 4 1 Tightening torques 4 1 200345 5 ACCESSORIES 5 1 200345 5 1 General 5 1 200345 ᓻ 200345 ...

Page 4: ...1 TECHNICAL DATA Contents 95XF series 2 ᓻ 200345 0 ...

Page 5: ...d external cab components TECHNICAL DATA 1 1 1 INTERNAL AND EXTERNAL CAB COMPONENTS 1 1 GENERAL 1 2 3 K100442 Legend 1 Comfort Cab type designation XL 2 Space Cab type designation XH 3 Super Space Cab type designation XC ᓻ 200345 ...

Page 6: ...g angle 58 5_ Cab width 2490 mm Cab length 2250 mm Cab height unloaded tyre size 315 80R22 5 XL 3225 mm XH 3525 mm XC 3850 mm With open roof hatch height 60 mm Doors Material galvanised sheet steel Opening angle of doors 80_ Steering column Tilting angle 15_ Height adjustment 85 mm 0 ᓻ 200345 ...

Page 7: ...0825 Recommended dimension between measuring points on the same cab side Recommended dimension between measuring points on opposite cab sides F F 1472 mm G G 2260 mm F H 1509 mm G F 2351 mm G K 1700 mm G K 2801 mm K H 1018 mm F H 2681 mm F G 725 mm F F 2210 mm A B 790 mm A N 1935 mm B P 2096 mm ᓻ 200345 ...

Page 8: ...1 TECHNICAL DATA Internal and external cab components 95XF series 1 4 K100391 Recommended dimensions at the cab front I I 2230 mm J J 2275 mm 0 ᓻ 200345 ...

Page 9: ...0 1 95XF series Internal and external cab components TECHNICAL DATA 1 5 K100392 L L 1025 mm R R 1025 mm L R 2239 mm ᓻ 200345 ...

Page 10: ...1 TECHNICAL DATA Internal and external cab components 95XF series 1 6 K100393 Recommended dimensions on cab floor L M 2061 mm S T 1554 mm 0 ᓻ 200345 ...

Page 11: ...0 1 95XF series Internal and external cab components TECHNICAL DATA 1 7 K100826 O O 2350 mm ᓻ 200345 ...

Page 12: ...s and other application compounds for gluing the Super Space Cab roof Product name Properties Application DAF number Sikaflex 252 white Working time within 15 min Curing time 2 days 48 hours Glue drip channel for gluing the polyester roof 1286578 Sikaflex 260 black Working time within 15 min Curing time 2 days 48 hours Glue cab front for gluing the polyester roof 1286577 Sika primer SP 209N Minimu...

Page 13: ...alant for gluing sealing the plastic sun visor plastic roof window 1286577 Sika primer SP 209N Minimum drying time 15 min Maximum drying time 24 hours Primer for polyester synthetic components 1240547 Sika cleaner SC 205 Minimum drying time 5 min Cleaning agent for polyester synthetic components 1240548 Sika remover SR 208 Glue remover for removing glue that has not yet cured 1241019 Scotch Brite ...

Page 14: ... cab components 95XF series 1 10 Adjustment dimensions of door locking mechanism rods Note Dimensions in mm measured from ball joint centre to centre or from ball joint centre to extreme end of the rod 554 599 637 90 79 K1 01 458 0 ᓻ 200345 ...

Page 15: ... Adjustment dimensions of exterior mirrors without dead angle exterior mirror Model without integrated bracket A B A B C A D E K1 01 524 Size Normal mm Normal adjustment angle A 1 966 32_ B 1 1293 29_ C 20_ D 2 1410 E 1450 1 Relative to the cab floor 2 Main mirror ᓻ 200345 ...

Page 16: ...Internal and external cab components 95XF series 1 12 Model with integrated bracket A C B B A C D E K1 01 525 Size Normal mm Normal adjustment angle A 387 16_ B 147 66_ C 370 76_ D 1 1387 E 1406 1 Main mirror 0 ᓻ 200345 ...

Page 17: ...L DATA 1 13 Adjustment dimensions of exterior mirrors with dead angle exterior mirror Model with integrated bracket A C B A D C D B E F K1 01 526 Size Normal mm Normal adjustment angle A 387 16_ B 84 56_ C 255 76_ D 640 76_ E 1 1387 F 1406 1 Main mirror ᓻ 200345 ...

Page 18: ...size 4 size 5 Pavement mirror A 1 m 1 m 1 25 m Wide angle exterior mirror B 2 5 m 15 m 12 5 m 25 m 3 m Main exterior mirror on co driver s side C 30 m 3 5 m 0 75 m 4 m Main exterior mirror on driver s side D 10 m 2 5 m Note The field of vision dimensions of the dead angle exterior mirror are not shown in the illustration and the table because use of this mirror is not required by law 0 ᓻ 200345 ...

Page 19: ...2 2 ᐔ 10 Fan setting 1 R1 R2 R3 2 R2 R3 3 R3 4 no resistor Heater control Colour of control cables Heater valve LHD red RHD blue Defroster valve LHD green RHD yellow Foot valve LHD black RHD green Doors Adjustment dimensions gap size from front post except for corner piece 8 ᐔ 2 mm maximum wedge shape of gap 2 mm transition between door cab inwards relative to front post 0 1 mm outwards relative t...

Page 20: ...er arm nut 18 Nm Windscreen wiper arm bracket lock nut M20 18 Nm Threaded holes in bulkhead windscreen wiper arm bracket silicone sealant Clutch pedal Sealant for end of clutch pedal spindle silicone sealant Recessed locking bolt according to standard 1 Steering column Universal joint attachment bolts 54 Nm 2 Steering wheel attachment nut 65 Nm Door Door limiter attachment nut M6 10 Nm Hinge attac...

Page 21: ...un Protection leaf sprung model without towing device Attachment bolt A 170 ᐔ 15 Nm 1 Attachment bolt B 170 ᐔ 15 Nm 1 with towing device Attachment bolt A 170 ᐔ 15 Nm 1 Attachment bolt B 260 Nm 1 1 Secure with Loctite 243 2 Always replace the attachment bolt and nut K100822 A B ᓻ 200345 ...

Page 22: ...1 TECHNICAL DATA Internal and external cab components 95XF series 1 18 0 ᓻ 200345 ...

Page 23: ...ension elements Size A ᐔ 5 mm 227 7 mm Size B ᐔ 5 mm 272 5 mm Size A distance between top of front cross member and bottom of stabiliser Size B distance from top of suspension bracket to centre of cab lock suspension bolt Note Measurements for unloaded cab and normal system pressure The coil spring elements can be adjusted in 4 steps of 3 mm Spring distance of coil spring and air suspension elemen...

Page 24: ...e overview of standard tightening torques Any other threaded connections that are not specified must therefore be tightened to the tightening torque stated in the overview of standard tightening torques When attachment bolts and nuts are to be replaced it is important that they are of exactly the same length and property class as the ones removed unless stated otherwise 0 ᓻ 200345 ...

Page 25: ... attachment bolt M14 x 110 170 ᐔ 15 Nm D Rear shock absorber attachment bolt M14 x 65 170 ᐔ 15 Nm E Self locking nut M14 for front and rear spring element 50 Nm F Front right hand side bracket fastening bolt M16 x 50 260 ᐔ 20 Nm G Front right hand side bracket fastening bolt M16 x 70 260 ᐔ 20 Nm H Front right hand side bracket fastening bolt M16 x 100 260 ᐔ 20 Nm J Vibration damper locating bolt M...

Page 26: ...1 TECHNICAL DATA Cab suspension 95XF series 2 4 0 ᓻ 200345 ...

Page 27: ...uded in the overview of standard tightening torques Any other threaded connections that are not specified must therefore be tightened to the tightening torque stated in the overview of standard tightening torques When attachment bolts and nuts are to be replaced it is important that they are of exactly the same length and property class as the ones removed unless stated otherwise Lifting cylinder ...

Page 28: ...1 TECHNICAL DATA Cab tilting gear 95XF series 3 2 0 ᓻ 200345 ...

Page 29: ...other threaded connections that are not specified must therefore be tightened to the tightening torque stated in the overview of standard tightening torques When attachment bolts and nuts are to be replaced it is important that they are of exactly the same length and property class as the ones removed unless stated otherwise Seats Seat attachment bolts M8 20 25 Nm Attachment of seat belt mechanism...

Page 30: ...1 TECHNICAL DATA Seats 95XF series 4 2 0 ᓻ 200345 ...

Page 31: ...e adjusted with the adjusting mechanism B Roof spoiler setting range mm aerodynamic Comfort Cab XL 630 810 Space Cab XH 370 515 Super Space Cab XC N A Note The size stated in the table represents the distance measured between the highest roof spoiler edge P and the cab roof plate local to the vehicle centreline P B K1 01 355 ᓻ 200345 ...

Page 32: ...1 TECHNICAL DATA Accessories 95XF series 5 2 0 ᓻ 200345 ...

Page 33: ...NG 1 1 0209 1 1 Cab heating fault finding table 1 1 0209 2 CAB SUSPENSION 2 1 0209 2 1 Fault finding table cab suspension 2 1 0209 2 2 Fault finding table cab tilting mechanism 2 2 0209 3 SEATS 3 1 0209 3 1 Fault finding table Isringhausen 6800 series 3 1 0209 1 ᓻ 0209 ...

Page 34: ...1 DIAGNOSTICS Contents 95XF series 2 1 ᓻ 0209 ...

Page 35: ...ab heating DIAGNOSTICS 1 1 1 CAB HEATING 1 1 CAB HEATING FAULT FINDING TABLE COMPLAINT CAB TEMPERATURE TOO HIGH Possible cause Remedy Heater valve cannot be fully closed Check the setting of the heater valve 1 ᓻ 0209 ...

Page 36: ...1 DIAGNOSTICS Cab heating 95XF series 1 2 1 ᓻ 0209 ...

Page 37: ...e height control valve and adjust suspension Defective valve Replace valve COMPLAINT INSUFFICIENT LATERAL DAMPING Possible cause Remedy Worn or damaged horizontal dampers at the rear of the cab Replace both dampers Worn or damaged silentblocks in front cab suspension Replace both silentblocks COMPLAINT AIR LEAKAGE Possible cause Remedy Damaged air bellows Replace air bellows Leakage in line connec...

Page 38: ...y Return stroke leakage Replace the tilting pump COMPLAINT PUMP ONLY FUNCTIONS IN THE LAST PART OF THE STROKE Possible cause Remedy Low oil level in oil reservoir Top up oil reservoir Leaking inlet valve ball Remove the two way valve and check the inlet valve Clean it or fit a reconditioning set Polluted inlet strainer Clean reservoir and strainer COMPLAINT PUMP OPERATES WITH DIFFICULTY CYLINDER D...

Page 39: ...ditioning kit Pressure release valve incorrectly set Check the pressure release valve using a pressure gauge only and adjust if necessary COMPLAINT CAB LOCK CANNOT BE OPENED Possible cause Remedy Damaged or broken pipe Replace pipe or connection Jammed piston in locking mechanism Repair or replace the locking mechanism COMPLAINT CAB CANNOT BE TILTED Possible cause Remedy Jammed piston in cab locki...

Page 40: ...1 DIAGNOSTICS Cab suspension 95XF series 2 4 1 ᓻ 0209 ...

Page 41: ...s Place seat in its highest position COMPLAINT SEAT MOVES UP AND DOWN INDEPENDENTLY UNLOADED Possible cause Remedy Not a functioning fault but excessive resistance in the system itself COMPLAINT SEAT MOVES UP AND DOWN INDEPENDENTLY LOADED Possible cause Remedy Leaking pneumatic system Check level control valve air suspension and air pipes for leakage Replace components or repair air pipe Cylinder ...

Page 42: ...olling the valve Replace the valve or control button depending on the fault Defective switch valve C Disconnect air pipes 5 and 6 and operate height control up and down If air escapes from the pipes 5 and 6 replace the valve C COMPLAINT SEAT MOVES TO TOP MOST POSITION AND IS NOT SPRUNG Possible cause Remedy Air connections not installed according to diagram Correct the incorrect connection s COMPL...

Page 43: ...nstallation pneumatic switch pneumatic valve for steering column setting 4 10 0209 4 10 Removal and installation steering column panels 4 11 0209 4 11 Removal and installation steering column 4 12 0209 4 12 Removal and installation steering wheel 4 14 0209 4 13 Removal and installation ignition lock 4 15 0209 4 14 Removal and installation floor plate on co driver s side 4 16 0209 4 15 Removal and ...

Page 44: ...1 INTERNAL CAB COMPONENTS Contents 95XF series 2 2 ᓻ 0209 ...

Page 45: ...n If the vehicle has been involved in a collision the cab must under no circumstances be tilted without due precautions The internal mechanism of the lifting cylinder may have been damaged to such an extent that the cylinder is no longer locked by the internal stop collar In that case there is a danger of the cab no longer being held back and falling forward to the ground 2 ᓻ 0209 ...

Page 46: ...1 INTERNAL CAB COMPONENTS Safety instructions 95XF series 1 2 2 ᓻ 0209 ...

Page 47: ...EW DRAWING INTERIOR CAB COMPONENTS 3 6 1 7 9 4 8 5 K100476 1 2 Centre console Legend 1 Rubber mat 2 Upper storage compartment 3 Lower panel 4 Extendable drawer 5 Control panel 6 Ashtray 7 Lower storage compartment 8 Parking brake panel 9 Parking brake valve frame 2 ᓻ 0209 ...

Page 48: ...6 Lower door post panel on co driver s side 7 Lower door post panel on driver s side 8 Defroster vent panel 9 Grommet for door ventilation 10 Side vent 11 Lower panel of central console 12 Lower panel on driver s door side 13 Lower panel central console side on driver s side 14 Instrument panel 15 Radio panel 16 Lower panel central console side on co driver s side 17 Lower panel of central fuse bo...

Page 49: ...NENTS 2 3 K100443 5 1 4 2 3 Ventilation heating system air ducts Legend 1 Front air duct on co driver s side 2 Rear air duct on co driver s side 3 Air duct for vents 4 Rear air duct on driver s side 5 Front air duct on driver s side 2 ᓻ 0209 ...

Page 50: ...1 Central fuse box attachment frame 2 Right hand side instrument panel attachment frame 3 Left hand side instrument panel attachment frame 4 Extendable table guide rail 5 Central console reinforcement profile 6 Central console attachment frame 7 Central console control panel attachment frame 2 ᓻ 0209 ...

Page 51: ... STEERING COLUMN C C D E F G A A B K1 00 917 H Legend A Steering column cover panels top B Steering column switches C Attachment of steering column cover panels bottom D Steering column cover panels bottom E Panel clamp F Steering shaft grommet G Steering column 2 ᓻ 0209 ...

Page 52: ...steering column pneumatically Once the steering column has been released its movements are cushioned by a gas damper The gas damper ensures that the steering column cannot drop after being released and that it can easily be pulled upwards The control valve switch is located on the front of the steering column The valve is equipped with a calibrated vent Should you forget to secure the column this ...

Page 53: ...ed If not replace the valve switch D000339 3 2 INSPECTION FASTENING OF UNIVERSAL JOINT TO STEERING BOX INPUT SHAFT Inspection fastening of universal joint to steering box input shaft 1 Check the universal joint for noticeable play If noticeable play is detected the affected part must be replaced 2 Check whether there is any noticeable play between the spline connection of the universal joint and t...

Page 54: ...istinguished amongst other things by the lip K1 01 443 Model I K1 01 444 Model II Adjusting roller sun blind model I 1 Remove the side cover with the operating lever by pressing the locking pins on either side of the sun blind and pulling out the cover Simultaneously press the operating lever 2 Pull out the spring rod 1 and let it loose enabling the roll up mechanism to fully expand K100816 2 1 2 ...

Page 55: ... inwards without letting the spring rod loose to interlock the roll up mechanism K100817 1 2 K100818 4 Fit the side cover with the control lever Simultaneously press the operating lever 5 Check that the roll up mechanism is working properly The spring tension of the roll up mechanism may be increased or reduced by turning the spring rod further forward or backward 2 ᓻ 0209 ...

Page 56: ...ng the attachment screws If the side cover is taken too far from the roller sun blind the internal spring of the roll up mechanism will fully expand 2 Remove the attachment screws 4 from the side cover if these are cross head screws remove them e g with a bent screw driver K1 01 452 4 2 3 1 3 Take the side cover so far from the roller sun blind that the side cover is able to turn Adjust the spring...

Page 57: ... the panel 2 Remove the switch from its locked position by carefully moving the feeler gauge in the direction of the arrow B 3 Carefully remove the switch from the panel In doing so ensure that the connector lock does not catch behind the panel causing the connector to fall behind the panel 4 If necessary remove the switch from the connector A B K1 01 334 Installing switches 1 Fit the connector 2 ...

Page 58: ...itches at the bottom of the instrument panel 4 Remove the attachment bolts beneath the switches after which you can pull the panel forward If the panel is to be removed mark the electrical and pneumatic connections first Installing instrument panel 1 Connect up all the electrical and pneumatic connections of the instrument panel 2 Fit the panel Be careful not to jam any wires between the panel and...

Page 59: ...t screws K100430 4 4 REMOVAL AND INSTALLATION LOWER CENTRAL CONSOLE STORAGE COMPARTMENT Removing lower central console storage compartment 1 Remove the rubber inlay and the attachment screws from the lower storage compartment 2 Remove the electrical wiring harness from the cigarette lighter and the accessories port after which you may remove the storage compartment Installing lower central console...

Page 60: ...r central console storage compartment 1 Fit the upper storage compartment and fasten it 2 Put the rubber inlay in the storage compartment K100337 4 6 REMOVAL AND INSTALLATION EXTENDABLE TABLE Removing the extendable table 1 Remove the upper central console storage compartment 2 Remove the extendable table by loosening the attachment bolts on the back and front beneath the table from the sliding ra...

Page 61: ...ble table 4 Remove the ashtray 5 Remove the attachment screws from the central console control panel and take out the panel Mark the position of the electrical connections Installing central console control panel 1 Fit the electrical connections of the central console control panel and install the panel on the central console 2 Replace the ashtray 3 Fit the extendable table 4 Fit the lower central...

Page 62: ...ve the attachment screws and take off the intermediate panel 6 Remove the upper central console storage compartment 7 Remove the lower central console storage compartment K100334 8 Remove the vents along the windscreen 9 Remove the attachment screws and take the lower panel from the central console 10 Remove the ashtray 11 Remove the attachment screws and take the side panel from the central conso...

Page 63: ...Remove the attachment screws on top window edge of the central cabinet panel K100341 16 Remove the attachment screws from the central part of the central console K100473 17 Open the flap of the central cabinet and remove the attachment screws on the side K100342 2 ᓻ 0209 ...

Page 64: ...w at the bottom of the central cabinet panel which secures the door air duct K100343 19 Remove the attachment screw which connects the air vent supply pipe to the panel K100345 20 Remove the attachment bolts on the bottom door post of the panel 21 Remove the central cabinet panel K100344 2 ᓻ 0209 ...

Page 65: ... between the air ducts are tight 3 Install the door air duct Make sure that the rubber ring fits tightly 4 Fit the vent duct for the windscreen 5 Fit the side panel of the central console 6 Fit the extendable table 7 Fit the upper central console storage compartment 8 Fit the central console control panel 9 Fit the door post panel 10 Install the lower panels and the floor pan 11 Fit the lower pane...

Page 66: ...setting 1 Remove the steering column panels 2 Remove the bracket with the steering column switch valve disconnect the air pipes and push the switch valve from the bracket Installing the pneumatic switch pneumatic valve for steering column setting 1 Fit the air pipes to the switch valve 2 Press the switch valve into the bracket and fit the bracket to the steering column 3 Install the steering colum...

Page 67: ...e left handle direction indicator 4 Remove the lower panels to the left and right of the steering column cover 4 5 Remove the steering column cover 4 by disconnecting the attachment screws 2 and the panel clamps 3 on the back Installing steering column panels 1 Re place the cover around the steering column and make sure that the steering column setting is working properly after doing so 2 Remove t...

Page 68: ... switches and the ignition switch 6 Remove the bracket holding the height setting switch 7 Disconnect the air pipes from the control valve and plug the supply pipe 8 Loosen one of the universal joints of the steering shaft which one depends on the operation to be performed either the universal joint beneath the steering wheel or the universal joint on the steering box Before loosening mark the pos...

Page 69: ...s correctly in place on the steering shaft or steering box so that the attachment bolt can be put in the notch C 2 Only fit a new attachment bolt with nut to the universal joint Tighten the bolt to the specified tightening torque see Technical data 3 Connect the air pipes to the control valve K1 01 353 A C B 4 Fit the bracket holding the height setting switch 5 Fit the ignition lock and multi func...

Page 70: ...WHEEL Note The special tools required to remove the steering wheel cannot be obtained from DAF These tools should be manufactured by yourself according to the drawing S7 00 065 Removing steering wheel 1 Place the steering gear in the central position using the markings on the steering box S7 00 166 2 ᓻ 0209 ...

Page 71: ...hat the markings on the steering wheel and the steering shaft see the arrows B align 3 Fit the attachment nut 3 Tighten the nut to the specified tightening torque see Technical data 4 Fit the cover plate 1 K1 01 144 1 3 4 2 A B B 4 13 REMOVAL AND INSTALLATION IGNITION LOCK Removing ignition lock 1 Remove the caps A from the steering column below the steering wheel 2 Disconnect the connectors behin...

Page 72: ... s side 1 Remove the floor mat 2 Remove the small attachment screw from the foot board and take the latter out K100436 3 Remove the panel clamps using a forked tool on the leg side of the floor pan K100333 4 Remove the attachment screws and take off the floor pan Installing the floor pan 1 Fit the floor pan 2 Fit the foot board and the floor mat K100435 2 ᓻ 0209 ...

Page 73: ...dal connector if applicable 5 Remove the attachment bolts 1 6 Remove the accelerator pedal from the cab floor Installing accelerator pedal 1 Check the gasket Replace the gasket if damaged 2 Fit the accelerator pedal with gasket on the cab floor 3 Insert the attachment bolts 1 Make sure that the gasket is positioned just below the pedal 4 If present fit the connector 5 Fit the dashboard panel above...

Page 74: ...rake pedal 2 and fittings Installing brake pedal 1 Fit the brake pedal and fittings 2 Fit the hinge pin 3 Fully depress the brake pedal and fit the circlip to the hinge pin 1 K1 01 528 1 2 4 17 REMOVAL AND INSTALLATION CLUTCH PEDAL Removing clutch pedal 1 Remove the dashboard panels to the left and right of the steering column 2 Remove the steering column panel 3 Remove the spring from the clutch ...

Page 75: ...king compound to the recessed locking bolt 1 see Technical data 3 Push the spindle to the right and tighten the recessed locking bolt Put silicone sealant on the end of the clutch pedal spindle 2 4 Fit the attachment bolt that controls the clutch cylinder take care with the ring 5 Install the clutch pedal spring 6 Fit the dashboard panels to the left and right of the steering column 7 Fit the stee...

Page 76: ...rake switch 3 4 Loosen the connector 5 Remove the lock nut from the engine brake switch 3 and remove the engine brake switch from the mounting plate 2 Installing engine brake switch 1 Fit the engine brake switch 3 with lock nut to the mounting plate 2 2 Fit the connector 3 Fit the mounting plate 2 with the engine brake switch 3 Do not fit the central attachment screw as yet 4 Fit the protection co...

Page 77: ...parking brake switch 2 from the holder 5 Installing parking brake switch 1 Fit the parking brake switch 2 in the holder 5 2 Fit the plugs 1 3 Fit the heater pipe and the radio panel Removing brake light switch 1 Remove the radio panel 2 Remove the heater pipe in front of the parking brake switch 3 Remove the plugs 3 of the parking brake switch 4 4 Remove the parking brake switch 4 from the holder ...

Page 78: ...nual window mechanism is fitted remove the attachment screw 2 and remove the window crank 1 2 K1 00 913 3 Remove the door knob by lifting it open door and pressing the locking clip underneath the knob Pull the knob off the mechanism K100370 4 Remove the control panel for operating the mirror and windows by lifting it carefully from the panel with a small screwdriver Mark the connectors and disconn...

Page 79: ...lightly with a small screwdriver The alignment plate can then be pulled from the panel by hand K100371 6 Remove the attachment screws from the panel K100374 7 Stick a screwdriver into the openings on the sides of the panel and pull the spring clips from the clamping sleeves Avoid damaging the paintwork 8 Remove the panel K100372 2 ᓻ 0209 ...

Page 80: ...the control panel fall through the openings 2 Fit the control panel for operating the mirror windows 3 Push the door knob on to the mechanism 4 Slide the alignment plate for the door lock into the panel 5 Fit the attachment screws and secure the panel 6 If a manual window mechanism is fitted fit the window crank with the attachment screw Apply locking compound to the attachment screw see Technical...

Page 81: ...ts 3 of the lock plate 4 and remove the lock plate 6 Remove the attachment bolts 5 and 6 from the unlocking handle 7 Remove the door handle 8 Remove the door lock 7 completely with control rods through the opening on the inside of the door Installing door locking mechanism 1 Check the length of the control rods and adjust them if necessary See Technical data 2 Fit the door lock completely with con...

Page 82: ...hment bolt 3 but do not tighten it yet Slide up the window guide as far as possible and tighten the attachment bolt 3 7 If necessary fit the locking mechanism of the central door locking system Note The control rod of the central door locking must be positioned behind the control rod of the unlocking handle 8 Fit new foil on the inside of the door 9 Fit the door panel K1 01 504 2 1 3 2 ᓻ 0209 ...

Page 83: ...m out of the door through the opening Installing manually operated window mechanism 1 Fit the window mechanism in the door and fit the attachment bolts 2 3 4 and the caps 5 2 Lower the glass and fit it to the window mechanism using attachment bolts 1 3 Raise the glass Close the glass almost completely Check whether the top edge of the glass is parallel with the window frame Loosen the attachment b...

Page 84: ...e door through the opening Installing electrically operated window mechanism 1 Fit the window mechanism in the door and fit the attachment bolts 2 and 4 the attachment nuts 3 and the caps 5 2 Connect the electric motor connector up 3 Lower the glass and fit it to the window mechanism using attachment bolts 1 4 Operate the window switch and close the glass almost completely Check whether the top ed...

Page 85: ...overs 1 and 2 2 Use a long screwdriver to bend back the lugs B of the lamp holder 3 Take the lamp holder out of the headlining 4 Unplug the connectors and remove the lamp holder K1 01 447 1 2 Installation interior lighting 1 Bend back the lugs B of the lamp holder 2 Connect the connectors and fit the lamp holder 3 Fit the covers 1 and 2 K1 00 617 B 2 ᓻ 0209 ...

Page 86: ...l centimetres backwards due to these slotted holes As a result of this the front edge has sufficient space and will therefore not break Please ensure that no there are no loose objects in the console that may fall out during tilting K100552 B A C Tilting roof console 1 Loosen the small guide rail socket head screw and remove the guide rail from the sun blind 2 Support the console 3 Slacken the 4 s...

Page 87: ...s 3 Tighten the 4 screws C in the upper edge This means that the self locking nuts of the hinges with B may only be permanently hand tightened These nuts will already have been hand tightened in the factory If the console only has to be tilted then do not change anything 4 Install the sun blind guide rail and fasten the small socket head screw K100552 B A C 2 ᓻ 0209 ...

Page 88: ...iew drawing K100470 A B C D F E Legend A 24 volt 40 A connector for microwave TV etc B Passage tube C 12 volt connector for audio equipment e g CB transmitter D Cover plate for additional switches Air duct for air horn F Central roof console connector Note Several facilities have been pre installed in the roof console to facilitate the installation of accessories 2 ᓻ 0209 ...

Page 89: ... s side for the installation of an air horn To access this pipe the bottom plate must be removed from the cabinet To do so remove the upholstery to expose the screws This is also the location of the central connector F for the roof console Use double sided tape to fasten the upholstery Storage cabinet on the co driver s side Underneath the floor of the storage cabinet there is a vacant passage B f...

Page 90: ...1 INTERNAL CAB COMPONENTS Removal and installation 95XF series 4 34 2 ᓻ 0209 ...

Page 91: ... REMOVAL AND INSTALLATION 4 1 0209 4 1 Removal and installation interior filter 4 1 0209 4 2 Removal and installation heating unit 4 2 0209 4 3 Removal and installation heater control panel 4 5 0209 4 4 Removal and installation heater radiator 4 7 0209 4 5 Removal and installation heating unit electric motor 4 9 0209 4 6 Removal and installation recirculation valve control motor 4 11 0209 4 7 Remo...

Page 92: ...1 CAB HEATING Contents 95XF series 2 3 ᓻ 0209 ...

Page 93: ... instructions CAB HEATING 1 1 1 SAFETY INSTRUCTIONS The air conditioning system may only be opened and filled by a specialist Furthermore many countries require official certification to carry out such activities 3 ᓻ 0209 ...

Page 94: ...1 CAB HEATING Safety instructions 95XF series 1 2 3 ᓻ 0209 ...

Page 95: ...ntilation system heating ventilation system combined with air conditioning The heater control consists of three rotary knobs and two switches one for the model without air conditioning The switches are fitted on the radio panel Knob 1 Five position switch to control fan speed K100395 1 Knob 2 Air distribution in the cab 0 0 position A leg area B windscreen and leg area C windscreen defroster K1 01...

Page 96: ...perated by an electric motor and a switch on the dashboard The inflowing air is then passed to the heater fan The first air distribution takes place in space B between the fan and the radiator Some of this air bypasses the heater radiator and can be passed directly to the cab D through the central air vents C The amount of air is controlled by rotating the dials on the air vents Opening the air ve...

Page 97: ... control panel fully left cold Check at the rear of the control panel that the bowden cable 1 red for LHD and blue for RHD abuts against the stop 2 1 2 K1 01 350 3 Turn the control knob fully right warm once and fully left again cold Check that the control arm 1 of the heater valve abuts fully against the stop 2 If this is not the case the heater valve must be adjusted 4 Fit the heater control pan...

Page 98: ...g clip 1 2 K1 01 350 3 Turn the temperature knob fully left cold and then 10 mm right warm 10mm K1 01 351 4 Take the fastening clip off the bowden cable and remove the heater valve 5 Press the control arm 1 of the heater valve against the stop 2 and fit the fastening clip 6 Turn the control knob fully right warm once and fully left again cold Check that the control arm of the heater valve abuts fu...

Page 99: ...the fastening strip 1 3 Remove the interior filter from the filter housing by sliding the bottom of the filter element outwards and downwards Installing interior filter 1 Place the top of the interior filter in the filter housing and push the filter upwards Note the arrow airflow on the edge of the filter element 2 Fit the fastening strip with the attachment screws 3 Close the grille 1 2 K1 01 469...

Page 100: ...arry out such activities 3 Remove the dashboard panels on co driver s side and from the central console 4 Remove the ashtray and the ashtray holder 5 Remove the radio panel 6 Remove the air ducts on driver s side 7 Remove the connector from the central console control panel 8 Remove the central console control panel 9 Unscrew the instrument panel until the attachment screws on the inside can be re...

Page 101: ...ame to be removed more easily K100404 13 Remove the attachment bolts of the heating unit in the cab floor 14 Remove the attachment bolts of the heating unit at the front of the cab underneath the grille To do so remove the interior filter housing 15 Remove the coolant pipe at the front of the cab underneath the grille Plug the connections on the heater in such a way that no coolant can leak from t...

Page 102: ...loor Fit the interior filter housing 3 Connect the connector on the side of the central cabinet 4 Install the upper air duct on driver s side 5 Place the central console upper frame and hand tighten it lift the dashboard panel on driver s side slightly to make installation easier 6 Install the central console front panel and tighten both frame parts 7 Connect the connector of the central console c...

Page 103: ...olts 1 from the control panel Note If the heating unit is removed remove the attachment bolts from the control panel and put the panel to one side Do not disconnect the control cables 4 Remove the control panel from the frame and turn it until the control cables can be reached 5 Remove the clips from the control cables 6 Remove the control cables 7 Disconnect all electrical connections 8 Remove th...

Page 104: ...rmost lever of the heater manifold push the outer cable against the stop and fix the clip 4 Attach one side of the Bowden cable of the heater valve to the temperature control lever push the outer cable against the stop and fix the clip 5 Attach the other side of the control cable to the heater valve adjust the heater valve see chapter Inspection and adjustment and attach the clip 6 Check the setti...

Page 105: ...TING 4 7 4 4 REMOVAL AND INSTALLATION HEATER RADIATOR Removing heater radiator 1 Remove the radio panel 2 Remove the lower air duct 3 Remove the pipes on the heating unit Capture any escaping coolant K100401 4 Remove the pipe clamp K100399 3 ᓻ 0209 ...

Page 106: ...move the radiator by carefully pulling it out of the heating unit Installing heating radiator 1 Place the radiator and carefully slide it into the heating unit 2 Fit new O rings to the pipes and fit them K100401 3 Fit the pipe clamp 4 Fit the lower air duct 5 Install the control panel 6 Fit the radio panel 7 Top up the cooling system 3 ᓻ 0209 ...

Page 107: ...ove the radio panel 4 Install the lower air duct on driver s side 5 Remove the connector from the central console panel 6 Remove the central console control panel K100398 7 Remove the attachment screws at the top and front of the central console allowing the panel to be lifted slightly 8 Remove the frame at the front of the central console including the vents To that end slightly lift the dashboar...

Page 108: ...it electric motor 1 Install the electric motor in the unit and connect all connectors 2 Install the cover and fix it with the clips In doing so make sure that the bowden cable does not get pinched off 3 Install the upper air duct on driver s side 4 Install the central console front panel and fasten it 5 Connect the connector of the central console control panel 6 Fit the radio panel dashboard pane...

Page 109: ...alve control motor 1 Remove the heating unit 2 Remove the attachment screws from the valve control at the bottom of the heating unit 3 Remove the connector from the control motor 4 Remove the control motor Installing recirculation valve control motor 1 Install the control motor and fit the connector 2 Install the heating unit K100407 3 ᓻ 0209 ...

Page 110: ... Remove the lower air duct on driver s side 5 Remove the central console control panel 6 Remove the attachment screws at the top and front of the central console allowing the panel to be lifted slightly 7 Remove the frame at the front of the central console including the vents To that end slightly lift the dashboard panel driver s side enabling the frame to be removed more easily K100404 8 Remove ...

Page 111: ...the retainer lips on the heater motor 2 Connect the connectors Note the markings or the wire numbers 3 Fit the cover with the clips 4 Fit the frame at the front of the central console including the vents 5 Fit the attachment screws at the top and front of the central console 6 Fit the central console control panel 7 Fit the lower air duct on driver s side 8 Fit the radio panel 9 Fit the ashtray an...

Page 112: ...1 CAB HEATING Removal and installation 95XF series 4 14 3 ᓻ 0209 ...

Page 113: ...r mirrors complete with bracket 4 10 200345 4 8 Removal and installation exterior mirrors 4 13 200345 4 9 Removal and installation exterior mirror glass 4 17 200345 4 10 Removal and installation bottom step 4 19 200345 4 11 Removal and installation mudguard 4 20 200345 4 12 Removal and installation windscreen wiper panel 4 21 200345 4 13 Removal and installation windscreen wiper mechanism 4 23 200...

Page 114: ...1 EXTERNAL CAB COMPONENTS Contents 95XF series 2 ᓻ 200345 4 ...

Page 115: ...be sure to cover the piston rod of the lifting cylinder Welding spatter and paint on the piston rod will inevitably cause damage to the oil seal Inspection after a collision Before tilting the cab after a collision check the cab rests the cab hinges and the attachment of the lifting cylinder to the chassis member and cab for cracks If the vehicle has been involved in a collision the cab must under...

Page 116: ...1 EXTERNAL CAB COMPONENTS Safety instructions 95XF series 1 2 4 ᓻ 200345 ...

Page 117: ...ibes the different types of vehicle mirrors according to the standard EC mirror classification The following vehicle mirror categories apply to trucks over 7 5 tonnes Category 2 Main exterior mirror Category 4 Wide angle exterior mirror blind angle exterior mirror Category 5 Close up exterior mirror Note Category 1 inside and category 3 exterior mirrors are intended for passenger cars The exterior...

Page 118: ... drawn vehicle The heating for the exterior mirrors can be switched on by a switch on the dashboard When the exterior mirror heating is turned on the warning lamp in the switch lights up The exterior mirrors can be divided into non heated exterior mirrors heated exterior mirrors except for the pavement mirror electrically adjustable main exterior mirrors always heated Exterior mirror types There a...

Page 119: ...ng is switched on When the wipe wash system has been operated with the lighting switched on the high pressure pump starts to build up pressure As the pressure rises the telescopes are pushed out Only when the pressure has reached its maximum does a valve at the top of the telescope open after which the liquid is sprayed at high pressure through the nozzle tips onto the headlight glass The high pre...

Page 120: ...1 EXTERNAL CAB COMPONENTS General 95XF series 2 4 4 ᓻ 200345 ...

Page 121: ...rque for the door hinge bolts 2 Look and feel whether there is a smooth transition between the door and corner section and between the door and cab roof see Technical data If necessary adjust the door by moving the door hinges inwards or outwards See Technical data for the specified tightening torque for the door hinge bolts K1 01 492 3 Check that the surface of the door handle area continues smoo...

Page 122: ...ues given in Technical data If necessary adjust the height and or angle as follows 1 Remove the cover panel on the back of the exterior mirror This panel can be loosened by sticking a wide screwdriver into the openings do not turn it and moving the screwdriver backwards K1 01 494 2 Unscrew the clamping bolts 1 This allows the mirrors to move freely over the bracket 3 Set the mirror to the proper h...

Page 123: ...ssary adjust the height and or angle as follows 1 Remove the cover panel on the back of the exterior mirror This panel can be loosened by sticking a wide screwdriver into the openings do not turn it and moving the screwdriver backwards K1 01 094 2 Unscrew the clamping bracket bolts 1 This allows the mirrors to move freely over the bracket 3 Set the mirror to the proper height and angle see Technic...

Page 124: ...side of the vehicle 4 Tighten the bolts to the specified tightening torque See Technical data B A C K100236 3 3 INSPECTION AND ADJUSTMENT HEADLIGHT WASHING SYSTEM 1 Using a felt pen draw two adjustment points from the centre on the headlight glass Determine the location of these adjustment points using the drawing The outer adjustment point should always be 58 mm away from the headlight centreline...

Page 125: ...ight glass 4 Repeat this procedure for the other nozzle tip Note The high pressure pump of the headlight washing system supplies a pressure of 2 5 bar The pipes from the pump to the washing system are therefore armoured When replacing them always make sure that armoured pipes are fitted From the high pressure pump there is one pipe to the crosspiece From the crosspiece there is one pipe to the lef...

Page 126: ...evel surface 2 Check in the cab that the control knob of the headlight levelling is set to 0 3 Check the headlight levelling See Technical data for the specified height adjustment The specified height adjustment is also shown on a sticker on the inside of the corner section around the headlight 4 If necessary adjust the headlights using adjusting screw 1 the headlight can be adjusted vertically us...

Page 127: ...move the side impact bar F by removing the two screws G and the plate H Installing the door extension 1 If necessary fit the side impact bar F Hand tighten this bar using attachment plate H 2 Slide the side impact bar into the door opening Make sure that the tip of the bar aligns with the lip K in the door Fit the extension to the door by hand tightening the attachment screws 3 Hand tighten the th...

Page 128: ...oor handle 1 Remove the door panel 2 Remove the attachment bolts on the inside of the door To do so remove the door seals K100421 3 Remove the door handle by turning it downwards At the same time hold the handle pressed in and the key turned clockwise lock The rods can then be taken from the door handle K100422 4 ᓻ 200345 ...

Page 129: ... Install the door panel K100423 4 3 REMOVAL AND INSTALLATION DOOR LOCK Removing the door lock 1 Remove the door handle 2 Insert the key in the cylinder lock use a screwdriver to turn the ring 1 outwards and remove the cylinder lock from the door handle Installing the door lock 1 Turn the ring 1 outwards and position the cylinder lock Pay attention to the position of the projection A Check whether ...

Page 130: ...Remove the door panel and remove the foil covering the inside of the door 2 Remove the attachment bolt 3 of the window guide and remove the window guide K1 01 504 2 1 3 3 Lower the glass remove the attachment bolts 1 and lower the mechanism 1 K1 01 089 4 Slide the glass down and remove the rubber seals and squeegee strips 4 ᓻ 200345 ...

Page 131: ...e the glue in places where the rubber of the fixed window is glued to the window pillar K1 01 511 6 Remove the window pillar attachment bolts K1 01 515 7 Tilt the window pillar slide up the glass and tilt the glass out of the door along the front of the window pillar K1 01 514 4 ᓻ 200345 ...

Page 132: ...d tighten the attachment bolt 3 K1 01 504 2 1 3 4 Fit the rubber seals and squeegee strips Make sure that the foil against the inside of the inner plate is pressed against the inside of the door by the lower squeegee strip 5 Secure the drop glass to the window mechanism using the attachment bolts 1 6 Close the drop glass until nearly shut Check that the top edge of the window is parallel to the wi...

Page 133: ...cified superfast adhesive to the rubber see Technical data Press the rubber firmly to the window pillar Immediately remove the excess glue Caution the specified superfast adhesive dries within a few seconds 11 Clean the glass for example with DAF window cleaning agent and the parts of the cab body which have become dirty during installation of the window K1 01 511 4 ᓻ 200345 ...

Page 134: ...al carefully out of the frame tilt if necessary K1 01 527 Installing the fixed door window 1 Make sure that the window frame is smooth and flat no major irregularities 2 Apply a lubricant to the outside of the rubber seal 3 Install the window using two suction pads special tool DAF no 0484800 in the door frame Tap the window properly and check that the weatherstrip properly fits into the door alon...

Page 135: ...ngs will touch the door 5 Remove the hinge bolts 3 and take off the door Installing the door 1 Suspend the door in the slings and position it with the hinges in front of the attachment holes Note Protect the door paint by fitting tape in the places where the slings will touch the door 2 Centre the attachment plate in the A pillar and fit all hinge bolts 3 3 Fit the door check 2 4 Feed the connecto...

Page 136: ...rs When disconnecting the connectors make sure the door wiring harness does not slip back through the hole in the door Should this nevertheless happen and if you are unable to reach the wiring harness through the hole disassemble the door upholstery and guide the wiring harness through the opening again Installing exterior mirrors complete with bracket 1 Connect the exterior mirror connectors Note...

Page 137: ...ter and adjustment on the inside of the door 3 Remove the attachment bolts and remove the exterior mirror complete with bracket Installing exterior mirrors complete with bracket Note Apply silicone sealant all round to the threaded holes for the attachment bolts of the exterior mirror bracket The purpose of this is to prevent water from penetrating the door 1 Install the exterior mirrors complete ...

Page 138: ... bracket 1 Remove the attachment bolts 1 of the pavement mirror and remove the mirror with gasket Installing the pavement mirror complete with bracket 1 Check the gasket If damaged replace the gasket 2 Put the pavement mirror with gasket in place and secure it using the attachment bolts 1 1 K101 519 4 ᓻ 200345 ...

Page 139: ...ling the main exterior mirror 1 Fit the exterior mirror to the bracket and fit the clamp bolts Do not yet tighten the clamp bolts 2 Fit the connector of the exterior mirror adjustment and or exterior mirror heating 3 Adjust the mirror height and angle see chapter Inspection and adjustment 4 Tighten the clamp bolts 5 Fit the cover push into place Removing the wide angle exterior mirror 1 Remove the...

Page 140: ...r mirror 1 Fit the exterior mirror to the bracket and fit the clamp bolts Do not yet tighten the clamp bolts 2 Fit the connector of the exterior mirror heating 3 Adjust the mirror height and angle see chapter Inspection and adjustment 4 Tighten the clamp bolts 5 Fit the cover push into place 4 ᓻ 200345 ...

Page 141: ...nd hand tighten the clamping bracket bolts 1 but do not tighten them firmly 2 Fit the connectors of the exterior mirror heating and or exterior mirror adjustment 3 Set the mirror to the proper height and angle see chapter Inspection and adjustment 4 Tighten the clamping bracket bolts 1 5 Fit the cover push into place Removing the wide angle exterior mirror dead angle exterior mirror 1 Remove the c...

Page 142: ...e exterior mirror to the bracket and hand tighten the clamping bracket bolts 1 but do not tighten them firmly 2 Fit the connector of the exterior mirror heating 3 Set the mirror to the proper height and angle see Technical data 4 Tighten the clamping bracket bolts 1 5 Fit the cover of the exterior mirror push into place 1 1 1 1 K1 01 095 4 ᓻ 200345 ...

Page 143: ...mirror glass from the top down into the fixing 3 Put the mirror in its required position Removing the wide angle exterior mirror glass dead angle exterior mirror glass 1 Press in the mirror glass on the left hand side 1 2 Push the glass sideways from right to left 2 3 Press in the mirror glass on the right hand side 3 4 Put your fingers in the opening created and now push the mirror from right to ...

Page 144: ...he attachment nut at the top 2 Remove the attachment nut and remove the mirror glass Installing the pavement mirror glass 1 Fit the mirror glass and set the proper angle see chapter Inspection and adjustment 2 Tighten the attachment nut to the specified torque see Technical data 3 Fit the cap of the attachment nut 4 ᓻ 200345 ...

Page 145: ...69 3 Remove the eight attachment bolts at the front of the anti underrun bumper The cross bracket at the rear will also come loose K100368 A Installing the bottom step 1 Fit the bracket against the front of the anti underrun bumper At the same time fit the cross bracket at the rear of the anti underrun bumper 2 Fit the step recess and secure it with the two attachment screws Make sure that the ste...

Page 146: ... 5 Remove the attachment bolts 4 and 5 on the inside of the wheel arch 6 Support the mudguard remove the attachment bolts 6 and take the mudguard off the cab Installing the mudguard 1 Install the mudguard using attachment bolts 6 2 Fit the attachment bolts 4 and 5 on the inside of the wheel arch 3 Fit the attachment bolts 2 and 3 in the steps 4 Fit the attachment bolts 1 of the upper attachment of...

Page 147: ...s the linkage of the windscreen wiper system 6 Remove the attachment bolts 11 of the ends of the windscreen wiper panel 1 7 Remove the cap 9 and remove the attachment bolt 10 8 Remove the covers 4 locknuts 3 and washers 2 9 Remove the caps 6 and the attachment bolts 7 of the handles 8 and remove the handles 10 Take the windscreen wiper panel some distance away from the cab and remove the windscree...

Page 148: ...screen wiper panel 2 Fit the handles 8 with the attachment bolts 7 and press the caps 6 into the handles 3 Fit the washers 2 locknuts 3 and covers 4 Tighten the locknuts 3 to the specified torque See Technical data 4 Fit the attachment bolt 10 and cap 9 5 Fit the attachment bolts 11 to the ends of the windscreen wiper panel 6 Fit the two covers across the linkage of the windscreen wiper system 7 F...

Page 149: ... the seals Use FINA Ceran grease when fitting a new wiper linkage When fitting a new linkage never hit the sealing covers of the linkage with a hammer or other hard object These covers are only 1 mm thick and might suffer damage in this way If the motor spindle shows evidence of axial play replace the motor This play will cause excessive wear to the wiper linkage Removing the windscreen wiper mech...

Page 150: ...hanism Note Apply silicone sealant all round to all threaded holes of the attachment bolts and screws and to the attachment bolts and screws fitted in the cab front The purpose of this is to prevent water from penetrating the cab 1 Fit the wiper linkage and secure it with the attachment bolts 2 Fit the washers locknuts and covers of the windscreen wiper arm spindles Tighten the locknuts to the spe...

Page 151: ... the attachment nut Tighten the attachment nuts to the specified torque See Technical data 6 Connect the windscreen washer hoses and close the windscreen wiper arm covers 7 Operate the windscreen wiper motor and check the windscreen wiper mechanism for proper operation 8 Fit the two covers across the wiper linkage 9 Fit the cab grille 4 ᓻ 200345 ...

Page 152: ...ts of the windscreen wiper motor 5 Using a plastic hammer carefully tap the end of the windscreen wiper motor spindle and take the crank off the motor spindle 6 In the cab remove the dashboard panels to the right of the steering column and the panel underneath the radio panel Note For a RHD vehicle remove the dashboard panels to the left of the steering column K100211 7 Unplug the connectors 1 and...

Page 153: ...t the dashboard panels to the right of the steering column and the panel underneath the radio panel 8 Set the windscreen wiper motor in the neutral position by switching it briefly on and off using the control switch 9 Put the windscreen wiper arms in the neutral position windscreen wipers in horizontal position 10 Fit the crank of the windscreen wiper arms to the windscreen wiper motor spindle an...

Page 154: ...bber seal around the windscreen 2 Apply a filler strip around the rubber seal in the groove where the rubber seal will be around the cab profile 3 Cover the rubber seal with liquid soap 4 Place the rubber seal with glass in the window frame of the cab 5 Using the filler strip pull the rubber seal with glass over the cab profile Press the rubber seal firmly from the outside in the place where the f...

Page 155: ...door ajar you will be able to reach the three attachment screws of the corner piece which are located on the inside of the front door post Installing the corner piece 1 Fit the corner piece by tightening the two attachment bolts at the front until they are fingertight Make sure that the spoiler still has some play 2 Fit the three attachment screws to the inside of the front door post 3 Close the g...

Page 156: ...nside of the plastic corner piece around the headlight 4 Remove the corner piece around the headlight by pulling it from behind the lower grille 5 Mark the position of the connectors on the headlight and unplug them 6 Remove the rubber grommet and the direction indicator plugs 7 Remove the attachment screw at the rear of the direction indicator Unhook the direction indicator from the headlight K1 ...

Page 157: ...tors to the headlight and the plugs to the direction indicator Fit the rubber grommet to the direction indicator 4 Slide the corner piece around the headlight behind the lower grille on the attachment brackets 5 Remove the four attachment bolts on the inside of the plastic corner piece around the headlight and the two attachment bolts on the side of the plastic corner piece around the headlight 6 ...

Page 158: ...s on the inside of the plastic corner piece around the headlight 4 Remove the corner piece around the headlight by pulling it from behind the lower grille 5 Mark the position of the connectors on the headlight and unplug them 6 Detach the headlight wipe wash washer hose plug the hose 7 Cut loose the clamping strips securing all wiring and wiring harnesses to the headlight bracket K1 01 480 8 Remov...

Page 159: ... headlight wipe wash washer 4 Fit the plastic corner piece around the headlight on the brackets behind the lower grille 5 Fasten the plastic corner piece around the headlights using the two attachment bolts on the side of the corner piece around the headlight and the four attachment bolts on the inside of the corner piece around the headlight 6 Tilt the cab to the normal driving position 7 Connect...

Page 160: ...ng it out of the opening in the holder 2 5 Remove the headlight levelling control from the headlight Installing the headlight levelling control 1 Install the headlight levelling control by fitting the adjusting spindle in the holder 2 Carefully push the rubber grommet in the opening of the headlight housing Make sure that the edge of the rubber grommet fits snugly in the opening all round The purp...

Page 161: ...ttachment 1 and remove the gas dampers from the grille 3 Remove the attachment bolts 2 of the grille hinges 4 Remove the cab grille Installing the cab grille 1 Fit the grille and tighten the attachment bolts 2 of the hinges 2 Support the grille in the open position and install the upper gas damper attachment 1 to the grille If applicable use new split pins 3 Close the grille K1 01 516 1 2 4 ᓻ 2003...

Page 162: ... Close the bottom step and remove the lower grille by pulling it upwards from the attachment points K100424 K100425 Installing the lower grille 1 Close the bottom step 2 Install the lower grille Make sure that the steps have been folded in and that the grille is securely fastened against the front by means of the attachment clips 3 Fit the attachment bolts 4 Open the steps and pull the rubber atta...

Page 163: ...e four attachment bolts B on the front of the bumper 4 Remove the bumper K100363 A B B Installing the steel bumper 1 Fit the bumper and hand tighten the two socket head screws on the front of the bumper 2 Fit the four attachment bolts to the inside of the combination lamp installation opening 3 Fit the two remaining attachment bolts 4 Make sure that the bumper is properly aligned with the other pa...

Page 164: ...move the cover panel 2 from the roof hatch 2 Remove the blind hatch 4 3 Remove the screws 5 on the inside of the cab and remove the roof hatch 6 Installing the roof hatch 1 Install the roof hatch 6 2 Install the blind hatch 4 using attachment screws 3 3 Install the cover panel 2 using attachment screws 1 K1 01 503 6 5 3 4 2 1 4 ᓻ 200345 ...

Page 165: ...nterior compartments and interior upholstery 2 Disconnect the electrical connections wiring harnesses 3 Remove the electrical roof hatch 4 Saw off the polyester roof approximately 10 cm from the bottom and remove the roof from the cab 5 Cut through the sealing compound between this edge and the steel cab 6 Break off the polyester edge from the steel cab in pieces 7 Cut away as much of the sealant ...

Page 166: ...fied abrasive see Technical data 3 Clean the sanded surface again with the specified cleaning agent see Technical data 4 Allow the cleaned surface to dry for at least 10 minutes at room temperature 5 Check that the surface to be glued is free of abrasives and other impurities If necessary repeat the cleaning operation 6 Using a brush apply a thin covering layer of the specified primer to the surfa...

Page 167: ...available apply 2 triangular beads of glue to the neck of the pre treated cab drip channel The beads should measure about 8x12 mm wxh Give the spraying nozzle the shape shown in the drawing At approx 10 mm from the top of the front piece apply a triangular bead of glue measuring 8x12 mm wxh After positioning the roof apply a finishing bead of glue to the front of the cab Setting It will take 2 day...

Page 168: ...y carefully cutting the sealant between the polyester roof and the plastic sun visor 2 Remove as much of the sealant remnants as you can from the polyester roof edge Pre treating the plastic sun visor The pre treatment described below guarantees that the entire surface which will come into contact with the glue will be covered with a suitable layer of primer 1 To prevent the sun visor from being f...

Page 169: ... to be glued with thin smooth adhesive tape When taping up the edges of the area to be glued keep in mind the drip channel to be applied later 2 Clean the places to which glue is to be applied with a clean non pilling cloth moistened with the specified cleaning agent see Technical data 3 Lightly sand the surface of the cab front and polyester roof to be glued with the specified abrasive see Techni...

Page 170: ...e shape shown in the drawing 12 mm 8 mm K1 00 721 Apply 3 triangular beads of glue measuring 8x12 mm wxh between the vertical spacer ribs on the polyester roof 4 1 bead at approx 10 mm 3 distance from the bottom of the roof 4 1 bead at approx 10 mm 1 distance from where the top of the sun visor 5 is to be located 1 bead in line with the middle 2 of the sun visor 5 Note Immediately after applying t...

Page 171: ...ment takes place It will take 2 days 48 hours before the glue is entirely set Until then the vehicle must not be driven Sealing the plastic sun visor Apply sealant 3 in the seam between sun visor 1 and polyester roof 2 The sealant 3 at the top should be finished off in the form of a drip channel Seal with the specified sealant See Technical data 3 1 2 3 K1 01 485 4 ᓻ 200345 ...

Page 172: ...n If transparent primer has been used instead of black primer it should be removed entirely Surface condition of the polyester roof The outside of the roof has a gel coating polyester top coat Do not apply a finishing coat to the gluing surface Pre treating the polyester roof 1 Tape up the edges of the area to be glued with thin smooth adhesive tape 2 Those polyester areas which are to be glued sh...

Page 173: ... cloth moistened with the specified cleaning agent see Technical data 3 Then lightly sand the area to be glued with the specified abrasive see Technical data 4 Clean the area to be glued once again with a clean non pilling cloth moistened with the specified cleaning agent see Technical data Allow the cleaned surface to dry for at least 10 minutes at room temperature 5 In places where there is no p...

Page 174: ...are to be glued should be cleaned beforehand with a non pilling clean white cloth moistened with the specified cleaning agent see Technical data and then sanded with the specified abrasive see Technical data The sanded surface should be cleaned once again with the specified cleaning agent and allowed to dry for a minimum of 10 minutes at room temperature Check whether the surface is free of abrasi...

Page 175: ...gain with a clean non pilling cloth moistened with the specified cleaning agent see Technical data Allow the cleaned surface to dry for at least 10 minutes at room temperature 4 Make sure the area to be glued is entirely free from abrasives and other impurities if necessary re clean the area with the specified cleaning agent see Technical data 5 Use a brush to apply a single thin covering layer of...

Page 176: ...closing the vehicle doors Avoid making the vehicle vibrate while the glue is setting as this could cause the window to shift out of place 1 Give the spraying nozzle the shape shown in the drawing 12 mm 8 mm K1 00 721 2 Apply an 8x12 mm wxh bead of glue see illustration in the neck of the window seal Use the specified glue for gluing the plastic window see Technical data 3 Fit the window into the f...

Page 177: ...ng a glue remover make sure this does not come into contact with the area to be glued as this would seriously reduce the quality of the glue bead Setting The glue should set for at least 2 hours at 20_C and 65 relative humidity before any further treatment takes place Sealing the plastic window Apply sealant 3 in the seam between window 1 and polyester roof 2 Seal with the specified sealant See Te...

Page 178: ...1 EXTERNAL CAB COMPONENTS Removal and installation 95XF series 4 52 4 ᓻ 200345 ...

Page 179: ... elements 3 3 0209 4 REMOVAL AND INSTALLATION 4 1 0209 4 1 Removal and installation stabiliser bar 4 1 0209 4 2 Removal and installation cab support silentblock 4 3 0209 4 3 Removal and installation stabiliser bar slide bearing bushes 4 5 0209 4 4 Removal and installation coil spring front suspension 4 7 0209 4 5 Removal and installation front air suspension 4 9 0209 4 6 Removal and installation r...

Page 180: ...1 CAB SUSPENSION Contents 95XF series 2 5 ᓻ 0209 ...

Page 181: ...e by turning the tap to the reverse tilting position When working on a tilted cab for example when welding spray painting or applying bitumen coatings be sure to cover the piston rod of the lifting cylinder Welding spatter and paint on the piston rod will inevitably cause damage to the oil seal Inspection after a collision Before tilting the cab after a collision check the cab rests the cab hinges...

Page 182: ...pend the cab in slings and put a stand in front of the cab Make sure that there is no one in front of the cab while it is being tilted After a collision always check the lifting cylinder for internal damage Replace the lifting cylinder if damaged or if in doubt 5 ᓻ 0209 ...

Page 183: ...d to the chassis with front and rear coil spring elements Depending on the type of cab this suspension may or may not be adjustable There is a stabiliser at the front Air suspension The cab is attached to the chassis with front and rear air suspension The system is equipped with height control valves and anti dive valves The system has a stabiliser at the front At the back the cab is also damped l...

Page 184: ...SPENSION The air suspension consists of an air bellows with an internal shock absorber The system is fitted with height control valves and an electropneumatic valve at the front which is used to disable the height control 8 5 8 6 9 10 11 7 5 4 1 2 3 K100441 5 ᓻ 0209 ...

Page 185: ...side behind front grille 5 Spring element Left and right hand sides under cab front 6 Height control disable valve Front left behind bumper 7 Air reservoir Front left underneath bumper Capacity 7 litres 8 Spring element Left and right hand sides under cab rear 9 Approximation switch In left hand cab lock 10 Air reservoir Central rear of the cab Capacity 7 litres 11 Horizontal damper Left and right...

Page 186: ...16 4 1 CWS A11 B294 K100812 Basic codes Description B294 Valve at front switching off cab suspension height control D758 Diode to prevent feedback CWS D759 Diode to prevent feedback to brake lights D722 Diode to prevent feedback CTE E030 Fuse brake lights 10A E013 Fuse horn 10A G036 Brake light relay G297 Cab air suspension relay F616 Cab locking sensor E511 Brake light control switch 5 ᓻ 0209 ...

Page 187: ...he height control to block connection between the height control valve and the cab air suspension is interrupted The height control is also blocked if relay G297 is activated This situation occurs when the cab is tilted switch F616 is closed Pneumatic diagram of cab air suspension 1 7 ltr 7 ltr B 294 1 K100382 A B 5 ᓻ 0209 ...

Page 188: ...SUSPENSION General 95XF series 2 6 2 3 SECTIONAL DRAWING OF AIR SUSPENSION ELEMENT 1 Attachment eye 2 Rebound rubber 3 Piston rod 4 Flange seam seal 5 Sealing ring 6 Rod guides 1 2 3 4 5 6 K1 01 451 5 ᓻ 0209 ...

Page 189: ...ral position may be different Note Ensure that the vehicle is standing on a level and horizontal surface On vehicles with air suspension make sure that the system is at maximum service pressure and that the vehicle is at normal driving height If the cab floor is not parallel with the chassis the suspension must be adjusted Inspecting and adjusting front cab suspension 1 Remove the lower grille 2 M...

Page 190: ... adjusting rear cab suspension 1 Measure distance B at the rear between the top of the bracket and the centre of the upper attachment bolt K100814 B 2 If necessary adjust the spring elements by turning the ring 1 For the setting value see Technical Data K1 00 702 1 5 ᓻ 0209 ...

Page 191: ...ng the height control valve 3 Then allow the height control valve to raise the cab to the proper height and measure distance A between the top of the cross beam and the bottom of the stabiliser 4 Correct the height by changing the length of the control rod or by shifting the height control valve depending on the version For the setting value see Technical Data Note The air bellows must be vented b...

Page 192: ...ol valve to raise the cab to the proper height and measure distance B between the top of the bracket and the centre of the attachment bolt 4 If this height must be adjusted loosen the attachment bolts of the height control valve After this the height can be adjusted by changing the position of the valve For the setting value see Technical Data Note The air bellows must be vented before each new me...

Page 193: ...only applies to air suspension elements 4 Remove the pipes to allow grease lubrication 5 Remove the grease lubrication connection nipple 1 6 Using a drop stamp remove the sealing plug 2 7 Remove the locating bolt 3 from the silentblock 4 8 Remove the locking bolt at the front of the stabiliser bar 9 Remove the cab bearing pin 5 at the front 10 Remove the stabiliser bar Installing the stabiliser ba...

Page 194: ...n such a way as to be able to install the cab bearing pin While installing ensure that the recess in the bearing pin aligns with the opening in the locking bolt 5 Fit the locking bolt 6 Fit the sealing plug using a plastic hammer 7 Fit the grease lubrication connection nipple 8 Connect the grease lubrication pipes 9 Carefully tilt the cab back 10 Fit the cab grille lower grille and the corner piec...

Page 195: ...OCK When working on the cab suspension provide extra supports for the cab to avoid the risk of being trapped Removing cab support silentblock 1 Remove the stabiliser bar 2 Remove the cab support s of the chassis 3 Using the special tool DAF no 1329401 push the silentblock out of the support K100557 5 ᓻ 0209 ...

Page 196: ... cab support silentblock 1 Using the special tool DAF no 1329401 push the silentblock into of the support s 2 Fit the support to the chassis and tighten the attachment bolts to the specified tightening torque See Technical data 3 Fit the stabiliser bar K100558 5 ᓻ 0209 ...

Page 197: ...NG BUSHES When working on the cab suspension provide extra supports for the cab to avoid the risk of being trapped Removing the stabiliser bar slide bearing bushes 1 Remove the stabiliser bar 2 Remove both slide bearing bushes A and sealing rings B by tapping them out of the stabiliser bar K100819 A A B B 5 ᓻ 0209 ...

Page 198: ...emoval and installation 95XF series 4 6 Installing the stabiliser bar slide bearing bushes 1 Use the special tool DAF no 1240493 to fit the slide bearing bushes and sealing rings 2 Fit the stabiliser bar K100415 5 ᓻ 0209 ...

Page 199: ... Lift the cab at the front in such a way as to make it possible to remove the cab bearing pin 3 Remove the pipe to allow grease lubrication 4 Remove the grease lubrication connection nipple 1 5 Using a drop stamp remove the sealing plug 2 6 Remove the locking bolt at the front of the stabiliser bar 7 Remove the cab bearing pin 5 at the front Make sure that the stabiliser bar cannot rotate 8 Detach...

Page 200: ...ension element together in such a way as to be able to install the cab bearing pin While installing ensure that the recess in the bearing pin aligns with the opening in the locking bolt 3 Fit the locking bolt for the cab bearing pin 4 Fit the sealing plug using a plastic hammer 5 Fit the grease lubrication connection nipple 6 Connect the grease lubrication hose 7 Carefully lower the cab 8 Fit the ...

Page 201: ...n such a way as to make it possible to remove the cab bearing pin 4 Remove the pipe to allow grease lubrication 5 Remove the grease lubrication connection nipple 1 6 Using a drop stamp remove the sealing plug 2 7 Remove the locking bolt at the front of the stabiliser bar 8 Remove the cab bearing pin 5 at the front Make sure that the stabiliser bar cannot rotate 9 Remove the air pipe from the air s...

Page 202: ...to be able to install the cab bearing pin While installing ensure that the recess in the bearing pin aligns with the opening in the locking bolt 3 Fit the locking bolt for the cab bearing pin 4 Fit the sealing plug using a plastic hammer 5 Fit the grease lubrication connection nipple 6 Connect the grease lubrication hose 7 Connect the air pipe to the air suspension element 8 Carefully lower the ca...

Page 203: ...g element by loosening the attachment bolt A a few turns and loosening attachment bolt B and attachment nut C Installing rear coil spring suspension 1 Fit the coil spring element and hand tighten the attachment bolts and nut 2 Tilt the cab back to the normal driving position 3 Tighten the attachment bolts and nut to the specified tightening torque see Technical data K1 01 450 B A C 5 ᓻ 0209 ...

Page 204: ...pension element by loosening the attachment bolt A a few turns and loosening attachment bolt B and attachment nut C Installing rear air suspension 1 Fit the air suspension element and hand tighten the attachment bolts and nut 2 Connect the air pipe to the air suspension element 3 Tilt the cab back to the driving position 4 Tighten the attachment bolts and nut to the specified tightening torque see...

Page 205: ... approximation switch connector C at the right hand side 5 Remove the hydraulic line D and plug it Collect any oil flowing out of the system 6 Remove the attachment bolts A and B 7 Remove the cab lock Installing cab lock mechanism 1 Install the cab lock and hand tighten the attachment bolts 2 Connect the connector C and fit the hydraulic line D 3 Carefully tilt the cab back to the normal driving p...

Page 206: ...the coolant 7 Remove the heater hoses at the connector pipes 8 Tilt the cab forwards 9 Remove the lower grille and the two side spoilers around the headlights 10 Remove the steering column joint from the steering box and tie it up 11 Remove the throttle cable 12 Disconnect the tachograph cable from the gearbox and tie the cable to the cab 13 Remove the engine noise insulation underneath the cab an...

Page 207: ...ve the lifting cylinder at the bottom of the cab 22 Remove the door rubbers from the seal on the left hand and right hand sides to install the lifting yoke 23 Install the lifting yoke special tool DAF no 1329438 with filling 24 Hang the cab in the lifting yoke in such a way as to provide sufficient support for the cab 25 Remove the lower attachment points of the front suspension 26 Remove the fron...

Page 208: ...Tighten the attachment bolts to the specified tightening torque see Technical data 8 Tilt the cab forwards 9 Tighten the upper attachment bolts of the lifting cylinder to the specified tightening torque See Technical data K100417 F G H J K 10 Fit the universal joint on the splines of the steering shaft or steering box Line up the groove A in the clutch with mark B on the steering shaft or steering...

Page 209: ... dirt enters the pipes during assembly 19 In the case of an MGS shift control fit the attachment bolts at the bottom of the rocker strip and tighten them 20 Install the engine noise insulation underneath the cab 21 Tilt the cab back to the driving position 22 Install the roof hatch rim and the roof hatch glass 23 Fit the door rubbers to the left and right 24 Fill and bleed the clutch main cylinder...

Page 210: ...1 CAB SUSPENSION Removal and installation 95XF series 4 18 5 ᓻ 0209 ...

Page 211: ...on and adjustment pressure limiting valve of cab tilting pump 3 2 0209 4 REMOVAL AND INSTALLATION 4 1 0209 4 1 Removal and installation cab tilting pump 4 1 0209 4 2 Removal and installation lifting cylinder 4 2 0209 4 3 Removal and installation cab tilting pump seals 4 4 0209 4 4 Removal and installation two way valve of cab tilting pump 4 7 0209 5 DISASSEMBLY AND ASSEMBLY 5 1 0209 5 1 Disassembl...

Page 212: ...1 CAB TILTING MECHANISM Contents 95XF series 2 6 ᓻ 0209 ...

Page 213: ...ilted cab for example when welding spray painting or applying bitumen coatings be sure to cover the piston rod of the lifting cylinder Welding spatter and paint on the piston rod will inevitably cause damage to the oil seal Inspection after a collision Before tilting the cab after a collision check the cab rests the cab hinges and the attachment of the lifting cylinder to the chassis member and ca...

Page 214: ...ting cylinder for internal damage Replace the lifting cylinder if damaged or if in doubt Always replace the cylinder if one of the following points has occurred during a collision A the cab has been pulled out of the cab locks B the cab locks have been deformed or damaged C the rear springs have been deformed or damaged 6 ᓻ 0209 ...

Page 215: ...tand in front of the cab After a collision always check the lifting cylinder for internal damage Tilting the cab Make sure there are no people immediately in front of the cab Make sure there is sufficient clearance around the cab Make sure there are no loose objects inside the cab Apply the parking brake Move the gear lever to the neutral position and turn off the engine Close the doors Turn the t...

Page 216: ...eath the piston of the lifting cylinder 3 The pressure in the pipes drops at the end of each pump stroke As a result the non return valve 5 closes In spite of the fact that the oil pressure above and below the cylinder piston is the same the cylinder is pumped out so that the cab is tilted This differential mechanism is based on the effect of pressure on two different surfaces The resulting force ...

Page 217: ...e lifting cylinder opens oil can flow back into the pump reservoir from the return side of the lifting cylinder 3 The cab can therefore only be tilted back when pressure has built up in the pump The pressure in the pump and the pipes drops at the end of each pump stroke The non return valve now closes The cab will fall downwards on its own a few centimetres before it is completely secured in the l...

Page 218: ...and may differ from the actual situation 1 4 5 11 12 13 14 15 16 10 17 6 18 19 8 9 7 3 2 K1 01 500 Legend 1 Two way valve 2 O ring 3 Teflon ring 4 Filler plug 5 O ring 6 Pin 7 Holder 8 Gasket 9 Reservoir 10 Pump housing 11 Magnet 12 Filter 13 Notched pin 14 Inlet ball 15 O ring 16 Ring 17 Torx bolt 18 Lever 19 O ring 6 ᓻ 0209 ...

Page 219: ... CYLINDER Legend 1 Dirt scraper 2 Circlip 3 U cup 4 Upper bearing 5 O ring 6 Stop ring 7 Piston 8 O ring 9 O ring 10 Circlip 11 Non return valve seat 12 Ring 13 O ring 14 Non return valve 15 O ring 16 Seal 17 Coupling 18 Coupling 19 Plastic ring 20 Plastic ring K100127 6 ᓻ 0209 ...

Page 220: ...1 CAB TILTING MECHANISM General 95XF series 2 6 6 ᓻ 0209 ...

Page 221: ...AND ADJUSTMENT 3 1 INSPECTING TILTING MECHANISM 1 Check all pipes and connections for any leakage 2 Check the cab tilting pump for leaks 3 Check the lifting cylinder and the cab locks for leaks Note A defective cab tilting mechanism is often the result of contaminated oil 6 ᓻ 0209 ...

Page 222: ...ure gauge with a range of no less than 600 bar to connection 1 3 Bleed the pressure gauge hose 4 Check the oil level in the pump Note Never check the oil level nor fill the oil reservoir with the cab in tilted position 5 Put the two way valve of the cab tilting pump in the lowering position Operate the pump If the measured pressure does not match the specified pressure see Technical data the press...

Page 223: ... range of no less than 600 bar to connection 1 3 Bleed the pressure gauge hose 4 Check the oil level in the pump Note Never check the oil level nor fill the oil reservoir with the cab in tilted position 5 Remove filler plug 2 and put the two way valve of the cab tilting pump in the lowering position Operate the pump and using an appropriate screw driver set the pressure limiting valve in the plung...

Page 224: ...1 CAB TILTING MECHANISM Inspection and adjustment 95XF series 3 4 6 ᓻ 0209 ...

Page 225: ...iner 1 2 3 A B C K1 01 456 Installing cab tilting pump Note Use Teflon tape when fitting the pipes to the nipples Caution Do not use the Teflon tape on the first turn of the nipple thread This is to prevent contamination of the system with Teflon tape 1 Fit the pump insert the sealing rings 3 between the pump and the bracket and fit the attachment bolts 2 2 Connect the pipes A pressure pipe thick ...

Page 226: ...hassis and remove the lifting cylinder 4 Remove the attachment bracket 1 of the lifting cylinder 4 by forcing the pin 2 out of the bracket using a press 1 4 2 3 K1 01 454 Installing lifting cylinder Note Use Teflon tape when fitting the pipes to the nipples Caution Do not use the Teflon tape on the first turn of the nipple thread This is to prevent contamination of the system with Teflon tape 1 Ap...

Page 227: ...ghten the attachment bolt to the specified tightening torque see Technical data 3 Fit the attachment bolts of the attachment bracket at the top of the lifting cylinder Tighten the attachment bolts to the specified tightening torque see Technical Data 4 Connect the pipes 5 For filling and bleeding the system see Draining and filling 6 ᓻ 0209 ...

Page 228: ...s chapter A defective cab tilting mechanism is often due to improper disassembly and or assembly of the cab tilting pump Clean the cab tilting pump on the outside Work in a clean environment Removing cab tilting pump seals 1 Remove the cab tilting pump 2 Release the 4 Torx screws used to attach the reservoir to the pump housing Collect the oil in a container K100136 3 Take the pump housing off the...

Page 229: ...ump housing 5 Secure the pump housing in a vice as shown in the opposite figure and carefully tap the pin out of the holder and lever axle K1 01 499 6 Remove the holder and the lever axle Remove the O ring from the lever axle K100139 7 Clean the reservoir filter magnet and mating surfaces of the gasket 6 ᓻ 0209 ...

Page 230: ...ver axle 2 Fit the holder to the lever axle Tap the pin into its holder and the lever axle Secure the pin as shown in the opposite figure K1 01 498 3 Fit the filter and the magnet to the pump housing 4 Fit the reservoir with a new gasket to the pump housing using the 4 Torx bolts K100137 5 Install the cab tilting pump 6 ᓻ 0209 ...

Page 231: ...lting pump Clean the cab tilting pump on the outside Work in a clean environment Removing two way valve of cab tilting pump 1 Remove the cab tilting pump 2 Tap the notched pin out of the two way valve and remove the steel ring Take the O ring out of the steel ring K1 01 340 3 Secure the pump housing in a vice as shown in the opposite figure and carefully tap the two way valve with the sealing plug...

Page 232: ...LTING MECHANISM Removal and installation 95XF series 4 8 4 Take the pump housing from the vice and remove the inlet ball K1 01 497 5 Remove the O ring and the Teflon ring from the pump housing k100144 6 ᓻ 0209 ...

Page 233: ...g valve must be checked adjusted See Inspection and adjustment 1 Fit the new O ring and the Teflon ring in the pump housing 2 Fit the new inlet ball 3 Lightly oil the new two way valve Fit the new two way valve and the sealing plug in the housing Make sure the holes in the two way valve and the connections in the housing are well positioned 4 Fit a new O ring in the steel ring Fit the steel ring o...

Page 234: ...1 CAB TILTING MECHANISM Removal and installation 95XF series 4 10 6 ᓻ 0209 ...

Page 235: ...s have to be reused Before disassembly clean the lifting cylinder on the outside Work in a clean environment A defective lifting cylinder is often caused by leaking oil seals or a damaged piston rod Never use compressed air to force the piston rod into or out of the lifting cylinder This would involve the risk of the piston moving into or out of the lifting cylinder in an uncontrolled manner Disas...

Page 236: ...clip has been removed from the lifting cylinder 3 Bleed the lifting cylinder by pumping out the piston rod completely Now turn the lifting cylinder upside down connections facing upwards Pump the piston rod 15 centimetres inwards Now turn the lifting cylinder round again 4 Pump the piston rod out approximately 10 mm from the end 5 Tap the upper bearing of the piston rod 5 to 10 mm back Make sure t...

Page 237: ... carefully completely out of the cylinder Collect the outflowing oil in a container K100150 7 Remove the circlip from the piston rod and remove the piston and the O ring underneath K100151 8 Tap the stop ring slightly back and remove the circlip underneath Remove the stop ring and the top bearing from the piston rod K100152 6 ᓻ 0209 ...

Page 238: ... return valve from the cylinder using a 17mm hexagonal socket K1 01 344 10 Thoroughly clean all parts Note Check that the piston piston rod and the inside of the cylinder are neither scratched nor damaged If one of these parts is damaged replace the entire lifting cylinder 6 ᓻ 0209 ...

Page 239: ... see Technical data 1 2 3 A B 4 5 6 K1 01 345 Note The components marked in the figure form part of the reconditioning kit 13 3 Slide the new dirt scraper A over the piston rod 4 Slide the new circlip 12 over the piston rod 5 Slide the new brass upper bearing B over the piston rod as shown 6 Slide the new stop ring 5 over the piston rod ensuring that the tapered side fits into the upper bearing 7 ...

Page 240: ...the circlip is properly seated in the groove This also puts the upper bearing in its final position 14 Apply a thin film of oil to the piston rod and the inside of the cylinder 15 Turn the cylinder upside down and press the piston rod into the cylinder using the cab tilting pump Add another twenty pump strokes when the piston has been fully pressed into the cylinder to bleed the cylinder 16 Press ...

Page 241: ...emove the filler plug and put the pump plunger into the lowest position by completely moving downward the pump actuating rod 2 Top up the reservoir with oil see specification manual Fluids and lubricants to the top of the pump plunger Bleeding tilting mechanism Note The cab must be tilted completely back into place 1 Start with approx 30 full pump strokes while leaving the two way valve in the low...

Page 242: ...filler plug 3 Turn the two way valve into the tilting position and start pumping until this is clearly getting heavier 4 Put the pump plunger into the lowest position by completely moving downward the pump actuating rod 5 Top up the reservoir with oil see specification manual Fluids and lubricants to the top of the pump plunger 6 Fit the filler plug and set the two way valve into the lowering posi...

Page 243: ... mechanism 4 8 0209 4 13 Removal and installation seat belt lock 4 9 0209 4 14 Removal and installation backrest air cushions IPS system 4 9 0209 4 15 Removal and installation heating elements 4 10 0209 4 16 Removal and installation manifold 4 11 0209 4 17 Removal and installation height control valve 4 11 0209 4 18 Removal and installation height adjustment valve 4 12 0209 4 19 Removal and instal...

Page 244: ...1 SEATS Contents 95XF series 2 7 ᓻ 0209 ...

Page 245: ...mechanism must be replaced even if no damage can be observed Always check the seat attachments for any fractures or cracks after a collision After a collision always check whether the seat slide and seat attachment bolts have been subjected to excessive stress If in doubt replace them Do not use abrasive cleaning agents to clean the seat belts these may damage the seat belt material 7 ᓻ 0209 ...

Page 246: ...1 SEATS Safety instructions 95XF series 1 2 7 ᓻ 0209 ...

Page 247: ...seat if the back rest has been fully folded forwards It is necessary however to restore routing of the air pipes and cables and their connections to the original positions Also keep to the proper colour position when installing the air pipes Air pipes and cables must not be kinked In the case of transport and storage ensure that the seat is placed on its longitudinal slides Air pipes must not be k...

Page 248: ...end A Back rest adjuster B Operating buttons of IPS system C Height adjustment D Seat tilting adjuster E Vertical damping adjuster F Rapid lowering handle G Seat position adjuster H Seat heating I Seat squab adjuster K100350 A B C D E F I H G 7 ᓻ 0209 ...

Page 249: ... PLATE OF SEAT The serial number A and the DAF part number of the seat are stated on the type plate located at the front of the seat underneath the dust boot The DAF part number is also located on the label at the side of the seat K100483 A 7 ᓻ 0209 ...

Page 250: ...P 25 13 16 18 27 26 28 17 14 12 5 4 8 7 6 3 E 19 9 10 11 1 2 K100482 Legend A Rapid lowering valve B Control unit of the level control valve C Switch valve D Height control valve E Level control valve F Adjustment cylinder G Air bellows H IPS Integrated Pneumatic System Rd Red Gr Grey Bl Black Br Brown 7 ᓻ 0209 ...

Page 251: ...r suspension brown from height control valve E12 to air suspension G18 Quick release valve bottom button brown from air suspension G18 to pressure relief valve A19 Pressurising the air suspension during use grey from height control valve E13 to cab Colours and functions of the height control air pipes Seat up brown from control valve D9 to switch valve C5 switch valve C8 adjustment cylinder F16 Se...

Page 252: ...neral 95XF series 2 6 2 4 OVERVIEW DRAWING HIGH LUXURY MODEL ISRI 6800 K100484 81 80 60 63 67 70 75 47 50 51 55 17 10 45 65 13 6 8 25 23 14 26 52 22 24 27 5 7 11 12 16 9 20 19 18 21 15 29 17 46 44 40 43 7 ᓻ 0209 ...

Page 253: ...elease valve assembly 20 Tilting control button 21 Height control knob 22 Shock absorber assembly 23 Air suspension assembly 24 Control disc assembly 25 Adjustment cylinder assembly 26 Or element complete 27 Level control valve assembly 28 Connections air pipes not shown 29 Button back and switch buttons for LWS IPS 40 43 Backrest assembly 44 Seat belt cover 45 Seat belt lock without contact switc...

Page 254: ...1 SEATS General 95XF series 2 8 2 5 OVERVIEW DRAWING LUXURY MODEL ISRI 6800 K100485 60 67 65 45 13 17 26 10 6 8 14 5 7 9 17 27 11 29 21 20 46 47 40 44 7 ᓻ 0209 ...

Page 255: ...ide covers 14 Front cover 17 Back rest adjuster Y section if any not shown 20 Tilting control button 21 Height control knob 26 Gas spring with mounting material 27 Adjuster cable assembly 29 Button back 40 Backrest assembly 44 Seat belt cover 45 Seat belt lock without contact switch 46 3 point seat belt 47 Backrest cover 60 Seat cushion assembly 65 Seat cushion adjuster 67 Seat cushion cover 7 ᓻ 0...

Page 256: ...1 SEATS General 95XF series 2 10 2 6 OVERVIEW DRAWING STANDARD MODEL ISRI 6800 K100486 47 48 40 41 44 46 15 16 17 29 11 5 7 14 6 8 13 45 17 80 81 7 ᓻ 0209 ...

Page 257: ...usin guides 11 13 Side covers 14 Front cover 15 16 Seat cushion cover 17 Back rest adjuster Y section if any not shown 29 Control button back 40 41 Backrest assembly 44 Seat belt cover 45 Seat belt lock without contact switch 46 3 point seat belt 47 48 Backrest cover 80 81 Arm rests 7 ᓻ 0209 ...

Page 258: ...1 SEATS General 95XF series 2 12 7 ᓻ 0209 ...

Page 259: ...TION AND ADJUSTMENT 3 1 INSPECTION SEAT BELT OPERATION Pull the belt quickly out of its retracting unit to test the locking action The belt must lock It must not be possible to pull the belt out any further after locking Check the seat belts for wear ᓻ 0209 7 ...

Page 260: ...1 SEATS Inspection and adjustment 95XF series 3 2 7 ᓻ 0209 ...

Page 261: ...if applicable K100412 3 Slide the seat backwards and remove the front screws 1 4 Slide the seat forwards and remove the rear screws 2 Installing seat assembly 1 Place the seat on the ground plate Make sure that the air piping does not get pinched off Slide the seat backwards and tighten the front screws 1 2 Slide the seat forwards and tighten the back screws 2 3 Connect the air pipe 4 Install the ...

Page 262: ...ontmost position only for models with seat squab adjustment SKTE 2 Remove the electric wiring from models with heated seats 3 Push the control lever 1 up with a screwdriver insert the screwdriver between frame X and the lever 4 Pull the seat cushion forwards and up Installing seat squab 1 Slide the seat cushion approx 20 cm into the guides at the back 2 At the same time push the front of the seat ...

Page 263: ...ing dust boot 1 Remove the entire seat 2 Remove the seat squab 3 Remove the side cover on control side and the opposite side 4 Release the attachment caps 1 and clamps 2 and 3 5 Remove the seat belt mechanism and pull the rubber boot over it 6 Pull the rubber boot over the controls and remove them through the bottom Installing dust boot 1 Install the rubber bellows 2 Fit the seat belt mechanism 3 ...

Page 264: ...move the air pipes from the LWS IPS valve 5 Installing cover panel on control side 1 Connect the air pipes of the LSW IPS valve 5 2 Fit the screws 1 2 and 3 3 Fit the backrest adjuster button 4 Fit the seat squab K100492 2 3 3 5 1 3 4 4 7 REMOVAL AND INSTALLATION SIDE COVER PANEL Removing side cover panel 1 Remove the seat squab 2 Remove the screws 2 3 and 1 Installing side cover panel 1 Fit the s...

Page 265: ...nel 1 Remove the seat squab 2 Remove the screws 1 and 2 3 Remove the plug connection at the back from the side cover and remove the plug 3 from the heater switch 4 4 Remove the switch 4 Installing front cover panel 1 Install the switch 4 2 Connect the plug 3 3 Fit the screws 4 Fit the seat squab K100494 1 2 4 3 7 ᓻ 0209 ...

Page 266: ...ntrol side 2 Remove the attachment bolt 1 from the seat belt attachment plate 2 and remove the screws 3 from the cover 3 Pull the seat belt 2 through the opening 4 Installing seat belt guide panel 1 Guide the seat belt 2 through the opening 4 2 Tighten the seat belt mounting plate 2 to the specified tightening torque see Technical data K100495 4 3 2 1 7 ᓻ 0209 ...

Page 267: ...ontrol side without disconnecting the air hoses from the IPS valve 3 Remove screw 7 from the seat belt mounting bracket and screw 8 from the seat belt roll 4 Remove the rubber air hoses 4 connection is underneath the seat belt roll holder and the electric plug connector 5 if applicable Installing backrest 1 Install the backrest in the closed position into the frame and secure it to the specified t...

Page 268: ...anel on control side without disconnecting the air hoses from the IPS valve 2 Remove the cover 1 3 Remove the screw 2 from the mounting plate 3 4 Remove the screw 4 from the seat belt roll 5 Remove the screw 5 from the lower seat belt mount Installing seat belt mechanism 1 Install the seat belt mounts and tighten them to the specified tightening torque see Technical data 2 Fit the seat belt roll h...

Page 269: ...S IPS SYSTEM Removing backrest air cushions IPS system 1 Carefully remove part of the backrest cover and slide it more than halfway upwards 2 Remove the four screws 6 IPS model only 3 Carefully remove the shaped foam at the bottom of the frame 4 Remove the pipes 1 located underneath the seat belt roll holder 5 Remove the two clips 2 and remove the air reservoir s 3 6 Remove the side air reservoirs...

Page 270: ...cover up as far as the white loop for the padding thread without removing the backrest cover 2 Carefully remove the heating element 2 from the shaped foam use a knife if necessary Installing seat squab heating element 1 Install a new heating element 1 and secure it with double sided adhesive tape 2 Connect the connector 3 of the heating element 1 3 Fit the upholstery Installing backrest heating el...

Page 271: ... manifold 1 Connect the air pipes to the manifold 2 Put the seat squab in the highest tilting position 3 Fit the manifold 4 Install the rubber bellows 5 Fit the seat squab K100503 2 1 4 17 REMOVAL AND INSTALLATION HEIGHT CONTROL VALVE Removing height control valve 1 Remove the seat squab 2 Remove the screws 2 3 Disconnect the air pipes from the height control valve 1 Installing height control valv...

Page 272: ... screws 1 3 Fit the seat squab K100505 1 2 4 19 REMOVAL AND INSTALLATION RAPID LOWERING HANDLE Removing rapid lowering handle 1 Remove the seat squab 2 Cut the air pipes of the rapid lowering control handle according to size X X 130 3 Remove the side cover on control side 4 Slightly loosen the screw 2 5 Remove the screws 3 from the rapid lowering handle and remove the handle along the upper side I...

Page 273: ...t disconnecting the air pipes from the valves 3 Remove the screws 1 4 Remove the shock absorber cable remove the lock ring 2 in the lowest position of the system and kink the cable from its holder 6 when the system is in the highest position Installing vertical damping adjuster 1 Install the combined cable and mounting plate assembly 3 and the control handle through the opening in the rubber bello...

Page 274: ...connection piece 2 Note the position of the small slot X when fitting the new connection piece 2 3 Fit the springs 1 and 4 4 Fit the seat squab K100508 1 X 2 3 4 4 22 REMOVAL AND INSTALLATION HEIGHT ADJUSTMENT HANDLE Removing height adjustment handle 1 Remove the seat squab 2 If necessary remove the side covers without disconnecting the air pipes from the valves 3 Remove the screw 1 and the plasti...

Page 275: ...Remove the seat squab 2 Remove the side cover without disconnecting the pipes from the valve 3 Remove the stop 1 after which the adjustment cable 2 can be lifted 4 Remove the upper plate 3 by pushing it out at position Y and pulling it from the frame 5 Remove the handle 4 6 Remove the plastic connection piece 5 Installing height adjustment handle 1 Fit the plastic connection piece 5 Note the posit...

Page 276: ...can be removed 7 Loosen the screw 7 of the backrest adjuster and remove it 8 Push the tooth segment assembly from the bracket 9 until the wire 10 can be removed Installing backrest adjuster without Y section 1 Fit the adjuster together with the wire 10 on one side 2 Fit the wire 10 into the tooth segment assembly at the other side 3 Insert the screw 7 into the backrest adjuster 4 Lift the spring 6...

Page 277: ...oupling piece 9 Push the tooth segment assembly from the bracket 9 until the pull rod 10 can be removed 10 Remove the tooth segment 8 combination together with the bracket 9 from the seat in downward direction Installing backrest adjuster with Y section 1 Fit the adjuster together with the pull rod 10 on either side of the seat 2 Fit the coupling piece of the pull rod 10 together and tighten the c...

Page 278: ...er on control side 4 Fit the seat squab K100510 2 1 3 4 26 REMOVAL AND INSTALLATION AIR BELLOWS Removing air bellows 1 Remove the entire seat 2 Remove the seat squab 3 Remove the clamping strip 1 by cutting it 4 Disconnect the air pipe 2 from the manifold 3 5 Unscrew the screws 4 and 5 to be able to remove the air bellows including the air pipe Installing air bellows 1 Install the air bellows 6 In...

Page 279: ...lates that hold the cylinder apart and remove the adjustment cylinder Installing adjustment cylinder 1 Push the metal plates that hold the cylinder apart and insert the adjustment cylinder 2 2 Install the retainer pin 4 3 Connect the air pipes 1 and 3 to the adjustment cylinder 4 Tighten the screw 5 slightly during installation 5 Release the lock and operate the height adjustment button upwards Ch...

Page 280: ... pin 4 5 Loosen the screw 5 slightly and push the holder 6 of the control discs 7 a little apart This makes it possible to pull the control discs from the adjustment cylinder 8 The guide plate 9 must remain attached to the pin 10 Push the ball 11 back onto the pin 10 if it has come loose Installing control unit of height control valve 1 Tighten the screw 5 slightly during installation 2 Operate th...

Page 281: ...he front and remove the locking ring 3 Installing vertical damper 1 Fit the damper and use the locking ring 3 to secure it at the bottom 2 Release the lock 3 Install the locking ring 1 4 Place the seat in the frontmost and lowest position and install the locking ring 2 5 Before installing the seat squab set the damping cable 5 in such a way as to achieve the stiffest damping when the control handl...

Page 282: ...or towards one another 2 Then tighten the Bowden cable using the check nut K100517 1 2 4 31 REMOVAL AND INSTALLATION FIXED SEAT GAS DAMPER Removing fixed seat gas damper 1 Remove the seat squab 2 Place the seat in its lowest position 3 Remove the stop 1 and Bowden cable 2 making sure not to operate the button 4 Release attachment nuts 3 and 4 5 Pull the chair upwards ejecting the gas spring from i...

Page 283: ... SEATS 4 23 4 32 REMOVAL AND INSTALLATION SEAT SQUAB COVER At the positions marked with an X the covers are attached to the shaped foam with Velcro fastener Removing seat squab cover 1 Remove the seat squab K100497 A 4 X X 2 3 A 1 7 ᓻ 0209 ...

Page 284: ...18 5 2 1 3 4 3 Carefully remove the cover little by little from the shaped foam At the same time hold the Velcro fastener in the shaped foam pushing it down to prevent it from being torn loose Installing seat squab cover 1 Fit the cover in such a way that the Velcro fastener is in the correct position and use the clips to secure the cover K100519 7 ᓻ 0209 ...

Page 285: ...oval and installation SEATS 4 25 4 33 REMOVAL AND INSTALLATION BACKREST COVER Removing backrest cover 1 Remove the seat belt guide panel 2 Remove the cover by unhooking it from the section at the bottom K100520 7 ᓻ 0209 ...

Page 286: ...shaped foam At the same time hold the Velcro fastener in the shaped foam pushing it down to prevent it from being torn loose Installing backrest cover 1 Fit the cover in such a way that the Velcro fastener is in the correct position and secure the cover in the profile at the bottom K100521 K100522 7 ᓻ 0209 ...

Page 287: ... 1 0209 3 2 Removal and installation rear air foils 3 2 0209 3 3 Removal and installation side skirts and catwalk 3 3 0209 3 4 Removal and installation corner spoiler 3 4 0209 3 5 Removal and installation windscreen sun visor 3 4 0209 3 6 Removal and installation air dam 3 5 0209 3 7 Removal and installation combi light 3 5 0209 3 8 Removal and installation roof spotlights 3 6 0209 3 9 Removal and...

Page 288: ...1 ACCESSORIES Contents 95XF series 2 8 ᓻ 0209 ...

Page 289: ...r of the cab The cab locks are opened hydraulically during pumping Before tilting the cab make sure that the doors are closed that there are no loose items in the cab and that the gear lever is in neutral Tilt the cab fully forward if work must be carried out underneath the cab You can stop the cab tilting forward at any time by turning the tap to the reverse tilting position 8 ᓻ 0209 ...

Page 290: ...1 ACCESSORIES Safety instructions 95XF series 1 2 8 ᓻ 0209 ...

Page 291: ...semi trailer 2 Determine the centreline of the vehicle and put a slat on the superstructure roof protruding into the cab direction 3 Put another slat as a tangent onto the outer roof spoiler edge P pointing into the direction of the superstructure 4 Both slats should cross at half the distance 1 2 X between the roof spoiler edge and the start of the superstructure The roof spoiler height can be ad...

Page 292: ...200 1110 220 33 33 57 600 A G H A A E D B F C C A K100474 XL CAB Legend A Roof spoiler B Cable duct for rotating light C Hose duct for air horn D Cable duct for satellite aerial E Mounting position for mobile phone aerial F Radio aerial standard G Cable duct for CB aerial H Cable duct for roof spotlights Reverse for RHD models 8 ᓻ 0209 ...

Page 293: ...600 A G H A A E D B F C C A K100475 XH CAB Legend A Roof spoiler B Cable duct for rotating light C Hose duct for air horn D Cable duct for satellite aerial E Mounting position for mobile phone aerial F Radio aerial standard G Cable duct for CB aerial H Cable duct for roof spotlights Reverse for RHD models 8 ᓻ 0209 ...

Page 294: ...1 ACCESSORIES Inspection and adjustment 95XF series 2 4 8 ᓻ 0209 ...

Page 295: ...oof 2 Fit the attachment nuts of the lower frame on the studs in the cab roof and tighten the nuts to the specified tightening torque See Technical data Removing roof spoiler 1 Remove the attachment nuts of the roof spoiler and the roof spoiler extension 2 Take the complete roof spoiler with roof spoiler extension from the cab roof Installing roof spoiler 1 Fit the entire roof spoiler with roof sp...

Page 296: ...ry remove the roof spoiler extension 1 of the aerodynamic roof spoiler by removing the attachment bolts and nuts Installing rear air foils 1 Using the attachment bolts fit the rear air foils 4 and the lower extension pieces 5 to the cab rear and tighten the attachment bolts to the specified tightening torque see Technical data 2 If necessary fit the rear air foil extension 2 with the clamping brac...

Page 297: ... 6 Remove the attachment bolts of the front catwalk plate and the remaining catwalk plates widthwise 7 Remove the front catwalk plate 8 Unhook the remaining catwalk plates from the chassis members Installing side skirts and catwalk 1 Fit the front catwalk plate to the chassis 2 Hook the catwalk plates widthwise completely in the chassis members 3 Fix the elements together using the attachment bolt...

Page 298: ...t the corner piece 1 completely and close the grille and door 2 3 1 K1 01 477 3 5 REMOVAL AND INSTALLATION WINDSCREEN SUN VISOR Removing windscreen sun visor 1 Remove the attachment bolts of the mounting brackets from the tapped holes in the cab 2 Remove the sun visor from the cab Installing windscreen sun visor 1 To fit the sun visor stress free loosen the attachment bolts fastening the plastic h...

Page 299: ...cab bottom and remove the air dam Installing air dam 1 Fit the air dam to the cab bottom using the suspension brackets and the attachment bolts and nuts 2 Fit the connectors of the combi light in the air dam 3 7 REMOVAL AND INSTALLATION COMBI LIGHT Removing combi light 1 Remove the combi light connector 2 Remove the attachment screw 1 and take the combi light out of the bumper Installing combi lig...

Page 300: ...VAL AND INSTALLATION AIR HORNS Removing air horn on roof spoiler 1 Remove the attachment bolts from the air horn and remove the air horn from the roof spoiler Note If after removal of the attachment bolts the air horn cannot be removed from the spoiler the air horn has been retrofitted as an accessory In this case detach the air pipe on the inside of the spoiler Installing air horn on roof spoiler...

Page 301: ...clockwise out of the lamp socket 2 2 Unplug the connector to the rotating beam coming from connector 291 to the left behind the overhead boxes underneath the bottom plate 3 Remove the three attachment bolts 3 and remove the lamp socket from the roof Installing rotating beam 1 Fit the lamp socket 2 to the roof and tighten the attachment bolts 3 2 Fit the connector 3 Turn the glass 1 of the rotating...

Page 302: ...1 ACCESSORIES Removal and installation 95XF series 3 8 8 ᓻ 0209 ...

Page 303: ...es on re treatment 2 1 0209 2 2 Treatment of the cab front 2 2 0209 2 3 Treatment of door post 2 3 0209 2 4 Treatment of the door sill 2 4 0209 2 5 Treatment of the tool box 2 5 0209 2 6 Treatment of the back panel 2 5 0209 2 7 Surface treatment of the roof hatch 2 6 0209 2 8 Treatment of the bottom 2 6 0209 10 ᓻ 0209 ...

Page 304: ...1 PREWAX TREATMENT Contents 95XF series 2 10 ᓻ 0209 ...

Page 305: ...tilted without due precautions The end stop in the lifting cylinder may be damaged which might cause the cab to shoot past its end stop When working on a tilted cab for example when welding spray painting or applying bitumen coatings be sure to cover the piston rod of the lifting cylinder Welding spatter and paint on the piston rod will inevitably cause damage to the oil seal Ensure that there is ...

Page 306: ...1 PREWAX TREATMENT Safety instructions 95XF series 1 2 10 ᓻ 0209 ...

Page 307: ... does not need to be cleaned 2 1 NOTES ON RE TREATMENT Thoroughly stir the PREWAX before use For optimal treatment the temperature of both the cab and the PREWAX must be 20_C All holes required for re treatment are already present in the cab Treat cavities with a minimum pressure of 6 bar After treatment of seams and hinges reduce the air pressure to 3 bar ideal pressure Make sure to re install th...

Page 308: ... 2 2 2 TREATMENT OF THE CAB FRONT Treat the entire front behind the grille cosmetically with a short spray pipe special tool Treat the inside of the foremost front beams through the existing holes having removed the ML plugs K100283 10 ᓻ 0209 ...

Page 309: ...TMENT 2 3 2 3 TREATMENT OF DOOR POST Treat the A post on both sides through the existing holes using the short and the flexible spray pipe special tool Remove the ML plugs before starting the treatment K100479 K100285 K100286 10 ᓻ 0209 ...

Page 310: ... 4 TREATMENT OF THE DOOR SILL Treat the door sill via the bottom of the cab wheel arch through the existing holes using the short and the flexible spray pipe special tool Remove the ML plugs before starting the treatment K100478 K100288 10 ᓻ 0209 ...

Page 311: ...ray pipe special tool and a pressure of 7 8 bar Treat the inside of the box door with the short spray pipe special tool First remove the bump caps from the door re install them after completion of the treatment K100477 2 6 TREATMENT OF THE BACK PANEL Treat the back panel through the existing holes Pay extra attention to the extreme upper corners which are less accessible K100291 10 ᓻ 0209 ...

Page 312: ...and the flexible spray pipe special tool K100292 2 8 TREATMENT OF THE BOTTOM Treat all longitudinal and transverse members through the existing holes using the flexible spray pipe special tool At the back of the transverse members treat the cab lock pin attachments using the short spray pipe special tool having reduced the pressure to 3 bar K100293 10 ᓻ 0209 ...

Reviews: