xStack® DGS-3620 Series Managed Switch Web UI Reference Guide
338
ARP or broadcast IP packet is detected.
The default value is Disabled.
IP Inspection
When both ARP and IP inspections are enabled, all IP packets are checked. The
legal IP packets are forwarded, while the illegal IP packets are dropped. When IP
Inspection is enabled, and ARP Inspection is disabled, all non-IP packets (Ex. L2
packets, or ARP) are forwarded by default.
The default value is Disabled.
Protocol
Use the drop-down menu to select the protocol types,
IPv4
,
IPv6
or
All
.
Zero IP
Use the drop-down menu to enable or disable this feature. Allow zero IP configures
the state which allows ARP packets with 0.0.0.0 source IP to bypass.
DHCP Packet
By default, the DHCP packet with broadcast DA will be flooded. When set to disable,
the broadcast DHCP packet received by the specified port will not be forwarded in
strict mode. This setting is effective when DHCP snooping is enabled, in the case
when a DHCP packet which has been trapped by the CPU needs to be forwarded by
the software. This setting controls the forwarding behavior in this situation.
Stop Learning
Threshold
Here is displayed the number of blocked entries on the port. The default value is
500
.
Click the
Apply
button to accept the changes made.
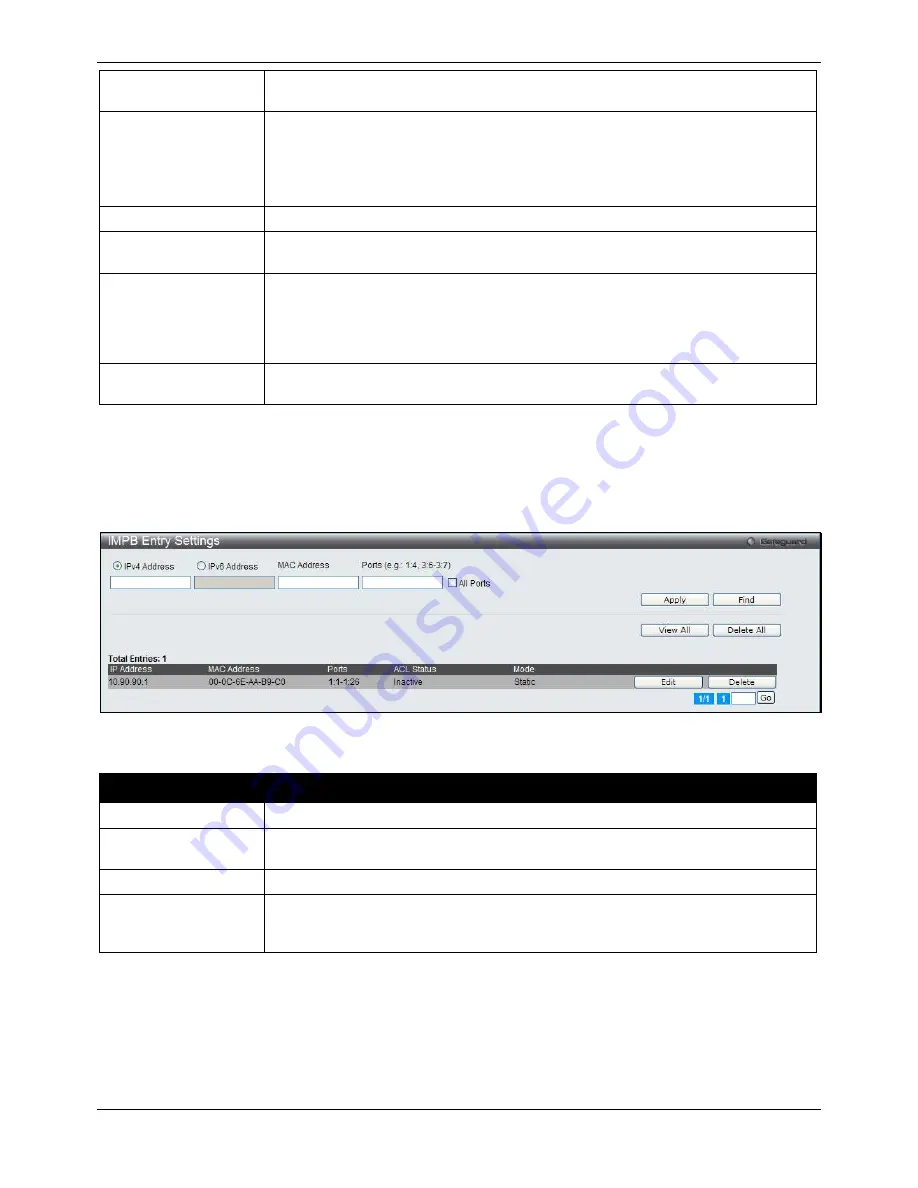
IMPB Entry Settings
This window is used to create static IP-MAC-binding port entries and view all IMPB entries on the Switch.
To view this window, click
Security > IP-MAC-Port Binding (IMPB) > IMPB Entry Settings
as shown below:
Figure 8-28 IMPB Entry Settings window
The fields that can be configured are described below:
Parameter
Description
IPv4 Address
Click the radio button and enter the IP address to bind to the MAC address set below.
IPv6 Address
Click the radio button and enter the IPv6 address to bind to the MAC address set
below.
MAC Address
Enter the MAC address to bind to the IP Address set above.
Ports
Specify the switch ports for which to configure this IP-MAC binding entry (IP Address
+ MAC Address). Tick the
All Ports
check box to configure this entry for all ports on
the Switch.
Click the
Apply
button to accept the changes made.
Click the
Find
button to locate a specific entry based on the information entered.
Click the
View All
button to display all the existing entries.
Click the
Delete All
button to remove all the entries listed.
Click the
Edit
button to configure the specified entry.
Click the
Delete
button to remove the specified entry.
Summary of Contents for DGS-3620-28PC-EI
Page 1: ......


