background image

DES-3226L Layer 2 

Fast Ethernet Switch User’s Guide


11.  Enter the commands to complete your desired tasks. Many commands require 

administrator-level access privileges. Read the next section for more 
information on setting up user accounts. See the 

DES 3226L


Command Line 

Interface Reference Manual 

on the documentation CD for a list of all 

commands and additional information on using the CLI. 

When you have completed your tasks, exit the session with the 

logout

 command or close 

the emulator program. 

Make sure the terminal or PC you are using to make this connection is configured to match 
these settings. 

If you are having problems making this connection on a PC, make sure the emulation is set to 
VT-100. You will be able to set the emulation by clicking on the


File


menu in you 

HyperTerminal window, clicking on 

Properties

 in the drop-down menu, and then clicking the 

Settings

 tab. This is where you will find the 

Emulation

 options

If you still don’t see 

anything, try rebooting the Switch by disconnecting its power supply. 

Once connected to the console, the screen below will appear on your console screen. This is 
where the user will enter commands to perform all the available management functions. The 
Switch will prompt the user to enter a user name and a password. Upon the initial connection, 
there is no user name or password and therefore just press 

Enter

 twice to access the command 

line interface.  

First Time Connecting to The Switch  

The Switch supports user-based security that can allow you to prevent unauthorized users 
from accessing the Switch or changing its settings. This section tells how to log onto the 
Switch. 


NOTE:

 The passwords used to access the Switch are case-sensitive; 

therefore, “S” is not the same as “s.” 


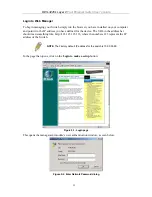
When you first connect to the Switch, you will be presented with the first login screen (shown 
below).  


NOTE:

 Press Ctrl+R to refresh the screen. This command can be used at 

any time to force the console program in the Switch to refresh the console 
screen. 


15


Summary of Contents for DES-3226L

Page 1: ...D Link DES 3226L Managed 24 port 10 100Mbps and 2GE ports Layer 2 Ethernet Switch Manual...

Page 2: ...radiate radio frequency energy and if not installed and used in accordance with this manual may cause harmful interference to radio communications Operation of this equipment in a residential area is...

Page 3: ...LLING THE SWITCH IN A RACK 9 Mounting the Switch in a standard 19 rack 10 POWER ON 10 Power Failure 10 Connecting The Switch 11 SWITCH TO END NODE 11 SWITCH TO HUB OR SWITCH 11 CONNECTING TO NETWORK B...

Page 4: ...Settings 60 STP Port Settings 62 FORWARDING 64 MAC Forwarding 64 CONFIGURE QOS 65 802 1p User Priority 66 Bandwidth Control Table 67 MIRRORING CONFIGURATIONS 68 VLAN CONFIGURATIONS 69 VLAN Mode Set 7...

Page 5: ...Cable Lengths 109 Glossary 110...

Page 6: ...d other aspects about how to manage the Switch Section 5 Basic Switch Configuration A detailed discussion about configuring some of the basic functions of the switch including accessing the Switch inf...

Page 7: ...ts appearing on your screen For example You have mail Bold font is also used to represent filenames program names and commands For example use the copy command Boldface Typewriter Font Indicates comma...

Page 8: ...TE indicates important information that helps you make better use of your device NOTICE A NOTICE indicates either potential damage to hardware or loss of data and tells you how to avoid the problem CA...

Page 9: ...or plug is damaged An object has fallen into the product The product has been exposed to water The product has been dropped or damaged The product does not operate correctly when you follow the operat...

Page 10: ...n extension cable use a 3 wire cable with properly grounded plugs Observe extension cable and power strip ratings Make sure that the total ampere rating of all products plugged into the extension cabl...

Page 11: ...that the stabilizers are secured to the rack extended to the floor and that the full weight of the rack rests on the floor Install front and side stabilizers on a single rack or front stabilizers for...

Page 12: ...can harm delicate components inside your system To prevent static damage discharge static electricity from your body before you touch any of the electronic components such as the microprocessor You ca...

Page 13: ...ogy Gigabit Ethernet is an extension of IEEE 802 3 Ethernet utilizing the same packet structure format and support for CSMA CD protocol full duplex flow control and management objects but with a tenfo...

Page 14: ...ied while still maintaining the same network cabling and adapter cards For Fast Ethernet or Gigabit Ethernet networks a switch is an effective way of eliminating problems of chaining hubs beyond the t...

Page 15: ...t full wire speed maximum 14 881 packets sec on each 10Mbps Ethernet port and maximum 148 810 packet sec on 100Mbps Fast Ethernet port Full and half duplex for both 10Mbps and 100Mbps connections Full...

Page 16: ...e flow control Two 1000BASE T Mini GBIC combo ports for connecting to another switch server or network backbone RS 232 DCE Diagnostic port console port for setting up and managing the Switch via a con...

Page 17: ...t in the back of the Switch using a straight through serial cable Port LEDs One row of LEDs for each port is located above the ports on the front panel The first LED is for the top port and the second...

Page 18: ...dissipate heat The sides of the system also provide heat vents to serve the same purpose Do not block these openings and leave at least 6 inches of space at the rear and sides of the switch for prope...

Page 19: ...DES 3226L Layer 2 Fast Ethernet Switch User s Guide Figure 1 5 Mini GBIC modules plug in to the Switch Figure 1 6 Installing the Mini GBIC Module 7...

Page 20: ...Link Reseller for replacement Before You Connect to the Network The site where you install the Switch may greatly affect its performance Please follow these guidelines for setting up the Switch Instal...

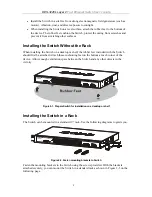
Page 21: ...a desktop or shelf the rubber feet included with the Switch should first be attached Attach these cushioning feet on the bottom at each corner of the device Allow enough ventilation space between the...

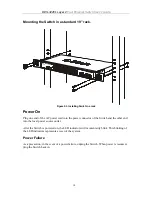
Page 22: ...r cord into the power connector of the Switch and the other end into the local power source outlet After the Switch is powered on the LED indicators will momentarily blink This blinking of the LED ind...

Page 23: ...be connected to the Switch via a twisted pair Category 3 4 or 5 UTP STP cable The end node should be connected to any of the ports of the Switch Figure 3 1 Switch connected to an end node The Link Ac...

Page 24: ...re ideal for uplinking to a network backbone or server The copper ports operate at a speed of 1000 100 or 10Mbps in full or half duplex mode The fiber optic ports can operate at 1000Mbps in full and h...

Page 25: ...ter you have successfully installed the Switch you can configure the Switch monitor the LED panel and display statistics graphically using a web browser such as Opera Netscape Navigator version 6 2 an...

Page 26: ...rt 2 3 Set the data rate to 9600 baud 4 Set the data format to 8 data bits 1 stop bit and no parity 5 Set flow control to none 6 Under Properties select VT100 for Emulation mode 7 Select Terminal keys...

Page 27: ...where you will find the Emulation options If you still don t see anything try rebooting the Switch by disconnecting its power supply Once connected to the console the screen below will appear on your...

Page 28: ...en first time connecting to the Switch Press Enter in both the Username and Password fields You will be given access to the command prompt DES 3226L shown below There is no initial username or passwor...

Page 29: ...e Switch do the following 1 At the CLI login prompt enter create account admin followed by the user name and press the Enter key 2 You will be asked to provide a password Type the password used for th...

Page 30: ...e level of security provided between the management station and the network device In SNMP v 1 and v 2 user authentication is accomplished using community strings which function like passwords The rem...

Page 31: ...formation Base module Consequently values for MIB objects can be retrieved from any SNMP based network management software In addition to the standard MIB II the Switch also supports its own proprieta...

Page 32: ...over the console serial port as follows 1 Starting at the command line prompt enter the commands config ipif System ipaddress xxx xxx xxx xxx yyy yyy yyy yyy Where the x s represent the IP address to...

Page 33: ...via the Web based management Connecting Devices to the Switch After you assign IP addresses to the Switch you can connect devices to the Switch To connect a device to an SFP transceiver port 1 Use yo...

Page 34: ...embedded web based HTML interface The Switch can be managed from remote stations anywhere on the network through a standard browser such as Opera Netscape Navigator Communicator or Microsoft Internet...

Page 35: ...device The URL in the address bar should read something like http 123 123 123 123 where the numbers 123 represent the IP address of the Switch NOTE The Factory default IP address for the switch is 10...

Page 36: ...xplained below Web based User Interface The user interface provides access to various Switch configuration and management screens allows you to view performance statistics and permits you to graphical...

Page 37: ...ession must be saved in the Save Changes web menu explained below or use the command line interface CLI command save Web Pages When you connect to the management mode of the Switch with a web browser...

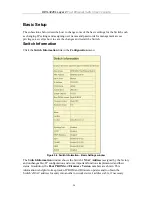
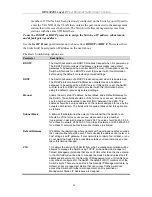
Page 38: ...ick the Switch Information link in the Configuration menu Figure 5 4 Switch Information Basic Settings window The Switch Information window shows the Switch s MAC Address assigned by the factory and u...

Page 39: ...Open the Management folder and click the Basic Switch Settings menu button The web manager will display the Switch s current IP settings and an IP configuration menu as seen below Figure 5 5 Basic Swi...

Page 40: ...xx xxx xxx xxx where each xxx is a number represented in decimal form between 0 and 255 This address should be a unique address on the network assigned for use by the network administrator The fields...

Page 41: ...set using the Command Line Interface CLI over the console serial port as follows Starting at the command line prompt enter the commands config ipif System ipaddress xxx xxx xxx xxx yyy yyy yyy yyy Wh...

Page 42: ...used to change and view the Console settings for your switch The default Baud Rate for this switch is set at 9600 and may be altered from 119200 38400 to 115200 to perform different functions Data Bi...

Page 43: ...ibutes and properties for individual physical ports including port speed and flow control Clicking on Port Configurations will open the following window for the user Figure 5 7 Port Configurations win...

Page 44: ...M Half 10M Full and 10M Half There is no automatic adjustment of port settings with any option other than Auto For the two Mini GBIC Combo ports the user may set the speed to Auto 100M Full 100M Half...

Page 45: ...tive 3 A listing of all user accounts and access levels is shown in the User Account Management window This list is updated when Apply is executed Click Show All User Account Entries to access this wi...

Page 46: ...ny changes to its non volatile ram and reboot You can logon again and are now ready to continue configuring the Switch Network Management The DES 3226L allows you to manage the switch via the Network...

Page 47: ...le Figure 5 12 SNMP View Table To delete an existing SNMP View Table entry click the selection button on the far left that corresponds to the port you want to configure and click the Delete button To...

Page 48: ...access Select Excluded to exclude this object from the list of objects that an SNMP manager can access SNMP Group Table An SNMP Group created with this table maps SNMP users identified in the SNMP Use...

Page 49: ...SNMP version 2c will be used The SNMP v2c supports both centralized and distributed network management strategies It includes improvements in the Structure of Management Information SMI and adds some...

Page 50: ...o use the community string to gain access to the Switch s SNMP agent An MIB view that defines the subset of all MIB objects that will be accessible to the SNMP community Read write or read only level...

Page 51: ...ty string created with this command can only read the contents of the MIBs on the Switch read_write Specifies that SNMP community members using the community string created with this command can read...

Page 52: ...he Auth NoPriv security level V3 Auth Priv To specify that the SNMP version 3 will be used with the Auth Priv security level Community String or SNMP V3 User Name Type in the community string or SNMP...

Page 53: ...twork Management folder Click on SNMPV3 and finally click on the SNMP User Table link This will open the SNMP User Table as shown below Figure 5 21 SNMP User Table window To delete an existing entry c...

Page 54: ...HMAC SHA authentication protocol will be used Priv Protocol None Indicates that no authorization protocol is in use DES Indicates that DES 56 bit encryption is in use based on the CBC DES DES 56 stan...

Page 55: ...istory log can be uploaded from the Switch to the TFTP server Download Firmware from TFTP Server To update the Switch s firmware click Basic Setup TFTP Services Download Firmware from TFTP Server Figu...

Page 56: ...witch parameters explicitly stated in the configuration file All other switch parameters will remain unchanged Click Save Settings to record the IP address of the TFTP server Click Download to initiat...

Page 57: ...transfer Ping Test Ping is a small program that sends data packets to the IP address you specify The destination node then returns the packets to the switch This is very useful to verify connectivity...

Page 58: ...andwidth being used on the port Port Utilization statistics may be viewed using the table format To view the port utilization click Basic Setup Network Monitoring Statistics Port Utilization Figure 5...

Page 59: ...in new browser The following fields are displayed TX transmit Parameter Description CRC Error Counts otherwise valid frames that did not end on a byte octet boundary Undersize The number of frames de...

Page 60: ...ingle Collision Frames The number of successfully transmitted frames for which transmission is inhibited by more than one collision Collision An estimate of the total number of collisions on this netw...

Page 61: ...256 511 The total number of packets including bad packets received that were between 256 and 511 octets in length inclusive excluding framing bits but including FCS octets 512 1023 The total number of...

Page 62: ...adcast RX Displays the number of broadcast packets received by the Switch in total number Frames and the rate Frames sec MAC Address Table This allows the switch s dynamic MAC address forwarding table...

Page 63: ...Browse button The following fields can be viewed in the table to the right Parameter Description VID The VLAN ID number VLAN Name The VLAN name MAC Address The MAC address entered into the address tab...

Page 64: ...ed as router ports A router port configured by a user using the console or Web based management interfaces is displayed as a static router port designated by S A router port that is dynamically config...

Page 65: ...the Multicast Group IP address and the corresponding MAC address from IGMP packets that pass through the Switch The ports where the IGMP packets were snooped are displayed signified with an M The num...

Page 66: ...bottom of the window will allow you to display all the switch Trap Logs The information is described as follows Parameter Description Sequence A counter incremented whenever an entry to the Switch s...

Page 67: ...Diagnostics Table window 802 1X Auth Statistics This is a read only field is used to display the authenticator statistics information on the switch To view this window click Basic Setup Network Monit...

Page 68: ...X Auth Session Statistics window 802 1X Auth Client This is a read only field is used to display the RADIUS Auth Client information on the switch To view this window click Basic Setup Network Monitori...

Page 69: ...n screen instructions for the differences among each option Note that all changes are kept in normal memory If a user does not save the result into NV RAM with the Save Changes function the switch wil...

Page 70: ...es window Restart System Figure 5 44 Restart System window Logout To logout off the switch click the Logout link under the Basic Setup folder which will present the following screen Figure 5 45 Web Lo...

Page 71: ...n 6 Advanced Setup Port Segmentation Spanning Tree Forwarding Configure QoS Mirroring Configurations VLAN Configurations Link Aggregation 802 1x System Log Multicast Configurations SSH Management Port...

Page 72: ...this switch as follows STP Switch Settings To globally configure STP on the Switch under Advanced Setup click Spanning Tree and then STP Switch Settings Figure 6 2 STP Switch Settings window The Switc...

Page 73: ...o the forwarding state PRIORITY 0 61440 32768 A Bridge Priority can be from 0 to 61 440 Zero is equal to the highest Bridge Priority STP VERSION Choose RSTP or STP compatible Both versions use STP par...

Page 74: ...Port Settings To configure STP Port Settings on the Switch under Advanced Setup click Spanning Tree and then STP Port Settings Figure 6 3 STP Port Table window Select an entry on the STP Port Table an...

Page 75: ...s cannot create loops however an edge port can lose edge port status if a topology change creates a potential for a loop An edge port normally should not receive BPDU packets If a BPDU packet is recei...

Page 76: ...d 765 seconds Note A very long Aging Time can result with the out of date Dynamic Entries that may cause incorrect packet filtering forwarding decisions A very short aging time may cause entries to be...

Page 77: ...queues are empty are packets of lower priority transmitted For weighted round robin queuing the number of packets sent from each priority queue depends upon the assigned weight For a configuration of...

Page 78: ...priorities Figure 6 7 802 1p User Priority window Once you have assigned a priority to the port groups on the switch you can then assign this Class to each of the eight levels of 802 1p priorities No...

Page 79: ...t Ethernet Switch User s Guide Bandwidth Control Table Figure 6 8 Bandwidth Control Table window The bandwidth control settings are used to place a ceiling on the transmitting and receiving data bit r...

Page 80: ...nd enter the desired rate Rates can be expressed using whole numbers up to the maximum available rate for the port Mirroring Configurations The Switch allows you to copy frames transmitted and receive...

Page 81: ...802 1p standard designed to provide a means of managing traffic on a network where many different types of data may be transmitted simultaneously It is intended to alleviate problems associated with t...

Page 82: ...at appears as a single LAN VLANs also logically segment the network into different broadcast domains so that packets are forwarded only between ports within the VLAN Typically a VLAN corresponds to a...

Page 83: ...s VLANs can also provide a level of security to your network IEEE 802 1Q VLANs will only deliver packets between stations that are members of the VLAN Any port can be configured as either tagging or u...

Page 84: ...ag The tag is contained in the following two octets and consists of 3 bits of user priority 1 bit of Canonical Format Identifier CFI used for encapsulating Token Ring packets so they can be carried ac...

Page 85: ...that are tagged are carrying the 802 1Q VID information can be transmitted from one 802 1Q compliant network device to another with the VLAN information intact This allows 802 1Q VLANs to span network...

Page 86: ...ill drop the packet Because of the existence of the PVID for untagged packets and the VID for tagged packets tag aware and tag unaware network devices can coexist on the same network A switch port can...

Page 87: ...port If it does not the packet is dropped If it has the same VID the packet is forwarded and the destination port transmits it on its attached network segment This process is referred to as ingress fi...

Page 88: ...then the packet will be dropped by the switch and will not reach its destination If Port 10 is a member of VLAN 2 the packet will go through This selective forwarding feature based on VLAN criteria i...

Page 89: ...he user may use the pull down menu to choose between 802 1Q VLAN and Port Based VLAN After choosing a different VLAN mode click Apply and the Switch will have to reboot to apply the settings Switch GV...

Page 90: ...Parameter Description VLAN ID VID The VLAN ID of the VLAN that was created VLAN Name The name of the VLAN that is being created VLAN Type This indicates the type of VLAN static or LACP Advertisement E...

Page 91: ...which will reveal the following screen Note The Switch s default is to assign all ports to a single VLAN named default As new VLANs are created the member ports assigned to the new VLAN will be remov...

Page 92: ...al port to be specified as a non VLAN member Tagged Untagged Allows an individual port to be specified as Tagged or Untagged A check in the Tagged field specifies the port as a Tagging member of the V...

Page 93: ...in the packet before forwarding the packet GARP VLAN Registration Protocol GVRP is a Generic Attribute Registration Protocol GARP application that provides 802 1Q compliant VLAN pruning and dynamic VL...

Page 94: ...D of incoming packets If not the ingress checking will drop the packets Port Based VLANs If you have chosen Port Based VLAN the heading Port Based VLAN will appear in the VLAN Configuration folder Cli...

Page 95: ...corresponding radio button of the VLAN entry and press the Edit button revealing the following window Figure 6 22 Port Based VLANs entry Settings Edit window After altering the Port Members of your Po...

Page 96: ...ports cannot have a trunk connection with the Switch Note If the two external module ports are used as a trunk group and either port is disconnected packets intended for the disconnected port will be...

Page 97: ...on group Load balancing is automatically applied to the ports in the aggregated group and a link failure within the group causes the network traffic to be directed to the remaining links in the group...

Page 98: ...existing entry Type Toggle to determine which type of link aggregation to use Static or LACP Master Port The Master port of link aggregation group Status This field can be toggled between Enabled and...

Page 99: ...it receives but does not initiate LACP negotiation This is the default Active LACP mode that places a port into an active negotiating state in which the port initiates negotiations with other ports by...

Page 100: ...User s Guide To edit an LACP Port Table entry select it and then click Edit Figure 6 26 Lacp Port Setting window Select the desired port mode and range of ports to be configured and then click Apply...

Page 101: ...See the following figure Figure 6 28 Typical 802 1x Configuration Prior to User Authentication Once the user is authenticated the Switch unblocks the port that is connected to the user as shown in th...

Page 102: ...6 2 Conformance to IEEE 802 1x Standards The DES 3226L implements the server side of the IEEE 802 1x Port based Network Access Control This mechanism is intended to allow only authorized users or othe...

Page 103: ...allows the user to enable or disable the 802 1x Port Based Network Access control server application on the switch When the 802 1x function is disabled authentication packets are flooded to all ports...

Page 104: ...thernet Switch User s Guide Click the radio button on the far left that corresponds to the port you want to configure and click the Edit button The following window will appear Figure 6 33 802 1x Port...

Page 105: ...he administrative control over the port s authorization status Force_Authorized forces the Authenticator of the port to become Authorized Force_Unauthorized forces the port to become Unauthorized Auto...

Page 106: ...ed reauthentication Choose the port or group of ports using the pull down menu and click Reauthenticate to start the process 802 1X Initialize Ports Figure 6 35 802 1X Initialize Ports window This win...

Page 107: ...tion Index RADIUS server settings index IP Address Type in the IP address of the RADIUS server Key Type the shared secret key used by the RADIUS server and the switch Up to 32 characters can be used A...

Page 108: ...tate to enable this function System Log State Figure 6 40 System Log State window To enable the System Log Server settings you have chosen on the System Log Server window select Enabled and click the...

Page 109: ...in the following Bold font means the facility values the switch supports now Numerical Facility Code 0 kernel messages 1 user level messages 2 mail system 3 system daemons 4 security authorization mes...

Page 110: ...e window Internet Group Management Protocol IGMP snooping allows the Switch to recognize IGMP queries and reports sent between network stations or devices and an IGMP host When enabled for IGMP snoopi...

Page 111: ...DES 3226L Layer 2 Fast Ethernet Switch User s Guide Figure 6 45 IGMP Snooping Configurations Edit window 99...

Page 112: ...he value of the robustness variable By default the robustness variable is set to 2 The user may wish to increase this value if the subnet loses packets frequently Last Member Query Interval 1 65535 Th...

Page 113: ...services over an insecure network It allows you to securely login to remote host computers to execute commands safely in a remote computer and so forth and to provide secure encrypted and authenticat...

Page 114: ...the Secure Shell protection SSH Global Figure 6 49 SSH Configure window The SSH Configure window contains the global server setting maximum simultaneous sessions connection timeout maximum fail attemp...

Page 115: ...cify the methods of user authentication supported by server Key Re Exchange Timeout minute Use the pull down menu to choose the timeout period for the Key Re Exchange The user may choose between Never...

Page 116: ...226L Layer 2 Fast Ethernet Switch User s Guide Figure 6 51 SSH Accounts Add window The SSH Accounts Add window can be used to specify user name new password authentication method host name and host IP...

Page 117: ...IEEE 802 3ab Gigabit Ethernet IEEE 802 1Q Tagged VLAN IEEE 802 1P Tagged Packets IEEE 802 3ab 1000BASE T IEEE 802 3x Full duplex Flow Control ANSI IEEE 802 3 NWay auto negotiation Protocols CSMA CD Da...

Page 118: ...s max EIA TIA 568 150 ohm STP 100 meters max UTP Cat 5e 100 meters max UTP Cat 5 100 meters max EIA TIA 568B 150 ohm STP 100 meters max Single mode fiber module 10km Multi mode fiber module 550m Singl...

Page 119: ...ce Packet Filtering Forwarding Rate Full wire speed for all connections 1 488 095 pps per port for 1000Mbps MAC Address Learning Automatic update Supports 4K MAC address Priority Queues 2 Priority Que...

Page 120: ...iagrams and tables show the standard RJ 45 receptacle connector and their pin assignments The standard RJ 45 port and connector RJ 45 Pin Assignments Contact MDI X Port MDI II Port 1 RD receive TD tra...

Page 121: ...ASE LX Single mode fiber module 10km 1000BASE SX Multi mode fiber module 550m 1000BASE LHX Single mode fiber module 40km Mini GBIC 1000BASE ZX Single mode fiber module 80km 1000BASE T Category 5e UTP...

Page 122: ...e normally used to connect the Switch to the backbone of your network Note that backbone ports were formerly known as designated downlink ports backbone The part of a network used as the primary path...

Page 123: ...ransmitted and received but not at the same time Contrast with full duplex IP address Internet Protocol address A unique identifier for a device attached to a network using TCP IP The address is writt...

Page 124: ...olerance on networks STP works by allowing you to implement parallel paths for network traffic and ensure that redundant paths are disabled when the main paths are operational and enabled if the main...

Page 125: ...VLT Virtual LAN Trunk A Switch to Switch link which carries traffic for all the VLANs on each Switch VT100 A type of terminal which uses ASCII characters VT100 screens have a text based appearance 113...

Page 126: ...0 85182250 URL www dlink com cn Denmark D Link Denmark Naverland 2 DK 2600 Glostrup Denmark TEL 45 43 96 90 40 FAX 45 43 42 43 47 URL www dlink dk Egypt D Link Egypt 19 El Shahed Helmy El Masry Al Maz...

Page 127: ...665 2186 URL www d link co za Spain D Link Iberia C Sabino de Arana 56 Bajos 08028 Barcelona Spain TEL 34 93 409 0770 FAX 34 93 491 0795 URL www dlink es Sweden D Link Sweden P O Box 15036 S 167 15 B...

Page 128: ...eitung keine Verbesserung erzielen e Das Ger t ist gefallen und oder das Geh use ist besch digt f Wenn das Ger t deutliche Anzeichen eines Defektes aufweist 16 Bei Reparaturen d rfen nur Orginalersatz...

Page 129: ...ackage returned to D Link without an RMA number will be rejected and shipped back to Purchaser at Purchaser s expense and D Link reserves the right in such a case to levy a reasonable handling charge...

Page 130: ...of Warranty The Limited Warranty provided hereunder for Hardware and Software portions of D Link s products will not be applied to and does not cover any refurbished product and any product purchased...

Page 131: ...s and exclusions may not apply This Limited Warranty provides specific legal rights and you may also have other rights which vary from state to state Trademarks D Link is a registered trademark of D L...

Page 132: ...ISTRATION Register online your D Link product at http support dlink com register Product registration is entirely voluntary and failure to complete or return this form will not diminish your warranty...

Page 133: ...________________________ 4 What network operating system s does your organization use D Link LANsmart Novell NetWare NetWare Lite SCO Unix Xenix PC NFS 3Com 3 Open Banyan Vines DECnet Pathwork Windows...

Page 134: ...122...

Reviews: