background image


Curtiss-Wright | PG Drives Technology 

SK77981-14


24 | R-net Technical Manual | Chapter 1 - Operation   

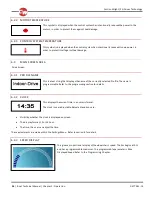
6.2.2  MOTOR TEMPERATURE 

This symbol is displayed when the control system has intentionally reduced the power to the 
motors, in order to protect them  against heat damage. 


6.2.3  CONTROL SYSTEM TEMPERATURE 

This symbol is displayed when the control system has intentionally reduced its own power, in 
order to protect itself against heat damage. 


6.3 

MAIN SCREEN AREA  

 Drive Screen  

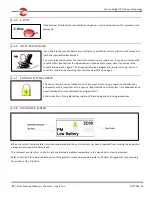
6.3.1  PROFILE NAME 

This is a text string that displays the name of the currently selected Profile. The name is 
programmable. Refer to the programming section for details. 


6.3.2  CLOCK 

This displays the current time in a numeric format. 

The clock is user adjustable. Adjustable options are: 


Visibility, whether the clock is displayed on screen. 


The display format, 12 or 24 hour. 


The time, the user can adjust the time. 

These adjustments are made within the Settings Menu.  Refer to section 8 for details.  

6.3.3  SPEED DISPLAY 

This gives a proportional display of the wheelchairs speed. The Arc begins at 0% 
and has a programmable maximum. The  programmable parameter is Max 
Displayed Speed. Refer  to the Programming Chapter. 


Summary of Contents for R-NET

Page 1: ...PG DRIVES TECHNOLOGY R NET TECHNICAL MANUAL SK77981 14 ...

Page 2: ...s Wright The information in this manual is furnished for informational useonly is subjectto change without notice and should not be construed as a commitment by Curtiss Wright Except as permitted by such terms no part of this manual may be reproduced stored in a retrieval system or transmitted in any form or by any means electronic mechanical recording or otherwise without the prior written permis...

Page 3: ...ckground 30 8 6 IR Setup 30 8 7 Exit 30 9 Tips for Using Your Control System 30 9 1 Driving General 30 9 2 Driving Technique 30 9 3 Slow or sluggish movement 31 10 Precautions for Use 31 10 1 Hazards 31 11 Safety Checks 32 11 1 Daily Checks 32 11 2 Weekly Checks 32 11 3 Servicing 32 12 Battery Gauge 33 12 1 How to Read a Battery Gauge 33 13 Battery Charging 34 14 Programming 35 15 Servicing 35 16 ...

Page 4: ... 69 4 2 Profile Enable PrfEn 69 4 3 Mode Enable Modes 69 4 4 Input Device Type ID Type 70 4 5 Input Device Subtype 70 4 6 Seat Reversal Profile 70 4 7 Allow Grab 71 5 Configuration 72 5 1 Mode Name 73 5 2 Input 73 5 3 Output 73 6 Speeds 74 6 1 Maximum Forward Speed Fwd Speed Max 74 6 2 Minimum Forward Speed Fwd Speed Min 74 6 3 Maximum Reverse Speed Rev Speed Max 74 6 4 Minimum Reverse Speed Rev S...

Page 5: ...peed Step Rate 90 7 39 Speed Wrap Time 90 7 40 Speed Wrap Delay 90 7 41 Speed Wrap Beep 90 8 Latched 91 8 1 Latched Drive Drive 91 8 2 Latched Actuators Acts 91 8 3 Latched Timeout Time 92 8 4 Latched Timeout Beep Bleep 92 9 Seating 92 9 0 1 Seating Module Enabled 92 9 1 Actuator Mode Entry Axis Act Entry Axis 93 9 2 Axis Channels Axis Display Invert Axis Direction 93 9 3 Axis Name 94 9 4 Accelera...

Page 6: ...icator FaultCurrent15V Indicator FaultCurrent 20V Indicator FaultCurrent 25V Indicator FaultCurrent 30V Indicator Fault Current 35V 119 15 OEMFactory 120 CHAPTER 4 ELPM 90 JSM LED SM 121 1 Introduction 121 2 Controls JSM LED and JSM LED L 122 2 1 Buttons 123 2 2 Actuator Indicator 124 3 Control System Status indication 125 3 1 Battery Gauge is Steady 125 3 2 Battery Gauge Flashes Slowly 125 3 3 Ba...

Page 7: ...145 3 7 Anti Spin 146 3 8 Forward Tilt Input 146 3 9 Orientation 146 3 10 Forward Tilt Input 147 13 1 Disable Inhibit 8 in Drive 147 13 2 Disable Inhibit 9 in Drive 147 3 11 Lower Level Threshold 148 3 12 Middle Level Threshold 148 3 13 Upper Level Threshold 148 3 14 Debounce Time 148 CHAPTER 7 GYRO MODULE 151 1 Introduction 151 2 Installation 151 2 1 Gyro Module Mounting 151 2 2 Position 152 2 23...

Page 8: ...15 DIME Error 186 3 16 Memory Error 187 3 17 PM Memory Error 187 3 18 Bad Cable 187 3 19 Bad Settings 188 3 20 Module Error 188 3 21 System Error 188 3 22 SID Disconnected 189 3 23 Switch Detached 189 3 24 Gone to Sleep 189 3 25 Charging 189 3 26 Encoder Error 190 3 27 Joystick Stationary Time Exceeded 190 3 28 Orientation Error 190 3 29 ASM disconnected 190 3 30 Gyro disconnected 190 3 31 Gyro Pr...

Page 9: ... 201 2 28 Actuator Acceleration 201 2 29 Actuator Deceleration 201 2 30 Brake Fault Detect 201 2 31 Brake Voltage 201 2 32 Soft Stop Rate 201 2 33 Maximum Current Limit Boost DriveCurrent Boost Drive Time 201 2 34 Compensation 202 2 35 Joystick Stationary Time Range 202 2 36 Compensation Factor 202 2 37 OEM Factory 202 2 38 Battery Gauge 203 2 39 Getting Ready to Drive 203 2 40 General 203 2 41 In...

Page 10: ...t the manual icons areused to drawthe reader s attention The icons used are NOTE A general point for best practice CAUTION A point of safety which if ignored could result in damage to the Control System or the vehicle WARNING A point of safety which if ignored could cause injury to the individual Curtiss Wrightaccepts no liability for any losses of any kind if the points are not followed ...

Page 11: ...easy to understand The control system incorporates state of the art electronics the result of many years of research to provideyou with ease of use and a very high level of safety In common with other electronic equipment correcthandlingand operation of the unit will ensuremaximum reliability Pleaseread this chapter carefully itwill help you to keep your wheelchair reliableand safe 2 GENERAL An R ...

Page 12: ...oth dampened with diluted detergent Be careful when cleaningthe joystick and screen Never useabrasiveor spirit based cleaners 3 MATING CONNECTORS To connect the Communication Cables Holding the connector housing firmly push the connector into its mate until you can no longer see the yellow plastic The connectors aresecured usinga friction system To disconnectthe Communication Cables Holding the co...

Page 13: ...stick Module with lightingcontrol Each of the controls is explained within this section 4 1 JOYSTICK The primary function of the joystick is to control the speed and direction of the wheelchair The further you push the joysti ck from the center position the faster the wheelchair will move When you releasethe joystick the brakes are automatically applied If the wheelchair is fitted with actuators t...

Page 14: ...ound whilethis button is depressed 4 2 3 SPEED DECREASE BUTTON This button decreases the maximum speed setting Depending on the way the control system has been programmed a momentary screen may be displayed when the button is pressed Refer to section 5 for details of the momentary screen Refer to Chapter 3 Programming for details 4 2 4 SPEED INCREASE BUTTON This button increases themaximum speed s...

Page 15: ...e button to turn the hazards on and depress the button again to turn them off When activated the hazard LED and the indicator LEDs will flash in sync with the wheelchair s indicators 4 2 8 LIGHTS BUTTON AND LED This button activates and de activates the wheelchair s lights Depress the button to turn the lights on and depress the button again to turn them off When activated the lights LED will illu...

Page 16: ... Jack Socket when no external device is connected 4 3 LCD SCREEN The status of the control system can be understood by observingthe LCD screen The control system is on when the screen is backlit Refer to section 5 for details on screen symbols 4 4 CHARGER SOCKET This socket should only be used for chargingor lockingthe wheelchair Do not connect any type of programming cable into this socket Refer ...

Page 17: ...ry Steady This indicates thatall iswell Flashing Slowly The control system is functioningcorrectly but you should chargethe battery as soon as possible Stepping Up The wheelchair batteries are being charged You will notbe ableto drive the wheelchair until the charger is disconnected and you have switched the control system off and on again Refer to section 12 for a description of how to read the B...

Page 18: ...ED When the control system is operatingin a latched condition this symbol will bedisplayed 5 1 7 RESTART When the control system requires a reboot for example after a module re configuration this symbol will beflashed 5 1 8 FAULT The control system can detect a wide variety of errors When the system has detected an error that is not severe enough to causethe system to trip then this symbol will be...

Page 19: ...13 BLUETOOTH When Bluetooth Mode is entered the screen will display the followingicon 5 2 MOMENTARY SCREENS If the momentary screens are programmed to be displayed then pressingthe Speed or ProfileButtons will display screens such as below Speed Momentary Screen Profile Momentary Screen 5 3 DIAGNOSTIC SCREEN When the control system safety circuitshaveoperated and the control system has been preven...

Page 20: ...note the Trip Text displayed the identified Module and the Trip Code Switch off the control system Make surethat all connectors on the listed Module and the wheelchair aremated securely Check the condition of the battery Note the Trip Text description and take the required action Switch on the control system again and try to drive the wheelchair If the safety circuits operateagain switch off and d...

Page 21: ...lease the joystick there will be a long beep The wheelchair is now locked The followingscreen will be displayed the next time the Control System is switched on If an LED Joystick Module is fitted the Speed Indicator LEDs will ripplefrom left to right Refer to Chapter 4 To unlock the wheelchair If the control system has switched off press the On Off button Deflect the joystick forwards until thecon...

Page 22: ...uator screen must be visible Depress the Mode Button to scroll through the Mode screens until you reach the actuator screen displayed below Actuator adjustment is achieved as follows Move the Joystick sideways to selectthe desired axis This is indicated by the section of the wheelchair that is highlighted Move the joystick forwards and backwards to move the actuator Repeat these steps for each act...

Page 23: ...icates thatall iswell Flashing Slowly The control system is functioningcorrectly but you should chargethe battery as soon as possible Stepping Up The wheelchair batteries are being charged You will notbe ableto drive the wheelchair until the charger is disconnected and you have switched the control system off and on again Refer to section 12 for a description of how to read the Battery Gauge 6 1 2...

Page 24: ...AME This is a text stringthat displaysthename of the currently selected Profile The name is programmable Refer to the programmingsection for details 6 3 2 CLOCK This displaysthecurrent time in a numeric format The clock is user adjustable Adjustableoptions are Visibility whether the clock is displayed on screen The display format 12 or 24 hour The time the user can adjustthe time These adjustments...

Page 25: ...control system is operatingin a latched condition this symbol will bedisplayed 6 3 7 INHIBIT If the speed of the wheelchair is beinglimited for example by a raised seat then this orange symbol will bedisplayed If the wheelchair is beinginhibited fromdriving then this red symbol will beflashing Mode Screens 6 3 8 ACTUATOR MODE Displaysthesections of the chair currently selected for movement the nam...

Page 26: ...ule re configuration this symbol will beflashed 6 4 2 TIMER This symbol is displayed when the control system is changingbetween different states An example would be entering into ProgrammingMode The symbol is animated to showthe sands falling 6 4 3 SLEEP This symbol will bedisplayed for a shorttime before the R net enters into a sleep state 6 4 4 CROSS TICK These symbols will bedisplayed duringcon...

Page 27: ...condition by switchingthe control system off and on again 6 4 7 CONTROL SYSTEM LOCKED The Control System can be locked in one of two ways Either usinga sequence of deflections and presses with a Joystick or with a physical Key How the Control System is locked depends on how the wheelchair manufacturer has programmed it Refer to Section 5 for a detailed description of the Locking and Unlockingproce...

Page 28: ...e or just after you switch the control system on the screen will flash the joystick displaced screen You must release and center the joystick to resume normal operation If you do not release the joystick within five seconds the wheelchair will not be able to move even if you release the joystick and push it again The screen will display the diagnostic screen at this time You can reset this conditi...

Page 29: ...htjoystick deflection will enter a clock adjustment screen in which further joystick deflections areused to set the time 8 2 DISPLAY TIME This sets the format of the time display or turns itoff The options are 12hr 24hr or Off Left and rightjoystick deflections areused to change between the options 8 3 DISTANCE This sets the functionality of the odometer and a screen as below will appear Total Dis...

Page 30: ...he parameter Background refer to the relevant section in the Programming chapter 8 6 IR SETUP IR Set up allows theuser access the Omni IR Infra Red menus For full details on how to learn delete and use the IR functions availablepleaserefer to the R net Omni Technical Manual SK78813 8 7 EXIT Exits the Settings Menu back to normal operation 9 TIPS FOR USING YOUR CONTROL SYSTEM 9 1 DRIVING GENERAL Ma...

Page 31: ...e extremelyreliable and each unit is rigorously tested during manufacture the possibility of a system malfunction always exists however small the probability Under some conditions of system malfunction the control system must for safety reasons stop the chair instantaneously If there is any possibility of the user falling out of the chair as a result of a sudden braking action it is imperative tha...

Page 32: ... not continue with the safety checks and contact your serviceagent 11 2 WEEKLY CHECKS Parkingbrake This test should be carried outon a level floor with at leastone meter clear spacearound the wheelchair Switch on the control system Check that the screen remains on after initialization and thatthe battery gauge is displayinga reasonableamount of charge Push the joystick slowly forwards until you he...

Page 33: ...travel in your wheelchair All wheelchair batteries will gradually losetheir capacity as they age The most importantfactor that reduces the lifeof your batteries is the amount of charge you take from the batteries before you recharge them Battery lifeis also reduced by the number of times you charge and dischargethe batteries To make your batteries lastlonger do not allowthem to become completely f...

Page 34: ...for losses of any kind arising from failure to comply with this condition Ensure that the charger plug pins are of the correct polarity to be compatible with the pin polarity shown on the control system s specific data sheet Failure to observe this condition could result in a burn hazard or fire hazard Curtiss Wright accepts no liability for losses of any kind arising from failure to comply with t...

Page 35: ...ol system or its components will invalidateany warranty and may resultin hazards to yourself or other people and is strictly forbidden WARNING Curtiss Wright accepts no liability for losses of any kind arising from unauthorized opening adjustment or modifications to the R net control system If the control system is damaged in any way or if internal damage may have occurred through impact or droppi...

Page 36: ...here is a range of alternatives available Pleasecontactyour wheelchair distributor or manufacturer for advice Do not replacethe joystick knob with any unauthorized item it may causehazardous operation WARNING Do not replace the joystick knob with any unauthorized item It may cause hazardous operation Curtiss Wright accepts no liability for losses of any kind arising from failure to comply with thi...

Page 37: ...articular disabilities need very lowbrakingrates and this results in a longer stoppingdistance the maximum speed must be re programmed so that the stoppingdistancerequirement is satisfied State in the wheelchair user handbook that it is the responsibility of the person programmingthe control system to make sure that the stopping distancerequirement is satisfied If the brakingrate is low the forwar...

Page 38: ...ures of the control system In addition you should includea brief specification of operatingsupply voltagerange and operating temperature range 2 IMMOBILIZING THE WHEELCHAIR 2 1 PREVENTION OF UNAUTHORIZED USE TÜV requires that the wheelchair must have a means of preventing unauthorized use This can be implemented as detailed in Chapter 1 section 5 4 2 2 CHARGER INTERLOCK ISO 7176 14 requires you to...

Page 39: ...ingis a selection of the most common configurations 3 1 CONTROL CONFIGURATIONS 3 1 1 BASIC CONFIGURATION Consists of a Power Module a Communication Cableand a Joystick Module 3 1 2 JOYSTICK ISM CONFIGURATION Consists of a Power Module an IntelligentSeating Lighting Module ISM 2 Communication Cables and a Joystick Module ...

Page 40: ...odule should be secured usingtwo M5 screws with a maximum penetration of 12mm Be careful not to overtighten the screws See data sheet for further information 4 1 2 ORIENTATION The Joystick Module must be mounted with the joystick shaftpointingvertically upwards If you want to use any other mounting alternatives then contact Curtiss Wright 4 2 POWER MODULE MOUNTING ...

Page 41: ...hat water cannotenter and remain in the connector recesses It is recommended that the unit is not mounted with the connectors uppermost The Power Module has an IPX4 moisture resistancerating 4 2 3 POSITION The Power Module must be mounted in a position where itis not exposed to conditions of water or dust above those specified in ISO7176 9 The Power Module is designed to withstand levels of shock ...

Page 42: ...above those specified in ISO7176 9 The ISM is designed to withstand levels of shock and vibration experienced when mounted to the chassis of a wheelchair Direct impacts onto the unitshould be avoided 4 4 CABLES The cables to the ISM must be routed and secured in such a way as to prevent damage to them for example by cutting or crushing ContactCurtiss Wrightif you need further advice 5 JOYSTICK MOD...

Page 43: ...AL Study the data sheets for the Power Module and the ISM to identify The output current ratings and restrictions The connector pin assignments Recommendations for the cross sectional area ratings and materialsfor wiringaregiven in the tablein section 6 2 These depend on the application You areresponsiblefor establishingthesuitability of the particular wiringarrangement used on the wheelchair Curt...

Page 44: ...ng from failure to comply with this condition The power connectors for the R net Power Module arespecially designed by Curtiss Wrightfor wheelchair applications The crimps arestandard AMP Timer parts but the plastic housings arecustom These connectors can be purchased from Curtiss Wrightor from Greenstock directly Greenstock will also providea pre assembled cableservice Contact details for Greenst...

Page 45: ...Curtiss Wright PG Drives Technology SK77981 14 45 R net Technical Manual Chapter 2 Installation 6 1 2 ISM WIRING The followingdiagramgives details of the ISM connections ...

Page 46: ...Curtiss Wright PG Drives Technology SK77981 14 46 R net Technical Manual Chapter 2 Installation 6 1 3 CRIMPING ...

Page 47: ... 29030 Die set for 0 5 1 5mm2 wire ICD 29468 Die set for 2 5 4 0mm2 wire ICD 29465 Die set for 4 0 6 0mm2 wire ICD 29467 Crimp tool includingdieset 8 10 0mm2 AMP PartNo 734533 1 Extraction tool for 0 5 1 5mm2 IET 503 Extraction tool for 2 5 10 0mm2 IET 552 OBC Inhibit Actuator and Lightingwiring Small crimp tool handle up to 6 0mm2 ICT 29020 Die set for 0 5 1 5mm2 wire ICD 29468 Extraction tool fo...

Page 48: ...NNECTIONS The control system incorporates sophisticated currentlimitingcircuitry as protection for the circuits in thecontrol system ISO 7176 14 requires you to provideprotection againstshortcircuits in thebattery wiringand the power loom or the extremely unlikely event of a short circuitin thecontrol system Placea suitablecircuitbreaker in series with the battery supply for example in the link be...

Page 49: ...he output becomes too hot it will shut off to prevent permanent damage to itself 6 7 INDICATOR CONNECTIONS Each indicator outputis rated at 42W maximum Use suitably rated wireto each bulb The outputs are self protectingagainst wiring and bulb faults and will shut off if the maximum power ratingis exceeded Likewise if either output becomes too hot it will shut off to prevent permanent damage to its...

Page 50: ...n overheating of the charger plugs This presents a potential burn hazard for the user Curtiss Wright accepts no liability for losses of any kind arising from failure to comply with this condition Ensure that the charger plug pins are of the correct polarity to be compatible with the pin polarity shown on the control system s specific data sheet Failure to observe this condition could result in a b...

Page 51: ... that they are compatible with the electrical and dynamic characteristics of their specific target vehicles The characteristics of one type of control system may not be compatible with a different unauthorized chair Failure to observe this warning could result in an unsafe setup for the wheelchair user and may create a fire hazard depending on the motors wiring connectors and circuit breakers inst...

Page 52: ...nce will allowentry to OBP Note a dongle will also allowOBP access if this method is set Hold down the Horn button and then hold down the On Off button until there is a shortbleep Note the normal power up sound will occur prior to this bleep Release the Horn button but continue to hold down the On Off button until there are two further short bleeps Release the On Off button there will nowbe a long...

Page 53: ...ffect Example of a profiled parameter screen Forward joystick deflections will selectthe parameter above Reverse joystick deflections will selectthe parameter below The firstleft joystick deflection will display theparameter name in full The second left joystick deflection will takeyou to the previous screen Right joystick deflections will selectthe parameter to the right if available 10 1 2 MAKIN...

Page 54: ...2 CABLES AND CONNECTORS Check all cables and connectors for damage Make surethat all connectors aresecurely mated 11 3 JOYSTICK AND GAITER Check that the joystick is notbent or damaged Check the thin rubber gaiter or boot around the base of the joystick shaft for damage or splitting Check visually only do not handlethe gaiter Check that the joystick returns to the center position when you push and...

Page 55: ... at3Hz 0 5Hz If hazard lamps arefitted Check each bulb for correct illumination and thatthe flashrateis 1 5Hz 0 5Hz 11 9 ACTUATOR TEST If actuators arefitted Check each motor for correct direction of movement Ensure the mechanical end stops aresecure and that they stall theactuator motors thus operating the ISM s automatic end stop detection 11 10 INHIBIT INPUT TEST Insertan appropriatebattery cha...

Page 56: ...he length of all wiringto a minimum Make surethe loop area of the wiringis minimized Route the positiveand negative wires to each motor together Route the battery positiveand negative wires together Where possible route the battery and motor looms together If fitted route the lighting indicator and actuator wires together Secure all looms to the wheelchair s chassisover as much of their length as ...

Page 57: ...he battery gauge is the resistanceof the cableand connections between the battery and the control system The control system must be matched approximately to the cableresistanceof your wheelchair to make the battery gauge accurate The parameter for adjustment is CableResistance refer to Chapter 3 As a guide 2 5mm2 cablehas a resistanceof about 8 milliohms per meter 4 0mm2 cablehas about 5 milliohms...

Page 58: ...Curtiss Wright PG Drives Technology SK77981 14 58 R net Technical Manual Chapter 2 Installation ...

Page 59: ...Module to suitan individual user There is no need for any additional programminghardware Whilein OBP mode the joystick and the speed control buttons are used to navigate the menus and make parameter adjustments If a parameter is availablein OBP mode the title used on the LCD will belisted in brackets next to the Parameter Titlein this chapter Example 6 9 Maximum Forward Deceleration Fwd Decel Max ...

Page 60: ... OBP access is gained by unauthorised personnel obtaining a dongle 2 2 NAVIGATING THE OBP SCREENS Whilstin OBP deflecting the joystick to the left whilstthe parameter titleis highlighted will display an elongated version of the parameter name There are two basic forms of display screen one which shows global parameters and one which shows parameters which are profiledependent i e can have differen...

Page 61: ...um turning speed Minimum Turn Speed Sets minimum turning speed Maximum Forward Acceleration Sets maximum forward acceleration Minimum Forward Acceleration Sets minimum forward acceleration Maximum Forward Deceleration Sets maximum forward deceleration Minimum Forward Deceleration Sets minimum forward deceleration Maximum Reverse Acceleration Sets maximum reverse acceleration Minimum Reverse Accele...

Page 62: ...Modes whilst driving Sleep Timer Sets the period of inactivity before the Control System powers down Standby Time Sets the period of inactivity before Standby Mode is entered Switch to Standby Sets if an external input switch can be used to enter Standby Mode Mode Selection in Standby Sets if the joystick can be used to select Modes when in Standby Mode Standby in Modes Sets the Modes that Standby...

Page 63: ...ator channel operates Actuator Endstop Timeout Sets the period of time before the drive is cut at an endstop position Seating Module Global Actuator Mode Entry Axis For parameter information Refer to the Chapter ELPM 90 JSM LED SM Axis Setup Axis Enabled For parameter information Refer to the Chapter ELPM 90 JSM LED SM Up Speed For parameter information Refer to the Chapter ELPM 90 JSM LED SM Down...

Page 64: ...er Module Steer Correct Adjusts the PM outputs to compensate for mis matched motors Display Speed Sets whether the speed and odometer is displayed in miles per hour or kilometers per hour Displays Sets the format of the digital speed display to be Speed Odometer or Both Maximum Rated Speed This calibrates the speedometer function Maximum Displayed Speed This sets the operation of the graphical spe...

Page 65: ...meter information Refer to the Chapter ISM8 Up Alarm For parameter information Refer to the Chapter ISM8 Down Assign For parameter information Refer to the Chapter ISM8 Down Inhibit in Bands For parameter information Refer to the Chapter ISM8 Down Alarm For parameter information Refer to the Chapter ISM8 Lights Global Indicator Fault Detection Sets whether defective turn indicator lamps can be det...

Page 66: ...apter ASM TM Orientation For parameter information Refer to the Chapter ASM TM Null Calibration For parameter information Refer to the Chapter ASM TM Accelerometer Accelerometer Module Fitted For parameter information Refer to the Chapter ASM TM Accelerometer Error Speed Limit For parameter information Refer to the Chapter ASM TM Maximum Acceleration Threshold For parameter information Refer to th...

Page 67: ...utton on the JSM Note itwill only be possibleto select a Mode if there is a Module that will supportthat Mode connected into the system For example if there is no Mouse Module connected then the user will notbe ableto select that Mode PROFILE MANAGEMENT The R net system can have up to 8 Profiles Conventionally Profile8 is reserved for Dual Attendant Control but can be re assigned meaningthere are7...

Page 68: ...et The R net system has been designed to allowthis by applyingthe followingrule Each operation of the External ProfileSwitch will selectthe next availableProfile Upon reachingthe highestavailableProfile the next operation of the switch will selectthe next availableMode regardless of whether the Mode is availablein the current Profile Curtiss Wrighttherefore recommend a programming set up as below ...

Page 69: ...iles More information is given in the above text If this parameter is selected a drop down menu as below will appear To set whether a Mode is enabled simply highlightthe appropriatemenu item Any combination of Modes can be selected When the drop down menu is closed the selected Modes are expressed as numbers and the parameter appears on the screen as below The numbers 1 to 8 refer to the Modes lis...

Page 70: ...is parameter is only relevantif the InputDevices are identical In all other instances itshould be ignored If set to All then either Input Device can control the Profile and it will bethe InputDevice used to power up the system that will bein control If set to 1 then only the older of the two InputDevices will beableto control the Profile If set to 2 then only the younger of the two Input Devices w...

Page 71: ... Yes for Profiles 1 to 5 meaning the Attendant can grab focus from any InputDevice connected AllowGrab is set to No for Profile8 meaning that other Input Devices cannot grab focus from the Attendant Example 2 In a playground environment a user must have the ability to take focus from the Attendant Module The system is set up as below Profiles 1 to 5 areset for any type of user Input Device Profile...

Page 72: ...ould be programmed as below This means that when the wheelchair is initially shipped with a Power Module and Seating Module fitted then Modes 1 and 2 will beDrive and Seating Control respectively and that Mode 8 would be used for OBP If at some point in the future an Environmental Control Module is required then Mode 4 would automatically become availableto the user I e the Mode button would step ...

Page 73: ... as shown in the followingdiagram Drive provides data that is appropriatefor drivingthe wheelchair and should always beused for Drive mode i e when the Power Module is the active Output Device Seating provides data that is appropriatefor controllingtheseatingof the wheelchair and should always beused for Seating Control mode i e when an ISM or equivalent is the activeOutput Device Raw provides bas...

Page 74: ...eed setting is atmaximum all 5 bars illuminated Programmablerange is 0 to 100 in steps of 1 6 2 MINIMUM FORWARD SPEED FWD SPEED MIN Sets the forward drivingspeed of the wheelchair when the joystick is deflected full ahead and the speed setting is atminimum just1 bar illuminated Programmablerange is 0 to Maximum Forward Speed in steps of 1 NOTE It is not possible to set the value of Minimum Forward...

Page 75: ...Max Turning Speed 6 7 MAXIMUM FORWARD ACCELERATION FWD ACCEL MAX Sets the acceleration rateof the wheelchair in the forward direction when the speed setting is at maximum all 5 bars illuminated Programmablerange is 0 to 100 in steps of 1 6 8 MINIMUM FORWARD ACCELERATION FWD ACCEL MIN Sets the acceleration rateof the wheelchair in the forward direction when the speed setting is at minimum just1 bar...

Page 76: ... illuminated Programmablerange is 0 to Maximum Reverse Acceleration in steps of 1 NOTE It is not possible to set the value of Minimum Reverse Acceleration higher than the value of Max Reverse Acceleration 6 13 MAXIMUM REVERSE DECELERATION REV DECEL MAX Sets the deceleration rate of the wheelchair in the reverse direction when the speed setting is atmaximum all 5 bars illuminated Programmablerange ...

Page 77: ...POWER This reduces the power of the wheelchair Power is the ability of a wheelchair to climb a hill or overcome an obstacle If itis set to 100 then the wheelchair will providefull power Values below 100 will resultin reduced power A typical useis minimizingdamageto doorways or furniture if the wheelchair is beingused indoors The values can be set independently between driveprofiles meaningseparate...

Page 78: ...eleration rate that is used whilefastbraking Fastbrakingis when the joystick is pulled to the reverse position to make a faster stop The programmable range is 0 to 200 If the valueis setlower than the Forward Deceleration value then the latter valuewill beused 7 CONTROLS CONTROLS GLOBAL 7 1 MOMENTARY SCREENS ENABLED MOMENTARY SCREENS This sets whether the large momentary screens appear in between ...

Page 79: ... Yes and No NOTE The beep will only occur on actuator mechanisms that use automatic endstop detection i e over current measurement 7 7 SOUNDER VOLUME SOUNDER VOLUME This sets the volume of the audiblefeedback given whenever a button or switch on the Joystick Module is operated The programmable range is 0 to 10 in steps of 1 If set to 0 there will beno sound given Higher values will giveprogressive...

Page 80: ...of entry into On Board Programming OBP The programmable options areYes and No If set to Yes then a sequence of button presses can be used to enter OBP The sequence is as detailed atthe end of this sec tion If set to No then a hardwareDongle must be connected into the system in order to enter OBP OBP keycode entry is as follows With the system switched off hold down the Horn button and then hold do...

Page 81: ...NCTION This sets whether singleswitch or a switch resistor array for multipleactuator control can beconnected to the External Profile Switch Jack The programmable options areStandard and Actuator Switches If set to Standard a singleswitch can be connected If set to Actuator Switches the External ProfileSwitch Jack will assumeanalogueoperation Dependent on the valueof resistanceconnected to this in...

Page 82: ... is the responsibility of the wheelchair OEM to undertake a risk assessment to determine if hazardous conditions can result from defects in the switch resistor array or its wiring Curtiss Wright accept no liability for losses of any kind arising from the control of actuators from a switch resistor array ...

Page 83: ...cted the function associated with the External ProfileSwitch Jack will bedisabled and a warningdisplayed on the screen NOTE To maximise the error checking capability the resistors must be fitted as physically close as possible to the switch contacts If set to Off the CJSM2 will not check for errors in the external circuitry connected to the External ProfileSwitch Jack and a standard external switc...

Page 84: ...rward speed This is particularly useful for users with limited hand movement The programmable range is 25 to 100 in steps of 1 The percentage valuecorresponds to the amount of joystick deflection required to reach full forward speed For example if set to 50 then only half joystick movement is need to reach full speed The Forward Throw can also be set interactively with the user actually deflecting...

Page 85: ...ts full name A second deflection to the left will exitthe current screen Once a parameter has been selected usingthe Speed Up and Speed Down buttons on the JSM s keypad will effect changes unless an on screen message details otherwise To set Throw Interactively usingOBP use the followingprocedure Enter OBP and selectControls From the Controls Menu select Joystick From the Joystick Menu select Acti...

Page 86: ...ft Right Forward Reverse Yes No Yes Right Left Reverse Forward No Yes Yes Right Left Forward Reverse Yes Yes Yes CONTROLS PROFILED 7 24 CHANGE MODE WHILE DRIVING CMID This sets whether Mode changes arepermitted whilethe wheelchair is driving The programmable options areYes and No 7 25 SLEEP TIMER SLEEP This sets the period of joystick or other type of InputDevice inactivity before the system will ...

Page 87: ...used to select different operating Modes Each of the four joystick directions can beprogrammed to enter a different Mode This is setby Standby Forward Standby Reverse Standby Left and Standby Right If set to No then STANDBY ON will bedisplayed on the screen and joystick deflections haveno effect To resume normal operation the ProfileButton or an External ProfileSwitch if fitted should be operated ...

Page 88: ... can be selected from the menu 7 31 STANDBY REVERSE This sets which Mode is entered when the joystick is deflected in reverse while the system is in Standby Mode Note Mode Select in Standby must be set to Yes for this function to be active The programmable options area listof Modes in a drop down menu Only one Mode can be selected from the menu 7 32 STANDBY LEFT This sets which Mode is entered whe...

Page 89: ...en display will beas above Profiles can beselected with left and right joystick deflections When the desired Profileor Mode is selected it can be entered with a forward deflection of the joystick If the standby timer expires while the system is in Remote Selection Mode the Standby Mode will be re entered and the original Profilewill still apply 7 35 BACKGROUND This sets the LCD screen background c...

Page 90: ...ter is set to Momentary then an operation is a singledeflection of the Speed Paddle If that parameter is set to Continuous then an operation is a continuous deflection of the Speed Paddlefor the programmed valueof parameter Speed Step Rate and will auto repeat 7 38 SPEED STEP RATE This sets the rate at which speed setting changes occur when the Speed Paddleis deflected The programmable range is 0 ...

Page 91: ...erse Cruisedriveis when the wheelchair accelerates while the joystick is deflected then when the joystick is released the drive continues at the achieved speed NOTE If any Profile has latched drive set then an Emergency Stop Switch must be fitted to the system via the Profile jack socket on the Joystick Module If it is required for the system to operate without an Emergency Stop switch this can be...

Page 92: ...will stop Time out is therefore an important safety feature that will stop drive or actuator movement should the user be unableto stop the functions in the usual way It is importantthat an appropriate time out period is set If a valueof 2 or less is set then the time out function is disabled This valueshould only beused in exceptional circumstances and after all therisks havebeen fully assessed WA...

Page 93: ...ach is programmableto define which actuator motors move and also how the user display appears The relevant parameters areAxis Channels and Axis Display INTELLIGENT SEATING MODULE GLOBAL 9 1 ACTUATOR MODE ENTRY AXIS ACT ENTRY AXIS This sets the actuator axis thatis selected when Seating Mode is entered The programmable options arein the form of a drop down menu as shown in the followingdiagram Simp...

Page 94: ...on the user display but with the elements highlighted as defined in red However if the arrow symbols are not defined in red they will not appear on the display In this example the axis direction isnotinverted i e when the joystick is deflected forwards the channel outputs will havepin 2 positivewith respect to pin 1 When the dialoguebox is closed the programming is expressed as follows 9 3 AXIS NA...

Page 95: ... function will not operate and damage to the actuator motor or the wheelchair frame may occur 9 6 UP SPEED UPSPD This sets the speed of a particular ISMchannel in the Up direction Up is defined as pin 2 positivewith respect to pin 1 when the joystick is displaced forward and InvertAxis Direction is not set Programmablerange is 25 to 100 in steps of 1 9 7 DOWN SPEED DNSPD This sets the speed of a p...

Page 96: ...ing of 100 speed the maximum current is 12A The actual speed setting that is required is dependent on the electrical characteristicsof the actuator motor being driven Therefore if currents of greater than 12A are required the speed settings should be gradually reduced until reliableactuator movement is attained Programmablerange is 1A to 15A in steps of 0 1A This parameter can be important if auto...

Page 97: ...auge For example if this valueis setto 2 then the flashingwill occur when the gauge drops to 2 bars 10 3 CABLE RESISTANCE This calibrates thesystem to compensate for the electrical resistanceof the battery cableand connectors to the Power Modul e This is necessary to ensure an accurateestimation of battery charge The programmable range is 0mOhms to 500mOhms in steps of 1mOhm The valueshould take i...

Page 98: ...e options are12V and 24V WARNING It is essential the correct value for the brakes operating voltage is set An incorrect value could result in damage to the brakes or motors Curtiss Wright accepts no liability for losses of any kind resulting from incorrect programming of this parameter 11 4 SOFT STOP RATE This sets the deceleration rate that is used while the wheelchair is soft stopping Soft stopp...

Page 99: ...e Invert M2 Direction and the Motor Swap parameters will apply If set to Inh 2 at 0V Profilemask activeand the Inhibit2 input is connected to 0V then the wheelchair will beconsidered to be in a rear wheel driveconfiguration and the followingconditions will apply The valueof Front Wheel Drive Rate will be forced to 0 within the Power Module s software The Invert M1 Direction the Invert M2 Direction...

Page 100: ...INHIBIT 1 LATCHING This sets whether the Off Board Charger inhibit which is located in the 3 way charger socket on the Joystick Module is latching or non latching Latchingmeans that power must be cycled after the inhibitis removed in order to resume normal operation Non latchingmeans that normal operation will resume immediately the inhibitis removed The programmable options areYes and No If set t...

Page 101: ... to 100 in steps of 1 If set to 0 then normal software for rear wheel driven wheelchairs is employed If set to any other valuethen front wheel drivesoftware is employed A higher valuemakes the software more suitablefor faster wheelchairs 11 13 FWD ACCELERATION LIMIT FWD Acceleration Limit sets the limitof forward acceleration when exiting a turn This limits theforward acceleration of the wheelchai...

Page 102: ...s set the maximum current output from the Power Module They are closely related so are detailed in one section Maximum Current Limitsets the long term maximum current output of the Power Module The programmable range is from50A to 60A on a PM60 50A to 80A on a PM80 or ELPM90 and 50A to 100A on a PM120 in steps of 1A Boost Drive Current sets the short term maximum current output of the Power Module...

Page 103: ...rrent Foldback Time sets a period of time which if exceeded by the software timer will initiatea reduction in the Power Module s maximum current output The programmable range is 0 Seconds to 250 Seconds in steps of 1 Second Current Foldback Level sets the level of current output reduction as a percentage of Maximum Current Limit that will result The programmable range is 25 to 100 in steps of 1 Cu...

Page 104: ...or and the Power Module are estimated to be 40mOhm This gives a total valueof 140mOhm The valueof Compensation should therefore be set to 70 of 140mOhm 100mOhm Once this valuehas been programmed some drivetesting should be carried out Firstof all check that the wheelchair is controllableand comfortableto driveon a smooth level surface If it is not then the valueof Compensation may be too high and ...

Page 105: ...r losses of any kind arising from failure to comply with any of these conditions 12 4 INVERT M1 DIRECTION This inverts the direction of rotation of motor channel M1 on the Power Module If the parameter Motor Swap is setto No then channel M1 drives the left motor The programmable options areYes or No If set to Yes then when the joystick is deflected forwards M1 pin will bepositivewith respect to M1...

Page 106: ...ll appear on the LCD screen NOTE Only certain Input Devices e g CJSM or Omni have the speedometer and Odometer functions 12 9 DISPLAYS Displaysdefines the format of the digital speed display Displayscan beprogrammed to Both Speed or Odometer If set to Both the speed and trip distanceare displayed on the screen If set to either Speed or Odometer only the speed or trip distance will bedisplayed 12 1...

Page 107: ...ge in these situations The programmable range is 0 minutes to 60 minutes in steps of 1 minute A setting of zero disables this function It is not normally necessary to adjust this parameter WARNING The values of both Joystick Stationary Time and Joystick Stationary Range have been selected by the wheelchair manufacturer in order to minimize the risk of motor damage Do not adjust these values with c...

Page 108: ...Power Module these are referred to as Inhibit2 and Inhibit3 and on the ISM these are referred to as Inhibit4 and Inhibit5 For connection details of these inputs pleaserefer to the Installation Chapter Each of these inputs can recognize four different input conditions or states This means that four different events can ori ginate from a singleinput See the followingSpeed Inhibitand Actuator Inhibit...

Page 109: ... 50 speed limitto 25 speed limitto full driveinhibit In this example the Inhibitis connected to Inhibit2 input that is sited on the Power Module A circuitsuch as follows isused The Inhibitinputmust be assigned to a specific softwareInhibit As this is a speed inhibit the parameter DriveInhibits Assign should be used Inhibit2 input is therefore assigned to Drive InhibitA When the seatis in the fully...

Page 110: ...Speed Limit in Band 3 0 ACTUATOR INHIBIT EXAMPLES Application 1 A wheelchair is fitted with a recliningbackrestthathas endstop switches connected to the R net s Inhibitinputs 4 and 5 on the ISM In this example the switches are installed to be normally closed and the Backresthas been programmed to use Actuator Channel 2 A circuitsuch as follows isused The Inhibitinputmust be assigned to a specific ...

Page 111: ... connected to the R net s Inhibit4 input sited on the ISM In this example the Backresthas been programmed to use Actuator Channel 3 The Inhibitinputmust be assigned to a specific softwareInhibit As this is an Actuator Inhibit the parameters Actuator Inhibits Channel 3 Up Assign Down Assign should be used The inputs are therefore assigned to Actuator Inhibits Channel 3 as follows Up Assign Input 4 ...

Page 112: ...his sets whether the PM Inhibit3 inputis interrogated justatentry into DriveMode or constantly duringDriveMode The programmable options areYes and No If set to Yes the input will only beinterrogated atentry into DriveMode An example of when this function may be useful i s if a tilt sensor is used thatcould be inadvertently operated when drivingover rough terrain By employing this function an inhib...

Page 113: ...Input Inhibit4 or Inhibit5 on the ISM See Inhibits Explained for more details on ISM inhibits and bands The programmable range is 0 to 100 in steps of 1 13 9 UPPER LEVEL THRESHOLD This sets the level of the threshold between Band 2 and band 3 for a particular InhibitInput Inhibit4 or Inhibit5 on the ISM See Inhibits Explained for more details on ISM inhibits and bands The programmable range is 0 t...

Page 114: ...See also sections Operation and InhibitAlarm below If set to between 1 and 100 the valuewill correspond to the maximum possiblespeed the wheelchair can drive 13 13 SPEED LIMIT IN BAND 1 This sets the maximum speed of the wheelchair when the Inhibitinput which is assigned to the Drive Inhibit is in Band 1 See Inhibits Explained for more details on Power Module inhibits and bands The programmable ra...

Page 115: ...ositivewith respect to pin 1 when the joystick is displaced forward and InvertAxi s Direction is not set These inhibits arereferred to as A B and C and each can be initiated by any actual hardwareinputin the system This functionality means that any actuator channel direction can be inhibited from3 individual sources The parameter Assign links thesoftware inhibits to an actual hardwareinhibit For e...

Page 116: ...nnels 1 to 6 Down is defined as pin 1 positivewith respect to pin 2 when the joystick is displaced in reverseand Invert Axis Direction is not set These inhibits arereferred to as A B and C and each can be initiated by any actual hardwareinputin the system This functionality means that any actuator channel direction can be inhibited from3 individual sources The parameter Assign links thesoftware in...

Page 117: ...mple if the inhibitis required for Band 3 only then that option should be selected as shown When the drop down menu is closed itwould appear as follows 13 23 CHANNEL X DOWN ALARM This sets whether an audiblealarmwill sound when a channel s down direction in inhibited Down is defined as pin 1 positive with respect to pin 2 when the joystick is displaced in reverseand Invert Axis Direction is not se...

Page 118: ...ed to be reversed when the Inhibit2 input on the Power Module is at0V For more details on seatreversal pleaserefer to section Seat Reversal The programmable options areYes and No If set to Yes then if the seat is reversed the turn indicator leftand rightchannels on the Seating Lighting Module will be exchanged This option should be used if the turn indicatorsaremounted on the wheelchair frame If s...

Page 119: ...taken by the front LED cluster atsupply voltages of 15V 20V 25V 30V and 35V Now repeat for the rear LED cluster This second step is not necessary if frontand rear clusters areof the same type Establishingthe current levels can be achieved by readingthe LED s data sheet the PC programmer status ISM window or by measurement usinga variable voltage power supply If the front and rear LED clusters ared...

Page 120: ...D cluster current draw must also be taken into account when determining the fault current thresholds 15 OEM FACTORY The parameters within the OEM Factory group allowthe manufacturer to set a maximum and minimum programming area for a set of parameters The set values create the new programmable range for the vehicles parameters which cannotbe adjusted without the R net PC Programmer OEM level Examp...

Page 121: ... understood JSM LED LED Joystick Module JSM LED L LED Joystick Module with lightingcontrol buttons EL PM90 EL 90A Power Module SM Seating Module NOTE The EL PM90 can actually be used with any R net JSM including LCD based versions as well as an Omni or any other Input Device The LED JSMs can actually be used with any R net PM ISM or any other Output Device The SM can only be used with the EL PM90 ...

Page 122: ...between the R net and R net LED control systems that operate as previously described in Chapter 1 Where a control has been moved this will benoted however where a control has changed a description of its new functionality and usewill begiven All information regardinghandlingadvice cleaningrequirements and overall control described in Chapter 1 should be followed ...

Page 123: ... steady or flashingslowly then you should chargethe batteries immediately LEDs 1 3 WARNING Do not operate the control system if the battery is nearly discharged Failure to comply with this condition may leave the user stranded in an unsafe position such as in the middle of a road Curtiss Wright accepts no liability for losses of any kind arising from failure to comply with this condition 2 1 2 MAX...

Page 124: ...eelchair is beingdriven Refer to Chapter 3 Programming for details 2 1 4 SPEED PROFILE INCREASE BUTTON This button increases themaximum speed setting or if the control system is programmed for driveprofileoperation selects a higher driveprofile It is possibleto program the control system so this button has no effect while the wheelchair is beingdriven Refer to Chapter 3 Programming for details 2 1...

Page 125: ...RELEASED The control system safety circuits haveoperated and the control system has been prevented from moving the wheelchair This indicates a systemtrip i e the R net has detected a problem somewhere in the wheelchair s electrical system Please followthis procedure Switch off the control system Make surethat all connectors on the wheelchair and the control system are mated securely Check the cond...

Page 126: ... hand motor has a short circuit to a battery connection Contact your service agent The right hand motor has a bad connection Check the connections to the right hand motor The right hand motor has a short circuit to a battery connection Contact your service agent The wheelchair is being prevented from driving by an external signal The exact cause will depend on the type of wheelchair you have A joy...

Page 127: ...ary slightly dependingon whether the control system is programmed to operate with driveprofiles For more information on driveprofiles refer to Chapter 3 3 10 1 SPEED INDICATION The number of LEDs illuminated shows the maximum speed setting For example if the setting is speed level 4 then the four left hand LEDs will be illuminated 3 10 2 PROFILE INDICATION The LED illuminated shows the selected dr...

Page 128: ...can reset this condition by switching the control system off and on again Refer to section 3 If the battery gauge flashes rapidly then the R net has detected a problem somewhere in the wheelchair s electrical system Refer to section 3 for details 5 MOUNTING AND INSTALLATION The modules that make up the LED range should be mounted as per the instructions in Chapter 2 Although the overall dimensions...

Page 129: ...ar wiring arrangements used on the wheelchair for both normal use and stalled conditions Curtiss Wright can make general recommendations for wiring for R net control systems but Curtiss Wright accepts no responsibility for and accepts no liability for losses of any kind arising from the actual wiring arrangement used The chair manufacturer is responsible for ensuring that only the mating connector...

Page 130: ...Curtiss Wright PG Drives Technology SK77981 14 130 R net Technical Manual Chapter 4 ELPM 90 JSM LED SM 6 1 1 POWER MODULE WIRING The followingdiagramgives details of the LED Power Module connections ...

Page 131: ...to Chapter 2 Installation 6 4 EL PM TO SEATING MODULE CONNECTIONS Use only a Curtiss Wrightsupplied SeatingModuleCable to connect between the EL PM and the Seating Module The 4 way connector on this cablecarries Actuator and Inhibit2 connections whilethe two 2 way connectors on the other end should be connected to the EL PM s Actuator and Inhibit2 connections NOTE If it is required to connect a sw...

Page 132: ...ociated with the Seating Module NOTE For any of the following programming to be effective the parameter Seating Module Enabled must be set to Yes ACTUATOR AXES EXPLAINED An actuator axis means a particular function of seatcontrol An axis may involvejustone actuator motor for example a simple seat lift or an axis may involvemultiple motors for example adjustment of both footrests simultaneously or ...

Page 133: ...axis that is selected when Seating Mode is entered The programmable options arein the form of a drop down menu as shown in the followingdiagram Simply select the required axis If Lastused is selected this means the axis thatwas selected on the last occasion SeatingMode was used will bethe selected axis when Seating Mode is re entered SEATING MODULE AXES SETUP 7 3 AXIS ENABLED This parameter sets i...

Page 134: ... LIMIT TIMEOUT This parameter sets the time after which Endforce will notbe applied to the actuator It is programmablebetween 0 OFF and 5000ms in steps of 10ms The PG default valueis 0 OFF 7 6 AXIS DISPLAY This parameter sets which Actuator Indicator LED s on a JSM LED areilluminated when a particular axisisselected If the Seating Module is beingused in conjunction with an LCD based Module then th...

Page 135: ...ule will illuminateboth Footrest LEDs and movement of the joystick either forward or backwards will activatethe actuator motors connected to channels 4 and 5 SEATING MODULE AXES INHIBITS 7 7 AXIS X UP ASSIGN X 1 TO 12 Each actuator axis has a softwareinhibitfor its up direction Up is defined as pin 2 positivewith respect to pin 1 when th e joystick is displaced forward The inhibitcan beinitiated b...

Page 136: ...inhibitfor its down direction Down is defined as pin 1 positivewith respect to pin 2 when the joystick is displaced in reverse The inhibitcan be initiated by any actual hardwareinhibitin thesystem The parameter Assign links thesoftware inhibitto an actual hardwareinhibit For example if Assign is set to 2 then the axis can be inhibited by InhibitInput2 The programmable options areOff and 2 to 33 If...

Page 137: ...nd direction of the wheelchair motors The encoder converts information such as position and direction of rotation of the motor into a digital signal which can beused by the R net system to accurately control the speed and direction of the wheelchair NOTE The Curtiss Wright Encoder Module should only be used with 24V Encoders with a current rating of 75mA per channel 2 INSTALLATION The Encoder Modu...

Page 138: ...ition where itis not exposed to levels of water dust shock or vibration above those expected on a mobility application The Encoder Module has been tested in accordancewith IS07176 14 with respect to these conditions Contact Curtiss Wrightif you need further advice 3 3 CONNECTIONS There are two 4 way connectors one for each encoder The pin out for these connectors is as below Encoder Module connect...

Page 139: ...mable options areYes and No If set to Yes and functioningencoders arenot connected then an error condition will occur If set to No and functioningencoder arenot connected then conventional drivecontrol will occur 4 2 ENCODER ERROR SPEED LIMIT This sets the maximum speed of the wheelchair should an encoder error be detected The programmable range is 0 to 100 in steps of 1 4 3 INVERT M1 This reverse...

Page 140: ... speed limits are active Full forward motor speed 21 6 24 x Motor Rated Speed The programmable range is 150rpm to 9775rpm in steps of 1rpm NOTE If a slower full forward motor speed is required then the parameter Forward Speed should be set accordingly 4 7 COMPENSATION Even though this parameter is not used for speed control to ensure safety particularly if an encoder becomes defective or disconnec...

Page 141: ...ced Front Wheel Drive eFWD software algorithmis employed Contact the Curtiss Wrightapplications department for a detailed set up procedure for front wheel drivechairs In addition theASM can also be used as a TiltModule TM a typical application beingto measure the angleof reclineof a wheelchair s adjustableseat To allowboth an ASM and a TM to be used on the same wheelchair there aretwo different pa...

Page 142: ...l strength 6 At a vertical heightlevel with the center of the drivewheels To help prevent largetransverseaccelerationswhen going over bumpy ground 2 2 TM MOUNTING The R net TM must be mounted 1 In a position where impactis unlikely 2 To a surfaceof the item from which the angleis to be measured 3 In one of the eight supported orientations Refer to see section 3 9 2 2 ORIENTATION The ASM TM should ...

Page 143: ...n the chair Null Calibration Sets a tilt angle offset to allow for the modules mounting position Accelerometer Accelerometer Module Fitted Sets whether the Power Module checks for the presence of an ASM Accelerometer Error Speed Limit Sets the maximum speed of the wheelchair should an ASM error be detected Maximum Acceleration Threshold Sets the acceleration above which the forward speed will star...

Page 144: ...UNCTION This parameter sets the function of the ASM The programmable options are Accelerometer Tiltand Both If set to Accelerometer the ASM will operateas a drive stability module If set to Tilt the ASM will operate as a tiltmodule If set to Both the ASM will operateas both a drivestability and a tiltmodule 3 2 ORIENTATION Orientation sets the expected mounting of the ASM with respect to the forwa...

Page 145: ...peed Limit If set to No and the ASM is not fitted then no speed limitwill bepresent 3 5 ACCELEROMETER ERROR SPEED LIMIT This sets the maximum speed of the wheelchair should an ASM error be detected The programmable range is 0 to 100 in steps of 1 3 6 MAXIMUM ACCELERATION THRESHOLD MINIMUM ACCELERATION THRESHOLD FORWARD SPIN SCALAR The effect of parameters Maximum Acceleration Threshold Minimum Acc...

Page 146: ...lchair may decelerate rapidly duringa turn This parameter is programmablebetween 0 and 100 where 0 disables thefunction STABILITY ADVANCED STABILITY MODULE TILT 3 8 FORWARD TILT INPUT The R net ASM measures the real angle of tiltusingthe forward TiltInput This information is transferred onto the R net bus as standard inhibitmessages which can be interpreted by other modules to effect seat movement...

Page 147: ...tion for more information INHIBITS GLOBAL 13 1 DISABLE INHIBIT 8 IN DRIVE This sets whether Inhibit8 input is interrogated justat entry into Drive Mode or constantly duringDriveMode The programmable options areYes and No If set to Yes the input will only beinterrogated atentry into DriveMode An example of when this function may be useful is if a tilt sensor is used thatcould be inadvertently opera...

Page 148: ...ut See ASM TM Inhibits Explained for more details on inhibits and bands The programmable range is 90 degrees to 90 degrees in steps of 1 degree 3 14 DEBOUNCE TIME This sets a debounce time for the Inhibitinput Debounce is the amount of time the inputmust be stablebefore a new condition is registered This is particularly useful if mercury switches arebeing employed and eliminates the effect of spla...

Page 149: ...the reclinemechanism and the forward tiltinput has been assigned to Inhibit8 used by the TM In this example the TM is programmed to Orientation 8 and the Reclinemotor has been connected to Actuator Channel 1 The Inhibitinputmust be assigned to a specific softwareInhibit As this is an Actuator Inhibit the parameters Actuator Inhibits Channel 1 Up Assign Down Assign should be used The inputs are the...

Page 150: ...inemechanismvia Inhibit8 This programmingmeans that the Down movement will beinhibited when the Inhibit8 inputis in Band 3 i e the reclineangle is greater than 78 The inhibit8 messages can be used by other modules to evoke drivespeed limits In this casea full drivelock outwhen tilted greater than 78 in band 3 a reduced speed in bands 2 and 1 when the seatis tilted between 77 and 20 and no speed re...

Page 151: ... that does not have the Gyro control enabled so that the chair is always safe and stable to drive without Gyro Curtiss Wright accepts no liability for losses of any kind arising from failure to comply with this condition 2 INSTALLATION The Gyro Module can connect into the R net serial bus atany convenient point 2 1 GYRO MODULE MOUNTING For best performance the Gyro Module should be mounted accordi...

Page 152: ...ection of this Chapter The module has an IPX4 dust and water rating 2 4 CONNECTIONS There is one ReBus connector within the Gyro Module used for connection to the R net system 3 PROGRAMMING The Gyro module gives the most comfortable results on a wheelchair that has already been set up to provideoptimal performance and steering stability without Gyro control The parameters that most affect general ...

Page 153: ...luences the straight tracking of a wheelchair to provide directional stability Dynamic Gain Sets whether the system uses 2 or all 4 Gain parameters to affect drive stability Low Speed Proportional Gain Sets the rate at which the Gyro will respond to fast changes in wheelchair direction at low speed Low Speed Integral Gain Influences the straight tracking of a wheelchair to provide directional stab...

Page 154: ...igh it will introduce steering overshoot and can introduceoscillation into the control loop The programmable range is 0 to 255 where 0 is a very slowresponserate and 255 is a very fastresponse rate 3 7 DYNAMIC GAIN This parameter sets whether the system uses the parameters Proportional Gain and Integral Gain solely or a combination of Proportional Gain Integral Gain Low Speed Proportional Gain and...

Page 155: ...abled within each of the Profiles The programmable options areYes and No If set to Yes then gyro control is enabled within that Profile If set to No then gyro control is not enabled within that Profile CAUTION At least one Profile should be set to No in order to allow the wheelchair to be used in a moving environments such as trains busses or ships 5 SET UP OF THE GYRO MODULE The set up should be ...

Page 156: ...e Gyro Status window 8 Repeat steps 6 and 7 above for the oppositeturn direction and average the 2 results 9 Program the Angular Speed Scalar parameter with the calculated result 10 Now the Gyro Module Fitted option may be set to Yes and the Proportional and Integral gains can beprogrammed 11 Tune the Proportional and Integral Gains as required 12 Enable the dynamic gains and tune optional 13 Sele...

Page 157: ...t is possible to set up a Control System so that it is unsuitable for some users or even some vehicles For all of the above reasons it is important that you contact Curtiss Wright if you have the slightest doubts or if you need any advice on programming WARNING Programming and diagnostics should only be conducted by healthcare professionals with in depth knowledge of Curtiss Wright electronic Cont...

Page 158: ...ain in the connector recesses It is recommended that the unitis not mounted with the connectors uppermost The ISM 8 has an IPX4 moisture resistancerating 3 2 POSITION The ISM 8 must be mounted in a position where itis not exposed to conditions of water or dust above thos e specified in ISO7176 9 The LM is designed to withstand levels of shock and vibration experienced when mounted to the chassisof...

Page 159: ...t Communication Cables Curtiss Wright accept no liability for any losses of any kind if an incorrect cable is used 4 2 INHIBITS The ISM 8 contains Inhibit18 to 33 connections These connections can be used to limitspeed inhibitdriveand or inhibit actuator channels Refer to Section 5 Programmingfor full details Signals to the Inhibitconnector can be passive i e A resistor varyingfrom0Ω to 10kΩ or ac...

Page 160: ...lay for a particular axis Invert Channel Direction Inverts the direction of a Channel within an Axis Channels Acceleration Sets the acceleration for each actuator channel Deceleration Sets the deceleration for each actuator channel Up Speed Sets the speed in the up direction for each actuator channel Down Speed Sets the speed in the down direction for each actuator channel Up Current Limit Sets th...

Page 161: ...n anti shear reclinesystem There are8 actuator motor channels on the ISM 8 and an axis can combineany number of these channels The default ISM 8 application can supportup to 12 actuator axes Each is programmableto define which actuator motors move and also how the user display appears Therelevant parameters areAxis Channels and Axis Display 5 2 1 ACTUATOR END STOP BLEEP This allows theuse of an Au...

Page 162: ... a dialoguebox as shown in the followingexamplediagram In this example Axis 6 is the Axis that is beingset up With the programming as shown Channels 2 3 4 and 5 will operatein this Axis the direction of Channel 2 is inverted i e when the joystick is deflected forwards the channel outputs will havepin 2 negative with respect to pin 1 and the Joystick Module will highlight thoseareas colored in red ...

Page 163: ...the automatic endstop function will not operate and damage to the actuator motor or the wheelchair frame may occur 5 2 5 DECELERATION This sets the deceleration rate for a particular ISM 8 channel Programmablerange is 1 to 100 in steps of 1 WARNING This parameter must be set to 100 on systems that use automatic endstops i e those that do not use micro switches at the end of actuator travel If the ...

Page 164: ...the high endstop force This forcecan be effectively reduced by reducingthe valueof this parameter NOTE The value must not be set so low that it cannot move the maximum rated load for the actuator mechanism or does not account for wear and increased friction in the mechanism 5 2 9 DOWN CURRENT LIMIT This sets the maximum current output for a particular ISM 8 channel in the Down direction Down is de...

Page 165: ...c programmingparameters This branch will beused where the ISM 8 has been customized by a wheelchair OEM to offer specific functionality thatis different to what is delivered as standard by PG These parameters will need to be defined in conjunction with Curtiss Wright 5 3 INHIBITS INHIBITS EXPLAINED The ISM 8 as 16 InhibitInputs these are number 18 33 For connection details of these inputs pleasere...

Page 166: ... Operation Each inputcan also be linked to an actuator function via the parameters Assign Channel x Up Inhibitin Bands and Channel x Down Inhibitin Bands SPEED INHIBIT EXAMPLE Application A wheelchair with an elevating seat whereby when the seat is lowered full speed drive is permitted Then as the seat raises 3 switches areoperated thereby changingthe resistanceconnected to the inputand giving say...

Page 167: ...peed Limit in Band 1 50 Speed Limit in Band 2 25 Speed Limit in Band 3 0 Actuator InhibitExamples Application 1 A wheelchair is fitted with a recliningbackrestthathas endstop switches connected to the R net s Inhibitinputs 20 and 21 on the ISM 8 In this example the switches are installed to be normally closed and the Backresthas been programmed to useActuator Channel 2 A circuitsuch as follows isu...

Page 168: ...ed to the R net s Inhibit20 input sited on the ISM 8 In this example the Backresthas been programmed to useActuator Channel 3 The Inhibitinputmust be assigned to a specific softwareInhibit As this is an Actuator Inhibit the parameters Actuator Inhibits Channel 3 Up Assign Down Assign should be used The inputs are therefore assigned to Actuator Inhibits Channel 3 as follows Up Assign Input 20 Down ...

Page 169: ...ton the ISM 8 See Inhibits Explained for more details on ISM 8 inhibits and bands The programmable range is 0 to 100 in steps of 1 5 3 3 UPPER LEVEL THRESHOLD This sets the level of the threshold between Band 2 and band 3 for a particular InhibitInputon the ISM 8 See Inhibits Explained for more details on ISM 8 inhibits and bands The programmable range is 0 to 100 in steps of 1 5 3 4 DEBOUNCE TIME...

Page 170: ... 33 If set to Off then the relevant Channel x Up Inhibitcan never be active If set to a numeric value then the relevant Channel x Up Inhibitwill beunder the control of the InhibitInputthat corresponds to that number Inhibit Inputs 2 and 3 are on the Power Module and Inhibits 18 to 33 will be on the ISM 8 5 3 7 CHANNEL X UP INHIBIT IN BANDS This sets the condition of the input assigned to Channel x...

Page 171: ...l sources Channel X Up InhibitActivein Axis sets whether the software Inhibitis activein a particular Axis If all twelve Axes areselected the software Inhibitwill beactivein all availableAxes If Up Inhibit InhibitActivein Axis is programmed to a subsetof Axes 1 12 the software Inhibitwill only beactive in the selected Axes In the example below Channel 1 Up direction is inhibited usingsoftwareInhib...

Page 172: ...nhibit thatwill resultin a n inhibitof the actuator drivein the down direction Down is defined as pin 1 positivewith respect to pin 2 when the joystick is displaced in reverseand Invert Channel Direction is not set The inhibitcan beset to occur in any combination of bands Inhibits Explained for more details on bands The programmable options areBand 0 Band 1 Band 2 and Band 3 If the parameter is se...

Page 173: ...is functionality means tha t any actuator Channel direction can be inhibited from three individual sources Channel X Down InhibitActivein Axis sets whether the software Inhibitis activein a particularAxis If all twelve Axes areselected the software Inhibitwill beactivein all availableAxes If Down Inhibit InhibitActivein Axis is programmed to a subset of Axes 1 12 the software Inhibitwill only beac...

Page 174: ...Curtiss Wright PG Drives Technology SK77981 14 174 R net Technical Manual Chapter 8 ISM 8 ...

Page 175: ... System so that it is unsuitable for some users or even some vehicles For all of the above reasons it is important that you contact Curtiss Wright if you have the slightest doubts or if you need any advice on programming WARNING Programming and diagnostics should only be conducted by healthcare professionals with in depth knowledge of Curtiss Wright electronic Control Systems Incorrect programming...

Page 176: ...however it should be mounted in such a way that water canno t enter and remain in the connector recesses It is recommended that the unit is notmounted with the connectors uppermost The LM has an IPX4 moisture resistancerating 3 2 POSITION The LM must be mounted in a position where itis not exposed to conditions of water or dust above thos e specified in ISO7176 9 The LM is designed to withstand le...

Page 177: ...tis required to ensure that a total maximum R net bus current is never exceeded It is necessary to announce the current consumption of the lightingfunctions on the R net bus This is done by setting the Lights Power and Indicator Power parameters see below 5 1 LAMP VOLTAGE This sets the operating voltage for the wheelchair s lightingsystem The programmable options are12V and 24V The wheelchair s li...

Page 178: ...rsalwaysflash ata duty cycleof 50 The programmable ranges is 1W to 42W in steps of 1W 5 4 INDICATOR FAULT POWER This sets the power threshold for singleindicator bulb failuredetection NOTE TÜV Germany requires that 2 x 21W lamps per side are used for the turn indicators With Indicator FaultDetection set to Yes If the total power drawn from the indicator outputis less than the valueprogrammed the i...

Page 179: ...ult in an unsafe set up of a wheelchair Curtiss Wright accepts no liability for losses of any kind arising from an incorrect or badly effected repair 1 1 DIAGNOSTIC PROCEDURE To diagnosea trip pleasefollowthis procedure Read and note the Trip Text displayed the Identified Module and the Trip Code Refer to section 2 Switch off the control system Make surethat all connectors on the listed Module and...

Page 180: ...odule Trip Text Low Battery Trip Code 2C00 This means the battery needs chargingor there is a bad connection to the battery Check the connections to the battery If the connections aregood try chargingthe battery 2 2 SYSTEM LOG SCREEN All trips arestored in the system log whether they have been resolved or arestill active The system log stores the Trip Text and the number of occurrences The trips a...

Page 181: ... will be displayed otherwise something similarto the following screen will be displayed 2 3 CONNECTIONS The R net has various connectionsthatarereferred to by the diagnostic text These connections can be on the Power Modules PM ELPM Joystick Modules JSM JSM LED and the Seating Modules LM SM ISM The followingdiagramshows the connections on these Modules ...

Page 182: ... Technology WARNING The R net has 5 Inhibit connections within these 3 Modules but programming allows for multiple inhibit connections to be added in further Curtiss Wright and 3rd party Modules For details of these inhibit connections refer to the Wheelchair Manufacturers documentation ...

Page 183: ...t Refer to section 3 10 R Ind Lamp Short Refer to section 3 10 L Ind Lamp Failed Refer to section 3 11 R Ind Lamp Failed Refer to section 3 11 Over current Refer to section 3 12 Overtemp Acts Refer to section 3 13 Overtemp Lamps Refer to section 3 14 DIME Error Refer to section 3 15 Memory Error Refer to section 3 16 PM Memory Error Refer to section 3 17 Bad Cable Refer to section 3 18 Bad Setting...

Page 184: ...trol system detects that the battery voltage has risen above35V The most common reasons for this are overcharging of the battery or bad connections between the control system and the batteries Check the condition of the batteries and the connections to the control system If the trip is still presentafter the batteries and connections have been checked then the Power Module may be defective Refer t...

Page 185: ...empt calibration If the trip is still presentafter the above has been attempted then the Joystick Module may be defective Refer to Section 5 3 8 BRAKE LAMP SHORT This occurs when the control system detects a shortin the Brake Lamp Circuit Refer to section 2 3 for connection details Check the brakelamps cables and connections to the control system If the trip is still presentafter the above checks ...

Page 186: ...been made then the SM or ISM may be defective Refer to Section 5 3 13 OVERTEMP ACTS This occurs when the control system detects that the SM or ISM s actuator circuitry has become too hot The control system will cease drive to the actuator motor in question Allowthe SM or ISM to cool If the SM or ISM is frequently overheating check the condition of the actuator motors and the connections to them If...

Page 187: ...sed trip Check all cables and connections Usingthe R net PC Programmer re program the control system This should be done with either the most current specific programfilefor the wheelchair or the manufacturer s original programming file WARNING Programming should only be conducted by healthcare professionals with in depth knowledge of Curtiss Wright control systems Incorrect programming could resu...

Page 188: ...nd if the programming of the control system is altered from the factory pre set values 3 20 MODULE ERROR This occurs when the control system detects a trip within a specific module The module will beidentified on the diagnostics screen as described in section 2 Check all cables and connections Cycle the power If the trip is still presentafter the above checks have been made then the module identif...

Page 189: ...s between the CJSM2 and the switch If the trip is still presentafter the above checks have been made then the switch or the CJSM2 may be defective Refer to Section 5 WARNING Because a disconnected User Switch means there is no emergency stop function Curtiss Wright recommend that Switch Detect for this option is always set to On Curtiss Wright will accept no liability for any losses resulting from...

Page 190: ...5 3 28 ORIENTATION ERROR This error occurs when the programmed orientation of the ASM does not match the actual mounted orientation Check the programmingof the parameter Orientation againstthe actual mountingof the ASM If the trip is still presentafter the above checks have been made then the ASM may be defective Refer to Section 5 3 29 ASM DISCONNECTED This error occurs when the control system de...

Page 191: ...xact information of other tests Curtiss Wright accepts no liability for losses of any kind arising from the carrying out of the described tests or from not carrying out additional relevant tests These testsshould be conducted in an open space and a restraining device such as a seat belt should always be used Curtiss Wright accepts no liability for losses of any kind arising from failure to comply ...

Page 192: ...release the joystick and ensurethe wheelchair comes to rest and the brakes are applied without the front wheels liftingoff the ground 4 5 LIGHTS INDICATORS AND HAZARD LAMPS TEST If lights arefitted Visually check each bulb for correct illumination Check each indicator bulb for correctillumination and thatthe flash rateis 1 5Hz 0 5Hz Disconnecteach bulb in turn and check that the remainingbulb for ...

Page 193: ...iss Wrightapproved serviceorganization for repair WARNING Any replacement work carried out without the wheelchair manufacturer s permission will invalidate the control system s warranty Opening or makingany unauthorized adjustments or modifications to the R net control system or its components will invalidate any warranty and may resultin hazards to the vehicleuser and is strictly forbidden WARNIN...

Page 194: ...SK77981 14 194 R net Technical Manual Chapter 10 Diagnostics Curtiss Wright PG Drives Technology ...

Page 195: ...t accepts no liability for losses of any kind arising from failure to comply with this condition Chapter 1 Section 8 2 2 3 HAZARDS WARNING Although the R Net control system is designed to be extremelyreliable and each unit is rigorously tested during manufacture the possibility of a system malfunction always exists however small the probability Under some conditions of system malfunction the contr...

Page 196: ... hazard for the user Curtiss Wright accepts no liability for losses of any kind arising from failure to comply with this condition Ensure that the charger plug pins are of the correct polarity to be compatible with the pin polarity shown on the control system s specific data sheet Failure to observe this condition could result in a burn hazard or fire hazard Curtiss Wright accepts no liability for...

Page 197: ...ection 17 2 10 PROGRAM SETTINGS WARNING It is the manufacturer s responsibility to program the control system to suit the vehicle model and ensure safe operation in compliance with relevant legal requirementsover the whole of the operating range Curtiss Wright accepts no liability for losses of any kind due to failure to or incorrect programming or the R net Control System Refer to Chapter 3 for p...

Page 198: ...es of any kind arising from failure to comply with this condition Chapter 2 Section 6 1 2 13 CRIMPING WARNING Defective or poor quality crimps may affect the warranty of the control system Curtiss Wright accepts no liability for losses of any kind arising from failure to comply with this condition Chapter 2 Section 6 1 3 2 14 WIRE GAUGE AND TYPES WARNING Battery and motor wires should have 105ºC r...

Page 199: ... condition The chair manufacturer is responsible for always ensuring that any replacement motors or gearboxes are fully compatible with the originals that the control system was designed to match Failure to do this may result in poor control characteristics which in extreme instances can make a chair uncontrollable and potentially unsafe Curtiss Wright accepts no liability for losses of any kind a...

Page 200: ...NG Curtiss Wright recommend that if seat actuators are driven using this input and a single switch then the switch must be fitted with a resistor as described above Curtiss Wright accept no liability for losses of any kind arising from the use of any other switch Chapter 3 Section 7 16 7 24 ON OFF JACK DETECT WARNING Curtiss Wright recommend the switch must be fitted with a resistor as described a...

Page 201: ...and damage to the actuator motor or the wheelchair frame may occur Chapter 3 Section 9 5 2 30 BRAKE FAULT DETECT WARNING This parameter should only ever be set to No if there are no electrical brakes fitted to the wheelchair Chapter 3 Section 11 2 2 31 BRAKE VOLTAGE WARNING It is essential the correct value for the brakes operating voltage is set An incorrect value could result in damage to the br...

Page 202: ...elchair type to another without first ensuring that the system is correctly programmed for the wheelchair it is intended to fit it to Even if control systems have the same Curtiss Wright part number they may not be programmed the same Failure to ensure the system is correctly programmed for the wheelchair may result in a hazardous condition Curtiss Wright accepts no liability for losses of any kin...

Page 203: ... accepts no liability for losses of any kind arising from the actual wiring arrangement used The chair manufacturer is responsible for ensuring that only the mating connectors specified by Curtiss Wright on the control systems specific data sheet are used to connect to the control system Curtiss Wright accepts no liability for losses of any kind arising from failure to comply with this condition T...

Page 204: ...ning device such as a seat belt should always be used Curtiss Wright accepts no liability for losses of any kind arising from failure to comply with this condition Chapter 5 Section 4 2 44 SERVICING OF DEFECTIVE UNITS WARNING Any replacement work carried out without the wheelchair manufacturer s permission will invalidate the control system s warranty Curtiss Wright accept no liability for losses ...

Page 205: ...tery ChargingCurrent 12Arms max Maximum Drive Current R Net 80 80A R Net 90 90A R Net 120 120A Indicator Outputs 42W per side Lighting Outputs 21W per side Brake Light Output 42W total Actuator Current ISM 15A max at reduced speed 12A max atfull speed SM 12A max MoistureResistance Electronics to IPX4 Non LCD Modules Modules with LCD Screens OperatingTemperature 25 C to 50 C 10 C to 50 C Storage Te...

Page 206: ...SK77981 14 206 R net Technical Manual Chapter 12 Specifications Curtiss Wright PG Drives Technology ...

Reviews: