21-0400E v2.3.3
Welcome
Common
Admin Config Install
Tech-Ref
25
7.6.4
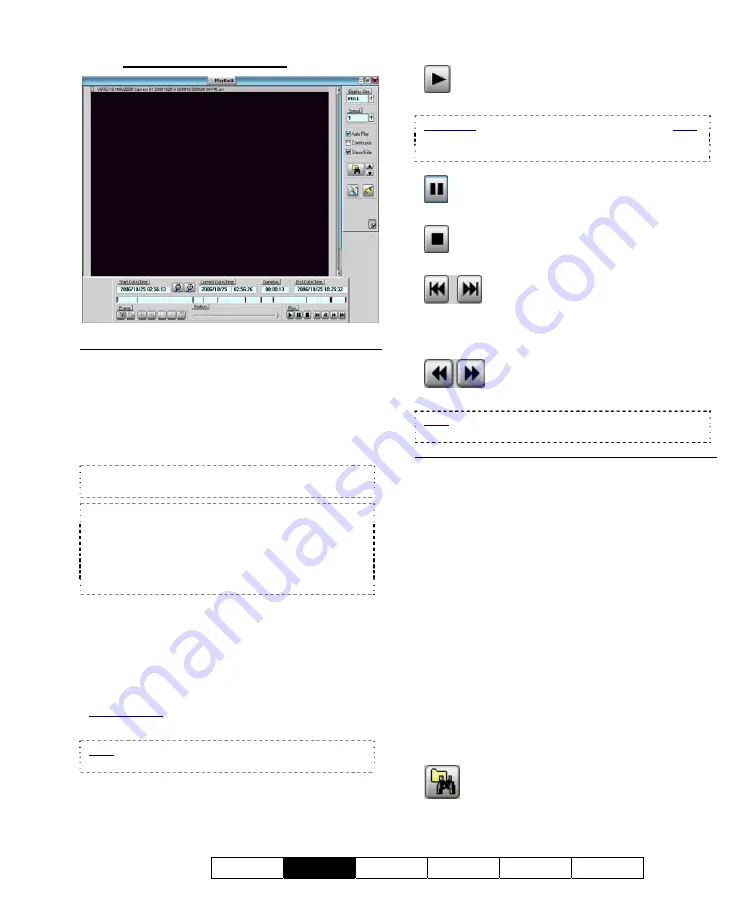
The Playback Screen
Bottom of the Screen
Dates/Times, Magnifiers, and
Coloured Bands
-
All recordings in the selected date/time-range
are indicated graphically as coloured bands at
the bottom of the screen.
The coloured bands indicate different types of
recordings in the selected time-range.
•
Red:
A motion / alarm-triggered recording;
•
Light Blue:
A pre-alarm recording (immediately
before motion was detected);
•
Yellow:
A manual / instant recording;
•
Green:
A scheduled recording.
You can change the dates/times as desired, or
use the 'magnifying glasses' to zoom into a
smaller date/time range (near the file being
viewed), or return to the full range.
- Frame (snapshot buttons)
: These allow
grabbing a video frame for viewing or printing.
Related Topic:
7.7 Viewing and Printing 'Snapshots'
Note: These are visible only when
Show/Hide
is
selected on the right [
9
].
Position (slider)
-
This allows you to move around within the file
that is on-screen.
Play (standard playback control buttons)
-
Play:
Starts playing the video clip(s) for
the selected start time.
Auto Play: This occurs automatically if "Auto Play"
is selected (
9
) near the bottom-right corner of the
screen.
-
Pause:
Stops playing the video(s) and
stays at the present position in the file(s).
-
Stop:
Stops playing the video(s) and
resets to the beginning of the present file.
-
Previous/Next File:
Jump to the
Previous
or
Next
file (as per the starting time
from any camera). This changes the
Start Time
to the beginning of that file.
-
Backward/Forward:
Rewinds or
advances the video one frame at a time.
Note: Some of the buttons above are visible only
when
Show/Hide
is selected on the right [
9
].
Right-Hand Side of the Screen
- Display Size
: This provides selections for
setting the relative size of the video within the
playback area.
-
Speed:
This sets the Playback Speed (relative
to the recorded speed of 1).
-
Auto Play:
When selected (
9
) 'found' files
start playing automatically (after performing a
search). You do not have to click
[Play]
.
-
Continuous:
When selected [
9
] all newer
recordings in the folder will be played (in the
order they were recorded), starting with your
(oldest) selected file. If not selected, playback
will stop at the end of the present file.
-
Show/Hide:
When selected [
9
] this displays
the 'Snapshot' and some additional playback
controls at the bottom of the screen.
-
Set Start Time:
This button brings up the
original
Search
screen where you can select the
Date
and
Events
again.
Summary of Contents for NetVision Plus
Page 1: ...User s Guide 2 3 ...
Page 2: ......
Page 8: ...vi NetVision Plus Elite and Micro DVR v2 3 SP2 User s Guide 21 0400E v2 3 3 ...
Page 9: ...21 0400E v2 3 3 Welcome Common Admin Config Install Tech Ref 1 Welcome to NetVision ...
Page 17: ...21 0400E v2 3 3 Welcome Common Admin Config Install Tech Ref 9 Common Daily Tasks ...
Page 54: ...46 NetVision Plus Elite and Micro DVR v2 3 SP2 User s Guide 21 0400E v2 3 3 ...
Page 71: ...21 0400E v2 3 3 Welcome Common Admin Config Install Tech Ref 63 System Configuration ...
Page 110: ...102 NetVision Plus Elite and Micro DVR v2 3 SP2 User s Guide 21 0400E v2 3 3 ...
Page 111: ...21 0400E v2 3 3 Welcome Common Admin Config Install Tech Ref 103 Reference Topics ...
Page 148: ...140 NetVision Plus Elite and Micro DVR v2 3 SP2 User s Guide 21 0400E v2 3 3 ...
Page 164: ......


