background image


42

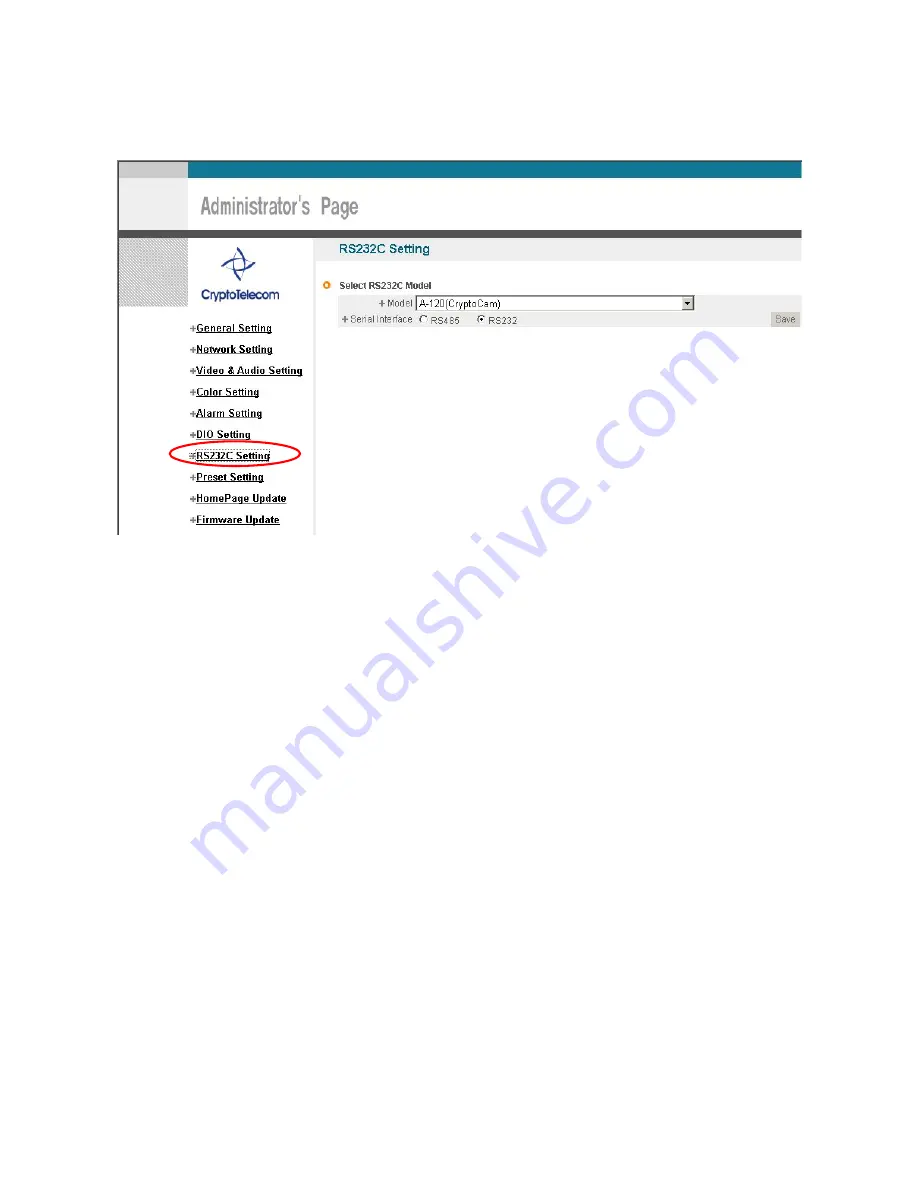
4.7 RS232C Setting   


Pic. 4

21 RS232C Setting 

It is available to select P/T/Z module supported or P/T/Z Integrated Camera. Models of Camera supported by 

S-160 are: 

A-120 (CryptoCam / RS232),   

Canon VC-C4R (RS232),   

Wonwoo PT-101 (RS485),   

Technovision SECUMERA_PRO (RS485),   

LG Electronics LPT-A100L(RS485),   

ShinTech SD-290(RS485),,   

Dongyang Unitec DRX-500,DRX-502A,DOH-240 (RS485), DSC-230Si,DSC-270Si,DOH-240Si (RS485),   

Hitron Fastrax2 (RS485).   

IZIrobotics A.I Robot TOBO[T-010](RS485) 

CNB Technology AN201L(RS485) 

Sunkwang SK-D106(RS485) 

TYCO/CTNCOM HD-0670(RS485) 

SAMSUNG SRX-100B/SPT-5IO/SCC-C4201/SCC-641/SCC-931T (RS485) 

PELCO PELCO-D 2400, PELCO-D 9600 (RS485) 

Sony EVI-D100/D70 

Sysmania ORX-1000 


Summary of Contents for S-160

Page 1: ...1 Network A V Server S 160 User s Manual Version1 0 ...

Page 2: ...ssage through Mobile Phone and E mail message from PC when events occur To record Event in FTP server installed in remote place or S 160 To search delete down load replay the recorded video To support various wireless devices such as Mobile Phone PDA to see real time Video in Wireless Internet handset For more information or inquiry please contact us to the followings Home Page www cryptotelecom c...

Page 3: ...aged In this case a Vaddio technician must examine the product before operating To reduce the risk of electric shock do not immerse in water or other liquids and avoid extremely humid conditions Do not attempt to take the S 160 apart There are no user serviceable components inside Do not use this product in connection with life safety or life monitoring related devices i e medical apparatus Do not...

Page 4: ...3 4 CAUTIONS 26 4 EXPERT SETTING 28 4 1 GENERAL SETTING 30 4 1 1 Title Setting 30 4 1 2 Administrator s ID and Password Change 31 4 1 3 User Registration 31 4 1 4 User List and Delete 31 4 1 5 Skip Login Automatic Monitoring 32 4 1 6 Time Zone Setting 32 4 1 7 Set Download Route of Plug in Type ActiveX 33 4 1 8 Select Language 33 4 2 NETWORK SETTING 33 4 3 VIDEO AUDIO SETTING 34 4 3 1 Video Settin...

Page 5: ...5 3 5 Search Camera 61 5 4 USE OF RELAY 62 5 5 USE OF SENSOR 63 5 6 SEE AND CONTROL OF STILL IMAGE IN MOBILE OR PDA 63 5 6 1 WAP2 0 HTML 63 5 6 2 PDA WinCE 66 5 7 USE OF PROPRIETARY VIEWER MPEG4 COMMUNICATOR 67 5 7 1 Required Specification of PC and OS 67 5 7 2 Supported O S 67 5 7 3 Program Installation 68 5 7 4 Use of Program 71 5 7 4 1 Viewer Screen 71 5 7 4 2 General Setting Menu 73 5 7 4 3 S ...

Page 6: ...6 1 Feature ...

Page 7: ...ower supply User Manual Software CD Cross Cable for installation only Please check contents before starting installation Be sure to use the provided power supply for the S 160 The Cross Cable is used only for Pre View of Video before set up and change of Network Information Use only the power supply provided with the S 160 system Use of any unauthorized power supply will void any and all warrantie...

Page 8: ...t Sensor Input port to be set in Inner Setting and to be used without regard to N C or N O 6 RS485 Port Input Output Port of RS485 7 Serial Port To control of Pan Tilt Zoom of Camera and connect to PLC or outer Devices RS232 8 Video In Input port to connect with signal output from Camera VTR Quad DVR 9 Video Out Output of the same video signal that put into the Video Input Port 10 LAN LAN Cable po...

Page 9: ...9 2 Installation and Video Check ...

Page 10: ...ntrol connect Cable into RS232 Port 7 of 2 1 or RS485 Port 6 of 2 1 3 Connect StreamVIEW and PC with LAN Cable Cross Cable 10 of 2 1 4 Turn on Camera and StreamVIEW Use provided power supply only 1 of 2 1 5 Wait about 2 minutes after powering up the StreamVIEW and then the LINK LED shows that the System has been booted normally 2 2 Video Check Basic network setting value of S 160 is to be 9 IP Add...

Page 11: ...as shown on Pic 2 2 Pic 2 3 Web Browser Input 2 Run Web Browser as shown on Pic 2 3 and input 192 168 1 8 in URL and click Enter then Pic 2 4 is to be shown In case 2 4 does not appear re set Hardware Reset Button 6 of Pic 2 1 to return Network Environment of S 160 to default and run Web Browser input 192 168 1 8 in URL line and click Enter ...

Page 12: ...2 4 S 160 Main Page 3 Click Connect Button of Pic 2 4 Pic 2 5 User login 4 Input ID and Password and click on the lock Pic 2 5 to see the Video feed 5 User s Authority to see Video feed on S 160 is as follows ...

Page 13: ... Relay Control Hearing 1 way Audio root root All Function 6 Above Table 2 1 is the value basically set in S 160 Change the User Information in General Setting of 4 Expert Setting after installation of S 160 7 Click 1 after input ID root Password root in 2 5 8 Message Window 2 6 appear soon click Yes If click No Web Viewer doesn t work Pic 2 6 ActiveX Download 9 Upon installation Web Viewer Pic 2 7...

Page 14: ...14 Pic 2 7 Web Viewer 10 After checking the video feed Pic 2 7 go to the next Chapter 3 Basic Setting 11 Refer to 5 Basic Use to see the details how to use Web Viewer ...

Page 15: ...15 3 Basic Setting ...

Page 16: ...efault value of ex factory Caution 1 Check Video before installation on 2 Installation and Video Check Caution 2 In case using IP sharing Device only Global IP is available Caution 3 S 160 does not support PPPoE IP Sharing Device is required to connect to S 160 under PPPoE Installation without IP sharing device For static IP refer to Static IP Setup For dynamic IP refer to Dynamic IP Setup Install...

Page 17: ... 3 2 Log in Page Pic 3 2 Administrator Page Log in 6 Put admin in ID and Password line click Login then Pic 3 3 Administrator s Page will be shown ID Password of S 160 is preset as admin admin in Administrator s Page Change Administrator s ID and Password in General Setting of 4 Expert Setting ...

Page 18: ...to fit with Network Environment to set Default Address of S 160 is DNS Address of Dacom Cryptotelecom Use DNS value normally set in PC 10 DNS Address should be necessarily input 11 In case of installation without IP sharing device under Static IP tick on Enable of Direct Connect The Direct Connect option makes direct connection to IP set on Video connection through Web Viewer But not tick Enable i...

Page 19: ...Click Here upon appearing of IP Change Window of Pic 3 5 14 IP Change loading Page appears as 3 6 the Main Page of changed address is connected May not find the main page of changed address under Cross Cable connection but IP been changed ...

Page 20: ...Check 9 Run Web Browser on PC input IP address set in S 160 onto URL and click Enter 9 Check if IP Setting is correct or not referring to Video Check 9 In case Video is seen S 160 has been correctly set up 9 In case Video is not seen check whether there may be confliction of IP in Network and re check the set value of Network environment of S 160 and Network environment of User s PC 3 2 2 Dynamic ...

Page 21: ...k 4 Go to Network Setting Page of Administrator s Page as per 4 5 6 7 of Static IP Setup Pic 3 7 Network Setting 5 Click on Dynamic IP Address in IP Setting 6 Click Save Button 7 Upon completion of setting close the Web Page and find IP of S 160 in IP Utility program provided with Proprietary Viewer see 5 Basic Use 8 If IP found S 160 has been given IP But in case IP is not found do re set of 2 1 ...

Page 22: ...s to be Name of Server registered in PIMA Server by user If the initial page is shown as Pic 3 8 check Video of S 160 referring to 1 Video Check If Video is seen set up is properly done Pic 3 8 Initial Page of S 160 3 3 Installation with IP Sharing Device Router 1 After checking Video in 1 Installation and Video Check then go to the next step 2 Connect S 160 and PC with LAN Cable Cross Cable 3 Cab...

Page 23: ...t IP sharing device under Static IP tick on Enable of Direct Connect The Direct Connect option makes direct connection to IP set on Video connection through Web Viewer But not tick Enable in case of installation under IP Sharing Device 9 Click Save Button of 3 9 to save the set value Pic 3 9 Network Setting 10 Click Click Here upon appearing of IP Change Window of Pic 3 10 11 IP Change loading Pag...

Page 24: ...S 160 referring to 1 Video Check as soon as it is connected to IP newly set up 14 Go to Network Setting Page of Administrator s Page as per 4 5 6 7 of Static IP Setup Pic 3 11 IP Change loading Page Pic 3 12 Port Setting 15 Set Port in Port Setting Page of Pic 3 12 It is required to set each different Port for many S 160 ...

Page 25: ...ss Port Number For example If you set IP address of S 160 to 192 168 0 100 and changed Web Server port to 81 you must input Http 192 168 1 100 81 Pic 3 13 Main Page of S 160 After Pic 3 13 appears check Video of S 160 referring to 1 Video Check 22 Check 2 Check from outside After registration of S 160 in PIMA Server refer to Use of PIMA Server of 5 Basic Use connect to S 160 by Domain Name Server ...

Page 26: ...can be checked on Port Setting of Network Setting of Administrator s Page Port of S 160 on ex factory is set default as follows Web Connection Port Port 80 TCP Authentication and Control Port Port 9000 TCP Video Streaming Port Port 9001 TCP Audio one way Port Port 9002 TCP Audio two way Port Port 9003 TCP In setting user port do not use 1504 1508 which port is used in S 160 itself ...

Page 27: ...27 4 Expert Setting ...

Page 28: ...ttp s 160 cryptotelecom net S 160 is to be Name of Server registered in PIMA Server by user Click Administrator s Page on Initial Page of S 160 login Page of Pic 4 1 appears Put admin in ID and Password line click Login then Pic 4 2 Administrator s Page will be shown ID Password of S 160 is preset as admin admin in Administrator s Page Change ID and Password of Administrator in General Setting of ...

Page 29: ...29 Pic 4 2 Administrator s Page ...

Page 30: ...30 4 1 General Setting Pic 4 3 General Setting 4 1 1 Title Setting Pic 4 4 Title Setting Server title is to be English without space Click Save Button to save title after input name ...

Page 31: ...dministrator s ID and Password should be English within 20 characters without space Allow the authority to users and click Save button A maximum user to allow registration is 100 persons View Only Monitoring only PTZ Control Monitoring Control of P T Z of Camera and Relay Audio Monitoring and hearing Audio of Server Interactive Audio Monitoring Two way Audio Communication with Camera Server PTZ Co...

Page 32: ...nect ID according to user authority If you don t check on Skip Login it is available to connect to S 160 Home Page but you can not see the Video feed from the camera In this case input user ID and Password for connection to see the Video feed from the Camera 4 1 6 Time Zone Setting This is to set Time zone of location where S 160 is to be installed to set up local time in case of monitoring from d...

Page 33: ...t has a merit to download the updated Active X of Web Viewer automatically Pic 4 12 Plug in Download Route 4 1 8 Select Language This is to select language to be displayed in all Web Pages such as Administrator s Page Web Viewer and Main Page of S 160 Pic 4 13 Select Language It supports both English and Japanese Click Save Button to save the set value after select the Language Input ID and Passwo...

Page 34: ...formation to fit environment for S 160 to be installed in 4 3 Video Audio Setting 4 3 1 Video Setting Pic 4 14 Video Setting Select and tick on the Channel to use input Video format NTSC or PAL Resolution Bit rate Frame rate and Key frame ...

Page 35: ...s 1 Bandwidth Clients have various network bandwidths to access S 152 If clients use broadband they never have problem with achieving live images from S 152 But if they don t live images cannot be viewed smoothly For smooth video images for clients using not only broadband but also narrowband S 152 can be configured as two different video setting For example you can set dual streaming as follows F...

Page 36: ...his shows 0 user cannot set up additional video channel setting CH Channel CH shows the number of camera displayed on the viewer when user access to S 160 and view the live images NO 1 camera can be accessed through CH 1 or CH 5 NO 2 camera can be accessed through CH 2 or CH 6 NO 3 camera can be accessed through CH 3 or CH 7 NO 4 camera can be accessed through CH 4 or CH 8 Resolution Configurable ...

Page 37: ...heck Audio Enable Server Client of Pic 4 17 And for two way audio communication check Interactive Audio Enable Server Client In case Audio is not used check Disable Then click Save to save Set value For adjustment of audio volume select in Audio Volume Setting and save in Pic 4 17 ...

Page 38: ...channel Pic 4 18 Display Color Setting Upon adjustment of color on Pic 4 18 then click Save to save the setting value In case to return to default value click Default Even in this case it is required to click Save Button for saving the setting value ...

Page 39: ...or setting in 4 6 DIO Setting 9 Sensitivity To select the sensitivity of motion detection The larger number represents higher sensitivity to motion Upon Event situation after setting on Enable in Alarm of Alarm Event Event is to be transmitted to user s Viewer and inform detection of Event with flickering on screen and alarm sound refer to 5 Basic Use To use SMS Service and E mail transmitting Eve...

Page 40: ...Alarm has happened In case Alarm Style Alarm Server is selected Event is to be notified to Alarm Server and is to recorded into the recorded file 10 seconds before and 20 seconds after Event and to be sent to Alarm Server In case user FTP Server is selected to use the recorded file 10 seconds before and 20 seconds after Event is to be saved in FTP Server It may take some time for Alarm Message to ...

Page 41: ... for Relay Relay name is to be input 9 Disable not to use Relay 9 Remote Control to control Relay through Internet using Viewer 9 Local Control Relay is on during Duration time upon Event on Sensor and then is to be off 9 Remote Local Control Control Relay through Internet using Viewer To be ON during Duration time upon event on Sensor then to be OFF It s available to designate name on Relay to us...

Page 42: ...vision SECUMERA_PRO RS485 LG Electronics LPT A100L RS485 ShinTech SD 290 RS485 Dongyang Unitec DRX 500 DRX 502A DOH 240 RS485 DSC 230Si DSC 270Si DOH 240Si RS485 Hitron Fastrax2 RS485 IZIrobotics A I Robot TOBO T 010 RS485 CNB Technology AN201L RS485 Sunkwang SK D106 RS485 TYCO CTNCOM HD 0670 RS485 SAMSUNG SRX 100B SPT 5IO SCC C4201 SCC 641 SCC 931T RS485 PELCO PELCO D 2400 PELCO D 9600 RS485 Sony...

Page 43: ...can not be used RS232C Bypass Control 9 To use RS232C Bypass set as RS232C BYPASS 9 User s data is to be sent thought RS232 of S 160 Example Transmit Data 0x6F 0x70 0x 65 0x6E BYB9600 1Aopen Transmit Data 0x6F 0x70 0x 65 0x6E BYB9600 1B6F70656E Explanation BYB Fixed not changeable 9600 is baud rate 2400 19200 38400 fixed not changeable 1 type 1 8bits No parity 1 stop bit 2 7bits Even parity 1 stop...

Page 44: ...eset Name is be 30 character without space and special characters 9 4 Preset SET SET button is to set the current coordinate as preset location with name recorded by user In three seconds after pushing SET button the Preset coordinate is to be set Do not move Camera during the time about three seconds 9 5 Preset Move to move to the selected preset number 9 6 Adjustment of Pan Tilt Zoom Speed Focus...

Page 45: ...htm page is to be the 1st main page of S 160 Image file is not uploaded in S 160 User Homepage cannot exceed 300Kbyte If user wants to re make user s homepage into Homepage provided complimentarily click Default Home Page Upload 4 10 Firmware Update 4 10 1 Remote Upgrade In case firmware is upgraded in the near future Crypto telecom s Upgrade Server Http cryptotelecom net will automatically upgrad...

Page 46: ...pon clicking Update button in Pic 4 24 Remote Update Pic 4 25 will appear Pic 4 25 Firmware Update S 160 will be automatically upgraded upon clicking Download button of Pic 4 25 after connecting to Upgrade Server and checking version Pic 4 26 Firmware Download Downloading message will be shown until completion of Update as Pic 4 26 it may take time according to Network situation Upon completion of...

Page 47: ...heck of Upgrade Version If user found Pic 4 29 there is an error in connection to Upgrade Server re check Internet Connection or re check DNS Server Address in 3 Basic Setting and try to upgrade again If user keep finding Pic 4 29 or cannot upgrade contact head office of CryptoTelecom Co Ltd or local agent Pic 4 29 Upgrade Server Connection Error 4 10 2 System Re booting This is the function to re...

Page 48: ...48 5 Basic Use ...

Page 49: ...l streaming Connect D2 2 of Dual streaming Connect quad display channel Link to Administrator s Page Connect each single channel Display Screen 100 Double clicking mouse on enlarged screen has the same function Enlarge Video of a channel to full screen Display 4 channels simultaneously Enlarge 4 channel display to full screen ...

Page 50: ...tton makes the lens Zoom in Un pressing stops the function Zoom Out Pressing this button makes the lens Zoom out Un pressing stops the function Focus Far Allows fine focus of Camera manually far Focus Near Allows fine focus of Camera manually near Relay On Relay Off Select preset to control Move to the selected Preset Preset Tour Move to preset location in regular sequence from No 1 to 20 Bring ca...

Page 51: ...9 Preset Move Function 9 The Number represents the Preset Number 9 20 Preset is controlled by Key Board 9 Key Board 1 0 Preset 1 Preset 10 9 Key Board q p Preset 11 Preset 20 9 Same function as 9 Zoom in Zoom out Function 9 is Zoom In Pressing the key makes doing the function Un pressing stops the function 9 is Zoom Out Pressing the key makes doing the function Un pressing stops the function 5 2 U...

Page 52: ... IP Find Button to find IP of S 160 on local Network Pic 5 3 Display IP The following window shows list of IP along with Web Server Port Number and Model Name of S 160 Click IP Find Button to find IP of S 160 on local Network ...

Page 53: ...Pic 5 5 IP Setting Input new IP Address Default Gateway Subnet Mask and then input Password of S 160 Administrator and click IP Change to set up new IP of S 160 Upon completion of setting find new IP and click Ping to check whether setting is done normally and close the program by clicking End button ...

Page 54: ...IMA Server Run Web Browser and input http cryptotelecom net in URL and click Enter then Pic 5 6 will appear as follows Pic 5 6 PIMA Server Click the language user want to use 5 3 1 User Registration Pic 5 7 User Login ...

Page 55: ...55 Click Register Now in Pic 5 7 Pic 5 8 Agreement Read the Agreement carefully and click Agree in case to agree and go to the next page ...

Page 56: ...gistration The part marked with is mandatory User ID is to be double checked Then click Log In Pic 5 10 User Registered If Pic 5 10 appears User Registration has successfully completed Click Log in and input User ID and ...

Page 57: ...Registration Input name of S 160 in of Pic 5 12 which will be applied only in PIMA Server At Server Name is to input Domain Name to connect to S 160 It is recommended to give the name easy to understand and remember as a Domain Name because it is available to connect to S 160 by Domain Name in case not knowing IP address of S 160 Domain Name should not be duplicated Register it after checking ...

Page 58: ... It is available to input up to 5 Mail address and input up to 5 messages upon checking on ENABLE Pic 5 13 Camera Registration SMS SERVICE is the function to send the set message SMS from PIMA Server to Mobile Phone number set by user upon alarm on S 160 in case setting to use Alarm Server as ENABLE refer to Alarm Setting of 4 Expert Setting It s available to input up to 5 Mobile Phone to get SMA ...

Page 59: ...Camera Registration to change the information of Camera registered will appear Change the information and click Camera Change to save the new information MAC is not changeable To change Server Name double check is required Upon clicking Camera Connect on Pic 5 14 the main page of S 160 will appear Upon clicking Alarm Log List on Pic 5 14 Event information transmitted to PIMA Server is to be displa...

Page 60: ...orded file the message will show No File In case the file has not sent to PIMA Server yet the message Uploading will be shown If Video and Audio has been downloaded in Download of Pic 5 16 user can download and see the recorded file Camera Delete of Pic 5 14 is to delete the Camera from the list 5 3 4 Change of User s Information On clicking User s Information editing in upper menu of Pic 5 14 Pic...

Page 61: ...of Pic 5 18 is the function to see information of S 160 or connect directly to S 160 without user registration in PIMA Server Upon clicking Camera Search on Pic 5 18 Pic 5 19 to search Camera will appear Type on Pic 5 19 is to select Camera Connect to connect directly to S 160 using MAC Address and then to input MAC Address of S 160 and click Yes then S 160 will be directly connected ...

Page 62: ...f S 160 will be shown as Pic 5 20 Pic 5 20 See Information 5 4 Use of Relay This is to select the relay mode whether to control in remote place or local place as per setting of DIO Setting in 4 Expert setting The built in relay of S 160 can be used up to AC250V 0 5A In case more capacity is needed please contact head office of Crypto telecom or local agent Pic 5 21 Connection of Relay on S 160 ...

Page 63: ...ng Pic 5 22 S 160 Sensor Connection As sensor has no polarity either any port of the line can be connected to plug in Up to 2 Sensors can be connected to use 5 6 See and Control of Still Image in Mobile phone or PDA To monitor and control of Still Image of S 160 on Mobile Phone register in Camera Registration of Use of PIMA Server in 5 Basic Use Model of Mobile Phone supported is WAP2 0 Phone HTML...

Page 64: ...asic Use Pic 5 24 List of Registered Products Select one of the products Camera or Server registered by user on Pic 5 25 Pic 5 25 Camera Channel Select the Camera channel of S 160 on Pic 5 26 Pic 5 26 Menu Select a item in menu of Pic 5 27 9 1 Monitoring and Control of Pan Tilt Zoom Preset ...

Page 65: ...elay Control 2 Relay controllable It is available to control up to 2 Relay Relay Name and current status ON OFF will be displayed On control of Relay Image of controlled channel will be shown along with Relay name of the channel ON OFF is to be controllable On selecting 3 State view current status of 4 Relays will be displayed 9 3 Check Sensor Status ...

Page 66: ...and control Image is same as one of 5 6 1 016 018 KTF Phone mhtml 5 6 2 PDA WinCE Run Internet Explorer of PDA and input http cryptotelecom net pdah5450_eng htm input in URL to connect to PIMA Server Pic 5 28 PDA Log in On user ID Input Page Pic 5 30 input user s ID registered in Use of PIMA Server of 5 Basic Use and click connect to log in Pic 5 29 Products List Select one of the products Camera ...

Page 67: ... 2 0G Main Memory 128 MB Above 256MB O S Window 98 SE Window 2000 or XP Web Browser I E 5 0 Above I E 5 0 Resolution 1 024 X 768 1 160 X 864 Network 100Base T Ethernet 100Base T Ethernet 5 7 2 Supported O S 9 Windows 98 Second Edition Korean OS English OS Japanese OS 9 Windows 2000 Professional Korean OS English OS Japanese OS 9 Windows XP Professional Windows XP Home Edition Korean OS English OS ...

Page 68: ...68 5 7 3 Program Installation Pic 5 32 Program Installation Pic 5 33 Installation click Next Button ...

Page 69: ...er Pic 5 34 is to select the folder where the program is to be installed The route is changeable at user s option To install in the default folder click Next to go to the next step Pic 5 35 File Copy Start Click Next to start installation ...

Page 70: ...70 Pic 5 36 Installation Status Pic 5 37 Installation Completed Upon completion of installation click Finish Button ...

Page 71: ...ppear an icon of MPEG4 Communicator on your PC Double click the icon to run the Program and then Program will be run as Pic 5 38 5 7 4 1 Viewer Screen Pic 5 38 Viewer Screen Click 1 2 3 on Pic 5 38 and then Menu of Pic 5 39 will appear Pic 5 39 Viewer Menu ...

Page 72: ...Open the connection Widow to connect to S 160 Pic 5 39 Disconnect S 160 Slide Bar for displaying recorded file Recording Play X2 Fast Play Pause Stop Open Search and select File Pic 5 42 Capture Image on the screen Displaying current status of Viewer Ready Live S 160 Connecting Rec Recording Flickering upon Sensor Event Displaying Sensor name set in S 160 Flickering upon Motion Event To connect or...

Page 73: ...signate the folder to record after select the directory to save the 12 Set the disk space to display the disk space warning on 3 Recorded files 13 Set the address of PIMA Server in case connecting to S 160 by the MAC Address default cryptotelecom net 4 Set the duration of passive recording to be recorded during the time users selected 14 Input Port Number of PIMA Server Default Port 9201 1 2 3 4 5...

Page 74: ...ent 8 Set the duration of Sensor recording 9 Select the beep sound enable or not upon event on Motion or Sensor 10 Set the duration of beep sound upon event on Motion or Sensor 5 7 4 3 S 151 Connection Click ON of Pic 5 39 to open S 160 Connection Page Pic 5 41 S 160 Connection Menu 1 2 3 4 5 6 7 8 9 10 11 12 13 14 15 16 17 18 ...

Page 75: ...MAC address 17 Save set value 6 Input Port number for IP connection or channel number for MAC address connection 18 Delete the selected S 160 or Folder 7 Not to connect Audio 8 For 1 way audio to listen only 9 For 2 way audio communication 10 Input User ID 11 Input User Password 12 Save Password Input the information of S 160 to be connected in Pic 5 41 and save it Connect to S 160 by clicking CON...

Page 76: ...folder of recorded files 13 Search additional file on the searched list 2 Search recorded files 14 To search file 3 Search Captured files 15 Play the selected file 4 Search passive recording files 16 Close file menu 5 Search Motion recording files 6 Search Sensor recording files 7 Search all recorded files or Captured files 1 2 3 4 5 6 7 8 9 10 11 12 13 14 15 16 ...

Page 77: ...en during monitoring Video on S 151 Pic 5 43 Pop up Menu Table 5 6 Description of Pop up Menu No Description No Description 1 Open the connection window with Server List 5 Pic 41 8 100 Screen 2 Disconnect Server 9 200 Screen 3 Record or stop recording 10 Full Screen 4 Capture image 11 See the general setting Page 5 40 5 Menu to control Zoom of Camera 12 Connect to Administrator s Page 6 Menu to co...

Page 78: ...78 6 Network Environments ...

Page 79: ...Video Streaming Port Port 9001 TCP 1 way Audio Port Port 9002 TCP 2 way Audio Port Port 9003 TCP 5 2 Broadband ADSL Cable Fiber Optic Modem Environment Home store small office use one Broadband modem DSL Cable Modem and use one public IP address normally In order to use several PC through one Public IP address the user in most cases use IP sharing device We recommend using an IP router IP Sharing ...

Page 80: ...80 7 Appendix ...

Page 81: ...t Register Number with 9999 or less Some Network may not support over number 10000 port ID and Password Administrator ID Password admin admin User ID root root guest guest Domain of Related Server IP Server cryptotelecom net Domain of Server to connect to register IP Alarm Server cryptotelecom net Domain of Server to connect to send Event upon detection of Sensor or Motion Upgrade Server cryptotel...

Page 82: ...eased Line Cable Modem HomePNA Support Dynamic IP and Static IP Usable under Router for ADSL Web Server User Homepage Upload and Saving Function Server Setting Function Web Viewer Download Page Supporte d Protocol HTTP FTP TCP IP DHCP ARP DNS ICMP Viewer Software Compatible WINDOWS 98 SE WINDOWS 2000 WINDOWS XP WINDOWS NT Security USER AUTHENTICATION Operation Environment OperationTemp 5 40 Storag...

Page 83: ...ion Detect Sensor Input and Drive Event Viewer Proprietary Viewer and Web Plug in Viewer to be down Loaded from remote server Video Recordin g Recording in Viewer or FTP Server upon Alarm Event Web Page Upload of user Web Page Through FTP E mail message Send E mail in Alarm Mode upon Event Dynamic IP Support IP Router Support Hardware Reset In case user forgets Administrator s Information and can ...

Page 84: ...o in port of TV and check if video can be seen If you found a problem in the product first check with C 1 Basic check point and solve the problem as following procedures C 2 Troubleshooting by type C 2 1 Cannot connect with network z Check with C 1 2 Network Cable LAN cable and cable connection check z PING Test In case Camera uses Static Public IP input Ping IP address to command window of PC and...

Page 85: ...eaming Port of S 160 is set on IP sharing device in case of using IP sharing device z For setting of IP sharing device Port refer to IP sharing device setting z In case web page can t be connected under super highway internet line some super highway ISP company may block the use Web port number 80 In this case change to other number from web connection port setting Appendix D Serial port RS232c ex...

Page 86: ...86 DSUB Female Mini DIN Connector Shield Shell Shell 1 NC 2 RxD 3 TxD 3 TxD 5 RxD 4 NC 6 GND 5 GND 4 GND 6 NC 7 NC 7 RTS 2 CTS 8 CTS 1 RTS 9 NC 8 NC ...

Reviews: