18-20
WR 3M
9
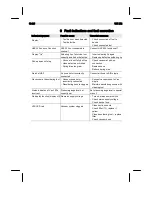
Fault indications and fault correction
Indication/symptom
Possible cause
Remedial measures
Display: "- - -“
−
Tool has not been detected
−
Tool defective
−
Check connection of tool to
device
−
Check connected tool
HAP 200 does not function
HAP 200 not connected to
channel 1
Connect HAP 200 to channel 1
Display: "tip"
Soldering tip of microtool not
correctly inserted or defective
−
Insert soldering tip again
−
Replacing defective soldering tip
Pick-up does not stop
−
Vacuum is not fully built up
−
Hose defective or kinked
−
Spring bias too great
−
Check vacuum at pick-up
connection
−
Replace hose
−
Reduce spring bias
No air at HAP
Air hose not or incorrectly
connected
Connect air hose to AIR nipple
No vacuum at desoldering tool
−
Vacuum hose not or
incorrectly connected
−
Desoldering nozzle clogged
−
Connect vacuum hose to Vac
nipple
−
Maintain desoldering nozzle with
cleaning tool
Status indication of Vac LEDs
incorrect
Pressure-gauge level not
correctly set
Set pressure-gauge level in special
menu 2
No display function (display off) No mains supply voltage
−
Turn on mains power switch
−
Check mains supply voltage
−
Check device fuse
VAC LED red
Vacuum system clogged
−
Clean suction nozzle
−
Check filter (13); replace if
yellow
−
Clean desoldering tool – replace
filter
−
Check vacuum hose
Summary of Contents for Weller WR 3M
Page 2: ......
Page 4: ...WR 3M II ...
Page 5: ...EN FR IT ES PT NL SV DK FI GR TR CZ PL HU SK SL EE LV LT WR 3M Betriebsanleitung DE ...
Page 25: ...EN FR IT ES PT NL SV DK FI GR TR CZ PL HU SK SL EE LV LT DE WR 3M Operating Instruction ...
Page 45: ...EN FR IT ES PT NL SV DK FI GR TR CZ PL HU SK SL EE LV LT WR 3M Mode d emploi DE ...
Page 67: ...EN FR IT ES PT NL SV DK FI GR TR CZ PL HU SK SL EE LV LT WR 3M Istruzioni per l uso DE ...
Page 89: ...EN FR IT ES PT NL SV DK FI GR TR CZ PL HU SK SL EE LV LT WR 3M Manual de uso DE ...
Page 111: ...EN FR IT ES PT NL SV DK FI GR TR CZ PL HU SK SL EE LV LT WR 3M Manual do utilizador DE ...
Page 131: ...EN FR IT ES PT NL SV DK FI GR TR CZ PL HU SK SL EE LV LT WR 3M Gebruiksaanwijzing DE ...
Page 151: ...EN FR IT ES PT NL SV DK FI GR TR CZ PL HU SK SL EE LV LT WR 3M Instruktionsbok DE ...
Page 171: ...EN FR IT ES PT NL SV DK FI GR TR CZ PL HU SK SL EE LV LT WR 3M Betjeningsvejledning DE ...
Page 191: ...EN FR IT ES PT NL SV DK FI GR TR CZ PL HU SK SL EE LV LT WR 3M Käyttöohjeet DE ...
Page 211: ...EN FR IT ES PT NL SV DK FI GR TR CZ PL HU SK SL EE LV LT WR 3M Οδηγίες Λειτουργίας DE ...
Page 233: ...EN FR IT ES PT NL SV DK FI GR TR CZ PL HU SK SL EE LV LT WR 3M Kullanım kılavuzu DE ...
Page 253: ...EN FR IT ES PT NL SV DK FI GR TR CZ PL HU SK SL EE LV LT WR 3M Návod k použití DE ...
Page 273: ...EN FR IT ES PT NL SV DK FI GR TR CZ PL HU SK SL EE LV LT WR 3M Instrukcja obsługi DE ...
Page 295: ...EN FR IT ES PT NL SV DK FI GR TR CZ PL HU SK SL EE LV LT WR 3M Üzemeltetési utasítás DE ...
Page 315: ...EN FR IT ES PT NL SV DK FI GR TR CZ PL HU SK SL EE LV LT WR 3M Návod na používanie DE ...
Page 335: ...EN FR IT ES PT NL SV DK FI GR TR CZ PL HU SK SL EE LV LT WR 3M Navodila za uporabo DE ...
Page 355: ...EN FR IT ES PT NL SV DK FI GR TR CZ PL HU SK SL EE LV LT WR 3M Kasutusjuhend DE ...
Page 375: ...EN FR IT ES PT NL SV DK FI GR TR CZ PL HU SK SL EE LV LT WR 3M Lietosanas instrukcija DE ...
Page 395: ...EN FR IT ES PT NL SV DK FI GR TR CZ PL HU SK SL EE LV LT WR 3M Naudojimo instrukcija DE ...
Page 415: ...WR 3M Circuit Diagram DE EN FR IT ES PT NL SV DK FI GR TR CZ PL HU SK SL EE LV LT ...
Page 416: ...WR 3M Exploded Drawing ...
Page 417: ......


