18-22
WR 3M
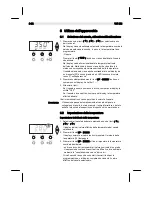
Il controllo regolazione lampeggia fintanto che la temperatura
rimane costante.
4. Confrontare le temperature visualizzate del dispositivo di
misurazione con l'indicazione che compare sul display.
5. Mediante i tasti UP o DOWN impostare nella stazione di
riparazione la differenza risultante tra il valore visualizzato nel
dispositivo di misurazione esterno ed il valore visualizzato nella
stazione.
Massima compensazione temperatura possibile ± 40 °C
(± 72 °F).
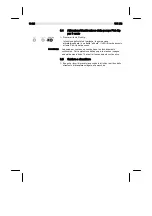
Esempio:
Display 450 °C, dispositivo di misurazione esterno 448 °C:
Impostazione
S
2
Display 450 °C, dispositivo di misurazione esterno 452 °C:
Impostazione
T
2
Avvertenza Premere il tasto ┌ 3 ┐ per abbandonare la voce di menu senza
apportare modifiche (EXIT).
6. Premere il tasto ┌ 2 ┐ (Set), per confermare il valore.
Lo scostamento della temperatura è quindi resettato (impostato a
0). La calibrazione a 450 °C / 842 °F è pertanto conclusa.
7. Con il tasto ┌ 3 ┐ abbandonare il menu 2.
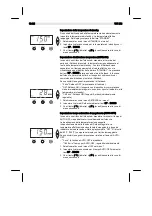
Ripristinare le impostazioni di fabbrica per la calibrazione
1. Selezionare la voce di menu FCC nel menu 2.
2. Tenere premuto il tasto ┌ 3 ┐.
3. Successivamente premere contemporaneamente i tasti UP e
DOWN.
Nel display comparirà la scritta "FSE" (Factory Setting Enabled).
A questo punto vengono nuovamente ripristinate nella stazione di
riparazione le impostazioni di fabbrica per la calibrazione.
4. Con il tasto ┌ 1 ┐ (indietro) o ┌ 2 ┐ (avanti) passare alla voce di
menu successiva.
Impostazione della resa di Pick-Up
Con questa funzione è possibile impostare la resa della pompa per
vuoto supplementare per la modalità Pick-Up:
−
Impostazione di fabbrica: 85 %
−
Range di possibile regolazione: 50 % – 100 %
1. Selezionare la voce di menu LEVEL nel menu 2.
2. Impostare il valore della pressione LEVEL mediante i tasti UP o
DOWN.
3. Con il tasto ┌ 1 ┐ (indietro) o ┌ 2 ┐ (avanti) passare alla voce di
menu successiva.
Summary of Contents for Weller WR 3M
Page 2: ......
Page 4: ...WR 3M II ...
Page 5: ...EN FR IT ES PT NL SV DK FI GR TR CZ PL HU SK SL EE LV LT WR 3M Betriebsanleitung DE ...
Page 25: ...EN FR IT ES PT NL SV DK FI GR TR CZ PL HU SK SL EE LV LT DE WR 3M Operating Instruction ...
Page 45: ...EN FR IT ES PT NL SV DK FI GR TR CZ PL HU SK SL EE LV LT WR 3M Mode d emploi DE ...
Page 67: ...EN FR IT ES PT NL SV DK FI GR TR CZ PL HU SK SL EE LV LT WR 3M Istruzioni per l uso DE ...
Page 89: ...EN FR IT ES PT NL SV DK FI GR TR CZ PL HU SK SL EE LV LT WR 3M Manual de uso DE ...
Page 111: ...EN FR IT ES PT NL SV DK FI GR TR CZ PL HU SK SL EE LV LT WR 3M Manual do utilizador DE ...
Page 131: ...EN FR IT ES PT NL SV DK FI GR TR CZ PL HU SK SL EE LV LT WR 3M Gebruiksaanwijzing DE ...
Page 151: ...EN FR IT ES PT NL SV DK FI GR TR CZ PL HU SK SL EE LV LT WR 3M Instruktionsbok DE ...
Page 171: ...EN FR IT ES PT NL SV DK FI GR TR CZ PL HU SK SL EE LV LT WR 3M Betjeningsvejledning DE ...
Page 191: ...EN FR IT ES PT NL SV DK FI GR TR CZ PL HU SK SL EE LV LT WR 3M Käyttöohjeet DE ...
Page 211: ...EN FR IT ES PT NL SV DK FI GR TR CZ PL HU SK SL EE LV LT WR 3M Οδηγίες Λειτουργίας DE ...
Page 233: ...EN FR IT ES PT NL SV DK FI GR TR CZ PL HU SK SL EE LV LT WR 3M Kullanım kılavuzu DE ...
Page 253: ...EN FR IT ES PT NL SV DK FI GR TR CZ PL HU SK SL EE LV LT WR 3M Návod k použití DE ...
Page 273: ...EN FR IT ES PT NL SV DK FI GR TR CZ PL HU SK SL EE LV LT WR 3M Instrukcja obsługi DE ...
Page 295: ...EN FR IT ES PT NL SV DK FI GR TR CZ PL HU SK SL EE LV LT WR 3M Üzemeltetési utasítás DE ...
Page 315: ...EN FR IT ES PT NL SV DK FI GR TR CZ PL HU SK SL EE LV LT WR 3M Návod na používanie DE ...
Page 335: ...EN FR IT ES PT NL SV DK FI GR TR CZ PL HU SK SL EE LV LT WR 3M Navodila za uporabo DE ...
Page 355: ...EN FR IT ES PT NL SV DK FI GR TR CZ PL HU SK SL EE LV LT WR 3M Kasutusjuhend DE ...
Page 375: ...EN FR IT ES PT NL SV DK FI GR TR CZ PL HU SK SL EE LV LT WR 3M Lietosanas instrukcija DE ...
Page 395: ...EN FR IT ES PT NL SV DK FI GR TR CZ PL HU SK SL EE LV LT WR 3M Naudojimo instrukcija DE ...
Page 415: ...WR 3M Circuit Diagram DE EN FR IT ES PT NL SV DK FI GR TR CZ PL HU SK SL EE LV LT ...
Page 416: ...WR 3M Exploded Drawing ...
Page 417: ......


