8-20
WR 3M
6
Operação do aparelho
6.1
Selecção do canal, ligar ou desligar
1. Premir uma das teclas ┌ 1 ┐, ┌ 2 ┐ ou ┌ 3 ┐ para seleccionar um
dos três canais.
No visor aparece a temperatura nominal do canal seleccionado
e, com letras pequenas, as temperaturas fixas programadas.
- ou -
premir a tecla ┌ 1·2·3 ┐ até que seja visualizado o canal
pretendido.
A seguir, aparece no visor a temperatura actual da ferramenta.
No campo inferior é adicionalmente visualizado o estado com a
respectiva temperatura nominal.
O canal seleccionado é indicado por um triângulo (22) no visor e
por um LED vermelho (1) aceso no aparelho.
2. Premir simultaneamente as teclas UP e DOWN até que
apareçam três traços "- - -“ no visor.
3. Soltar as teclas.
Se o canal estiver desactivado, aparece a indicação "OFF“ no
visor.
Se o canal estiver activado, aparece a temperatura real actual no
visor.
Os dados memorizados não se perdem ao desligar um canal.
Nota A indicação comuta automaticamente para o canal no qual uma
ferramenta foi ligada, o interruptor de gatilho foi premido ou a
ferramenta foi retirada do suporte de comutação.
6.2
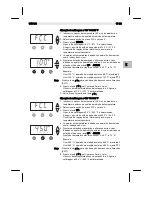
Regulação da temperatura
Regulação individual da temperatura
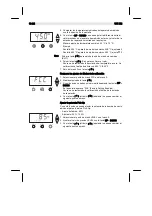
1. Seleccionar o canal pretendido premindo uma das teclas ┌ 1 ┐,
┌ 2 ┐ ou ┌ 3 ┐.
O visor apresenta o valor real da temperatura do canal
seleccionado.
2. Premir a tecla UP ou DOWN.
O visor comuta para o valor nominal definido. O símbolo de
temperatura (18) fica intermitente.
3. Premir a tecla UP ou DOWN para regular a temperatura nominal
pretendida:
-
Premir a tecla por um instante muda o valor nominal em um
grau.
-
Premir a tecla de modo permanente muda o valor nominal a
passo rápido.
Aproximadamente 2 segundos após soltar as teclas de
regulação, aparece novamente no visor o valor real do canal
seleccionado.
Summary of Contents for Weller WR 3M
Page 2: ......
Page 4: ...WR 3M II ...
Page 5: ...EN FR IT ES PT NL SV DK FI GR TR CZ PL HU SK SL EE LV LT WR 3M Betriebsanleitung DE ...
Page 25: ...EN FR IT ES PT NL SV DK FI GR TR CZ PL HU SK SL EE LV LT DE WR 3M Operating Instruction ...
Page 45: ...EN FR IT ES PT NL SV DK FI GR TR CZ PL HU SK SL EE LV LT WR 3M Mode d emploi DE ...
Page 67: ...EN FR IT ES PT NL SV DK FI GR TR CZ PL HU SK SL EE LV LT WR 3M Istruzioni per l uso DE ...
Page 89: ...EN FR IT ES PT NL SV DK FI GR TR CZ PL HU SK SL EE LV LT WR 3M Manual de uso DE ...
Page 111: ...EN FR IT ES PT NL SV DK FI GR TR CZ PL HU SK SL EE LV LT WR 3M Manual do utilizador DE ...
Page 131: ...EN FR IT ES PT NL SV DK FI GR TR CZ PL HU SK SL EE LV LT WR 3M Gebruiksaanwijzing DE ...
Page 151: ...EN FR IT ES PT NL SV DK FI GR TR CZ PL HU SK SL EE LV LT WR 3M Instruktionsbok DE ...
Page 171: ...EN FR IT ES PT NL SV DK FI GR TR CZ PL HU SK SL EE LV LT WR 3M Betjeningsvejledning DE ...
Page 191: ...EN FR IT ES PT NL SV DK FI GR TR CZ PL HU SK SL EE LV LT WR 3M Käyttöohjeet DE ...
Page 211: ...EN FR IT ES PT NL SV DK FI GR TR CZ PL HU SK SL EE LV LT WR 3M Οδηγίες Λειτουργίας DE ...
Page 233: ...EN FR IT ES PT NL SV DK FI GR TR CZ PL HU SK SL EE LV LT WR 3M Kullanım kılavuzu DE ...
Page 253: ...EN FR IT ES PT NL SV DK FI GR TR CZ PL HU SK SL EE LV LT WR 3M Návod k použití DE ...
Page 273: ...EN FR IT ES PT NL SV DK FI GR TR CZ PL HU SK SL EE LV LT WR 3M Instrukcja obsługi DE ...
Page 295: ...EN FR IT ES PT NL SV DK FI GR TR CZ PL HU SK SL EE LV LT WR 3M Üzemeltetési utasítás DE ...
Page 315: ...EN FR IT ES PT NL SV DK FI GR TR CZ PL HU SK SL EE LV LT WR 3M Návod na používanie DE ...
Page 335: ...EN FR IT ES PT NL SV DK FI GR TR CZ PL HU SK SL EE LV LT WR 3M Navodila za uporabo DE ...
Page 355: ...EN FR IT ES PT NL SV DK FI GR TR CZ PL HU SK SL EE LV LT WR 3M Kasutusjuhend DE ...
Page 375: ...EN FR IT ES PT NL SV DK FI GR TR CZ PL HU SK SL EE LV LT WR 3M Lietosanas instrukcija DE ...
Page 395: ...EN FR IT ES PT NL SV DK FI GR TR CZ PL HU SK SL EE LV LT WR 3M Naudojimo instrukcija DE ...
Page 415: ...WR 3M Circuit Diagram DE EN FR IT ES PT NL SV DK FI GR TR CZ PL HU SK SL EE LV LT ...
Page 416: ...WR 3M Exploded Drawing ...
Page 417: ......


