


47
7.
MAINTENANCE
7.1.
TANKS
Drain the two tanks as described in the relative sections.
Remove any solid dirt by filling and draining the
tanks until all dirt has been eliminated: use a washing
hose or similar tool to do this.
•
Water hotter than 50°, a high-pressure cleaner
or excessively powerful sprays may damage the
tanks and the machine.
Leave the plugs of the tanks open (only while the ma-
chine is not being used) so that they can dry and thus
prevent the formation of foul odors.
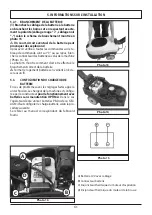
7.2.
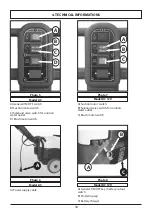
SOLUTION FILTER CLEANING
Remove the transparent cap ( Photo 29 - A ) then re-
move the metal strainer.
Clean them, reinstall the metal strainer in its seat and
close the water filter screwing the transparent cap.
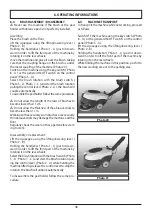
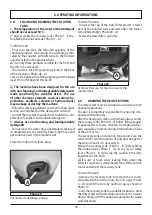
7.3.
SUCTION HOSE
Detach the suction hose from the squeegee ( Photo
23 - B ). Now you can wash the hose and remove any
obstructions.
Firmly insert the hose on the squeegee body.
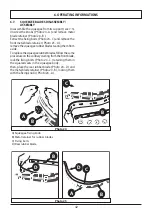
7.4.
SQUEEGEE
•
Do not handle the squeegee with bare hands:
wear gloves and any safety clothing needed to carry
out the operation.
Detach the squeegee from the machine and clean it
under running water using a sponge or a brush.
Check the efficiency and the wear on the strips in con-
tact with the floor. They are designed to scrape the
film of detergent and water on the floor and to isolate
that portion of the surface to enhance the vacuum of
the suction motor: this ensures that the machine will
dry very efficiently. Working constantly in this manner
tends to round or to deteriorate the sharp edge of the
strip, thus reducing drying efficiently. This is why the
squeegee strips must be replaced.
To replace the worn blades, follow the instructions in
the relative section. Turn the blades around to wear
down the other sharp corners or to install new ones.
7.5.
ACCESSORIES
Remove and clean the brush or the abrasive pad disk.
•
To avoid damaging the floor and the machine, care-
fully check if foreign matter, such as metallic parts, screws,
chips, cords or similar items, has become jammed.
Check that the brushes are flat as they work on the
surface (check for any irregular wear on the brushes
or on the abrasive disks). If necessary, adjust the slant
of the action on the floor.
Use only the accessories recommended by the manu-
facturer: other products may reduce operating safety.
7.6.
MACHINE BODY
Use a sponge or a soft cloth to clean the exterior of
the machine and, if necessary, a soft brush to elim-
inate tough dirt. The machine’s shockproof surface
is rough to make it harder to see scratches caused
during use. However, this does not make it easier to
remove tough stains on the surface.
It is prohibited
to use steam machines, hoses with running water
and high-pressure cleaners.
7.7.
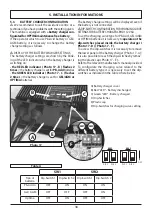
BATTERIES
PB-Acid batteries
Carry out maintenance operations in accordance
with the manufacturer’s instructions and with all the
other instructions provided in this manual.
Exposing the element plates (not completely im-
mersed in the acid solution) will lead to rapid oxida-
tion and irreparably reduce the element’s operating
capacities.
An overflowing acid solution may corrode the ma-
chine.
Use battery chargers recommended by the manufac-
turer and, in any case, those that are suitable for the
type of battery to be charged.
Always charge batteries in well-ventilated rooms:
there is an explosion risk!
The use of gel or maintenance-free batteries is highly
recommended.
GEL batteries
Carry out maintenance operations in accordance
with the manufacturer’s instructions and with all the
other instructions provided in this manual.
Use only those battery chargers recommended by
the manufacturer.
If the batteries are not used, in either case, for an ex-
tended period of time, disconnect them and restore
the charge within the time limits specified for the
type of battery used (generally and as a precaution,
no more than 3 months for Pb-acid/GEL/AGM batter-
ies, 6 months for Li-ion batteries).
The manufacturer accepts no liability for damage to
batteries caused by failure to follow this procedure.
7.8.
THERMAL BREAKERS
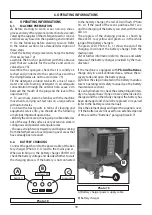
The machine is equipped with electric protection
devices on the main operating components to avoid
costly malfunctions.
Thermal breakers are installed to protect the suction
7. MAINTENANCE INFORMATIONS
Summary of Contents for CPS 36 BX
Page 148: ...148...
Page 149: ...149...
Page 150: ...150...
Page 151: ...151...
Page 152: ...152...
Page 153: ...153...
Page 154: ...154...
Page 155: ...155...
Page 157: ...157 1 1 1 1 1 2 2 10 1 3 1 4...
Page 158: ...158 1 2 1 5 2 2 1 m 4 C e 35 C 10 50 30 95 2 10...
Page 159: ...159 2 2 2...
Page 160: ...160 3 3 1 3 2 3 3 3 3 4 0 38 61 DC 12V 70 DC 12V 50 82 cm 56 cm 8 2 c m...
Page 161: ...161 4 4 1 4...
Page 162: ...162 162 B A C D B A B A B C D 1 2 B A C A B A B A B C 4 3 4 4 2 A...
Page 163: ...163 B A C A B C A B A B C DC 12V DC 12V B A C D A B C D AC 7 5 AC A 8 6 A 4 C...
Page 164: ...164 69 101 79 114 47 4 4 3 104 81...
Page 165: ...165 5 A 5 5 1 9 10 11 12 9 10 11 12...
Page 166: ...166 5 2 14 4 13 14 5 2 1 15 16 B 16 13 14 B 5 15 16 D C A A 12V B C D...
Page 168: ...168 6 6 6 1 7 2 7 5 2 7 9 6 2 19 18 A 1 18 C 18 19 A A B A B C B...
Page 169: ...169 8 7 6 3 2 1 20 8 5 5 D 7 2 1 1 2 1 5 D 7 2 6 20 21 6 4 8 5 2 1 20...
Page 171: ...171 6 C C A A B B B B D D 24 25 A B C D 6 7 7 5 24 24 B 24 A 25 A 24 C 24 D 24 B 24...
Page 172: ...172 6 8 50 C 1 D 1 28 2 A A 28 A 29 A 6 29 A 6 9 1 D 1 B 3 B 4 13...
Page 173: ...173 A 30 A 6 30 A 3 C 30 A 6 10 31 33 2 5 C 7 B 5 D 7 C 31 32 33...
Page 175: ...175 6 7 13 3 6 12 5 7 10 6 13 AC DC 12V AC...
Page 176: ...176 7 7 1 50 7 2 29 A 7 3 23 7 4 7 5 7 6 7 7 7...
Page 177: ...177 3 AGM 6 7 8 16 16 D 7 9 7 9 1 7 9 2 7 9 3 7 10 8...
Page 178: ...178 8 8 1 1 8 2 8 3 8 4 8 5 8 6 8 7 8 8 8 9 100 8...
Page 179: ...179 20 30 8...
Page 180: ...180 9 9 12 9 1 2013 56 EU 9 2 2012 19 EU 2012 19 EU...
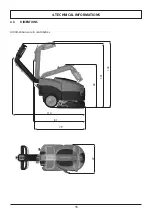
Page 218: ...218 69 101 79 114 47 4 TEKNISETTIEDOT 4 3 MITAT Kaikki mitat on ilmaistu senttimetriss 104 81...
Page 242: ...242 69 101 79 114 47 4 TEKNISK INFORMATION 4 3 M TT Alla m tt anges i centimeter 104 81...
Page 312: ...312 69 101 79 114 47 4 INFORMA IITEHNICE 4 3 DIMENSIUNI Toate dimensiunile sunt n mm 104 81...
Page 336: ...336 69 101 79 114 47 4 TEKN K B LG LER 4 3 EBATLAR cm 104 81...
Page 401: ...1 401 1 1 1 1 2 2 10 1 3 1 4 1 5...
Page 402: ...2 402 2 2 1 4 C 35 C 10 C 50 C 30 95 2 10...
Page 403: ...2 403 2 2...
Page 404: ...3 3 1 3 2 3 3 3 404 4 4 0 38 3 61 kg D 12V 70 kg D 12V 50 kg 82 cm 56 cm...
Page 405: ...4 405 4 4 1...
Page 406: ...406 B A C D B D 1 2 B A C A B B C 4 3 4 4 2 A...
Page 407: ...407 B A C A B C A B DC 12V DC 12V B A C D A B C D AC 7 5 AC A 8 6 4 C...
Page 408: ...408 69 101 79 114 47 4 4 3 104 81...
Page 409: ...409 5 A 5 5 1 9 10 11 12 9 10 11 12...
Page 410: ...410 5 2 14 4 B 13 14 5 2 1 15 0 16 B 16 13 14 B 5 15 16 D C A 12V D...
Page 413: ...413 8 7 6 3 2 1 20 8 A 5 A 5 D 7 C 2 A 1 cm 1 cm 2 1 5 D 7 C 6 20 21 2 A 6 4 8 A 5 A 2 1...
Page 414: ...6 5 22bis E 22 A 22 23 B 6 6 23 B 22 6 414 22 bis A D E F G H A B E D E F H C 22 23 B A B B G...
Page 415: ...415 6 6 7 7 5 24 A 24 B 24 25 C C A A B B B B D D 24 25 A D 24 24 D 24 B 24 A...
Page 416: ...416 6 8 50 C 1 1 D 28 A 2 A A 28 29 A 6 29 A 6 9 3 1 1 D 3 4 B 13...
Page 417: ...417 A 30 A 6 30 A 3 C 30 A 3 C 6 10 31 33 2 5 C 7 B 5 D 7 C ON 31 32 33...
Page 419: ...419 6 7 7 13 3 6 12 5 7 10 6 13 7 7 1 50 7 2 29...
Page 420: ...420 7 3 23 7 4 7 5 7 6 7 7 Pb 3 AGM 6 7 8 16 16 D 7...
Page 421: ...421 7 9 7 9 1 Pb 7 9 2 Pb 7 9 3 7 10 7...
Page 422: ...422 8 8 1 8 2 8 3 8 4 8 5 8 6 8 7 8 8 8 9 100 8...
Page 423: ...423 8 9 20 30 9 12 9 1 2013 56 9 2 WEEE 2012 19 EU 2012 19 EU...
Page 425: ......
Page 427: ......
Page 430: ...7 504 0290 rev 04 09 2021...