


43
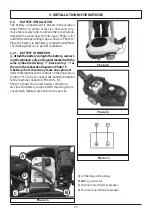
6.8.
FILLING AND DRAINING THE SOLUTION
TANK
☞
The temperature of the water or the detergent
should never exceed 50°C.
☞
Always empty the recovery tank ( Photo 1 - B ) be-
fore filling the solution tank ( Photo 1 - D )
To fill the tank:
- Pour into the tank the required quantity of the
chemical product, considering the percentage indi-
cated by the supplier, with reference to the full tank
capacity listed on the product sheet.
•
Use only those products suitable for the floor and
the dirt to be removed.
- Pour water in the filling opening placed in the front
of the machine ( Photo 28 - A ).
Leave 2 cm between the filling opening and the liquid
level. Do not fill beyond this point!
•
The machine have been designed for the use
with non-foaming and biodegradable detergents
made specifically for scrubber-driers. The use
of other chemical products (such as sodium hy-
pochlorite, oxidizers, solvents or hydrocarbons)
may damage or destroy the machine.
- Follow the safety regulations specified in the relative
section and indicated on the detergent container.
- Contact the machine manufacturer to obtain a com-
plete list of available and suitable detergents.
☞
Always use non-foaming and biodegradable
detergents
- Do not leave the water hose unattended and insert
it completely into the tank: the hose might move and
get sensitive parts of the machine wet.
Close the tank with its foam plug.
A
A
Photo 28
A) Solution tank filling opening
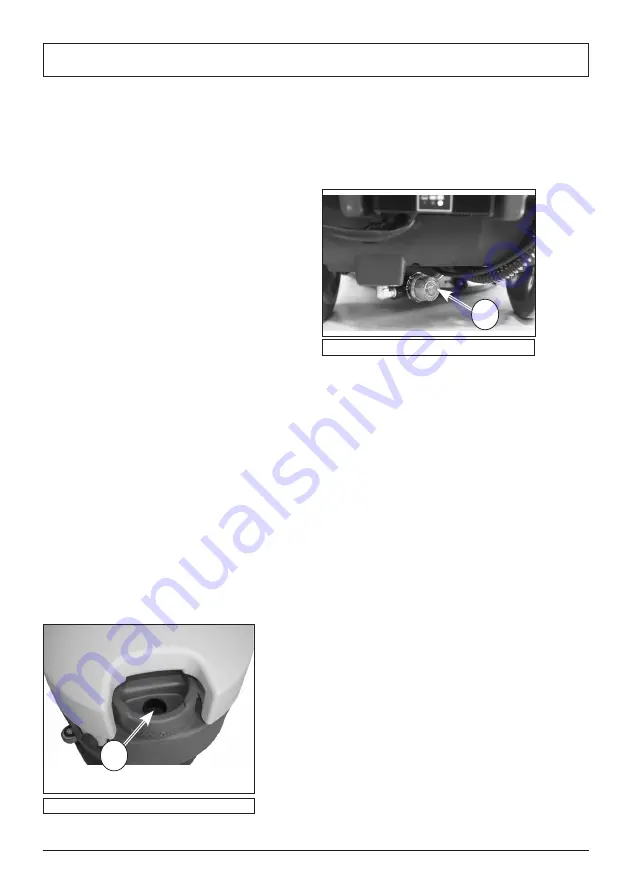
Photo 29
A) Water filter cap for the drainage of the
solution tank
To drain the tank:
- Unscrew the cap of the water filter placed in lower
part of the solution tank and wait untul the tank is
completely empty ( Photo 29 - A ).
- Screw the water filter cap firmly.
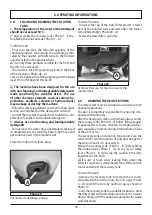
6.9.
DRAINING THE RECOVERY TANK
The dirty water must be drained in accordance with
national regulations.
The user is completely responsible for ensuring com-
pliance with such rules.
After the detergent solution is finished, always empty
the recovery tank ( Photo O - 3) before filling it again.
In general, the recovery tank can be emptied when-
ever required, and even during intermediate phases
of the work cycle.
The recovery tank and solution tank volume are the
same and to avoid situations of potential danger for
the suction motor it is necessary to
empty the recovery tank ( Photo 1 - B ) before filling
the solution tank ( Photo 1 - D ); in any case, a safety
float ( Photo 3 - B ) will stop the suction if the dirty
liquid level is too high
•
If water or foam starts leaking from under the
tanks for any reason, immediately turn off the suction
motor and empty the recovery tank.
To drain the tank:
- Remove the recovery tank; to remove the recovery
tank, detatch the suction hose from its siege ( Photo
4 - B ) and lift the tank by pulling it up as shown in
Photo 13.
- Carry the recovery tank to a suitable location to drain
the dirty water and preferably near a toilet or a sewer
drain (comply with the national regulations for waste
water disposal).
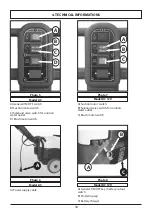
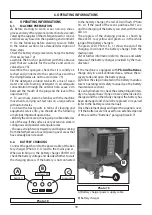
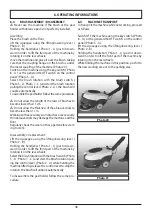
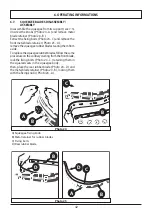
6. OPERATING INFORMATIONS
Summary of Contents for CPS 36 BX
Page 148: ...148...
Page 149: ...149...
Page 150: ...150...
Page 151: ...151...
Page 152: ...152...
Page 153: ...153...
Page 154: ...154...
Page 155: ...155...
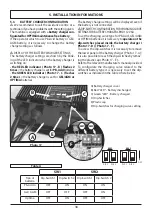
Page 157: ...157 1 1 1 1 1 2 2 10 1 3 1 4...
Page 158: ...158 1 2 1 5 2 2 1 m 4 C e 35 C 10 50 30 95 2 10...
Page 159: ...159 2 2 2...
Page 160: ...160 3 3 1 3 2 3 3 3 3 4 0 38 61 DC 12V 70 DC 12V 50 82 cm 56 cm 8 2 c m...
Page 161: ...161 4 4 1 4...
Page 162: ...162 162 B A C D B A B A B C D 1 2 B A C A B A B A B C 4 3 4 4 2 A...
Page 163: ...163 B A C A B C A B A B C DC 12V DC 12V B A C D A B C D AC 7 5 AC A 8 6 A 4 C...
Page 164: ...164 69 101 79 114 47 4 4 3 104 81...
Page 165: ...165 5 A 5 5 1 9 10 11 12 9 10 11 12...
Page 166: ...166 5 2 14 4 13 14 5 2 1 15 16 B 16 13 14 B 5 15 16 D C A A 12V B C D...
Page 168: ...168 6 6 6 1 7 2 7 5 2 7 9 6 2 19 18 A 1 18 C 18 19 A A B A B C B...
Page 169: ...169 8 7 6 3 2 1 20 8 5 5 D 7 2 1 1 2 1 5 D 7 2 6 20 21 6 4 8 5 2 1 20...
Page 171: ...171 6 C C A A B B B B D D 24 25 A B C D 6 7 7 5 24 24 B 24 A 25 A 24 C 24 D 24 B 24...
Page 172: ...172 6 8 50 C 1 D 1 28 2 A A 28 A 29 A 6 29 A 6 9 1 D 1 B 3 B 4 13...
Page 173: ...173 A 30 A 6 30 A 3 C 30 A 6 10 31 33 2 5 C 7 B 5 D 7 C 31 32 33...
Page 175: ...175 6 7 13 3 6 12 5 7 10 6 13 AC DC 12V AC...
Page 176: ...176 7 7 1 50 7 2 29 A 7 3 23 7 4 7 5 7 6 7 7 7...
Page 177: ...177 3 AGM 6 7 8 16 16 D 7 9 7 9 1 7 9 2 7 9 3 7 10 8...
Page 178: ...178 8 8 1 1 8 2 8 3 8 4 8 5 8 6 8 7 8 8 8 9 100 8...
Page 179: ...179 20 30 8...
Page 180: ...180 9 9 12 9 1 2013 56 EU 9 2 2012 19 EU 2012 19 EU...
Page 218: ...218 69 101 79 114 47 4 TEKNISETTIEDOT 4 3 MITAT Kaikki mitat on ilmaistu senttimetriss 104 81...
Page 242: ...242 69 101 79 114 47 4 TEKNISK INFORMATION 4 3 M TT Alla m tt anges i centimeter 104 81...
Page 312: ...312 69 101 79 114 47 4 INFORMA IITEHNICE 4 3 DIMENSIUNI Toate dimensiunile sunt n mm 104 81...
Page 336: ...336 69 101 79 114 47 4 TEKN K B LG LER 4 3 EBATLAR cm 104 81...
Page 401: ...1 401 1 1 1 1 2 2 10 1 3 1 4 1 5...
Page 402: ...2 402 2 2 1 4 C 35 C 10 C 50 C 30 95 2 10...
Page 403: ...2 403 2 2...
Page 404: ...3 3 1 3 2 3 3 3 404 4 4 0 38 3 61 kg D 12V 70 kg D 12V 50 kg 82 cm 56 cm...
Page 405: ...4 405 4 4 1...
Page 406: ...406 B A C D B D 1 2 B A C A B B C 4 3 4 4 2 A...
Page 407: ...407 B A C A B C A B DC 12V DC 12V B A C D A B C D AC 7 5 AC A 8 6 4 C...
Page 408: ...408 69 101 79 114 47 4 4 3 104 81...
Page 409: ...409 5 A 5 5 1 9 10 11 12 9 10 11 12...
Page 410: ...410 5 2 14 4 B 13 14 5 2 1 15 0 16 B 16 13 14 B 5 15 16 D C A 12V D...
Page 413: ...413 8 7 6 3 2 1 20 8 A 5 A 5 D 7 C 2 A 1 cm 1 cm 2 1 5 D 7 C 6 20 21 2 A 6 4 8 A 5 A 2 1...
Page 414: ...6 5 22bis E 22 A 22 23 B 6 6 23 B 22 6 414 22 bis A D E F G H A B E D E F H C 22 23 B A B B G...
Page 415: ...415 6 6 7 7 5 24 A 24 B 24 25 C C A A B B B B D D 24 25 A D 24 24 D 24 B 24 A...
Page 416: ...416 6 8 50 C 1 1 D 28 A 2 A A 28 29 A 6 29 A 6 9 3 1 1 D 3 4 B 13...
Page 417: ...417 A 30 A 6 30 A 3 C 30 A 3 C 6 10 31 33 2 5 C 7 B 5 D 7 C ON 31 32 33...
Page 419: ...419 6 7 7 13 3 6 12 5 7 10 6 13 7 7 1 50 7 2 29...
Page 420: ...420 7 3 23 7 4 7 5 7 6 7 7 Pb 3 AGM 6 7 8 16 16 D 7...
Page 421: ...421 7 9 7 9 1 Pb 7 9 2 Pb 7 9 3 7 10 7...
Page 422: ...422 8 8 1 8 2 8 3 8 4 8 5 8 6 8 7 8 8 8 9 100 8...
Page 423: ...423 8 9 20 30 9 12 9 1 2013 56 9 2 WEEE 2012 19 EU 2012 19 EU...
Page 425: ......
Page 427: ......
Page 430: ...7 504 0290 rev 04 09 2021...