


39
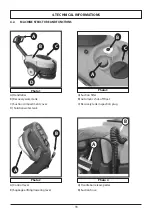
6. OPERATING INFORMATIONS
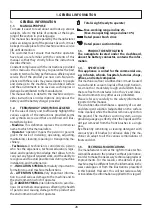
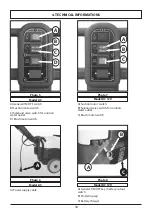
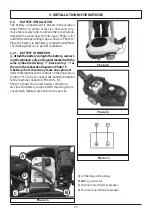
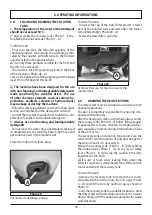
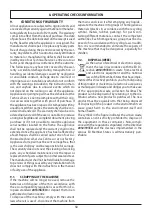
Yellow LED
Green LED
Red LED
Photo 18
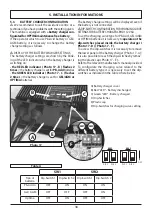
Photo 19
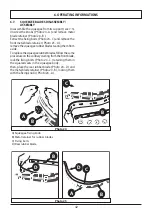
A) Battery charger power supply cable
B) Battery charger
A
B
C
A
B
6.
OPERATING INFORMATIONS
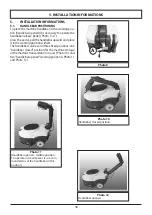
6.1.
MACHINE PREPARATION
•
Before starting to work, wear non-slip shoes,
gloves and any other personal protection device indi-
cated by the supplier of the detergent used or consid-
ered necessary based on the operating environment.
☞
Do the following before starting to work. Refer
to the relative sections for a detailed description of
these steps:
Check the battery charge level and charge the battery
if necessary (see 7.2).
assemble the brush or pad driver (with the abrasive
pad) that are suitable for the surface and work in-
volved (see 7.3).
Assemble the squeegee, check that it is solidly at-
tached and connected to the suction hose and that
the drying blades are not too worn (see 7.5).
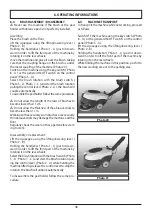
Fill the detergent solution tank with a mix of clean
water and non-foaming detergent in an adequate
concentration through the anterior hole. Leave 2 cm
between the mouth of the plug and the level of the
liquid (see 7.9).
☞
To avoid risks, become familiar with the machine
movements, carrying out test runs on a large surface
without obstacles.
To obtain the best results in terms of cleaning and
equipment service life, you should do the following
simple but important operations:
- Identify the work area, moving all possible obstacles
out of the way; if the surface is very extensive, work in
contiguous and parallel rectangular areas.
- Choose a straight work trajectory and begin working
from the farthest area to avoid passing over areas that
have already been cleaned.
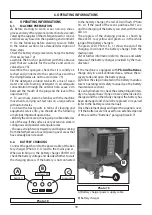
6.2.
BATTERY CHARGING
Connect the patch cord to the power cable of the bat-
tery charger ( Photo 19 - A ) and to the mains power.
When switching on, the battery charger CBHD1 will
check the battery voltage and decide whether to start
the charging process. If the battery is not connected
to the battery charger, the red LED will flash ( Photo
18 - A ). If the result of the test is positive after 1 sec-
ond the charging of the battery can start, with the red
LED on.
The progress of the charging process is shown by
three LED’s: red, yellow and green, as in the whole
range of the battery chargers.
The green LED ( Photo 18 - C ) shows the end of the
charging. Disconnect the battery charger from the
mains power.
•
For further information refer to the use and safety
manual of the battery charger provided by the man-
ufacturer.
If the machine is equipped with
Pb-Acid batteries
,
charge only in a well-ventilated area, remove the re-
covery tank and open the battery plugs.
•
Follow the steps indicated in the battery manufac-
turer’s operating and safety manual (see the battery
maintenance section).
Use an hydrometer to check the element liquid inten-
sity on a regular basis: if one or more elements are dis-
charged and the others fully charged, the battery has
been damaged and should be replaced or repaired
(refer to the battery service manual).
Close the element plugs and lower the superior cover.
☞
If the batteries are not used for an extended period
of time, read the “Batteries” paragraph (see 8.7)
Summary of Contents for CPS 36 BX
Page 148: ...148...
Page 149: ...149...
Page 150: ...150...
Page 151: ...151...
Page 152: ...152...
Page 153: ...153...
Page 154: ...154...
Page 155: ...155...
Page 157: ...157 1 1 1 1 1 2 2 10 1 3 1 4...
Page 158: ...158 1 2 1 5 2 2 1 m 4 C e 35 C 10 50 30 95 2 10...
Page 159: ...159 2 2 2...
Page 160: ...160 3 3 1 3 2 3 3 3 3 4 0 38 61 DC 12V 70 DC 12V 50 82 cm 56 cm 8 2 c m...
Page 161: ...161 4 4 1 4...
Page 162: ...162 162 B A C D B A B A B C D 1 2 B A C A B A B A B C 4 3 4 4 2 A...
Page 163: ...163 B A C A B C A B A B C DC 12V DC 12V B A C D A B C D AC 7 5 AC A 8 6 A 4 C...
Page 164: ...164 69 101 79 114 47 4 4 3 104 81...
Page 165: ...165 5 A 5 5 1 9 10 11 12 9 10 11 12...
Page 166: ...166 5 2 14 4 13 14 5 2 1 15 16 B 16 13 14 B 5 15 16 D C A A 12V B C D...
Page 168: ...168 6 6 6 1 7 2 7 5 2 7 9 6 2 19 18 A 1 18 C 18 19 A A B A B C B...
Page 169: ...169 8 7 6 3 2 1 20 8 5 5 D 7 2 1 1 2 1 5 D 7 2 6 20 21 6 4 8 5 2 1 20...
Page 171: ...171 6 C C A A B B B B D D 24 25 A B C D 6 7 7 5 24 24 B 24 A 25 A 24 C 24 D 24 B 24...
Page 172: ...172 6 8 50 C 1 D 1 28 2 A A 28 A 29 A 6 29 A 6 9 1 D 1 B 3 B 4 13...
Page 173: ...173 A 30 A 6 30 A 3 C 30 A 6 10 31 33 2 5 C 7 B 5 D 7 C 31 32 33...
Page 175: ...175 6 7 13 3 6 12 5 7 10 6 13 AC DC 12V AC...
Page 176: ...176 7 7 1 50 7 2 29 A 7 3 23 7 4 7 5 7 6 7 7 7...
Page 177: ...177 3 AGM 6 7 8 16 16 D 7 9 7 9 1 7 9 2 7 9 3 7 10 8...
Page 178: ...178 8 8 1 1 8 2 8 3 8 4 8 5 8 6 8 7 8 8 8 9 100 8...
Page 179: ...179 20 30 8...
Page 180: ...180 9 9 12 9 1 2013 56 EU 9 2 2012 19 EU 2012 19 EU...
Page 218: ...218 69 101 79 114 47 4 TEKNISETTIEDOT 4 3 MITAT Kaikki mitat on ilmaistu senttimetriss 104 81...
Page 242: ...242 69 101 79 114 47 4 TEKNISK INFORMATION 4 3 M TT Alla m tt anges i centimeter 104 81...
Page 312: ...312 69 101 79 114 47 4 INFORMA IITEHNICE 4 3 DIMENSIUNI Toate dimensiunile sunt n mm 104 81...
Page 336: ...336 69 101 79 114 47 4 TEKN K B LG LER 4 3 EBATLAR cm 104 81...
Page 401: ...1 401 1 1 1 1 2 2 10 1 3 1 4 1 5...
Page 402: ...2 402 2 2 1 4 C 35 C 10 C 50 C 30 95 2 10...
Page 403: ...2 403 2 2...
Page 404: ...3 3 1 3 2 3 3 3 404 4 4 0 38 3 61 kg D 12V 70 kg D 12V 50 kg 82 cm 56 cm...
Page 405: ...4 405 4 4 1...
Page 406: ...406 B A C D B D 1 2 B A C A B B C 4 3 4 4 2 A...
Page 407: ...407 B A C A B C A B DC 12V DC 12V B A C D A B C D AC 7 5 AC A 8 6 4 C...
Page 408: ...408 69 101 79 114 47 4 4 3 104 81...
Page 409: ...409 5 A 5 5 1 9 10 11 12 9 10 11 12...
Page 410: ...410 5 2 14 4 B 13 14 5 2 1 15 0 16 B 16 13 14 B 5 15 16 D C A 12V D...
Page 413: ...413 8 7 6 3 2 1 20 8 A 5 A 5 D 7 C 2 A 1 cm 1 cm 2 1 5 D 7 C 6 20 21 2 A 6 4 8 A 5 A 2 1...
Page 414: ...6 5 22bis E 22 A 22 23 B 6 6 23 B 22 6 414 22 bis A D E F G H A B E D E F H C 22 23 B A B B G...
Page 415: ...415 6 6 7 7 5 24 A 24 B 24 25 C C A A B B B B D D 24 25 A D 24 24 D 24 B 24 A...
Page 416: ...416 6 8 50 C 1 1 D 28 A 2 A A 28 29 A 6 29 A 6 9 3 1 1 D 3 4 B 13...
Page 417: ...417 A 30 A 6 30 A 3 C 30 A 3 C 6 10 31 33 2 5 C 7 B 5 D 7 C ON 31 32 33...
Page 419: ...419 6 7 7 13 3 6 12 5 7 10 6 13 7 7 1 50 7 2 29...
Page 420: ...420 7 3 23 7 4 7 5 7 6 7 7 Pb 3 AGM 6 7 8 16 16 D 7...
Page 421: ...421 7 9 7 9 1 Pb 7 9 2 Pb 7 9 3 7 10 7...
Page 422: ...422 8 8 1 8 2 8 3 8 4 8 5 8 6 8 7 8 8 8 9 100 8...
Page 423: ...423 8 9 20 30 9 12 9 1 2013 56 9 2 WEEE 2012 19 EU 2012 19 EU...
Page 425: ......
Page 427: ......
Page 430: ...7 504 0290 rev 04 09 2021...