


45
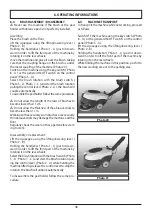
6.11. DRIVING THE MACHINE
Model AC
- Connect the power cable of the machine ( Photo 6 -
A ) to the power mains using a patch cord.
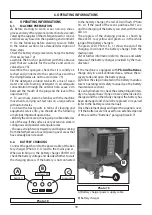
- Switch ON the general ON-OFF switch ( Photo 5 - A ).
- Switch ON the brush motor switch ( Photo 5 - D )
•
The brush will start the rotation only when
the operator will pull the brush operation lever
( Photo 2 - A )
.
- Switch ON the suction motor switch ( Photo 5 - B ).
- Switch ON the solenoid valve switch for solution
water outlet ( Photo 5 - C ).
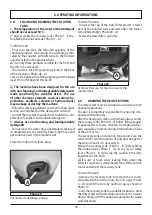
- Open the solution water valve rotating the lever (
Photo 31, 32, 33 ).
- Lower the squeegee unit by using the lift/lower
lever ( Photo 2 - B ).
- Wash the floor moving forward slowly, pulling the
brush operation lever ( Photo 2 - A ) to start the brush
rotation and the solution water outlet; releasing the
lever the brush rotation will stop after few seconds.
•
Remember to lift the squeegee before driving re-
verse to avoid damaging it.
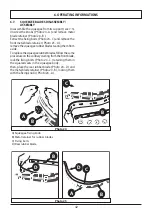
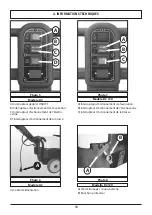
Model DC 12V
- Verify that the battery connector placed under the
recovery tank ( Photo 16 - B ) is connected.
- Put the ignition key ( Photo 8 - A ) in and turn ON
the machine.
- On the on-board battery charger ( Photo 19 ) check
the battery charge status ( Photo 18 ).
- Switch ON the brush motor switch ( Photo 7 - C )
•
The brush will start the rotation only when
the operator will pull the brush operation lever
( Photo 2 - A )
.
- Switch ON the suction motor switch ( Photo 7 - A ).
- Switch ON the solenoid valve switch for solution
water outlet ( Photo 7 -B ).
- Open the solution water valve rotating the lever (
Photo 31, 32, 33 )
- Lower the squeegee unit by using the lift/lower
lever ( Photo 2 - B ).
- Wash the floor moving forward slowly, pulling the
brush operation lever ( Photo 2 - A ) to start the brush
rotation and the solution water outlet; releasing the
lever the brush rotation will stop after few seconds.
•
Remember to lift the squeegee before driving re-
verse to avoid damaging it.
6.12. WORK METHOD
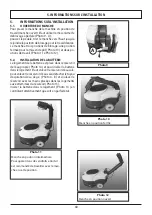
6.12.1. PREPARATION AND WARNINGS
Remove any loose solid residue from the surface
to be treated (using suitable tools, such as vacuum
cleaners, sweepers, etc.). It this is not done, the solid
dirt might prevent the squeegee from operating cor-
rectly, reducing drying efficiency.
Only trained personnel can drive this machine.
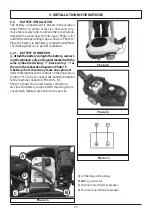
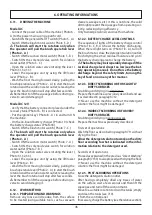
6.12.2. BATTERY CHARGE LEVEL CONTROLS
The sequence of lights of the battery charge control
( Photo 18 - C, B, A ) shows the battery discharging.
When the red light turns on ( Photo 18 - A ), turn off
the brush motor, close the detergent solution outlet,
finish drying the small residual moisture and go to
the battery charging area to charge the battery.
•
The battery may be irreparably damaged if the
residual charge level drops too low (see the bat-
tery operating manual). Do not force the battery
discharge beyond the safety limits, turning the
key off and on or in any other manner.
6.12.3. DIRECT SCRUBBING OR FOR SLIGHTLY
DIRTY SURFACES
Scrubbing and drying in a single pass.
Prepare the machine as previously described and use
it as described in paragraph 7.12 .
☞
Never use the machine without the detergent
solution: the floor might be damaged.
6.12.4. INDIRECT SCRUBBING OR FOR VERY
DIRTY SURFACES
Scrubbing and drying in various passes.
Prepare the machine as previously described.
First set of operations:
Wash the floor as described in paragraph 7.11 without
drying the floor
Allow the detergent solution to work on the dirty
floor according to what is indicated in the infor-
mation relative to the detergent used.
Second set of operations:
Proceed as explained in the previous “Direct Washing”
paragraph (7.13.3) to also proceed with drying the floor.
☞
Never use the machine without the detergent
solution: the floor might be damaged.
6.12.5. POST-SCRUBBING OPERATIONS
Close the detergent solution outlet.
After having completely dried any traces of water
on the surface, wait a few seconds and then lift the
squeegee and turn off the suction motor.
Move to a suitable location to drain the tanks; empty
and clean the tanks (see 7.10).
it from the control panel.
If necessary, charge the battery (see the relative section).
6. OPERATING INFORMATIONS
Summary of Contents for CPS 36 BX
Page 148: ...148...
Page 149: ...149...
Page 150: ...150...
Page 151: ...151...
Page 152: ...152...
Page 153: ...153...
Page 154: ...154...
Page 155: ...155...
Page 157: ...157 1 1 1 1 1 2 2 10 1 3 1 4...
Page 158: ...158 1 2 1 5 2 2 1 m 4 C e 35 C 10 50 30 95 2 10...
Page 159: ...159 2 2 2...
Page 160: ...160 3 3 1 3 2 3 3 3 3 4 0 38 61 DC 12V 70 DC 12V 50 82 cm 56 cm 8 2 c m...
Page 161: ...161 4 4 1 4...
Page 162: ...162 162 B A C D B A B A B C D 1 2 B A C A B A B A B C 4 3 4 4 2 A...
Page 163: ...163 B A C A B C A B A B C DC 12V DC 12V B A C D A B C D AC 7 5 AC A 8 6 A 4 C...
Page 164: ...164 69 101 79 114 47 4 4 3 104 81...
Page 165: ...165 5 A 5 5 1 9 10 11 12 9 10 11 12...
Page 166: ...166 5 2 14 4 13 14 5 2 1 15 16 B 16 13 14 B 5 15 16 D C A A 12V B C D...
Page 168: ...168 6 6 6 1 7 2 7 5 2 7 9 6 2 19 18 A 1 18 C 18 19 A A B A B C B...
Page 169: ...169 8 7 6 3 2 1 20 8 5 5 D 7 2 1 1 2 1 5 D 7 2 6 20 21 6 4 8 5 2 1 20...
Page 171: ...171 6 C C A A B B B B D D 24 25 A B C D 6 7 7 5 24 24 B 24 A 25 A 24 C 24 D 24 B 24...
Page 172: ...172 6 8 50 C 1 D 1 28 2 A A 28 A 29 A 6 29 A 6 9 1 D 1 B 3 B 4 13...
Page 173: ...173 A 30 A 6 30 A 3 C 30 A 6 10 31 33 2 5 C 7 B 5 D 7 C 31 32 33...
Page 175: ...175 6 7 13 3 6 12 5 7 10 6 13 AC DC 12V AC...
Page 176: ...176 7 7 1 50 7 2 29 A 7 3 23 7 4 7 5 7 6 7 7 7...
Page 177: ...177 3 AGM 6 7 8 16 16 D 7 9 7 9 1 7 9 2 7 9 3 7 10 8...
Page 178: ...178 8 8 1 1 8 2 8 3 8 4 8 5 8 6 8 7 8 8 8 9 100 8...
Page 179: ...179 20 30 8...
Page 180: ...180 9 9 12 9 1 2013 56 EU 9 2 2012 19 EU 2012 19 EU...
Page 218: ...218 69 101 79 114 47 4 TEKNISETTIEDOT 4 3 MITAT Kaikki mitat on ilmaistu senttimetriss 104 81...
Page 242: ...242 69 101 79 114 47 4 TEKNISK INFORMATION 4 3 M TT Alla m tt anges i centimeter 104 81...
Page 312: ...312 69 101 79 114 47 4 INFORMA IITEHNICE 4 3 DIMENSIUNI Toate dimensiunile sunt n mm 104 81...
Page 336: ...336 69 101 79 114 47 4 TEKN K B LG LER 4 3 EBATLAR cm 104 81...
Page 401: ...1 401 1 1 1 1 2 2 10 1 3 1 4 1 5...
Page 402: ...2 402 2 2 1 4 C 35 C 10 C 50 C 30 95 2 10...
Page 403: ...2 403 2 2...
Page 404: ...3 3 1 3 2 3 3 3 404 4 4 0 38 3 61 kg D 12V 70 kg D 12V 50 kg 82 cm 56 cm...
Page 405: ...4 405 4 4 1...
Page 406: ...406 B A C D B D 1 2 B A C A B B C 4 3 4 4 2 A...
Page 407: ...407 B A C A B C A B DC 12V DC 12V B A C D A B C D AC 7 5 AC A 8 6 4 C...
Page 408: ...408 69 101 79 114 47 4 4 3 104 81...
Page 409: ...409 5 A 5 5 1 9 10 11 12 9 10 11 12...
Page 410: ...410 5 2 14 4 B 13 14 5 2 1 15 0 16 B 16 13 14 B 5 15 16 D C A 12V D...
Page 413: ...413 8 7 6 3 2 1 20 8 A 5 A 5 D 7 C 2 A 1 cm 1 cm 2 1 5 D 7 C 6 20 21 2 A 6 4 8 A 5 A 2 1...
Page 414: ...6 5 22bis E 22 A 22 23 B 6 6 23 B 22 6 414 22 bis A D E F G H A B E D E F H C 22 23 B A B B G...
Page 415: ...415 6 6 7 7 5 24 A 24 B 24 25 C C A A B B B B D D 24 25 A D 24 24 D 24 B 24 A...
Page 416: ...416 6 8 50 C 1 1 D 28 A 2 A A 28 29 A 6 29 A 6 9 3 1 1 D 3 4 B 13...
Page 417: ...417 A 30 A 6 30 A 3 C 30 A 3 C 6 10 31 33 2 5 C 7 B 5 D 7 C ON 31 32 33...
Page 419: ...419 6 7 7 13 3 6 12 5 7 10 6 13 7 7 1 50 7 2 29...
Page 420: ...420 7 3 23 7 4 7 5 7 6 7 7 Pb 3 AGM 6 7 8 16 16 D 7...
Page 421: ...421 7 9 7 9 1 Pb 7 9 2 Pb 7 9 3 7 10 7...
Page 422: ...422 8 8 1 8 2 8 3 8 4 8 5 8 6 8 7 8 8 8 9 100 8...
Page 423: ...423 8 9 20 30 9 12 9 1 2013 56 9 2 WEEE 2012 19 EU 2012 19 EU...
Page 425: ......
Page 427: ......
Page 430: ...7 504 0290 rev 04 09 2021...