


51
This function allows the installer to work on the Vedo
System with complete peace of mind, with the siren, PSTN
part, GSM part and email all "silenced".
The control panel is working and can be programmed (via
Safe Manager) but does not generate any Alarm event.
1.
From the keypad, enter a valid installer code (default master
code 001961).
2.
Press Prog.
3.
Remove jumper JP7.
4.
Close the control panel cover.
5.
Press C until you completely leave the menus.
5.3.20 Setting the control panel to Service Status
5.3.21 Exiting Service Status
1.
From the keypad, enter a valid user code (default 111111).
2.
Press Prog.
3.
The first line of the display will show the message “System
Mgmt.” indicating that you can now modify the system
options.
4.
Using the navigation keys (up and down), select the
“COMMANDS” menu on the second line of the display, and
press Confirm: the message “GENERATE COMMAND” will
appear on the first line of the display.
5.
Using the navigation keys (up and down), select “AUTH.
INSTALLER?” on the second line, and press Confirm: the
message “DONE” will appear on the display.
6.
Press C until you have exited the menus completely (i.e.
until the date and time are displayed on the keypad).
7.
From the keypad, enter a valid installer code (default master
code 001961).
8.
Press Prog.
9.
Open the control panel cover.
10.
Insert jumper JP7.
» The control panel will remain in service while jumper
JP7 remains inserted. The keypad display will show
"SCHEDULED MAINTENANCE!" or "N" across all areas.
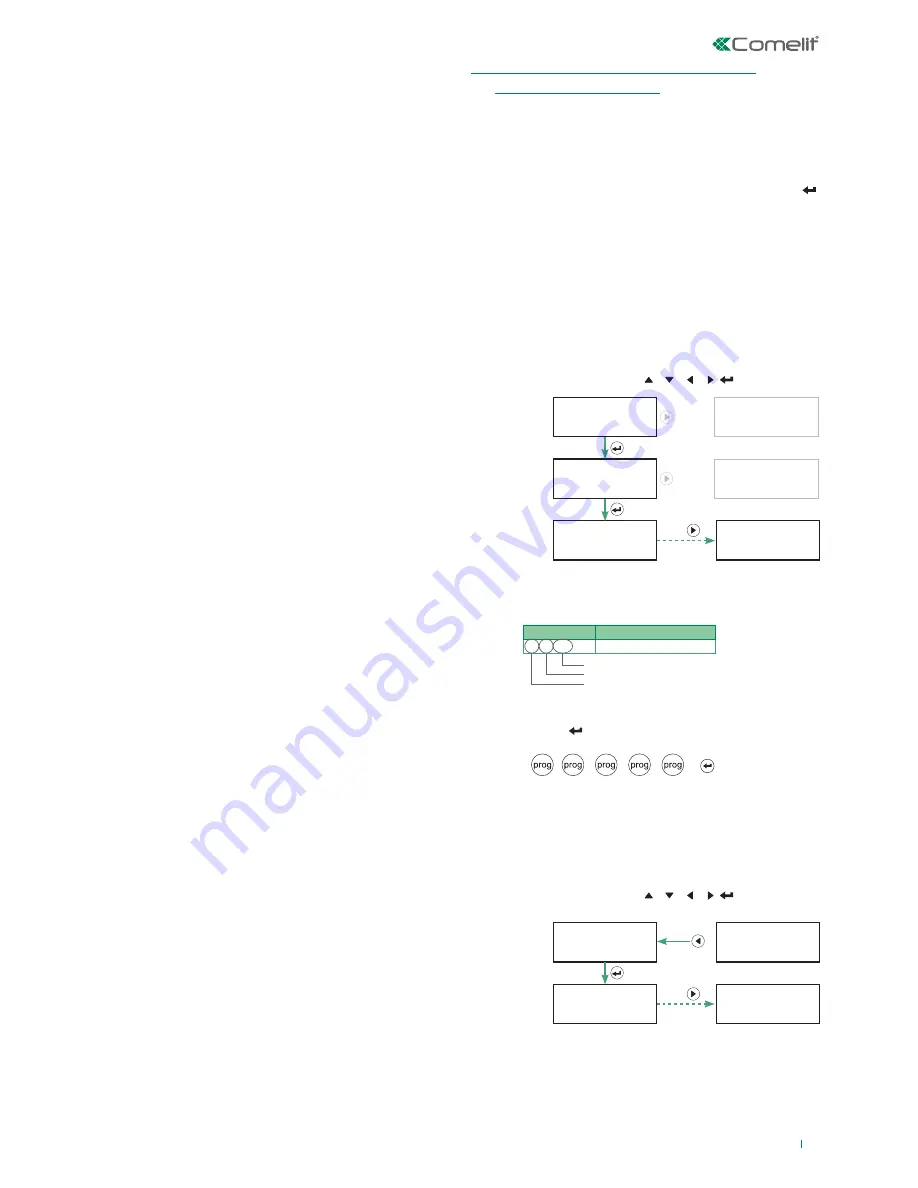
At whatever menu depth level you are, it is possible to use fast
navigation by inserting the coordinates.
The coordinates are inserted in pairs of lines, or columns, for each
navigation depth level.
Each coordinate is confirmed by pressing prog.
The end of inserting the coordinates is confirmed by pressing .
Fast navigation can be cancelled by pressing "C" until all the
numbers entered have been deleted.
Any error in entering the coordinates is indicated with the message
"FUNCTION NOT AVAILABLE". The same message is also displayed
if a user does not possess the necessary authorisations for access to
the navigation level requested.
Start entering the coordinates from the current level.
EXAMPLE 1:
"ENABLE BUZZER" ON KEYPAD 1
Traditional navigation with keys
Fast navigation
Indices
Parameters
1.1.1.1.x.16
Buzzer on
where x= "device number" coordinate
5.4 FAST NAVIGATION OF KEYPAD MENU
(INSTALLER AND USER)
Keypad 1
Buzzer enabled
Prog. Parameters
Keypads
Main Menu
Prog. Parameters
Main Menu
System Mgmt.
Parameters Prog.
......
Keypad 1
Description
LEVEL 1
LEVEL 3
LEVEL 2
LEVEL 1
(1
(1
(.1
.1)
.2)
....)
Parameters Prog.
Vedotouch
(.1
.2)
(.1
(.1
(.1
.1)
.1)
.16)
LEVEL 2
LEVEL 3
1.
Consult the table with the indices of the parameters* and
find the index of the desired function
2. Type in the
index as follows, pressing prog at "." and
pressing
at the end of the sequence:
* the following pages show only the indices of the parameters
to be configured to obtain grade 2 certification according to
EN50131-1.
1
1
1
1
1
16
EXAMPLE 1:
"ENABLE BUZZER" ON KEYPAD 1 FROM DEPTH
LEVEL 2 PARAMETERS PRG./VEDOTOUCH
Traditional navigation with keys
Keypad 1
Buzzer enabled
Prog. Parameters
Keypads
Keypad 1
Description
(1
(.1
(.1
.1)
.1)
.16)
LEVEL 2
LEVEL 3
10 ×
10 ×


