47
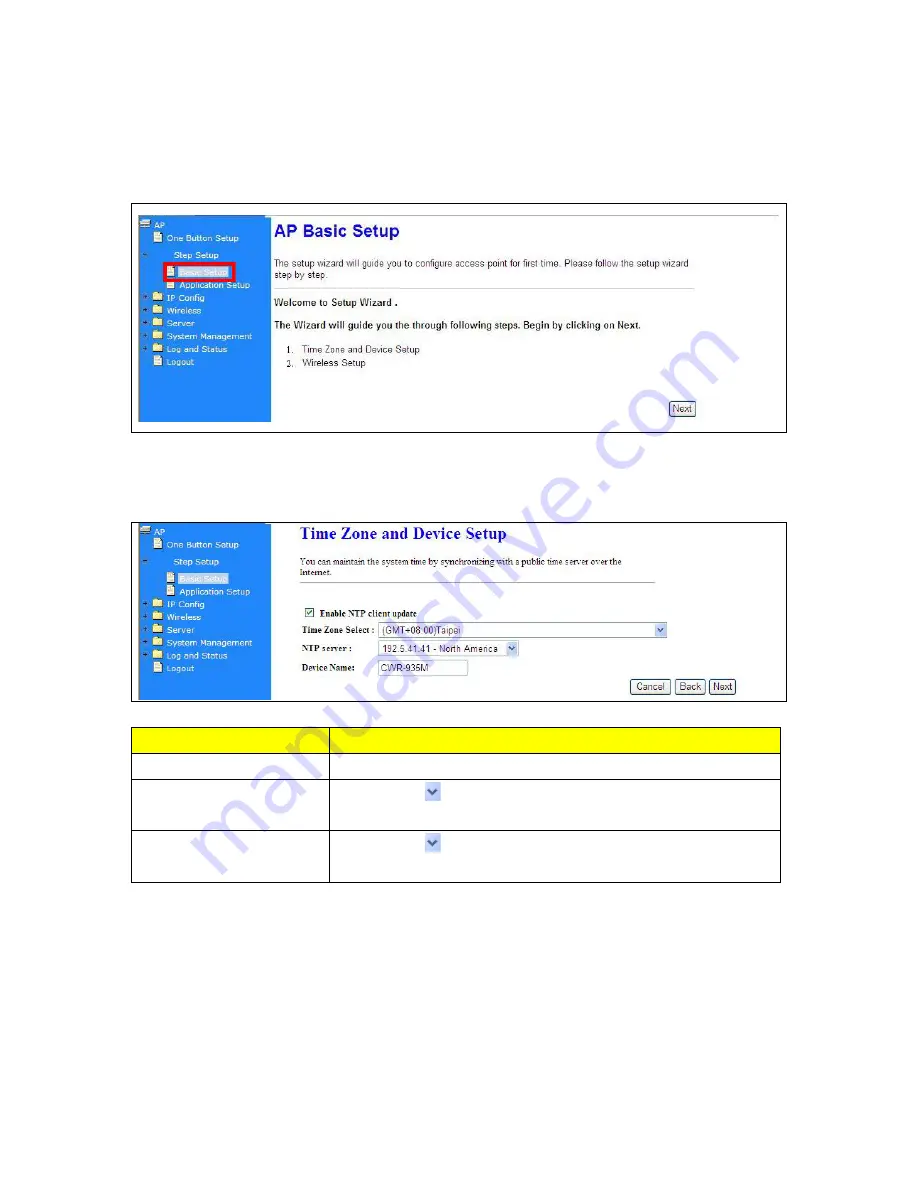
4. Click on Step Setup in the left screen of the main menu. Then you’ll see the
“Basic Setup”
and
“Application Setup”.
Please click
“Basic Setup”
then click
“Next>>”
to start configure your
CWR-935M.
4.4.1 Time Zone Setup
Item
Description
Enable NTP Client update
Device will auto synchronize with NTP server
Time Zone Select
Please press
button, a drop-down list will be shown, and you can
choose a time zone of the location you live.
NTP Server
Please press
button, a drop-down list will be shown, and you can
choose a NTP server which you want to use
After you finish all setting, please click
“Next>>”
button.
Summary of Contents for CWR-935M
Page 1: ...1 CWR 935M Wireless N Mobile Router User Manual Version 1 0 Jun 2009 ...
Page 23: ...23 ...
Page 25: ...25 3 2 One Button Setup for AP Mode ...
Page 27: ...27 ...
Page 46: ...46 3 Enter the username and password the username is admin password is admin ...
Page 54: ...54 ...
Page 89: ...89 The following figure is the explanation ...
Page 122: ...122 Step 1 Please go to Start Printers and Faxes to add a printer Step 2 Click Add a printer ...
Page 123: ...123 Step 3 Click Next ...
Page 124: ...124 Step 4 Click the Local printer attached to this computer and then click Next ...
Page 126: ...126 Step 7 Input the IP address of CWR 935M 192 168 1 1 Router Mode and then click Next ...
Page 127: ...127 Step 8 Select the Custom and click the Settings and then click Next ...
Page 130: ...130 Step 12 Click on Finish button and all steps of setting printer server are completely ...
Page 140: ...140 ...
Page 186: ...186 Step 1 Please go to Start Printers and Faxes to add a printer Step 2 Click Add a printer ...
Page 189: ...189 Step 7 Input the IP address of CWR 935M 192 168 1 254 and then click Next ...
Page 190: ...190 Step 8 Select the Custom and click the Settings and then click Next ...
Page 192: ...192 Step 10 Click the Finish ...
Page 198: ...198 2 Please click Save to save configuration to your computer ...
Page 234: ...234 There will be a pop up screen showing the image from web camera as below example ...
Page 239: ...239 Step 1 Please go to Start Printers and Faxes to add a printer Step 2 Click Add a printer ...
Page 243: ...243 ...
Page 245: ...245 Step 10 Click the Finish ...
Page 252: ...252 b Load configuration file 1 Click Browse 2 Select configuration file then click Open ...


