background image


CIRCONTROL, S.A. 

– Innovació, 3 – 08232 – Viladecavalls (Barcelona) 

                         Tel.: +34 937 362 940 

– Fax: +34 937 362 941


47      


                     Web: www.circontrol.com 

– E-mail:


[email protected]


WALLBOX SMART 

– INSTRUCTION MANUAL 

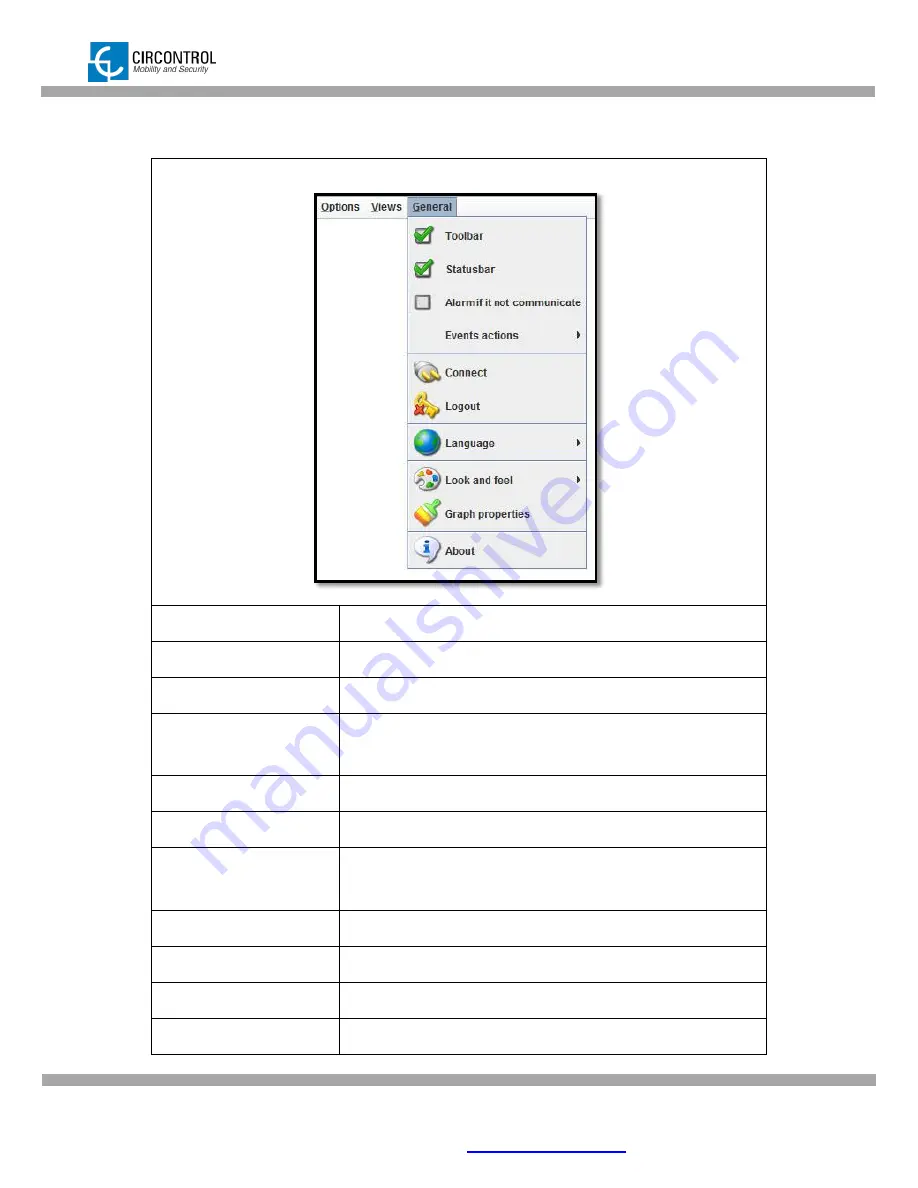
9.1.3  GENERAL MENU 


Option 

Description 

Toolbar 

Displays or hides the toolbar. 

Statusbar 

Displays or hides the status bar. 

Alarm if it not 

communicate 

Audible  alarm  if  communication  is  lost  between  charge 

point and computer connected. 

Events actions 

List of actions enabled in the client software. 

Connect 

Connects with another CirCarLife Engine. 

Logout 

Closes  the  current  session.  Only  available  when  the  user 

has connected to engine that requires authentication. 

Language 

Changes the client application language. 

Look and feel 

Changes the appearance of the client application (Skin). 

Graphs properties 

Changes graph appearance. 

About 

Displays client application information. 

Summary of Contents for CCL-WB MIX-SMART series

Page 1: ...INSTRUCTION MANUAL MODELS 3G models also included CCL WB2M SMART CCL WB2M SMART TRI CCL WB MIX SMART CCL WB MIX SMART TRI ...

Page 2: ...uced copied translated or transmitted in any form or by any means without the prior written permission of the original manufacturer Information provided in this manual is intended to be accurate and reliable However the original manufacturer assumes no responsibility for its use or for any infringements upon the rights of third parties that may result from its use All other product names or tradem...

Page 3: ...TIONS 11 4 1 PREREQUISITES 11 4 2 NETWORK TOPOLOGY 12 4 3 STEP BY STEP LAN CONNECTION PROCEDURE 13 4 4 SETUP WEB PAGE 17 4 4 1 NETWORK SETUP 18 4 4 2 MODEM SETUP only for 3G series 18 4 4 3 PUBLIC ADDRESS MANAGER 19 4 4 4 LOCALE SETUP 20 4 4 5 TIME SETUP 20 4 4 6 DYNAMIC DNS SETUP 21 4 4 7 SECURITY SETUP 22 4 4 8 SYSTEM INFORMATION 23 4 5 OTHER URL CONFIGURATION 25 4 5 1 LOG WEB PAGE 25 4 5 2 MODE...

Page 4: ... STEP INTEGRATIONS PROCEDURE 38 7 URL SUMMARY TABLE 41 8 CHARGE STATION MONITORING 42 8 1 USING CIRCARLIFE CLIENT 42 8 2 USING WEB BROWSER 43 9 CIRCARLIFE SCADA CLIENT 44 9 1 MENU BAR 45 9 1 1 OPTIONS MENU 45 9 1 2 VIEWS MENU 46 9 1 3 GENERAL MENU 47 9 2 TOOLBAR 48 9 2 1 TOOLBAR SETUP MENU 48 9 3 STATUS BAR 49 9 4 SCADA GRAPHS 50 9 4 1 GRAPHS TOOLBAR 52 9 5 SCADA TABLES 53 9 5 1 TABLE PROPERTIES 5...

Page 5: ... than electric vehicle charging Do not modify this unit If modified Circontrol will reject all responsibility and the warranty will be void Comply strictly with current safety regulations according to your country rules Do not make repairs or manipulations with the unit energised Only trained and qualified personnel should have access to low voltage electrical parts inside the device Check the ins...

Page 6: ...rnet compliant network between the Wall mount and customer network is available 3G and GPRS optional for remote control or OCPP integrations Energy metering Integrated meter built is measuring power and energy consumed by the EV during a charge Real time monitoring Using standard browser system allows access to the unit and monitoring charge status Remote control Remote actions as start stop charg...

Page 7: ...3 1 START RECHARGING PROCEDURE Wallbox has two status led indicators for each outlet Green light means there is at least one outlet available and ready to start a recharge Present a RFID card to the right side of the WallBox unit Wait until the display shows the following message Plug the cable into your car Choose one available socket in the WallBox mount unit Connect your cable to the unit Choos...

Page 8: ...of the plug connected changes to yellow Display shows the following message System will lock the plug automatically If vehicle is not ready to charge this status will be permanent When vehicle is ready to charge led status indicator of the plug connected will change from yellow to blue WallBox starts recharging On display shows the following information Charge time Real time consumed energy PLUG A...

Page 9: ...E mail circontrol circontrol com WALLBOX SMART INSTRUCTION MANUAL 3 1 1 DISPLAY INFORMATION WHILE CHARGING The display shows in scroll mode following messages when an EV is charging Plug A status Real time consumed Energy of Plug A Plug B status Plug A recharging elapsed time Show card Only if there is an available plug ...

Page 10: ... outlet Blue light means there is one outlet busy and recharging an electric vehicle Green light means there is at least one outlet available and ready to start a recharge Present a RFID card to the right side of the WallBox unit for 3 seconds Led status indicator of the plug connected change from blue to green On display shows the following information IMPORTANT For STOP recharging present same c...

Page 11: ... 08232 Viladecavalls Barcelona Tel 34 937 362 940 Fax 34 937 362 941 9 Web www circontrol com E mail circontrol circontrol com WALLBOX SMART INSTRUCTION MANUAL First remove your cable from the unit Remove cable from your vehicle ...

Page 12: ...AL 3 2 1 DISPLAY INFORMATION WHEN RECHARGING ENDS The display shows in scroll mode following messages as a data summary when charge ending Plug A recharging elapsed time Total consumed Energy of Plug A Show card Only if there is an available plug Total cost of recharging the vehicle Free prepayment disabled Total cost of recharging the vehicle Indicates Plug A has to be disconnected ...

Page 13: ...cess to the device main setup page will be showed Charge station is shipped from the factory with default network setting of DHCP enabled It means that the charge station will try to obtain an IP address from a DHCP server available on the network Step by step below guide detailed setup an IP address to the charging station in case there is no DHCP server available on the network 4 1 PREREQUISITES...

Page 14: ...UCTION MANUAL 4 2 NETWORK TOPOLOGY Connecting pc with charge station needs to be done with static IP address and TCP IP v4 protocol Next section shows how to do this configuration Below figure shows Ethernet connection topology and the IP addresses used in this guide as example IP 192 168 1 11 NETMASK 255 255 255 0 IP 192 168 1 10 NETMASK 255 255 255 0 Crossover UTP cable ...

Page 15: ...STEP LAN CONNECTION PROCEDURE This section provides a step by step guide to be able to connect a laptop to the charge station in order to see real time status Step Actions 1 Click on the network icon next to the clock of the taskbar Click on Open Network and Sharing Center 2 On the left pane click the option Change adapter settings 3 Right click on Local Area Connection and then click on Propertie...

Page 16: ...eb www circontrol com E mail circontrol circontrol com WALLBOX SMART INSTRUCTION MANUAL 4 Select Internet Protocol Version 4 TCP IP option and click Properties 5 Setup IP address and subnet mask like as shown below Click OK twice to complete the process to assigning IP address to the computer EXAMPLE ...

Page 17: ...ircontrol circontrol com WALLBOX SMART INSTRUCTION MANUAL 7 Execute IPSetup exe utility 8 Enter the following parameters MAC of the CCL1 device see lateral label in the device IP address i e 192 168 1 11 Netmask i e 255 255 255 0 Gateway leave default settings 10 Wait 30 seconds approximately until the process is complete EXAMPLE ...

Page 18: ... circontrol com E mail circontrol circontrol com WALLBOX SMART INSTRUCTION MANUAL 11 The process will complete when the following message appears If the message shown is the next one check the following parameters Check IP address entered Check the MAC of the device entered Try with another UTP CAT5e cable ...

Page 19: ...LBOX SMART INSTRUCTION MANUAL 4 4 SETUP WEB PAGE Setup web page allows managing networking setup modem 3G setup upgrading the device and other options To access to the setup web page open a web browser and enter the following address NOTE Remember to remove the quotes when entering an address into the web browser Direct link http IP_ADDRESS html setup html ...

Page 20: ...disable the IP address assignment by a DHCP server DHCP Client ID Client ID associated to the DHCP Server If available Address IP address assigned to the charge point Netmask Netmask of the network 4 4 2 MODEM SETUP only for 3G series Devices with 3G modem integrated on the unit can enter on this section the parameters of the modem provided by the mobile network operator Value Description APN Acce...

Page 21: ... system Value Description Address type Local address When selected private IP address will be sent to OCPP central system This option is valid if the OCPP central system is connected to the same private network of the charge point Static address When selected enter a value on Public IP textbox IP address or a domain name SIERRA Wireless Raven XE H2295EW Select this option only when SIERRA Wireless...

Page 22: ... screen Value Description Language Allows selecting the unit language using a dropdown 4 4 5 TIME SETUP This section allows setting the time and region unit time Value Description Primary NTP Server Allows to synchronize the time through internet automatically Secondary NTP Server Time zone Allows selecting the regional unit time using a dropdown Time Actual date and time of the unit Time and date...

Page 23: ...ircontrol com WALLBOX SMART INSTRUCTION MANUAL 4 4 6 DYNAMIC DNS SETUP Dynamic DNS is a system that updates in real time the public IP address assigned to a domain name server Value Description Server Allows selecting the type of Dynamic DNS Server using a dropdown Hostname Parameters provided by dynamic DNS server User Password Server Port ...

Page 24: ...o the web page configuration setup html of the device and also prevents the export or import of a new configuration of PowerStudio engine from an unauthorized user Value Description Password ON authentication enabled OFF authentication disabled Username Username and password authentication for setup html web page New password Password Do not forget the credentials of the device There is no way to ...

Page 25: ... Version Upgrade Version of the firmware currently installed and link to the upgrade web page Powerstudio version Engine version of PowerStudio Devices status Link that allows viewing the status of the configured devices 4 4 8 1 SYSTEM UPGRADE Upgrade web page allows to upgrade the firmware of the unit through a file with upgrade extension This file is provided by your installer or manufacturer of...

Page 26: ...ces that can communicate with the charge point NOTE Remember to remove the quotes when entering an address into the web browser NOTE it is reserved the right to change without notice the drivers on future firmware versions of the charge point Firmware file transfer must not be interrupted Failure of the file transfer involves irreversible damage to CCL1 master controller and the correct functional...

Page 27: ...into the web browser 4 5 OTHER URL CONFIGURATION There are more useful web pages installed on the master device This section shows the purpose of these web pages and how to access them 4 5 1 LOG WEB PAGE Log web page is a log that is created since charge point is powered ON If charge point is restarted this log is erased and immediately is created a new one These logs are not recorded and no way t...

Page 28: ...move the quotes when entering an address into the web browser Value Description Connection 3G communications status Data access protocol used Cell phone signal and coverage IP address Public IP assigned to the charge point 4 5 2 1 SIGNAL LEVEL TABLE Following table shows some possible values of the integrated modem on the charge point SIGNAL DESCRIPTION More than 80dBm Good signal Between 80dBm an...

Page 29: ... order to set up 3G communications and Internet access APN Access Point Name User Password These parameters have to be provided by your mobile network operator of the SIM card inserted 5 1 STEP BY STEP CONFIGURATION Step by step bellow shows how to configure the 3G communications service Step Action 1 Open web browser and go to http IP_ADDRESS html setup html 2 Locate Modem Setup section 3 Enter f...

Page 30: ... to enter PIN number the first time that SIM card is inserted into CCL1 device Enter SIM PIN and click on Confirm button 6 After entering pin number it shows following message Wait a few seconds until modem is connected on the network 7 When the 3G connection is successful following message will appear on the web page of modem status PIN number will not be required anymore after entering for the f...

Page 31: ...NSTRUCTION MANUAL Connection Indicates the connection status and the type of connection established IP address Public IP assigned by your mobile network operator 8 OPTIONAL STEP Finally it is recommendable to setup parameters of Dynamic DNS for update in real time the public IP address assigned to a domain name Dynamic DNS parameters can be introduced in setup web page ...

Page 32: ...able on the dropdown list To access to the setup web page open a web browser and enter the following address NOTE Remember to remove the quotes when entering an address into the web browser The selected default option is none When this option is set to none there is no integration enabled on the charge point In this way all RFID showed can start a rechargement Available options OCPP 1 2 Open Charg...

Page 33: ...integration selected on the previous section First time is running OCCP engine on the charge point it starts as configuration mode and all fields are empty The data is always saved even when the charge point is powered off or even the OCPP engine is stopped To access to the OCCP engine setup web page open a web browser and enter the following address NOTE Remember to remove the quotes when enterin...

Page 34: ...s for configuring the OCPP engine website It is recommended leaving the default settings Value Description Administration TCP port Port number where the OCPP engine website is hosted By default 8080 Administrator Administrator username By default admin New admin password Password for administrator user By default 1234 If a new password is entered it will be applied after saving new configuration R...

Page 35: ...rameters on this section Value Description Host URL URL where PowerStudio is hosted By default http 127 0 0 1 Port PowerStudio port By default 80 User System level Username and password authentication configured on PowerStudio Default factory parameters Username admin Password 1234 Password User Edit level Username and password configured in the security section of setup html website Default facto...

Page 36: ...stem administrator Please contact to your OCPP central system administrator to get the configuration parameters Value Description Charge Box ID Charge point identifier Protocol Protocol type If HTTPS is selected make sure to have CS Server CA certificate OCPP Listening port internal Listening port from charge point Make sure the ports configured are opened on the gateway OCPP Listening port public...

Page 37: ...al white list Yes store a list of authorised users on the charge point No Authorization is consulted for each RFID card shown Use OCPP time synchronization Time synchronization between charge point and OCPP central system Compress OCPP messages Sending compressed messages between charge point and central system NOTE Before enabling this option consult to your OCPP administrator if central system a...

Page 38: ...econds before connecting to the central system Meter value sample interval Meter value sample send interval in seconds for the back end system NOTE Put 0 seconds to send meter values only when charge point starts or stops charging a vehicle 6 2 5 MANAGEMENT SYSTEM CS This section provides to the charge point where OCPP central system is located and if it is requires authentication Please contact t...

Page 39: ...ge point and central system on Internet Consult your OCCP central system administrator for the CS Server certificate Value Description CS Server CA certificate Central System file certificate supplied by your central system administrator CB Server CA certificate Upload charge box file certificate supplied with charge point unit 6 2 7 ACTIONS Final options to complete the OCCP engine configuration ...

Page 40: ...s This page allows selecting and enabling the integration type on the CCL1 device 2 By default there is no integration configured on the CCL1 Select desired integration and click on Save setup button 4 Enter a new address on the web browser This page allows setup the integration enabled in previous steps 5 Fill the blank fields following parameters as your central system administrator Click on Sav...

Page 41: ...wser Locate Public address Manager section shown as below The selected default option is Local address To configure CCL1 3G series go to next step To configure CCL1 without 3G connectivity go to step number 9 8 This step is only for CCL1 3G series Change address type from Local address to TELIT HE863 on Public address Manager section inside Setup web page To finish go to step 10 Direct link http I...

Page 42: ...LLBOX SMART INSTRUCTION MANUAL 9 This step is only for CCL1 or other devices without 3G connectivity 1 Change address type from Local address to Static address on Public address Manager section inside Setup web page 2 Enter Public IP address or a domain name To finish go to next step 10 Click on Save setup to confirm Wait a few seconds until CCL1 restarts ...

Page 43: ... entire URL available as described in previous sections DESCRIPTION URL Setup http IP_ADDRESS html setup html Upgrade http IP_ADDRESS html upgrade html PowerStudio version http IP_ADDRESS services system info html Devices status http IP_ADDRESS html devstat html Log http IP_ADDRESS html log Modem status http IP_ADDRESS html modem status html Integration enable disable http IP_ADDRESS 65432 Integra...

Page 44: ...N MANUAL 8 CHARGE STATION MONITORING The IP address assigned in last section it will be useful to connect to the charge station to monitor the real time status Exist two ways to connect to the charge station CirCarLife client software Supplied by Circontrol Internet web browser 8 1 USING CIRCARLIFE CLIENT Step Action 1 Execute CirCarLife Client software 2 Go to General Connect ...

Page 45: ...port shown in the last example IP address Port 80 Click OK to connect to the charge point 8 2 USING WEB BROWSER It is needed to have installed the latest version of java to access to the monitoring page Download it from www java com Step Action 1 Execute your web browser and enter the following address i e http IP_ADRESS monitor page will open automatically 2 Wait while the client software is star...

Page 46: ...allows displaying and reporting all parameters generated by devices connected to the engine of the charge point Client platform is implemented in Java and can be executed on many devices Devices connected to the charge point may vary depending on model purchased CirCarLife Scada client is divided on 4 sections 1 Menu bar 2 Toolbar 3 Screen information 4 Status bar Following section describes in de...

Page 47: ...client features There are three main menus Options Views and General 9 1 1 OPTIONS MENU Option Description Properties Displays properties of the currently active view This option can be active or not depending on the view in progress Print Print currently active view This option can be active or not depending on the view in progress Export Exports currently active view This option can be active or...

Page 48: ...NSTRUCTION MANUAL 9 1 2 VIEWS MENU Option Description Previous Displays the previous view Next Displays the next view If available Historic Displays any view previously consulted Study Displays graph and tables views Devices Device list shortcut Events Displays the events log or the active events window Device status Display the general status of all connected devices ...

Page 49: ...ommunicate Audible alarm if communication is lost between charge point and computer connected Events actions List of actions enabled in the client software Connect Connects with another CirCarLife Engine Logout Closes the current session Only available when the user has connected to engine that requires authentication Language Changes the client application language Look and feel Changes the appea...

Page 50: ...consulted Devices Device list shortcut Graph Creates a graph Table Creates a table Events Displays event history Properties Displays the properties window of the current view Print Allows us to print the current view 9 2 1 TOOLBAR SETUP MENU It is possible to hide or display buttons for the toolbar Right click on the toolbar and following setup menu appears NOTE The toolbar may be hidden using the...

Page 51: ... working properly Offline CirCarLife Scada engine Incidences Description One or more devices are not communicating See device status section to find witch device is not communicating One or more devices are not reporting One or more events are active Double click over icon showed to see details NOTE Status bar can be hidden using the General option in the client application menu It may also be hid...

Page 52: ...ces Following image shows variables selection window under CCL1Engine where it is possible to select Plug A and Plug B on the charge point At first it appears the available plugs from the charge station Select the desired plug to proceed with the creation of the graph The system automatically chooses the representation period and the grouping of data which can obviously be changed later Default pa...

Page 53: ...ata represented by bars for energy or by lines for power Each area contains some common characteristics Key Provides general information about the variables that are represented in the area Y Axis Provides information on the units of the variables that are represented in this axis and the range of values that are being displayed X axis Typically this is the time axis and is located at the bottom o...

Page 54: ... toolbar Contains a series of actions that can be performed on the graph Depending on the type of graph it will contain more or fewer options 9 4 1 GRAPHS TOOLBAR Graphs always have a toolbar at the bottom of the window that allows different actions related to the data represented Option Description Back Displays the previous interval of data Next Displays the next interval of data Go to Allows ch...

Page 55: ...ed variables and click on table button option Once table button is pressed a discriminator window appears CCL1Engine has two types of tables Standard sampling variable energy power voltage depending on the meter installed on the charge point Charge summary of recharges on the charge point Following image shows the appearance of table recharges Table tool has following sections Title data period di...

Page 56: ...erties option This option can be accessed using the Options menu Properties submenu or directly with the Properties button on the main toolbar Table properties window Using this option it is possible to add new variables to the table in the same way as they are added to the graph by clicking on Add It is also possible to delete variables from the table selecting the desired variables and clicking ...

Page 57: ...cessed via the Views menu option then Events and finally Active events or directly from the status bar by clicking on the icon indicating there are active events in the system Notified events window Note that an event with an acknowledgement date and a deactivation date will disappear from the list of events reported This window allows event acknowledgement Select from the events to be acknowledge...

Page 58: ...ANUAL 10 CCL1 ENGINE CCL1 engine is the application of recharging Wallbox Smart and it is showed as a main screen when CirCarLife Scada client is connected on the CCL1 device Following image shows the aspect of the charge point engine The engine is divided on two sections Bollard state describes general state of the charge point Plug status plug status and other useful information ...

Page 59: ...ons may not appear on the charge point It depends on the hardware of the unit purchased or by software configuration Status Leakage Charge point leakage status Normal operation Channel 3 tripped Tamper switch Tamper switch status Normal operation Rear cover removed Tilt sensor inside CCL1 device Charge point tilt status Normal operation Charge station tilted If any of the points mentioned above is...

Page 60: ...his section describes the plug status and other useful information Each plug looks the same configuration as shown below Following table shows the status of each option showed on plug section Description Status Plug status Plug available Starting recharge Plug in use Fault Car connected Vehicle connection status Car connected Car not connected Connector lock Connector lock status Locked plug Unloc...

Page 61: ...le the plug Leakage RCD plug status Normal operation Channel 1 or 2 tripped Charge relay Indicates contactor status Voltage is being supplied to the vehicle No voltage is being supplied to the vehicle Active Energy kWh Total charge measured energy Partial active energy kWh Partial energy meter of the last charge Charge request date Date of the last charge request Charge begin date Starting date of...

Page 62: ... Tel 34 937 362 940 Fax 34 937 362 941 60 Web www circontrol com E mail circontrol circontrol com WALLBOX SMART INSTRUCTION MANUAL C Innovació 3 Pol Ind Can Mitjans 08232 Viladecavalls Barcelona Spain Tel 34 937 362 940 Fax 34 937 362 941 www circontrol com ...

Reviews: