


4-4
Chapter 4: Software support
Chapter
4
4.3.2
TurboV EVO
ASUS TurboV EVO introduces
TurboV
that allows you to manually adjust the CPU frequency
and related voltages as well as
Auto Tuning
function that offers automatic and easy
overclocking and system level up. After installing AI Suite II from the motherboard support
DVD, launch TurboV EVO by clicking
Tool > TurboV EVO
on the AI Suite II main menu bar.
Refer to the software manual in the support DVD or visit the ASUS website at
www.asus.com for detailed software configuration.
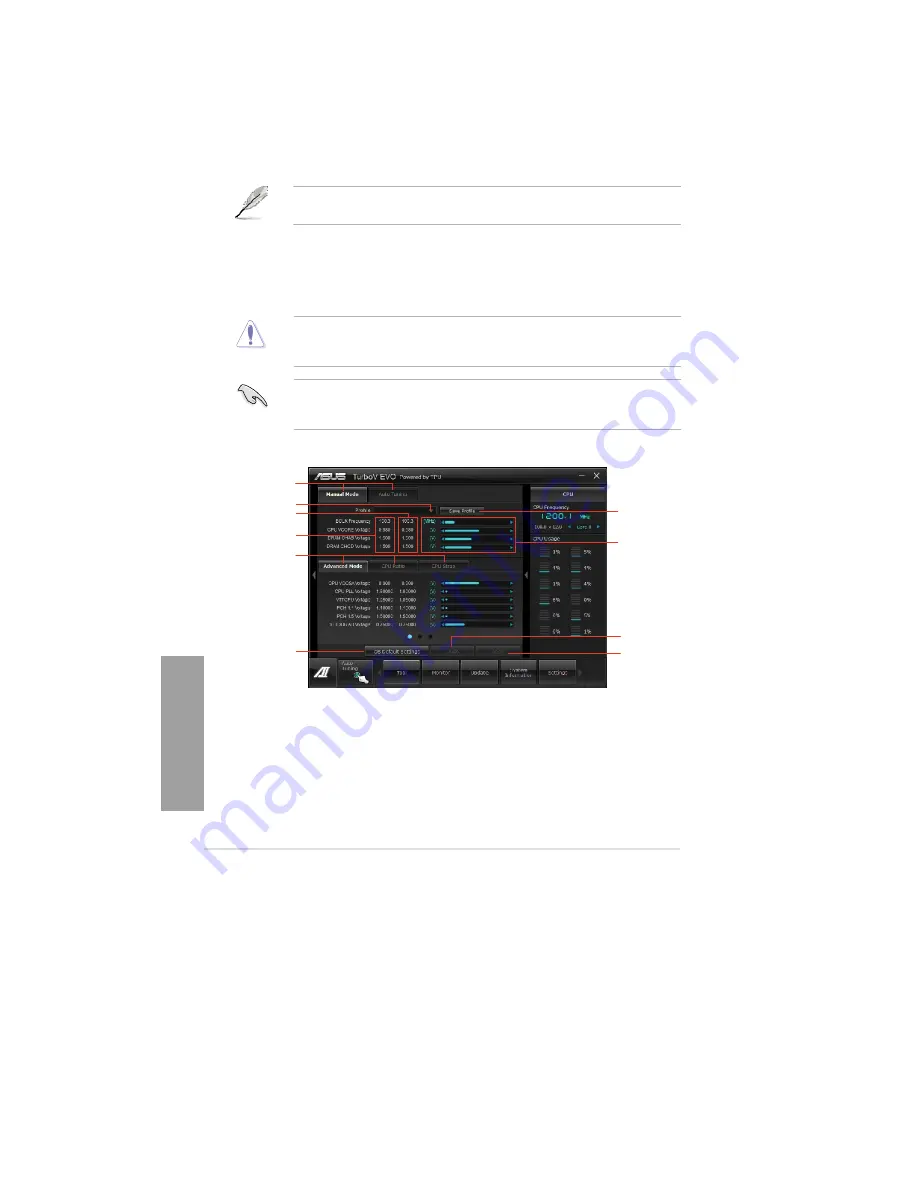
TurboV
TurboV allows you to overclock the BCLK frequency, CPU voltage, CPU PLL voltage, and
DRAM Bus voltage in Windows
®
environment and takes effect in real-time without exiting and
rebooting the OS.
Refer to the CPU documentation before adjusting CPU voltage settings. Setting a high
voltage may damage the CPU permanently, and setting a low voltage may make the
system unstable.
For system stability, all changes made in TurboV will not be saved to BIOS settings and
will not be kept on the next system boot. Use the
Save Profile
function to save your
customized overclocking settings and manually load the profile after Windows starts.
Click to select
mode
Load profile
Target values
Current values
Click to show
settings
Save the current
settings as a
new profile
Voltage
Adjustment
bars
Click to restore
all start-up
settings
Undoes all changes
without applying
Applies all changes
immediately
Summary of Contents for Kronos 600 X79-KA SERIES
Page 1: ...User Guide Kronos 600 Workstation X79 KA XXXXX XX XXX...
Page 8: ...CIARA Kronos 600 workstation X79 KA XXXXX XX XXX 8...
Page 36: ...CIARA Kronos 600 workstation X79 KA XXXXX XX XXX 36 NOTES...
Page 43: ...P9X79 WS Motherboard...
Page 58: ...16...
Page 107: ...ASUS P9X79 WS 2 37 5 6 Triangle mark 7 8 B A 9 B A...
Page 109: ...ASUS P9X79 WS 2 39 2 3 4 DIMM installation 1 2 3 To remove aDIMM B A...
Page 111: ...ASUS P9X79 WS 2 41 3 DO NOT overtighten the screws Doing so can damage the motherboard...
Page 112: ...2 42 Chapter 2 Hardware information 2 3 6 ATX Power connection 1 2 OR...
Page 113: ...ASUS P9X79 WS 2 43 2 3 7 SATAdevice connection 1 OR 2...
Page 122: ...2 52 Chapter 2 Hardwareinformation...
Page 226: ...5 14 Chapter 5 rv JltipleGPUtechnology support...


