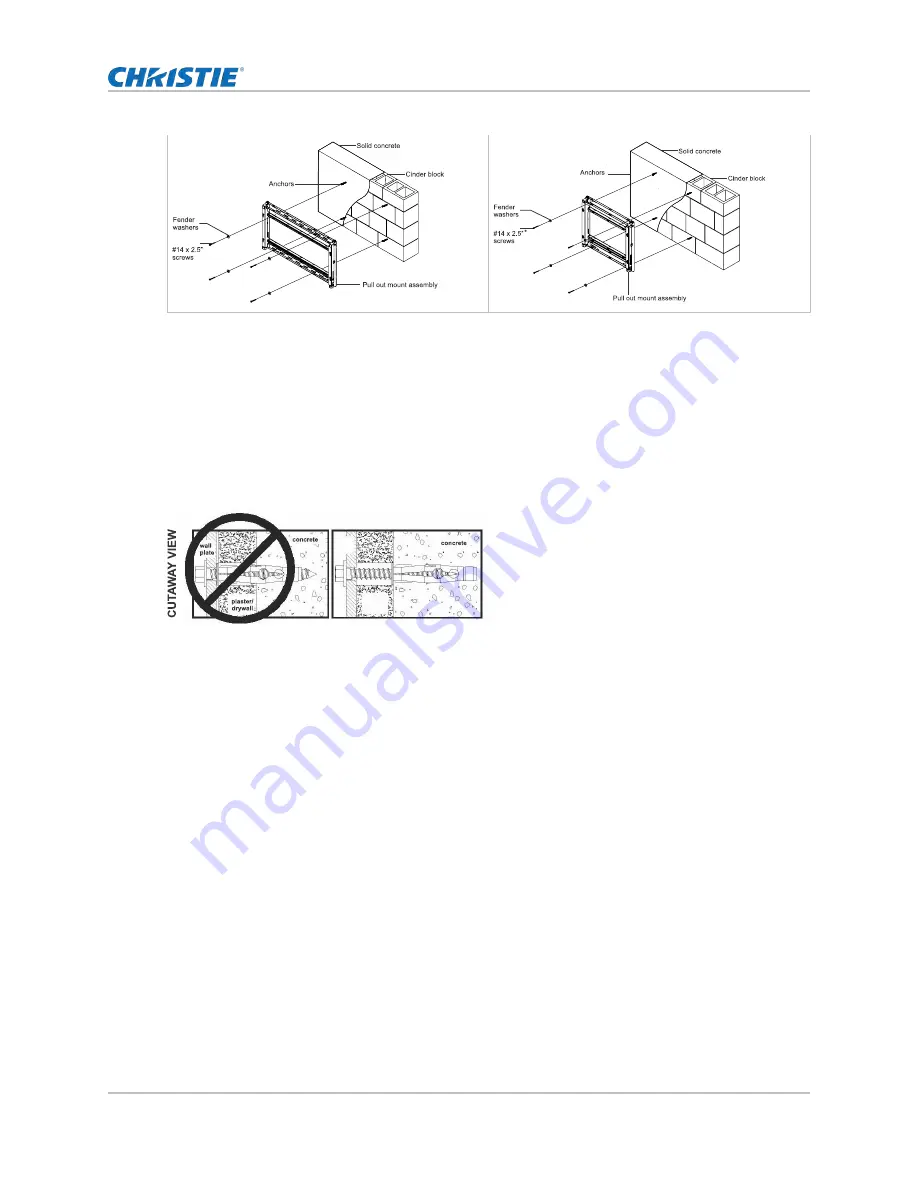
3. Use a standard electric drill on slow setting to drill four 5/16” (8 mm) diameter holes to a
minimum depth of 2.5” (64 mm).
To avoid breaking out the back of the hole when entering a void or cavity, do not use a
hammer drill. On cinder block walls, mount in a solid part of the block, generally 1" (25 mm)
minimum from the side of the block. Do not drill into mortar joints.
4. Insert anchors into the holes flush with the wall.
Never attach concrete expansion anchors to concrete covered with plaster, drywall, or other
finishing material. If mounting to concrete surfaces covered with a finishing surface is
unavoidable, the finishing surface must be counter bored, as shown in the image below.
5. Place the pull out mount assembly over the anchors and secure it with four #14 x 2.5”
screws, and fender washers.
Make sure concrete anchors do not pull away from the concrete when tightening screws. If
the wall is covered with plaster, drywall, or other finishing material thicker than 5/8" (16
mm), custom fasteners must be supplied by the installer.
6. Tighten the four #14 x 2.5" wood screws and fender washers so that the wall plate is firmly
attached, but do not over-tighten.
Never tighten in excess of 80 in-lbs (9Nm).
Installing the mount to a Unistrut P series metal frame
Learn how to install a wall mount onto the Unistrut metal frame channel.
When installing Peerless wall mounts to Unistrut "P" Series metal framing channels, the channels must
be installed and supported per the Unistrut design specifications. Use only compatible Unistrut
hardware. Never exceed maximum load capacity of Unistrut channel or supporting surface.
1. Insert the 1/4-20 Unistrut channel nut with spring on the Unistrut metal frame channel.
2. Level and install the Unistrut P series metal frame channel to the wall according to the
instructions included with the Unistrut frame.
3. Attach the wall mount to the Unistrut metal frame channel with the 1/4-20 hex head screws.
Installing 46-55" flat panel screens on the ML10/MP10 wall mount
Installing Flat Panels on the ML10/MP10 Wall Mount Instruction Sheet
8
020-101712-03 Rev. 1 (07-2015)


