background image

Menu Operation 


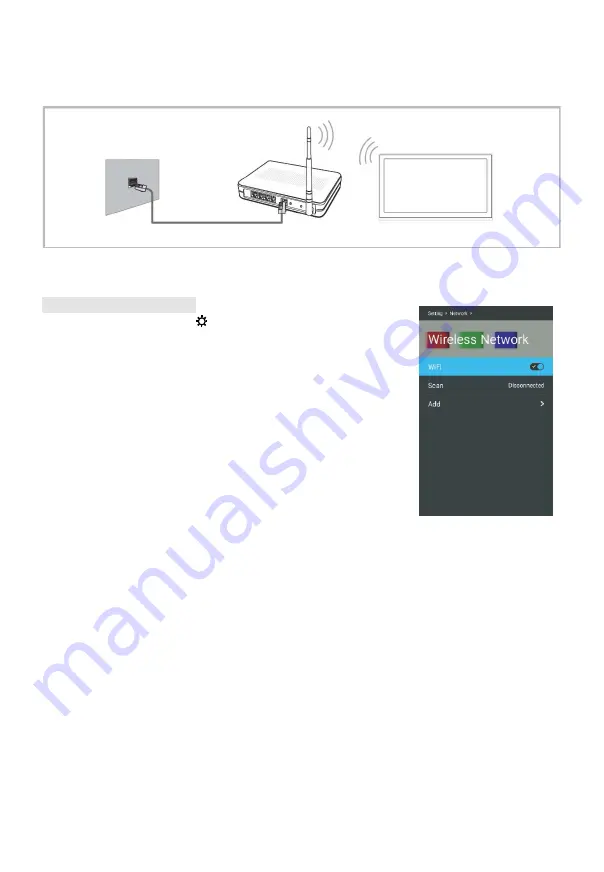
 Connecting to a Wireless Network 

• 

You can connect your TV to your LAN through a standard wireless router or modem. 


• 

To use a wireless network, your TV must be connected to a wireless IP sharer (either 

a router or a modem). If the wireless IP sharer supports DHCP, your TV can use a 

DHCP or static IP address to connect to the wireless network.


Wireless Network Setup


Step 1: 

Press

 SETTING 

(


)

button to open “

Setting

” 

interface, and press 

▲/▼

 button to select 

Network

then press


OK

 button to enter.


Step 2: 

Press 

▲/▼

 buttons to select 

Wireless Network

”,


then press


OK

 button to enter


submenu.   

Step 3:


When “

WiFi

” is selected, press the

 OK


button

 to


set 

to 

“On”.


Scan: 

The system starts to search the wireless 

network. When done, it displays a list of the available 

networks. 

Step4:

 Press 

▲/▼

 buttons to select your Wi-Fi signal. Press 

OK

 button and password window display. 

Step5:


After input right password, select “

Connect

” item and 

press 

OK

 button to connect Wi-Fi signal. 

Add

You can also add a Wi-Fi network manually by selecting Add others.


NOTE:


 As there are many brands of routers and the performances, the network signal 

reception effects of a device directly influences your experience to use a smart network 

TV. 

The TV with Built-in Wireless


The Modem Port on the Wall 

Wireless IP sharer 

(AP having DHCP server) 

Modem Cable 

24

Summary of Contents for UHD55F6000

Page 1: ...Model UHD55F6000 www changhong com...

Page 2: ...not attempt to modify this product in any way without written authorization from supplier Unauthorized modification could void the user s authority to operate this product It is not recommended to ke...

Page 3: ...of the product please always ensure the whole product was placed within the table surface in horizontal CAUTION connecting the Power Cord Most appliances recommend they be placed upon a dedicated circ...

Page 4: ...heat source such as radiators heat registers stoves or other apparatus including amplifiers that produce heat 6 Clean only with a dry cloth 9 Do not defeat the safety purpose of the polarized or grou...

Page 5: ...tripod bracket or table specified by the manufacturer or sold with the apparatus When a cart is used use caution when moving the cart apparatus combination to avoid injury from tip over NOTE Disposal...

Page 6: ...button operation menu Open the input source menu Open the TV s OSD menu Accesses the Home menu Turn off the TV Close the five button operation menu NOTE In OSD menu Press the button to enter Press the...

Page 7: ...ce input 3 4 9 5 COMPONENT AV 6 7 NOTE Input Output connectivity options may change from model to model 1 2 3 4 5 ANT Connection of the external antenna AV OUT AV audio video signal output 6 7 8 9 109...

Page 8: ...USB2 0 Connect a USB Storage device and multimedia file playback COMPONENT input YPbPr Connect a device that has component video jacks such as a DVD player Y Pb Pr Component Video They provide good pi...

Page 9: ...ed and you will need to replace the batteries Notes on Using Batteries The use of the wrong type of batteries may cause chemical leakage and or explosion Please note the following Always ensure that t...

Page 10: ...page 8 Next in Media mode Reveal the hidden information of some teletext pages 9 Fast reverse in Media mode Enter subtitle mode or subpage 10 Fast forward in Media mode Cancel the teletext but not to...

Page 11: ...oard in some input box 20 MENU Open close the menu in the current source 21 BACK Returns to the previous menu pages 22 HOME Accesses the main scene interface 23 Press to adjust the volume level up or...

Page 12: ...reen prompts will assist in configuring basic settings TIPS Make sure that the antenna or cable TV system connection is made Set you desired language Press the buttons to select the Menu Language and...

Page 13: ...o select Wired or Wifi and wired or wireless network is enabled respectively For more details on connection please refer to the Network settings NOTE If you select skip the network connection follow t...

Page 14: ...learn how to navigate the menu in order to select and adjust different functions The access step may differ depending on the selected menu Press MENU button to display the main OSD menu Press the but...

Page 15: ...select and change the picture size according to your preferences Press buttons to select Aspect Ratio then press OK button to enter and press buttons to select NOTE With different signal sources or d...

Page 16: ...ferred audio language only available in DTV mode Audio Lang and Audio Lang Press the buttons to select Primary and Secondary Audio Language only available in DTV mode Subtitle Languages Press the butt...

Page 17: ...placing of the image V Position To adjust the vertical placing of the image Phase To adjust the internal signal phase Size To adjust the screen size Channel Menu Before your TV can begin memorizing t...

Page 18: ...Manual Tuning in DTV mode Tuning the digital channel manually Press to select DTV manual Tuning and then press OK button to enter the sub menu Antenna Type is Air 1 Press the buttons to select channe...

Page 19: ...e Adjust the frequency of the channel finely Left Search Press the OK button to search up from the current frequency Right Search Press the OK button to search down from the current frequency Press th...

Page 20: ...the device formatting do not disconnect the device or turn off the power If your USB device can t be formatted or fail to be checked by the system it means the device isn t compatible with the TV or i...

Page 21: ...to save the scheduled recording NOTE Different schedules should not overlap and there must be at least a 1 minute time gap to set up between two schedules When the time appointment is conflict it wil...

Page 22: ...When using the PVR Media function remember the following important points You should use a USB disk with at least 4GB capacity The connected USB device must support 2 0 speeds We strongly recommend yo...

Page 23: ...et the picture quality by yourself please press the buttons to make adjustments after selecting the corresponding options Brightness For you to set the brightness of the screen Contrast For you to adj...

Page 24: ...may be found that there is great difference between the volumes of different channels Press the OK key to enable this function and the volume can be adjusted smartly so as to avoid too high or too lo...

Page 25: ...ess OK button to enter submenu Step 3 When WiFi is selected press the OK button to set to On Scan The system starts to search the wireless network When done it displays a list of the available network...

Page 26: ...r router that supports Dynamic Host Configuration Protocol DHCP Modems and routers that support DHCP automatically provide the IP address subnet mask gateway and DNS values your TV needs to access the...

Page 27: ...et can be used as a simple router and the other devices can access the network via the network name and the password prompted by the system NOTE The network connection speed may differ depending on th...

Page 28: ...the audio through an AV receiver using HDMI ARC Press OK buttons to switch the HDMI ARC function on or off Auto Power On Pushing the Play button on the CEC enabled device will command the device to p...

Page 29: ...dicating the time of the program playing From the Programme Guide it is possible to check the program information for the next eight days If the information is available from the broadcaster Channel T...

Page 30: ...era TV Store Media TV Manager On the right of the screen are the Applications Press arrow buttons to cyclically these functions Press OK button to enter a small window for selection NOTE The picture i...

Page 31: ...arrow buttons to select SEARCH and then press the OK button NOTE The contents installation modes etc of the application program in the application shop are subject to change from time to time without...

Page 32: ...orward Press the button to display the play list and then press buttons to select play the next previous file in the same directory Press the MENU button to enter the play setting menu press the up do...

Page 33: ...s Info Picture information Press the button to display the play list and then press buttons to select play the next previous file in the same directory Press the MENU button to enter the play setting...

Page 34: ...s the MENU button to enter the play setting menu press the up down key to select various options repeatedly and press the OK key to enter the menu of the next level Press the BACK key to return to the...

Page 35: ...e displayed If Add Share devices in the device bar is selected and the OK key is pressed the manual input logon page is entered and it is required to input the IP address user name and password TV Man...

Page 36: ...heir own favorite sites to the Speed Dial or they can manage the existing ones by editing moving or deleting entries 1 Press the button to select Speed Dial 2 Press the arrow buttons to select and the...

Page 37: ...m Movie Music or Photo and press OK to enter it You will only see supported media files under each category Select the files you want to play and press play button Introduction of DMR Sharing Function...

Page 38: ...1 Image Sharing Single image sharing open the image viewing application in an Apple device to view one image and select the Multi screen sharing service name in the list of icon then the image will be...

Page 39: ...same wireless network To start using Screen Mirror feature go to home page and press OK on Screen Mirror Turn on Wireless Display a k a Wi Fi Display Wi Fi Direct or Cast Screen function on your smar...

Page 40: ...amera application The functions of the buttons in the right tool bar are as follows from the top to the bottom Mode switch browse camera or video recorder and resolution setting You can use the MENU k...

Page 41: ...by Virtual buttons Your cell phone can be a TV remote control You can use Virtual Buttons to control the TV in the application such as Off Home Menu Back Prog Vol etc In order to achieve the function...

Page 42: ...see if there any object between the product and remote control Causing obstruction Are batteries installed with correct polarity to to Make sure Remote is aimed at sensor Install new batteries Power i...

Page 43: ...for a while Wet a soft cloth in a mixture of lukewarm water and a little fabric softener or dish washing detergent Wring the cloth until it s almost dry and then used it to wipe the screen 2 Make sure...

Reviews: