background image

PLAYBACK

E-78

PLAYBACK

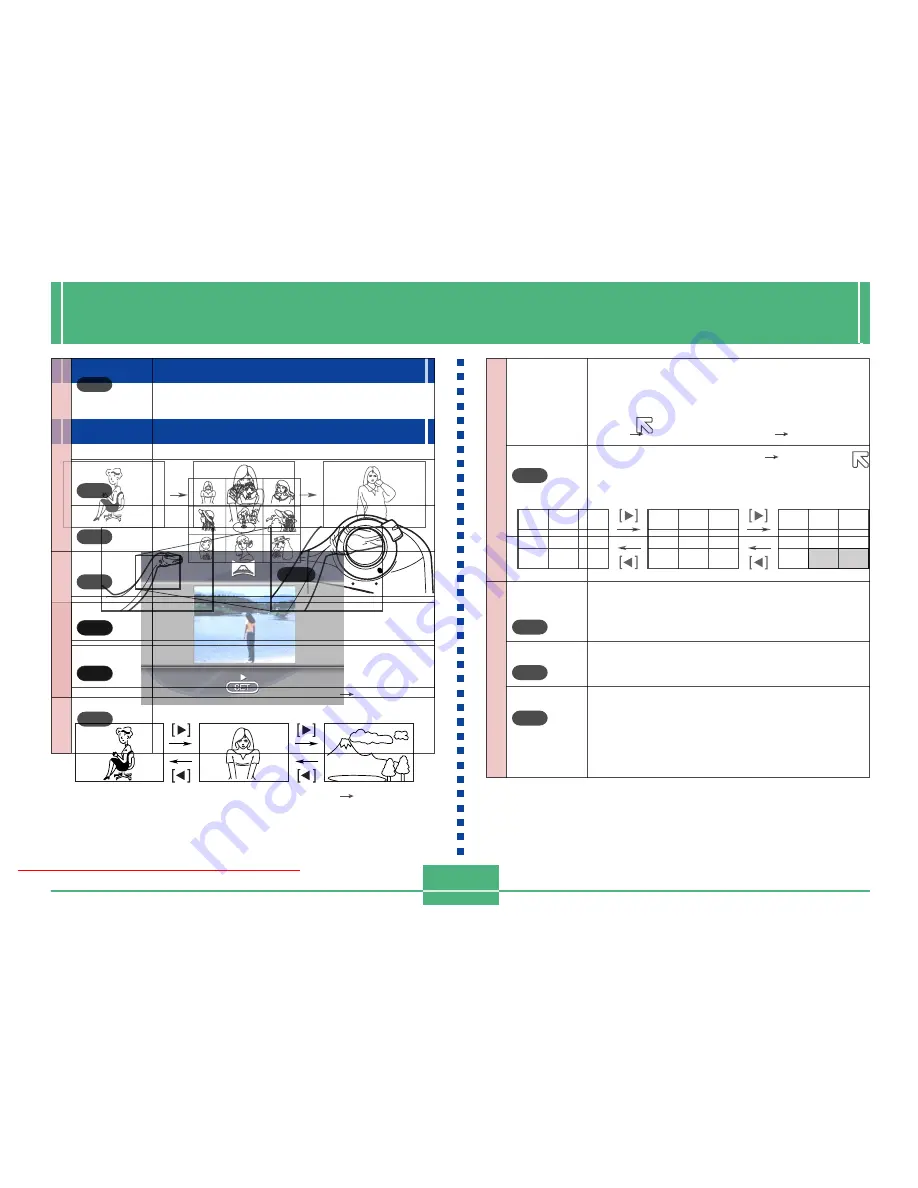
The following describes the different techniques that you can
use to playback recorded images.

Basic Playback Operation

The built-in monitor screen of the camera lets you play back
recorded images without connecting an external monitor.

1.

Align the POWER/Func-
tion Switch with PLAY.

2.

Use [

] and [

] to scroll through the images

stored in camera memory.

• Press [

] to scroll forward and [

] to scroll back. Hold-

ing down either button scrolls at high speed.

NOTE

The image that initially appears on the monitor screen
in the PLAY mode is a preview image. The full of
image appears after three seconds. Images copied
from another digital camera or a computer may take
longer time to appear.

Downloaded From camera-usermanual.com

E-79

• To enlarge the movie image so it fills the entire moni-

tor screen, press DISP. Pressing the DISP again re-
turns the image to its original small size.

• Pressing SET during movie play pauses playback.

Press SET again to resume playback.

• While movie playback is paused, you can use [

] (for-

ward) and [

] (reverse) to move frame-by-frame

through the movie.

4.

After the movie is complete, press MENU.

Playing Back a Movie

Use the following operation to play back a movie that was
recorded using the operation under “Movie Recording” on
page E-62.

1.

Align the POWER/Function Switch with PLAY.

2.

Use [

] and [

] to select the movie you want to

play back.

3.

Press SET to start playing back the movie.

• You can use [

] (forward) and [

] (reverse) while

playing back a movie to change the playback direc-
tion.

Downloaded From camera-usermanual.com

E-80

• Pressing DISP changes to a small-image display.

Press DISP again to return to the full-screen size.

• Pressing SET during panorama play pauses play-

back. Press SET again to resume playback.

• While panorama playback is paused, you can use [

]

(forward) and [

] (reverse) to move frame-by-frame

through the panorama.

4.

Press MENU to stop panorama playback.

Panorama Playback

Use the following operation to playback panoramas re-
corded using the operation under “Panorama Recording” on
page E-64.

1.

Align the POWER/Function Switch with PLAY.

2.

Use [

] and [

] to select the panorama you

want to play back.

3.

Press SET to start panorama playback.

• You can change the direction of a panorama that is

playing back by pressing [

] or [

].

Downloaded From camera-usermanual.com

E-81

Using Zoom

The following operation lets you magnify an image to twice
and a half its normal size. Note that you can zoom only a
single still image.

IMPORTANT!

Movie and panorama images cannot be zoomed.

1.

Align the POWER/Function Switch with PLAY.

2.

Use [

] and [

] to select the image you want to

zoom.

3.

Press MENU.

4.

Select “Zoom”.

• On the advanced menu, select “View” 

 “Zoom”.

5.

Specify the area.

• The portion of the selected area appears on the dis-

play at twice and a half its normal size.

• Use [

] and [

] to move the area selection frame left

and right. Use [

] and [

] to move it up and down.

6.

To return the image to its normal size, press
any button besides [

], [

], [

], [

].

Downloaded From camera-usermanual.com

E-82

1.

Align the POWER/Function Switch with PLAY.

2.

Press MENU.

3.

Select Ò9 MultiÓ.

• On the advanced menu, select “View” 

 “9 Multi”.

• The first image of the set is the image that was on the

screen when you performed step 2 of this operation.
The other images are those that sequentially follow
the first one.

Displaying Nine Images

The following operation lets you simultaneously view nine
images on the same screen. This capability is especially
useful when playing back to the screen of a connected TV,
and can be used to display a catalog of products, etc.

4.

Use [

] and [

] to scroll through images

stored in memory.

• To view a particular image in normal size, press DISP.

This causes the 

 mark to appear in the upper left

corner of the monitor screen. To produce an enlarged
view of an image, use [

] and [

] to move the 

mark to the image you want and then press SET.

5.

After you are finished, press any button be-
sides [

], [

], or DISP to return to the normal

single-image display.

Downloaded From camera-usermanual.com

E-83

IMPORTANT!

Auto Power Off (page E-41) is disabled whenever Slide
Show is being used. This means you should not leave
Slide Show running when using batteries to power the
camera. Doing so can rundown batteries. Be sure to
stop Slide Show and turn off the camera after you are
finished.

Slide Show

Slide Show automatically scrolls through the images stored
in memory. You can also specify how much time should be
allowed between each image.

1.

Align the POWER/Function Switch with PLAY.

2.

Press MENU.

3.

Select “Slide Show”.

• On the advanced menu, select “View” 

 “Slide Show”.

4.

To stop Slide Show, press any button besides
MENU.

• Pressing MENU while a Slide Show is in progress

displays a screen that lets you change the interval
within the range of 3 to 30 seconds.

• Note that all buttons are disabled while an image

change is in progress. Wait until an image is stopped
on the monitor screen before performing a button
operation, or hold down the button until the image
stops.

• Images copied from another digital camera or a

computer may take longer time to appear.

Downloaded From camera-usermanual.com

E-84

Screen Saver

The screen saver function automatically activates Slide
Show (which automatically scrolls through images)
whenever you do not perform any operation for about five
minutes in the PLAY Mode. This protects the camera’s
monitor screen and the screen of a connected TV against
“burn in” of a static image that is left displayed too long.

IMPORTANT!

• The screen saver is enabled only when the camera is

being powered by its optional AC adaptor. If you do
not perform any operation for five minutes under bat-
tery power, camera power automatically turns off
(Auto Power Off).

• The screen saver displays protected images only. The

screen saver is disabled if there are no protected im-
ages in memory.

• Photo Loader will not send images between the cam-

era and a personal computer while the screen saver is
turned on. Make sure you turn off the screen saver
before trying to perform any image transfer operation.
Note that the screen saver is turned on when you pur-
chase the camera.

1.

Align the POWER/Function Switch with PLAY.

2.

Press MENU.

3.

Select “Tools” 

 “Screen Saver” 

 “On”.

• “Tools” appears on the advanced menu only.

• To turn off the screen saver, perform the above proce-

dure and select “Off”.

• The screen saver activates if you do not perform any

operation for about five minutes in the PLAY Mode.

• Press any key to exit the screen saver.

• When changing between images, the screen saver

uses the interval that is specified for Slide Show (page
E-83).

Downloaded From camera-usermanual.com

E-85

Zoom


BASIC

9 Multi
 

BASIC

Slide Show
 

BASIC

View

Enlarges the image on the monitor screen.

Displays nine images on the monitor screen.

Automatically scrolls through the images one-
by-one.

Using the PLAY Menus

The PLAY menus provide you with control over the display
format and DPOF settings, image delete and save opera-
tions, and other settings. Each PLAY menu has two formats:
a basic menu and an advanced menu. Press DISP to toggle
between the basic menu and advanced menu.

PLAY Menus

See “Menu Screens” on page E-31 for information about
how to use menus.
Basic menu items are indicated by  

BASIC

 .

Tools

Protect

DPOF
 

BASIC

Screen
Saver

Card
Browser
 

BASIC

Format
 

BASIC

Date
 

BASIC

Use this item to protect images against deletion.

Select : Protects a single specific image.
Folder : Protects all images in a specific

folder.

All

: Protects all images.

Use this item to specify images for printing on
a DPOF printer.

Select : Prints a single specific image.
All

: Prints a specific number of copies

of all images.

This item turns the screen save off and on.

Use this item to select the card browser file
type.
Off/ Type1 / Type2 / Type3 / Type4

Select this item to format a memory card.

Use this item to specify the format of the date
that appears in the monitor screen, and to
adjust the date setting.
Style(Year/Month/Day / Day/Month/Year /
Month/Day/Year) / Adjust

Set Up

Downloaded From camera-usermanual.com

E-86

Set Up

This item can be used to specify the format of
the video output signal.

NTSC : Video format in the United States

and Japan

PAL

: Video format in Europe and other

areas

This setting lets you select either English or
Japanese as the display language.

Use this item to turn the key input confirmation
tone off and on.

Deletes a single specific image.

Deletes all unprotected images in a specific
folder.

Deletes all unprotected images.

Video Out
 

BASIC

Language
 

BASIC

Beep
 

BASIC

Select
 

BASIC

Folder
 

BASIC

All
 

BASIC

Delete

Downloaded From camera-usermanual.com

Summary of Contents for QV-3000EX/Ir

Page 1: ...LCD Digital Camera User s Guide QV 3000EX Ir English Downloaded From camera usermanual com...

Page 2: ...he side of the camera to release it and then swing the cover up to open it 2 2 2 2 2 Load the batteries so their plus and minus ends are facing as shown in the illustration 2 1 Swing the battery compa...

Page 3: ...t cover Close the memory card slot cover Insert a memory card into the camera so the arrow on the front of the card is pointed down If the memory card eject button is extended press it back down befor...

Page 4: ...to set the time and date before using the camera for the first time File name assignment and date and time stamping will not be performed correctly if the time and date are wrong Setting the Current...

Page 5: ...n press the shutter button about half way and hold it there The camera s Auto Focus feature automatically focuses the image After confirming that the Auto Focus operation is complete the operation lam...

Page 6: ...laying Back Images page E 78 MODE REC OFF PLAY MF T W MENU SET DISP PREVIEW 1 Align the POWER Function Switch with PLAY 2 Use and to scroll through the images stored in camera memory Downloaded From c...

Page 7: ...to make sure that you really want to delete the image you selected Press MENU to exit the image delete operation 3 Press the PREVIEW button Align the POWER Function Switch with PLAY Press to select Y...

Page 8: ...E 33 Removing a Memory Card from the Camera E 34 Formatting a Memory Card E 35 E 38 POWER SUPPLY Loading Batteries E 38 Using AC Power E 42 Power Save Settings E 43 E 45 SETTING THE CURRENT DATE AND T...

Page 9: ...Using the PLAY Menus E 85 E 87 FOLDER TYPES Memory Card Folder Precautions E 87 Selecting a Folder for Playback E 88 E 89 IMAGE PROTECTION Protecting and Unprotecting a Single Image E 89 Protecting an...

Page 10: ...E 33 Removing a Memory Card from the Camera E 34 Formatting a Memory Card E 35 E 38 POWER SUPPLY Loading Batteries E 38 Using AC Power E 42 Power Save Settings E 43 E 45 SETTING THE CURRENT DATE AND T...

Page 11: ...uence you want using a DPOF compatible printer DPOF can also be used by pro fessional print services when specifying images to produce prints Continuous recording page E 58 Continuous recording of hig...

Page 12: ...d by a 3 34 megapixel CCD for amazing resolution and clarity Some slight image noise may be caused when using slow shutter speeds Easy to understand graphic interface page E 28 All camera operations c...

Page 13: ...using 3X optical zoom together with 2X digital zoom Landscape Mode Night Scene Macro Feature Portrait Mode Shutter Speed Priority S Mode page E 59 page E 66 page E 65 page E 61 page E 66 page E 67 Dow...

Page 14: ...E 14 Aperture Priority A Mode page E 67 Self timer Date and Time Stamping 9 image Screen Slide Show 00 2 1 page E 69 page E 45 page E 82 page E 83 Display Zoom page E 81 Downloaded From camera userma...

Page 15: ...on page E 89 Camera Orientation Detection The Photo Loader application automatically rotates the image on your computer screen to compensate for portrait and landscape orientation page E 50 Downloaded...

Page 16: ...year unplug the AC adaptor from the power outlet and clean the area around the prongs of the plug Dust build up around the prongs can create the danger of fire If the camera s case should ever become...

Page 17: ...ent cover open for a few hours Never open the battery compartment cover disconnect the AC adaptor from the camera or unplug it from the wall socket while recording images Doing so will not only make s...

Page 18: ...year unplug the AC adaptor from the power outlet and clean the area around the prongs of the plug Dust build up around the prongs can create the danger of fire If the camera s case should ever become...

Page 19: ...ent cover open for a few hours Never open the battery compartment cover disconnect the AC adaptor from the camera or unplug it from the wall socket while recording images Doing so will not only make s...

Page 20: ...eck strap is intended for use with this camera only Do not use it for any other application Never swing the camera around by the neck strap Allowing the camera to swing freely from your neck can resul...

Page 21: ...ns cover Attaching the Neck Strap Attach the neck strap as shown in the illustration below Attach the lens cap holder to the triangular ring The cap holder helps to protect against accidental loss of...

Page 22: ...eck strap is intended for use with this camera only Do not use it for any other application Never swing the camera around by the neck strap Allowing the camera to swing freely from your neck can resul...

Page 23: ...d slot cover page E 33 Bottom Side Downloaded From camera usermanual com E 27 The camera is ready to record when the lamp is off Partial Shutter Button Operation lamp The Operation lamp shows the oper...

Page 24: ...eration lamp page E 27 PREVIEW button pages E 50 91 SET button page E 32 ZOOM slider page E 59 Downloaded From camera usermanual com E 26 Card access The Card access lamp flashes green while the memor...

Page 25: ...tery compartment lock page E 38 Opening the Terminal Panel Cover Battery compartment cover page E 38 Diopter dial page E 51 DIGITAL terminal page E 98 USB port page E 98 VIDEO OUT terminal page E 98 A...

Page 26: ...eration lamp page E 27 PREVIEW button pages E 50 91 SET button page E 32 ZOOM slider page E 59 Downloaded From camera usermanual com E 26 Card access The Card access lamp flashes green while the memor...

Page 27: ...d slot cover page E 33 Bottom Side Downloaded From camera usermanual com E 27 The camera is ready to record when the lamp is off Partial Shutter Button Operation lamp The Operation lamp shows the oper...

Page 28: ...der name File number Indicator display The indicator display located on the top of the camera also shows various camera status indicators during image re cording The indicator display comes in handy e...

Page 29: ...r name File number Indicator display The indicator display located on the top of the camera also shows various camera status indicators during image re cording The indicator display comes in handy esp...

Page 30: ...File number Indicator display The indicator display located on the top of the camera also shows various camera status indicators during image re cording The indicator display comes in handy especiall...

Page 31: ...File number Indicator display The indicator display located on the top of the camera also shows various camera status indicators during image re cording The indicator display comes in handy especiall...

Page 32: ...File number Indicator display The indicator display located on the top of the camera also shows various camera status indicators during image re cording The indicator display comes in handy especiall...

Page 33: ...tored on a memory card Because of this you should always make backup copies of important images on other media magnetic optical disk floppy diskette computer hard disk etc Memory card problems can be...

Page 34: ...mal use Take care when removing it from the camera Take care to avoid strong pressure on the label side of the microdrive when it is removed from the camera Strong pressure can damage internal compone...

Page 35: ...tored on a memory card Because of this you should always make backup copies of important images on other media magnetic optical disk floppy diskette computer hard disk etc Memory card problems can be...

Page 36: ...mal use Take care when removing it from the camera Take care to avoid strong pressure on the label side of the microdrive when it is removed from the camera Strong pressure can damage internal compone...

Page 37: ...memory card Because of this you should always make backup copies of important images on other media magnetic optical disk floppy diskette computer hard disk etc Memory card problems can be corrected b...

Page 38: ...hium or Ni MH nickel metal hydride dry cell batteries with this camera Never mix old bat teries with new ones Doing so can result in bursting or leaking of batteries creating the danger of fire or per...

Page 39: ...l hydride dry cell batteries with this camera Never mix old bat teries with new ones Doing so can result in bursting or leaking of batteries creating the danger of fire or personal injury Always make...

Page 40: ...l hydride dry cell batteries with this camera Never mix old bat teries with new ones Doing so can result in bursting or leaking of batteries creating the danger of fire or personal injury Always make...

Page 41: ...l hydride dry cell batteries with this camera Never mix old bat teries with new ones Doing so can result in bursting or leaking of batteries creating the danger of fire or personal injury Always make...

Page 42: ...l hydride dry cell batteries with this camera Never mix old bat teries with new ones Doing so can result in bursting or leaking of batteries creating the danger of fire or personal injury Always make...

Page 43: ...or Ni MH nickel metal hydride dry cell batteries with this camera Never mix old bat teries with new ones Doing so can result in bursting or leaking of batteries creating the danger of fire or personal...

Page 44: ...l hydride dry cell batteries with this camera Never mix old bat teries with new ones Doing so can result in bursting or leaking of batteries creating the danger of fire or personal injury Always make...

Page 45: ...ate clock settings have been cleared Use the procedure on this page to make the correct time and date set tings If you do not set the camera s built in clock to the cur rent date and time all images a...

Page 46: ...t any one of the following formats for the above date 00 2 1 1 2 00 2 1 00 1 Press MENU 2 Select Set Up Date Style 3 Use and to select the date format you want and then press SET 4 After making all th...

Page 47: ...etween the camera and the subject is 30cm or less The monitor screen turns on automatically whenever the camera is in the Macro Mode Use the monitor screen to compose images in the Macro Mode Diopter...

Page 48: ...but ton half way down The screen momentarily goes dark when you press the shutter button half way The Auto Focus frame turns green when the image is in focus Downloaded From camera usermanual com E 5...

Page 49: ...etween the camera and the subject is 30cm or less The monitor screen turns on automatically whenever the camera is in the Macro Mode Use the monitor screen to compose images in the Macro Mode Diopter...

Page 50: ...on half way down The screen momentarily goes dark when you press the shutter button half way The Auto Focus frame turns green when the image is in focus Downloaded From camera usermanual com E 54 Flas...

Page 51: ...etween the camera and the subject is 30cm or less The monitor screen turns on automatically whenever the camera is in the Macro Mode Use the monitor screen to compose images in the Macro Mode Diopter...

Page 52: ...on half way down The screen momentarily goes dark when you press the shutter button half way The Auto Focus frame turns green when the image is in focus Downloaded From camera usermanual com E 54 Flas...

Page 53: ...etween the camera and the subject is 30cm or less The monitor screen turns on automatically whenever the camera is in the Macro Mode Use the monitor screen to compose images in the Macro Mode Diopter...

Page 54: ...on half way down The screen momentarily goes dark when you press the shutter button half way The Auto Focus frame turns green when the image is in focus Downloaded From camera usermanual com E 54 Flas...

Page 55: ...etween the camera and the subject is 30cm or less The monitor screen turns on automatically whenever the camera is in the Macro Mode Use the monitor screen to compose images in the Macro Mode Diopter...

Page 56: ...on half way down The screen momentarily goes dark when you press the shutter button half way The Auto Focus frame turns green when the image is in focus Downloaded From camera usermanual com E 54 Flas...

Page 57: ...etween the camera and the subject is 30cm or less The monitor screen turns on automatically whenever the camera is in the Macro Mode Use the monitor screen to compose images in the Macro Mode Diopter...

Page 58: ...s on the advanced menu only The indicator is on the monitor screen while the Continuous Shutter Mode is selected 4 Compose the image and then record it Focus is locked when you record the first image...

Page 59: ...s on the advanced menu only The indicator is on the monitor screen while the Continuous Shutter Mode is selected 4 Compose the image and then record it Focus is locked when you record the first image...

Page 60: ...s on the advanced menu only The indicator is on the monitor screen while the Continuous Shutter Mode is selected 4 Compose the image and then record it Focus is locked when you record the first image...

Page 61: ...s on the advanced menu only The indicator is on the monitor screen while the Continuous Shutter Mode is selected 4 Compose the image and then record it Focus is locked when you record the first image...

Page 62: ...s on the advanced menu only The indicator is on the monitor screen while the Continuous Shutter Mode is selected 4 Compose the image and then record it Focus is locked when you record the first image...

Page 63: ...s on the advanced menu only The indicator is on the monitor screen while the Continuous Shutter Mode is selected 4 Compose the image and then record it Focus is locked when you record the first image...

Page 64: ...s on the advanced menu only The indicator is on the monitor screen while the Continuous Shutter Mode is selected 4 Compose the image and then record it Focus is locked when you record the first image...

Page 65: ...s on the advanced menu only The indicator is on the monitor screen while the Continuous Shutter Mode is selected 4 Compose the image and then record it Focus is locked when you record the first image...

Page 66: ...s on the advanced menu only The indicator is on the monitor screen while the Continuous Shutter Mode is selected 4 Compose the image and then record it Focus is locked when you record the first image...

Page 67: ...s on the advanced menu only The indicator is on the monitor screen while the Continuous Shutter Mode is selected 4 Compose the image and then record it Focus is locked when you record the first image...

Page 68: ...ode 1 Mode Memory 1 Recording Mode Off P Mode Focus Off AF Flash On Last mode select Digital Zoom On Last mode select Mode 2 Mode Memory 2 Metering Off Multi White Balance Off Auto Flash Intensity Off...

Page 69: ...s on the advanced menu only The indicator is on the monitor screen while the Continuous Shutter Mode is selected 4 Compose the image and then record it Focus is locked when you record the first image...

Page 70: ...ode 1 Mode Memory 1 Recording Mode Off P Mode Focus Off AF Flash On Last mode select Digital Zoom On Last mode select Mode 2 Mode Memory 2 Metering Off Multi White Balance Off Auto Flash Intensity Off...

Page 71: ...s on the advanced menu only The indicator is on the monitor screen while the Continuous Shutter Mode is selected 4 Compose the image and then record it Focus is locked when you record the first image...

Page 72: ...ode 1 Mode Memory 1 Recording Mode Off P Mode Focus Off AF Flash On Last mode select Digital Zoom On Last mode select Mode 2 Mode Memory 2 Metering Off Multi White Balance Off Auto Flash Intensity Off...

Page 73: ...s on the advanced menu only The indicator is on the monitor screen while the Continuous Shutter Mode is selected 4 Compose the image and then record it Focus is locked when you record the first image...

Page 74: ...ode 1 Mode Memory 1 Recording Mode Off P Mode Focus Off AF Flash On Last mode select Digital Zoom On Last mode select Mode 2 Mode Memory 2 Metering Off Multi White Balance Off Auto Flash Intensity Off...

Page 75: ...s on the advanced menu only The indicator is on the monitor screen while the Continuous Shutter Mode is selected 4 Compose the image and then record it Focus is locked when you record the first image...

Page 76: ...ode 1 Mode Memory 1 Recording Mode Off P Mode Focus Off AF Flash On Last mode select Digital Zoom On Last mode select Mode 2 Mode Memory 2 Metering Off Multi White Balance Off Auto Flash Intensity Off...

Page 77: ...s on the advanced menu only The indicator is on the monitor screen while the Continuous Shutter Mode is selected 4 Compose the image and then record it Focus is locked when you record the first image...

Page 78: ...power the camera Doing so can rundown batteries Be sure to stop Slide Show and turn off the camera after you are finished Slide Show Slide Show automatically scrolls through the images stored in memor...

Page 79: ...ries Be sure to stop Slide Show and turn off the camera after you are finished Slide Show Slide Show automatically scrolls through the images stored in memory You can also specify how much time should...

Page 80: ...ries Be sure to stop Slide Show and turn off the camera after you are finished Slide Show Slide Show automatically scrolls through the images stored in memory You can also specify how much time should...

Page 81: ...ries Be sure to stop Slide Show and turn off the camera after you are finished Slide Show Slide Show automatically scrolls through the images stored in memory You can also specify how much time should...

Page 82: ...to power the camera Doing so can rundown batteries Be sure to stop Slide Show and turn off the camera after you are finished Slide Show Slide Show automatically scrolls through the images stored in m...

Page 83: ...ries Be sure to stop Slide Show and turn off the camera after you are finished Slide Show Slide Show automatically scrolls through the images stored in memory You can also specify how much time should...

Page 84: ...ries Be sure to stop Slide Show and turn off the camera after you are finished Slide Show Slide Show automatically scrolls through the images stored in memory You can also specify how much time should...

Page 85: ...ries Be sure to stop Slide Show and turn off the camera after you are finished Slide Show Slide Show automatically scrolls through the images stored in memory You can also specify how much time should...

Page 86: ...ries Be sure to stop Slide Show and turn off the camera after you are finished Slide Show Slide Show automatically scrolls through the images stored in memory You can also specify how much time should...

Page 87: ...era automatically creates a new folder and store the image there The above maximum numbers of files and folders are ab solute maximums The actual numbers of folders and files may be less due to memory...

Page 88: ...cting a Folder for Playback 1 Align the POWER Function Switch with PLAY 2 Press 3 Use and to select the folder you want to select for playback 4 Press SET to playback the first image in the folder Dow...

Page 89: ...Protect Select Tools appears on the advanced menu only IMAGE PROTECTION Downloaded From camera usermanual com E 90 Protecting an 1 Align the POW 2 Press 3 Use and to select the folder you want to pro...

Page 90: ...Protect Select Tools appears on the advanced menu only IMAGE PROTECTION Downloaded From camera usermanual com E 90 Protecting an 1 Align the POW 2 Press 3 Use and to select the folder you want to pro...

Page 91: ...al com E 92 Delet 1 Align th 2 Press M 3 Select Se 4 Select t Protected images are not displayed Note that the first time you display an image its icon is turned on 5 Press or to toggle the mark of th...

Page 92: ...com E 92 Delet 1 Align th 2 Press M 3 Select Se 4 Select t Protected images are not displayed Note that the first time you display an image its icon is turned on 5 Press or to toggle the mark of the s...

Page 93: ...al com E 92 Delet 1 Align th 2 Press M 3 Select Se 4 Select t Protected images are not displayed Note that the first time you display an image its icon is turned on 5 Press or to toggle the mark of th...

Page 94: ...al com E 92 Delet 1 Align th 2 Press M 3 Select Se 4 Select t Protected images are not displayed Note that the first time you display an image its icon is turned on 5 Press or to toggle the mark of th...

Page 95: ...oaded From camera usermanual com E 96 6 Use and to specify the number of cop ies you want to print If you want to specify more images for printing repeat steps 4 through 6 If you change your mind abou...

Page 96: ...oaded From camera usermanual com E 96 6 Use and to specify the number of cop ies you want to print If you want to specify more images for printing repeat steps 4 through 6 If you change your mind abou...

Page 97: ...oaded From camera usermanual com E 96 6 Use and to specify the number of cop ies you want to print If you want to specify more images for printing repeat steps 4 through 6 If you change your mind abou...

Page 98: ...T Be sure to turn off both the camera and other equip ment before making any connections Check the documentation that comes with your other equipment for information you may need to know when making c...

Page 99: ...connect to this camera Battery capacity page E 30 and other displays that normally appear on the camera s monitor screen are also displayed on the television screen Selecting the Video Output Signal M...

Page 100: ...essional only Macintosh Mac OS 8 5 or higher Mac OS 8 1 with USB system extentions iMac Update 1 0 is required Power PC G3 CD ROM drive for installa tion Keyboard and mouse or equivalent input device...

Page 101: ...tration to connect to this camera Battery capacity page E 30 and other displays that normally appear on the camera s monitor screen are also displayed on the television screen Selecting the Video Outp...

Page 102: ...essional only Macintosh Mac OS 8 5 or higher Mac OS 8 1 with USB system extentions iMac Update 1 0 is required Power PC G3 CD ROM drive for installa tion Keyboard and mouse or equivalent input device...

Page 103: ...e ID normally shows the manufacturer and product name but no ID may appear at all depending on how the equipment was set up by the manufacturer When performing IrTran P data communication with another...

Page 104: ...U Sending Data Transferring a movie or panorama to another model Digital Camera other than the QV 3000EX Ir causes the images to be ungrouped Such images cannot be played back on other CASIO Digital C...

Page 105: ...ery power too much distance between infrared ports and misalign ment of infrared ports can cause failure of image transfers or corrupted data Proper image data transfer is impossible whenever there is...

Page 106: ...er regardless of version Note that the Type1 and Type3 formats use Java Script so their use requires Microsoft Internet Explorer 4 01 or later or Netscape Communicator 4 5 or later Turning on Card Bro...

Page 107: ...O digi tal camera also shows dates in image folder names and im age file names which helps to make data management easier CompactFlash Card Directory Tree Card Browser Files Files and folders required...

Page 108: ...er regardless of version Note that the Type1 and Type3 formats use Java Script so their use requires Microsoft Internet Explorer 4 01 or later or Netscape Communicator 4 5 or later Turning on Card Bro...

Page 109: ...you re format the card and delete its contents before using it to record more images Card Browser Card Browser makes it possible to use a browser application to view images recorded with the QV 3000E...

Page 110: ...er regardless of version Note that the Type1 and Type3 formats use Java Script so their use requires Microsoft Internet Explorer 4 01 or later or Netscape Communicator 4 5 or later Turning on Card Bro...

Page 111: ...you re format the card and delete its contents before using it to record more images Card Browser Card Browser makes it possible to use a browser application to view images recorded with the QV 3000E...

Page 112: ...er regardless of version Note that the Type1 and Type3 formats use Java Script so their use requires Microsoft Internet Explorer 4 01 or later or Netscape Communicator 4 5 or later Turning on Card Bro...

Page 113: ...failure indicator on LCD No recording when shutter button is pressed Auto Focus cannot focus the image 1 Correctly load batteries page E 38 2 Replace all four batteries with a set of new ones page E...

Page 114: ...r non fluorescent lighting page E 49 1 Select the Movie Record Mode page E 62 2 Delete images you no longer need from camera memory 1 Replace all four batteries with a set of new ones page E 38 2 Neve...

Page 115: ...read cards recorded with such cameras 2 Make more room available on the memory card by deleting some of its images or other data 1 Connect correctly using the video cable page E 99 2 Set up the TV cor...

Page 116: ...m 4 Avoid infrared data communication in direct sunlight Some functions are not available for playback of certain types of images Malfunction due to static electrical charge or strong impact Camera is...

Page 117: ...he MENU button and format the memory card in the camera but doing so deletes all image files currently stored on the memory card The memory card is not formatted Format the memory card before trying t...

Page 118: ...o record cannot be compressed for some rea son Try changing the angle of the camera to the subject Battery power is low Camera power turns off automatically shortly after this message appears No image...

Page 119: ...temperatures shorten battery life White Balance Automatic fixed 4 modes manual switching Self timer 10 seconds 2 seconds Built in Flash Flash Modes AUTO ON OFF Red eye reduction Flash Range Approxima...

Page 120: ...temperatures shorten battery life White Balance Automatic fixed 4 modes manual switching Self timer 10 seconds 2 seconds Built in Flash Flash Modes AUTO ON OFF Red eye reduction Flash Range Approxima...

Page 121: ...temperatures shorten battery life White Balance Automatic fixed 4 modes manual switching Self timer 10 seconds 2 seconds Built in Flash Flash Modes AUTO ON OFF Red eye reduction Flash Range Approxima...

Reviews: