background image

17 

E

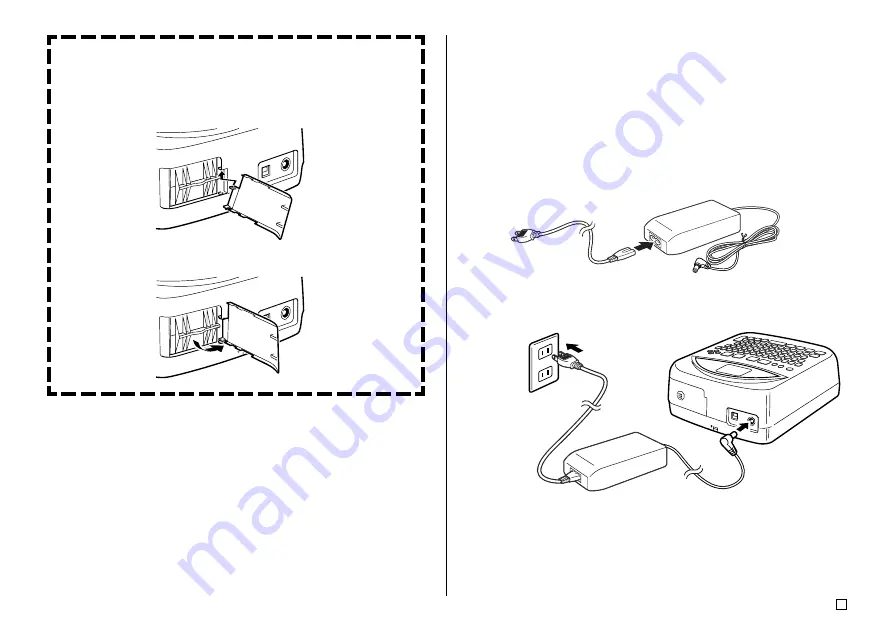
Replacing the Battery Cover onto Its Hinges

The battery compartment cover may come off its hinges when you open
it. If it does, perform the following steps to replace it.
Aligning the cover to the right, insert the upper hinge as shown in the
illustration.

Slide the bottom hinge into place as shown in the illustration.

Using the AC Adaptor

You can use the optionally available AC adaptor (AD-A12280L) to power the
printer from a standard household wall outlet.
Note the following important precautions whenever you use the AC adaptor to
power your printer.

To connect the AC adaptor

Important!

Use only the AC adaptor model specified for this printer.

1.

Connect the power cord to the AC adaptor.

2.

Connect the AC adaptor plug to the AC adaptor terminal of the printer 

1

,

and then plug the power cord into a household power outlet 

2

.

1

2

Summary of Contents for CW-75 - Disc Title Printer Color Thermal Transfer

Page 1: ...data to become corrupted Note that CASIO COMPUTER CO LTD shall not be held liable for any loss or corruption of data on discs arising through the use of this printer CD R CD RW DVD R etc Be sure to r...

Page 2: ...eparation between the equipment and receiver Connect the equipment into an outlet on a circuit different from that to which the receiver is connected Consult the dealer or an experienced radio TV tech...

Page 3: ...CO LTD All rights reserved Be sure to read this manual carefully before attempting to use the product for the first time Safety Precautions Thank you for purchasing this quality CASIO product Before u...

Page 4: ...t that is shared by other devices or into a shared extension cord Warning Power cord AC adaptor USB cable Misuse of the power cord AC adaptor or USB cable can damage it and create the risk of fire and...

Page 5: ...ver your head Doing so creates the risk of suffocation Particular care is required in households where young children are present Caution Power cord AC adaptor USB cable Misuse of the power cord AC ad...

Page 6: ...so can cause the product to fall creating the risk of personal injury Loading and replacing batteries The springs inside of the battery compartment have sharp edges Take care that you do not touch the...

Page 7: ...t head Never use excessive force when pulling the disc tray The disc tray will not open unless the printer is turned on Contents Safety Precautions 1 Operating Precautions 5 Unpacking 7 Part 1 Getting...

Page 8: ...delete a character using the DEL key 48 Clearing the All Text 49 To clear all text 49 Text Editing 49 To switch between overwrite and insert 49 Adjusting Display Contrast 25 To change the display cont...

Page 9: ...delete a label 50 Part 9 Printing a Label 51 Getting Ready to Print 51 To print a label with text in only one area Label 1 or Label 2 51 To print a label with text in both areas Label 1 and Label 2 52...

Page 10: ...a disc store it in its original case or in a commercially available CD case Avoid storing a disc so its label comes in direct contact with the surface of a vinyl case bag etc Warning Never play a CD R...

Page 11: ...el These sections provide detailed information on all you can do when creating a label Inputting Label Data page 33 Controlling the Appearance of your Text page 43 Editing Text page 48 Advanced Label...

Page 12: ...layout templates helps to make creation of original labels quick and easy Three built in print patterns page 31 and 24 built in label formats page 32 provide you with tools to create labels for a wide...

Page 13: ...bels every time Auto text formatting page 40 automatically lays out text in accordance with the number of characters and the amount of available space Proportional spacing page 45 adjusts spacing betw...

Page 14: ...E 12 Incorporate logos into labels A total of 10 built in often used terms and logos are easily accessible for input into a label page 39 CW 75 Printer Features...

Page 15: ...out tools for perfect labels every time Fonts page 43 Styles page 45 Symbols page 36 Illustrations page 36 User Characters page 37 Important This printer and its software do not include functions for...

Page 16: ...If the disc tray will not open due to printer malfunction you can open it manually by inserting a thin pointed object at least 20 mm 13 16 long and less than 1 5 mm 1 16 thick into this hole Use this...

Page 17: ...print operation When the above message appears replace the batteries or use the optional AC adaptor for power If the print operation is the first one after turning on the printer you need to press SE...

Page 18: ...SERT arrow is facing towards the battery compartment when you slide it in Important Check the battery case for dirt dust and other foreign matter before sliding it back into the battery compartment 5...

Page 19: ...ation Using the AC Adaptor You can use the optionally available AC adaptor AD A12280L to power the printer from a standard household wall outlet Note the following important precautions whenever you u...

Page 20: ...isconnect the AC adaptor while a printing operation is in progress Doing so can damage the printer 1 Disconnect the power cord from the household power outlet 1 and then disconnect the AC adaptor plug...

Page 21: ...on the display is automati cally stored in memory Then the next time you turn on power a LAST DATA item is added to the initial screen Since LAST DATA is selected simply press SET to recall the data...

Page 22: ...ESC keys press to turn on power 3 In response to the confirmation message that appears press SET to ini tialize the printer memory or ESC to abort Data Error Whenever you turn on the printer it perfo...

Page 23: ...bon cassette into the printer Important When you purchase your printer the carriage is held stationary by packing material Note that you will have to remove the packing material page 22 before you can...

Page 24: ...g so can damage the printer If you are loading an ink ribbon cassette for the first time When you purchase your printer the carriage is secured in place by packing material If you are loading an ink r...

Page 25: ...the front cover 10 Close the disc tray Press the disc tray until it closes securely with a click The printer will make noise when you press the button while the disc tray is open This is normal and d...

Page 26: ...isplay language To change the message language 1 Press SET UP to display the SET UP menu 2 Use x and z to select LANGUAGE and then press SET 3 Use x and z to select the language you want to use and th...

Page 27: ...ant press SET to exit the adjustment screen Turning Sound On and Off The label printer is equipped with sound capabilities that signal when power is turned on and when an illegal operation is attempte...

Page 28: ...item 2 Use x and z to select NEW and then press SET This displays a menu of print patterns The print pattern controls whether printing is performed in both the upper and lower labels or in the upper...

Page 29: ...ecome corrupted Check your label before you print it Pressing the PREVIEW button at any time during text input or before you actually start printing will display a preview of your label For details se...

Page 30: ...ng surface is facing upwards Important Check to make sure that the disc tray and the disc are free of dirt dust and foreign matter which can damage the disc surface and make recording to it impossible...

Page 31: ...elect STORE and then press SET 15 Input the name you want to assign to the layout and then press SET You can input up to five characters for the layout name 16 Press SET to exit the label store screen...

Page 32: ...low Note that the LAST DATA option appears only if you were working on a label the last time you used the printer Getting Ready Load batteries or connect the optionally available AC adaptor page 15 to...

Page 33: ...ck on after using is previously the initial screen may also include a LAST DATA item See Power On Recall on page 19 for more information about this item 2 Use the cursor keys to select NEW and then pr...

Page 34: ...O 4 AUTO 1 or AUTO 2 See Label Formats on page 64 for details about all the label formats that are available 5 Use the c and v cursor keys to scroll through the available label formats until the one y...

Page 35: ...in the upper right corners of the keys The keyboard automatically unshifts and the shift indicator disappears as soon as you in put a character appears when you press the CODE key While this indicato...

Page 36: ...hen you are using auto format 0 Scroll indicators These indicators appear when there is data above or below the currently dis played screen q Font indicators A pointer appears next to the currently se...

Page 37: ...es If you input a wrong character press BS or DEL to delete it and input again See page 48 for other details on editing text 2 When you reach the end of a line of text press SET About the CODE key The...

Page 38: ...Pressing SET returns to the input screen with the symbol dingbat number Greek letter or Russian letter you selected input at the location where the cursor was located when you displayed the SYMBOL men...

Page 39: ...this condition a continuous series of white dots will be drawn when you move the cursor To create a user character using an existing character 1 Input the character or symbol you want to use as a bas...

Page 40: ...racter to store the edited character To recall a user character 1 With the cursor located in the input screen where you want to input the user character press USER CHR 2 Use the cursor keys to select...

Page 41: ...labels that use logos Inserting a Logo Into a Label When creating a label using a LOGO format LOGO 1 through LOGO 4 you can insert one of the printer s 10 built in logos into the graphic block of the...

Page 42: ...page 31 to complete the label AUTO 1 1 line AUTO 2 2 lines Displayed Size Printed Size Displayed Size Printed Size 0 to 9 5 15mm 5 8 2 6mm 1 4 10 to 12 4 12mm 1 2 2 6mm 1 4 13 to 16 3 9mm 3 8 2 6mm 1...

Page 43: ...limit To create new phrase memory text 1 Press PHRASE MEMORY 2 Use the cursor keys to select DATA EDIT and then press SET 3 Use the cursor keys to select MAKE and then press SET 4 Use the cursor keys...

Page 44: ...Use the cursor keys to select the phrase memory where you want to store the text and then press SET 7 In response to the confirmation message that appears press SET to save the phrase or ESC to abort...

Page 45: ...ans serif Italic SANS SERIF ITC New Sans serif Rounded SANS SERIF RND New Roman ROMAN New Roman Italic ROMAN ITC You can specify a font for all the text or for a specific line of text You can even spe...

Page 46: ...o change the font to another style if you want To change the font of text you have just input 1 After inputting the text you want press FONT 2 Use the cursor keys to select the font you want to change...

Page 47: ...f the label 4 Press SET to apply your setting and return to the text input screen Selecting Bold or Normal Text Use the following procedure to specify either bold or normal for text The current bold n...

Page 48: ...ess SET 3 Use the c and v cursor keys to select the alignment setting you want 4 When the setting you want is selected press SET 5 On the next screen that appears select the range of text to which you...

Page 49: ...c and v cursor keys to switch between them and then press SET 3 To stop the scrolling at any point press SET While the scrolling is stopped you can use the c and v cursor keys to scroll step by step T...

Page 50: ...Press FUNCTION v Deleting an Individual Character You can delete an individual character with either the BS key or the DEL key The only difference between the operations of these two keys is the loca...

Page 51: ...rwrites existing characters with new input or inserts new input between existing characters Note the follow ing example Example Existing text ABCDEFGHI Cursor location E New input XXX Overwrite Result...

Page 52: ...save the label or ESC to abort To recall a label 1 Press to turn on the printer 2 Use x and z to select STORED DATA and then press SET 3 Use x and z to select RECALL and then press SET 4 Use x and z t...

Page 53: ...become corrupted Getting Ready to Print Load batteries or connect the optionally available AC adaptor pages 15 and 17 Load an ink ribbon cassette page 21 Turn on the printer page 19 To print a label...

Page 54: ...n top of these raised areas Be sure to position the disc in accordance with the layout of the label Printing will be performed in the area bounded by the guidelines 5 Close the disc tray Press the dis...

Page 55: ...next depends on whether your disc has distinctly de fined areas for printing or if printing can be performed anywhere on the disc surface If the disc has distinctly defined print areas perform steps 7...

Page 56: ...el 1 printing Positioning the Disc on the Disc Tray Use the positioning guide to adjust the position of the disc on the tray in the following cases When the label of the disc already has logos or othe...

Page 57: ...the disc tray opens automatically when you start a print operation To select the tray auto open setting 1 Press SET UP to display the SET UP menu 2 Use the cursor keys to select TRAY and then press SE...

Page 58: ...e data you want to print and then press SET 7 Use the x and z cursor keys to select PRINT and then press SET 8 Use the c and v cursor keys to select either LABEL1 upper label area or LABEL2 lower labe...

Page 59: ...batteries into the printer or connect the optionally availableAC adap tor for power See page 15 of this manual for more information 3 Make sure that the printer is turned off If the printer is turned...

Page 60: ...nstallation If it does click the Yes button and proceed with the installation The above messages will not appear if your computer is running Win dows 98 98SE or Me 8 After you are finished printing pr...

Page 61: ...s the printer s button to turn it on 2 Press the printer s button This causes the disc tray to open part way 3 Carefully pull out the disc tray the rest of the way If there is a disc on the tray remov...

Page 62: ...ries pages 15 and 17 If the disc tray still does not open use the procedure described on page 14 to open it manually Press to turn on the printer Nothing prints Printing is unclear characters are dama...

Page 63: ...sitioned correctly on the tray Battery power is low Ink ribbon cassette is used up You pressed the FUNCTION key and the printer is waiting for input of a function command Print on light colored discs...

Page 64: ...s not contain any data Select the correct preset phrase memory You are attempting to recall or delete stored label data when none exists Save label data before trying to recall it Message Cause and Re...

Page 65: ...63 E Illustrations Symbols Dingbats and Special Characters SYMBOL DINGBAT NUMBER GREEK RUSSIAN...

Page 66: ...3 1 8 3 1 8 3 1 8 3 1 8 6 1 4 Maximum Number 12 16 24 24 16 49 49 16 24 49 49 24 49 49 49 24 49 49 49 49 24 Format Num ber 11 12 13 14 15 16 17 18 1 2 3 4 Vertical Size mm inch 6 1 4 3 1 8 3 1 8 3 1...

Page 67: ...65 E Type AUTO Num ber 1 2 Input Item TITLE TITLE1 TITLE2 Vertical Size mm inch 15 3 9 16 1 8 6 3 1 4 1 8 6 3 1 4 1 8 Maximum Number 49 49 49 Format...

Page 68: ...95 F Model CW 75 Input Keyboard Layout Typewriter QWERTY Character Types Alpha 52 A to Z a to z 99 etc Numbers 10 Greek 48 Russian 66 Symbols 251 Illustrations 124 User Memory for storage of 4 charact...

Page 69: ...CASIO ELECTRONICS CO LTD Unit 6 1000 North Circular Road London NW2 7JD U K...

Page 70: ...CASIO COMPUTER CO LTD 6 2 Hon machi 1 chome Shibuya ku Tokyo 151 8543 Japan MO0304 A...

Reviews: