background image

25

24

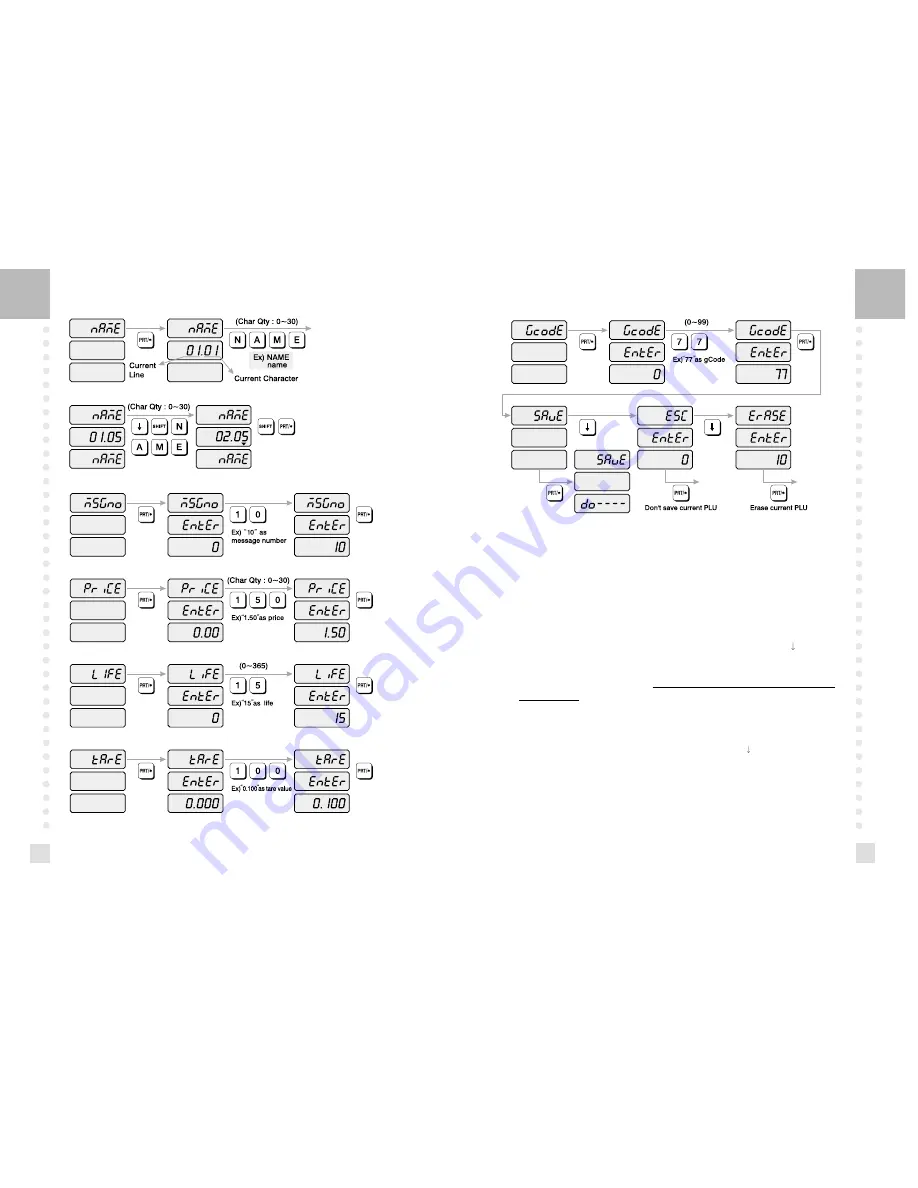
1) To go to PROGRAM mode, press 10000 by using numeric keys and VOID key.

2) The display shows: “PLU ”.

3) Press PRT/* key. The display shows: “PLUno   4000”.

The number in the UNIT PRICE display indicates the amount of empty PLUs ready to be

programmed. 

4) Type a PLU number you wish to program. Remember, this number must be 

between 1 and 4000.

5) Press PRT/* key. The display shows “iCodE”.

Press PRT/* key. (If you do not wish to program an item code, press the 

key)  The

display shows “iCodE EntEr 0”. 

6) Type the item code number. The item code can be from 1 to 999999. If you enter 0, item

code will not be printed on the label. (This number is used by the scanning device in order

to reference PLU. In most cases, the item code is programmed to be the same as the PLU

number). Press PRT/* key when you’re done.

7) The display shows “nAME”(The name field is composed of 2 lines of text. Each line can

contain up to 30 characters. Name is commonly referred to as commodity name.)

8) Press PRT/* key. (If you do not wish to program name, press the 

key) The display shows

“nAME 01.01”. The numbers in the unit price display represent the line number and

character number on which your cursor is at. The number to the left of the decimal is the

line number you are on(01 to 02). The number to the right is the number of the character

position on which you are about to type(01 to 30).

9) Now type in the first line of text using the Alpha-numeric keypad on the left side. If you

want to type second line of text, press ENTER key. (To skip, press PRT/* key.)

Summary of Contents for LP 1.6 Series

Page 1: ...LP 1 6 Series Label Printing Scale OWNER S MANUAL ...

Page 2: ...ngredients Programming 28 4 5 Programming the Head Data 29 4 6 Programming the Shop Data 30 4 7 SET 32 4 7 1 Programming the Date SET 1 34 4 7 2 Programming the Time SET 2 35 4 7 3 Programming the Department Number SET 3 36 4 7 4 Programming the Label SET 4 37 4 7 5 Programming the Adjust Number SET 5 42 4 7 6 Programming the Printing Information SET 6 43 4 7 7 Programming the Auto Print Function ...

Page 3: ...rized dealer Avoid sudden shock to the scale Internal mechanism could be damaged Place the scale on firm and temperature consistent environment Take the battery out when scale is not in use for long time Leakage from the batteries is hazardous Keep the scale away from other electromagnetic generating devices This may interfere with accurate reading Grab on the bottom of the scale when moving Do no...

Page 4: ...ace only with the same or equivalent type recommended by the manufacturer Dispose of used batteries according to the manufacturer instructions 1 2 Assembling the Display Pole If your scale is the Pole type then you must follow this section and then continue to the next However if your scale is the Non Pole type then you may skip this section and go on to the next To begin installing the Pole displ...

Page 5: ...ixed onto the inside of the printer side cover Use this diagram or this manual for future reference on how to properly install the label roll See below fig Tilt the rear cover towards the back of the scale and connect the three connectors to their adequate receptacles on the rear display P C B See below fig Find and remove the Label Roll Pin and the Pick up Pin Also find the Print Head Release Lev...

Page 6: ... roll installation See below fig 2 Keypad Display 2 1 Numeric Keypad The Numeric Keypad is used to enter all numerical data in PGM mode In REG Mode the Numeric Keypad is used to enter prices quantities and counts See below fig KEY Function Numeric Keys used to enter numerical data Clear Key used to clear error conditions and bring displays to their initial state Used to enter by piece sales i e 3 ...

Page 7: ...Arrow Key It is used to scroll from Line to Line when programming commodity names message data or store name and address It is also used to move up the System Maps In REG mode it is used to go to AUTO mode This is the Down Arrow Key It is used to scroll from Line to Line when programming commodity names message data or store name and address It is also used to move down the System Maps This key is...

Page 8: ...ver removed LABEL PEEL SENSOR This sensor is used in conjunction with IR LED to detect if there is a printed label waiting to be taken THERMAL PRINTHEAD The Thermal Printhead is the part that does the actual printing The printhead is VERY sensitive Please keep water and other liquids AWAY from the printhead DO NOT TOUCH the underside of the printhead If labels become jammed and stuck to the printh...

Page 9: ...to Use TARE Known Tare If you know the weight of container you may use this method to enter the tare For example if the weight of the container is 10g press the 1 0 and TARE key Call up a PLU and place a commodity then you will see the net weight Unknown Tare If you do not know the weight of the container you may use this method Place the container on the platter and press the TARE key Call up a P...

Page 10: ...nt to add up press the key Press the PAY key to calculate your changes after add up sales and enter customer payment Ex 90 00 type 9 0 0 0 Press the PRT key You will see changes on the display If you press the PRT key again you will have a total price label 3 1 5 How to Use FOR Key Call up a PLU or enter unit price of non PLU Press the FOR key Press 5 key on the numeric keypad Press the PRT key NO...

Page 11: ...te labels you need 3 1 7 Auto Printing AUTO MODE In AUTO mode labels are issued when the weight is stabilized and greater than 100g The use of PRT key will also generate a label How to go to AUTO mode Press the key If the scale is in AUTO mode AUTO lamp is ON in the UNIT PRICE display To finish AUTO mode press the key again Press speed key or press 1 key on the numeric keypad and press PLU key Put...

Page 12: ...C mode If you want to use the key or key to go up and down a menu and the UNIT PRICE and TOTAL PRICE displays are NOT blank you must first press the PRT key After the UNIT PRICE and TOTAL PRICE displays are blank You can use the key or keys 4 2 PLU Programming PLU means Price Look Up PLUs are used to store the price name and other data of items being sold Every PLU has seven data fields Item Code ...

Page 13: ...in order to reference PLU In most cases the item code is programmed to be the same as the PLU number Press PRT key when you re done 7 The display shows nAME The name field is composed of 2 lines of text Each line can contain up to 30 characters Name is commonly referred to as commodity name 8 Press PRT key If you do not wish to program name press the key The display shows nAME 01 01 The numbers in...

Page 14: ...e gross weight of the item at the time of weighing 22 Press PRT key If you do not want a tare please press key The display shows tArE EntEr 0 00 Type the tare value you want on the Numeric keypad Press the PRT key 23 The display shows GCodE The group code is a number from 0 to 99 that is printed on the label It can be used to group PLUs in to sections for example all beef PLUs are group code 10 al...

Page 15: ... Keypad Remember the number can be from 1 to 1000 If you make any mistakes press the C key and repeat step 4 5 Press the PRT key The display shows MSG 01 01 You may now begin typing your MSG data using your Alpha numeric keypad Each message has 8 lines of text and each line contains 50 characters After you type each line press ENTER key when you are done typing a line If you wish to skip a line pr...

Page 16: ...xt that get printed on the bottom of the label when it is not suppressed by the label format You can use these two lines to print the name and address of the store or anything else you wish the scale to print at the bottom Each line contains 30 characters of text How to program the shop data 1 To go to PROGRAM mode press 10000 by using numeric keys and VOID key 2 Press key four times 3 The WEIGHT ...

Page 17: ...For details see page 37 Label Format For details see page 38 Label Mask For details see page 39 Label Barcode For details see page 40 SET MENU DEFINITIONS Adjust For details see page 42 Printing Information For details see page 43 Auto Printing For details see page 45 Address For details see page 46 Baud Rate For details see page 47 4 7 SET ...

Page 18: ...The display shows SEt 8 If you wish to finish PROGRAM mode press C key 4 7 1 Programming the Date SET 1 How to program the Time 1 To go to PROGRAM mode press 10000 by using numeric keys and VOID key 2 Press key five times 3 The WEIGHT display shows SEt 4 Press PRT key and the display shows SEt EntEr 5 Press 2 key and PRT key The display shows tiME EntEr 6 Now type in the time in HOURS MINUTES SECO...

Page 19: ...ress C key 4 7 3 Programming the Department Number SET 3 How to program the label length 1 To go to PROGRAM mode press 10000 by using numeric keys and VOID key 2 Press key five times 3 The WEIGHT display shows SEt 4 Press PRT key and the display shows SEt EntEr 5 Press 4 key and PRT key 6 The display shows LAbEL EntEr 1 7 To program label length press 1 key The display shows LAbEL LEnGtH 40 8 Ente...

Page 20: ...o 36 0 30 fixed format 31 36 free format Refer to Appendix 9 The display shows LAbEL EntEr If you want to program label mask press 3 key If you want to go to SET menu press C key 2 Label format 3 Label mask How to program the label mask 1 To go to PROGRAM mode press 10000 by using numeric keys and VOID key 2 Press key five times 3 The WEIGHT display shows SEt 4 Press PRT key and the display shows ...

Page 21: ... D 2 D D D D D D D D D D D D D D D 3 I I I I I I I I I I I I I I I 4 I I I I I I I I I I P I I I I 5 I I I I I I I I I P P I I I I 6 I I I I I P I I I P P I I I I 7 I S I I P P I I S P P t I W U 8 S P I P P P w I W P P W T W U 9 P P P D P D W W W P P W W W U 10 P P P D P D W W W P P W W W U 11 P P P D P D W W W P P W W W U 12 P P P P P P W W W P P W W P P 13 C C C C C C C C C C C C C P P 14 P P 15...

Page 22: ...t on the Numeric keypad 1mm 8pixel 8 Press PRT key The display shows FEEd EntEr 60 9 Type the new feed value by pixel unit Numeric keypad 1mm 8pixel 10 Press PRT key The display shows SEt 11 If you wish to finish PROGRAM mode press C key 4 7 5 Programming the Adjust Number SET 5 ADJUST is to adjust the position of label FEED is to feed label or receipt 4 7 6 Programming the Printing Information SE...

Page 23: ...ress 10000 by using numeric keys and VOID key 2 Press key five times 3 The WEIGHT display shows SEt 4 Press PRT key SEt EntEr 5 Press 7 key and PRT key 6 The display shows AUtoP EntEr 100 7 The number in the Total Price display represents the weight sensitivity number by which your scale calculates auto print The default is 0 100 Enter the weight sensitivity number by using numeric keys 8 Press PR...

Page 24: ...dress SET 8 Address means the ID of the scale when you network scales The address can be from 0 to 99 How to program baud rate 1 To go to PROGRAM mode press 10000 by using numeric keys and VOID key 2 Press key five times 3 The WEIGHT display shows SEt 4 Press PRT key SEt EntEr 5 Press 9 key and PRT key 6 The display shows bAUd EntEr 3 9600 7 Look at table below and type number that you want 8 Pres...

Page 25: ...u wish to finish PROGRAM mode press C key 4 9 Password Password can be from 1000 to 999999 but you have to set the numbers of four digits If you set it to 0 there is no password Once you set password you have to enter it to go to program mode How to program password 1 To go to PROGRAM mode press 10000 by using numeric keys and VOID key 2 Press key seven times 3 The WEIGHT display shows PASS 4 Pres...

Page 26: ...lank you must first press the PRT key After the UNIT PRICE and TOTAL PRICE displays are blank You can use the key or keys 5 2 Print Report There are four types of sales reports Grand Total ALL PLU Non PLU and PLU no Each of the reports prints on a label the PLU prints a report label for each PLU that had sales activity All reports labels contain the starting time and date since the last time the s...

Page 27: ...report will generate labels of those PLUs that had sales activity 5 2 3 Individual PLU 1 To go to ACCOUNT mode press 20000 by using numeric keys and VOID key 2 The display shows Print 3 Press PRT key The display shows Print GrAnd 4 Press key or keys until the display shows Print PLUno 5 Press PRT key The display shows Print PLUno 0 6 Type PLU number that you wish to take and press the PRT key The ...

Page 28: ... display shows CLEAr ALLPLU 5 Press PRT key The display shows CLEAr ALLPLU End 6 You can use the key or key to select nonPLU ALL or GrAnd To go to CLEAR menu press key To finish ACCOUNT mode press the C key again 1 To go to ACCOUNT mode press 20000 by using numeric keys and VOID key 2 Press key The display shows CLEAr 3 Press PRT key The display shows CLEAr GrAnd 4 Press key or keys until the disp...

Page 29: ...d Check CHESS You can use this function to check the quality of print and if there are any scratches or burn on the printhead This function produces a pattern on the label which you can use to determine the condition of the printhead 1 To go to ACCOUNT mode press 20000 by using numeric keys and VOID key 2 Press key two times The display shows CHESS 3 Press PRT key The display shows CHESS tyPE 1 4 ...

Page 30: ...bel roll you used was broken away from the interrupt sensor replace the label roll between the two green sensor caps and fix the label roll pin Error 15 You attempted to print a label when there is an issued label please remove the issued one You have pressed PRT key when the printer front cover is not placed properly You attempted to print a label when the print head is in the lifted up push it d...

Page 31: ...ABEL FORMAT 0 58mm 40mm W H 1 58mm 30mm 2 58mm 40mm W H 3 58mm 30mm 4 54mm 35mm 5 54mm 35mm 6 54mm 35mm 7 58mm 40mm 8 58mm 40mm 9 58mm 40mm 10 58mm 40mm 11 58mm 40mm 12 58mm 40mm 13 48mm 40mm 14 48mm 40mm 15 48mm 40mm ...

Page 32: ...63 62 16 54mm 53mm 17 54mm 53mm 18 48mm 54mm 19 48mm 54mm 20 58mm 51mm 21 58mm 51mm 22 58mm 60mm 23 58mm 60mm 24 48mm 68mm 25 48mm 68mm ...

Page 33: ...65 64 26 48mm 68mm 27 58mm 63mm 28 58mm 63mm 29 58mm 60mm 30 58mm 60mm ...

Page 34: ...66 ...

Reviews: