background image

174 

Š


Additional Information 

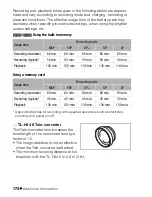
Recording and playback times given in the following tables are approxi-
mate and vary according to recording mode and charging, recording or 
playback conditions. The effective usage time of the battery pack may 
decrease when recording in cold surroundings, when using the brighter 
screen settings, etc.

/

 Using the built-in memory

Using a memory card

* Approximate times for recording with repeated operations such as start/stop, 

zooming, and power on/off.

7

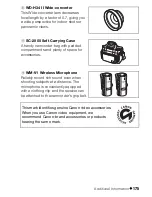
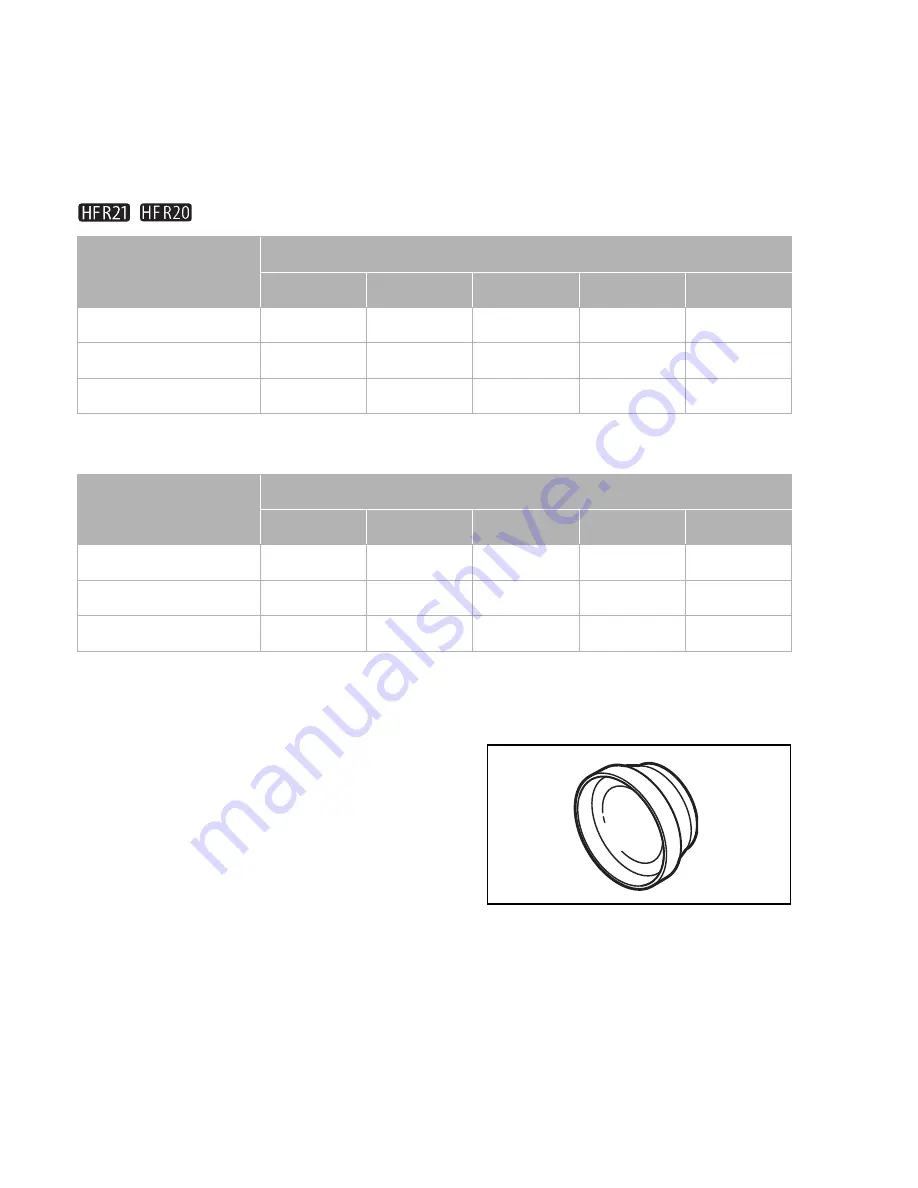
 TL-H34 II Tele-converter

This Tele-converter lens increases the 
focal length of the camcorder lens by a 
factor of 1.5.
• The image stabilizer is not as effective 

when the Tele-converter is attached.

• The minimum focusing distance at full 

telephoto with the TL-H34 II is 0.9 m (3 ft.).

Usage time

Recording mode

MXP

FXP

XP+

SP

LP

Recording (maximum)

80 min.

80 min.

85 min.

85 min.

85 min.

Recording (typical)*

50 min.

50 min.

50 min.

50 min.

50 min.

Playback

130 min.

135 min.

135 min.

135 min.

140 min.

Usage time

Recording mode

MXP

FXP

XP+

SP

LP

Recording (maximum)

80 min.

80 min.

80 min.

80 min.

85 min.

Recording (typical)*

45 min.

45 min.

45 min.

45 min.

50 min.

Playback

130 min.

130 min.

130 min.

130 min.

130 min.

Summary of Contents for Vixia HF R20

Page 1: ...Canon VIXIA HFR20 VIXIA HF R21 VIXIA HF R200 NTSC ...

Page 2: ...is equipment generates uses and can radiate radio frequency energy and if not installed and use in accordance with the instructions may cause harmful interference to radio communications However there is no guarantee that interference will not occur in a particular installation If this equipment does cause harmful interference to radio or television reception which can be determined by turning the...

Page 3: ...g CAUTION RISK OF ELECTRIC SHOCK DO NOT OPEN CAUTION TO REDUCE THE RISK OF ELECTRIC SHOCK DO NOT REMOVE COVER OR BACK NO USER SERVICEABLE PARTS INSIDE REFER SERVICING TO QUALIFIED SERVICE PERSONNEL The lightning flash with arrowhead symbol within an equilateral triangle is intended to alert the user to the presence of uninsulated dangerous voltage within the product s enclosure that may be of suff...

Page 4: ...t where they exit from the apparatus 9 Only use attachments accessories specified by the manufacturer 10 Unplug this apparatus during lightning storms or when unused for long periods of time 11 Refer all servicing to qualified service personnel Servicing is required when the apparatus has been damaged in any way such as power supply cord or plug is damaged liquid has been spilled or objects have f...

Page 5: ...e is atrademark of Google Inc Other names and products not mentioned above may be trademarks or registered trademarks of their respective companies This device incorporates exFAT technology licensed from Microsoft ANY USE OF THIS PRODUCT OTHER THAN CONSUMER PERSONAL USE IN ANY MANNER THAT COMPLIES WITH THE MPEG 2 STANDARD FOR ENCODING VIDEO INFORMATION FOR PACKAGED MEDIA IS EXPRESSLY PROHIBITED WI...

Page 6: ...Image Mix Data CD ROM Contains the full version Instruction Manual of the camcorder PDF file See the explanation on next page 1 CA 11 OE including power cord in Asia 2 The CD ROM includes the instruction manual of the software PDF file A printed Installation Guide for PIXELA s software is also supplied Refer to this Installation Guide for details about the supplied software 3 The CD ROM includes t...

Page 7: ...tion Manual This guide will get you started and show you how to use the most basic functions of your camcorder to shoot video take photos and play back your recordings using the camcorder or connecting it to your TV To learn more about the more advanced functions of your camcorder to read important handling precautions and to consult the troubleshooting section if an error message is displayed be ...

Page 8: ...n on the desktop 4 Click Double click the Disc_Setup exe icon 5 In the installer panel click Instruction Manual of the Camcorder and select your language 6 When the installation is complete click OK then Exit The installer will save the camcorder s Instruction Manual PDF file on the computer and will create a shortcut icon on the desktop for easy access To uninstall the camcorder s Instruction Man...

Page 9: ...ength and arrange them into a video clip set to your favorite background music PDf 68 DISP onscreen display button Change the camcorder s onscreen displays PJ E 87 BAIT INFO button Press when the camcorder is off to check the battery pack s charge status and its remaining usage time PPf 151 MIC terminal Connect an external microphone PDF 79 J USB terminal Connect the camcorder to a computer C PQf ...

Page 10: ...nnect the camcorder to a standard definition 1V _egI 111 113 0 headphone terminal PDF 77 Strap mount Attach an optional shoulder strap for convenience and portability PDF 25 Grip belt Adjust for a comfortable and secure grip PDF 24 Stereo microphone Zoom lever IJ 29 PHOTO button CD 28 ACCESS memory access indicator IJ 28 POWER button ON OFF CHG charge indicator Green ON Orange Standby OJ 32 Red Ch...

Page 11: ...CD 20 27 Speaker PDF 52 START STOP button CD 28 Tripod socket Mount the camcorder on a tripod for steadier shots PDD 167 Serial number The serial number label is located on the battery compartment cover canon Battery compartment cover CD 17 Battery compartment CD 17 11 ...

Page 12: ... in red Battery pack is almost empty Replace with a fully charged battery pack When the camcorder is off press IBATT INFO to display the charge status of a battery pack The Intelligent System will display the charge status as a percentage and the remaining recording time in minutes for 5 seconds If the battery pack is exhausted the battery information may not be displayed The first time you use a ...

Page 13: ...ecial scene recording program to apply the camcorder settings most appropriate for a variety of situations PDF 61 63 Manual exposure Correct the exposure manually for a picture darker brighter than the one obtained using the automatic exposure set by the camcorder c e_p I 70 r I Autofocus MF Manual focus 3 PDF 71 Face detection You can have the camcorder automatically detect people s faces and use...

Page 14: ...ng _ _PJ f_ 40 When there is no more free space on the memory End built in memory or 0 End End memory card will be displayed and the recording will stop 111 11 01 111 only Tele macro Take close up shots of nearby subjects POI 72 Microphone attenuator Use the attenuator to avoid audio distortions when the sound is too loud J J Jf 137 Wind screen off Wind screen removes the background sound of wind ...

Page 15: ...nnot record any more photos 0 I in red No memory card in the corresponding memory card slot Displays the aperture f stop and shutter speed used Focus and exposure lock OJ 28 Playing movies during playback i Playback control buttons CO 37 Control button Open the Edit panel PDF 135 External audio input Connect your portable audio player to use your favorite music as background music during playback ...

Page 16: ...splay information related to the camcorder settings like the shutter speed or aperture value used PDF 87 138 Volume and music balance PPf 50 Decoration Add drawings and animated stamps to your recording PD 97 Ii Viewing photos _ __r Control button Open the setup menus PDF 136 Current photo Total number of photos Photo number PJ f 141 Photo jump PDF 104 Slideshow Play back a slideshow of your photo...

Page 17: ...riod of time fully charge it and then use the camcorder until the battery pack is completely exhausted Doing so will ensure that the remaining recording time will be displayed accurately Connect the compact power adapter CD Connect to the adapter for Asia only Plug into a power outlet Insert the battery pack Press softly into the battery attachment unit until the battery pack l clicks into place C...

Page 18: ...n memory All given times are approximate and vary according to recording mode and charging recording or playback conditions See Charging Recording and Playback Times J Qf 173 for details o IMPORTANT The battery pack will be charged only when the camcorder is off Do not connect to the camcorder s DC IN terminal orto the compact power adapter any electrical equipment that is not expressly recommende...

Page 19: ...tery itself is outside the temperature range of approximately o C to 40 C 32 of to 104 OF charging will not start If remaining battery time is an issue you can power the camcorder using the compact power adapter so the battery pack will not be consumed Charged battery packs continue to discharge naturally Therefore charge them on the day of use or the day before to ensure a full charge We recommen...

Page 20: ...n to select it or a control button to perform the corresponding action Drag While applying pressure swipe your finger up and down or left and right across the screen to scroll menus to browse through index screen pages or to adjust slider controls for example to adjust the volume See Handling Precautions _PI 166 Cleaning 1 PI 170 for important information about how to take care of the touch screen...

Page 21: ...ge various settings up to your preferences In either mode press START STOP to shoot movies or press PHOTO to take photos D Smart AUTO Take it easy and leave all the settings to the camcorder 1 I fO PHOTO i I _ i f_ i o I I I f i I START STOP I C 1 0 I I I i I I I I I I I I I l__ _ I I I I I B Index selection control button Touch i B in any index screen to open the Index Selection screen From that ...

Page 22: ... recorded them organized by recording date CO 28 Photo index screen 111 PJJE 103 II Ig lIJIiD lQJ Built in memory K w Memory card miG Scenes and video h tllery II Ig IDDE Scenes converted to standard definition only when a memory card is selected P g E 122 125 ...

Page 23: ...e Touch or T to change the field When the internal clock is not set the DatelTime screen will appear if I li V When you turn on the camcorder for the first time you will need to set the date and time before using the camcorder You can also change the date format and time zone For your convenience you can do so after changing the language to your preference See Changing the Time Zone PDF 35 for det...

Page 24: ... displays Select the language of your preference using the menu See Using the Menus J Df 32 for details R FUNC MENU I I Language V Desired language OK X Only when performing the procedure in a recording mode English is the default language G NOTES You may need to scroll to find your language 24 If you changed the language by mistake look for the menu option with the mark ...

Page 25: ...with the Camcorder PDF 36 for details Before using an Eye Fi card be sure to refer to Using an Eye Fi card J gf 131 ON OFF CHGl C I J Turn off the camcorder Make sure the indicator is off Open the double memory card slot cover Insert a memory card into slot III and close the double memory card slot cover You can also insert a single memory card into slot m or use two memory cards at the same time ...

Page 26: ...re to refer to Using an Eye Fi card PDF 131 oIMPORTANT Memory cards have front and back sides that are not interchangeable Inserting a memory card facing the wrong direction can cause a malfunction of the camcorder For important information regarding the use of SDXC memory cards be sure to refer to SOXC Memory Cards PDF 37 Initialize memory cards when you use them with this camcorder for the first...

Page 27: ...ness See Grip Belt PDF 24 Adjusting the Position and Brightness of the LCD Screen PDF 27 LCD Brightness and LCD Screen Dimmer _ PQF 144 for details o Open the LCD panei and adjust the angle CD Rotate it up to 90 degrees down for example to record with your hand extended above a crowd Rotate it up to 180 degrees toward the lens for example to record video of yoursel Fasten the grip belt Adjust it s...

Page 28: ...matically oSet the camcorder to Smart AUTO G Press POWER Press a r I Start recording movies r I Press to start recording Press again to pause the recording and record the video on the memory as one scene e _ CACCESS 28 AF frames r I Take a photo I I Before using an Eye Fi card be sure to refer to Using an Eye Fi card PDF 131 CD Press halfway to activate the autofocus AF and lock the focus and expo...

Page 29: ...rd the T telephoto end IMPORTANT 0 I I Touch ZOOM to display the onscreen zoom controls Observe the following precautions while the ACCESS indicator is on or flashing Failing to do so may result in permanent data loss or damage to the memory Do not open the double memory card slot cover Do not disconnect the power source or turn off the camcorder Do not change the operating mode 2Q ...

Page 30: ...l through Advanced Functions and Taking Photos in Flexible Recording Mode PDF 107 and all through Additional Functions for details When recording photos if the camcorder cannot focus on the subject automatically 8 turns yellow In flexible recording mode you can focus manually See Manual Focus Adjustment PDF 71 for details About the zoom The camcorder features 20x optical zoom When recording movies...

Page 31: ...IWhen you have finished recording Shooting Video and Taking Photos ON OFF CHGl c _ Confirm that the indicator goes out OACCESS 31 ...

Page 32: ...ry pack Additionally when you open the LCD panel the camcorder is ready to start recording in approximately 1 second allowing you to start recording right away The actual time required varies depending on the shooting conditions 32 ell beep G I ON OFF CHG 71 Orange standby G 1 ON OFF CHG d 1 Green ready to record In record pause ell close the LCD panel T CD Changes to orange to indicate the camcor...

Page 33: ...attery charge is too low the camcorder may not enter the standby mode Check that the indicator changes to orange The camcorder will power off automatically if left in standby mode for 10 minutes In that case press POWER to turn on the camcorder You can select the length of time until shut off or turn off the Quick Start function See Power Saving Mode PQE 144 for details You can use the Quick Start...

Page 34: ...ty or LP mode for longer recording times See Selecting the Video Quality Recording Mode PDF 59 for approximate recording times You need to access the menu to select the recording mode but the recording mode selected will apply also when the camcorder is set to Smart AUTO mode See Using the Menus PDF 32 for details o Press POWER Select the recording mode Default recording mode 34 FUNC MENU I liP I ...

Page 35: ...g Photo Size PDF 108 for the approximate number of photos that can be recorded on a 1 GB memory card and the print size recommended for each photo size You need to access the menu to select the photo size but the settings selected will apply also when the camcorder is set to Smart AUTO See Using the Menus P QE 32 for details D Press POWER Select the photo size 6 FUNC MENU I iii I Photo Aspect Rati...

Page 36: ...0 See Playing Back the Video PDF 50 Viewing Photos SJYDF 103 for details 36 D Press to set the camcorder to playback mode r I Change the index screen if necessary CO 21 Select the Photos index screen to view photos or one of the other options to play back movies r t Look for the scene or photo you want to play back eD Move toward W to show 15 scenes photos move toward T to show 6 scenes photos Dra...

Page 37: ...ck to display the playback controls Touch anywhere else to hide the playback controls Beginning of the scene 1 double tap to jump to the previous scene Pause touch again to resume playback Photos The selected photo is displayed in single photo view Drag your finger left right to browse through the photos one by one Touch the screen to display the playback controls Start the slideshow _ _ Photo jum...

Page 38: ...d using this camcorder You may not be able to play back with this camcorder movies recorded using another device When viewing photos the following images may not be displayed correctly Images that were not recorded with this camcorder Images edited on or uploaded from a computer Images whose file names have been changed CD NOTES When playing back movies depending on the recording conditions you ma...

Page 39: ...I IIIgUsing the camcorder you can convert your movies into standard definition You can then easily upload these SO movies to your favorite video sharing Web site See Uploading Movies to Video Sharing Web Sites l j F 125 for details IPhoto related software Photo Application See the Photo Application Instruction Manual PDF file on the Instruction Manual Photo Applications Ver 35 Music Data Image Mix...

Page 40: ...e TV Select the most appropriate connection according to the input terminals on your TV In decreasing order of picture quality the connections are I HOMI J Component video I Composite video 1 r COMPONENT OUT w J AVOUT 40 1 1 Turn on the camcorder E I Press to turn on the camcorder directly in playback mode Play back your movies or photos Iii as described in the previous pages ...

Page 41: ... high definition connection See Connection Diagrams Connection I PDF 113 for details about additional settings COMPONENT OUT CTC 100 Component Cable optional STV 250N Stereo Video Cable supplied R d Pr Cr e 81 Pb Cb ue Green AUDIO White JL Red R Composite video connection Analog standard definition connection See Connection Diagrams Connection PDF 113 for details about additional settings VIDEO T ...

Page 42: ...und from the built in speaker will be muted while the S TV 250N Stereo Cable is connected to the camcorder Adjust the volume using the TV When you play back 16 9 movies on standard TV sets with a 4 3 aspect ratio the TV set will switch automatically to widescreen mode if it is compatible with the Video 10 1 system Otherwise change the aspect ratio of the TV manually See TV Type PDF 138 for details...

Page 43: ...lt in memory MXP mode 2 hr 55 min FXP mode 4 hr 10 min XP mode 5 hr 45 min SP mode 9 hr 35 min LP mode 12 hr 15 min IDIBl 8 GB built in memory MXP mode 40 min FXP mode 1 hr XP mode 1 hr 25 min SP mode 2 hr 20 min LP mode 3 hr Commercially available 16 GB memory card MXP mode 1 hr 25 min FXP mode 2 hr 5 min XP mode 2 hr 50 min SP mode 4 hr 45 min LP mode 6 hr 5 min Power supply rated 3 7 V DC batte...

Page 44: ...Use of genuine Canon accessories is recommended This product is designed to achieve excellent performance when used with genuine Canon accessories Canon shall not be liable for any damage to this product and or accidents such as fire etc caused by the malfunction of non genuine Canon accessories e g a leakage and or explosion of abattery pack Please note that this warranty does not apply to repair...

Page 45: ...uch non Canon brand items is given by the manufacturer or producer thereof If the Equipment contains a hard disk drive Canon USA recommends that data stored on that drive be duplicated or backed up to prevent its loss in the event of failure or other malfunction of such drive Canon USA shall have no responsibility under this limited warranty for use of the EqUipment in conjunction with incompatibl...

Page 46: ... USE THE EQUIPMENT REGARDLESS OF THE LEGAL THEORY ON WHICH THE CLAIM IS BASED AND EVEN IF CANON USA HAS BEEN ADVISED OF THE POSSIBILITY OF SUCH DAMAGES NOR SHALL RECOVERY OF ANY KIND AGAINST CANON USA BE GREATER THAN THE PURCHASE PRICE OF THE EQUIPMENT SOLD BY CANON USA AND CAUSING THE ALLEGED DAMAGE WITHOUT LIMITING THE FOREGOING YOU ASSUME ALL RISK AND LIABILITY FOR LOSS DAMAGE OR INJURY TO YOU ...

Page 47: ...rior finish of the Equipment media nor does it apply to Equipment purchased outside Canada If the Equipment contains a hard disk drive Canon Canada recommends that data stored on that drive be duplicated or backed up to prevent its loss in the event of a failure or other malfunction of such drive TO OBTAIN WARRANTY SERVICE Ship your Equipment in its original carton box or equivalent properly packe...

Page 48: ... Honolulu HI 96814 USA If you have any questions call the Canon U S A Information Center toll free at 1 800 828 4040 USA only 0 0 0 in CO I 0 CANADA IE H Q CENTROY SURAMERICA CANON LATIN AMERICA INC 703 Waterford Way Suite 400 Miami FL 33126 USA ASIA CANON HONGKONG COMPANY LTD 19 F The Metropolis Tower 10 Metropolis Drive Hunghom Kowloon Hong Kong Tel 852 3191 2333 Fax 852 2428 3963 For support co...

Page 49: ...PUB DIE 0383 000 HD Camcorder Instruction Manual Y ...

Page 50: ...h the instructions may cause harmful interference to radio communications However there is no guarantee that interference will not occur in a particular installation If this equipment does cause harmful interference to radio or television reception which can be determined by turning the equipment off and on the user is encouraged to try to correct the interference by one or more of the following m...

Page 51: ...ERVICING TO QUALIFIED SERVICE PERSONNEL CAUTION RISK OF ELEC R C SHOCK DO NO OPEN The lightning flash with arrowhead symbol within an equilateral triangle is intended to alert the user to the presence of uninsulated dangerous voltage within the product s enclosure that may be of sufficient magnitude to constitute a risk of electric shock to persons The exclamation point within an equilateral trian...

Page 52: ...it from the apparatus 9 Only use attachments accessories specified by the manufacturer 10 Unplug this apparatus during lightning storms or when unused for long periods of time 11 Refer all servicing to qualified service personnel Servicing is required when the apparatus has been damaged in any way such as power supply cord or plug is damaged liquid has been spilled or objects have fallen into the ...

Page 53: ...k of Google Inc Other names and products not mentioned above may be trademarks or registered trademarks of their respective companies This device incorporates exFAT technology licensed from Microsoft ANY USE OF THIS PRODUCT OTHER THAN CONSUMER PERSONAL USE IN ANY MANNER THAT COMPLIES WITH THE MPEG 2 STANDARD FOR ENCODING VIDEO INFORMATION FOR PACKAGED MEDIA IS EXPRESSLY PROHIBITED WITHOUT A LICENS...

Page 54: ...n the built in memory or on commercially available memory cards 0 36 You can add flare to your movies by adding text stamps or oven freehand illustrations 1 1 080 lines 1 Full HD 1080 refers to Canon camcorders compliant with high definition video composed of 1 080 vertical pixels scanning lines 2 Video is recorded at this resolution only when the recording mode is set to MXP or FXP mode In other ...

Page 55: ...scenes and arrange them into a video clip set to your favorite background music Face Detection 0 66 Image Stabilization The camcorder automatically detects people s faces and adjusts the focus and other settings accordingly for beautiful results Dynamic IS 0 64 compensates for camcorder shake when you shoot video while walking Just point the camcorder and it will automatically select the best sett...

Page 56: ...mputer or a video sharing Web site Save or upload to the Web Standard Definition Convert your HD movies in the camcorder itself to standard definition files 0 125 High Definition Use the supplied PIXELA s software 0 119 125 4 Refer to the instruction manual of the device compatible with the type of card memory used Depending on the device used correct playback may not be pos sible even if the devi...

Page 57: ...9 ...

Page 58: ... the Position and Brightness of the LCD Screen 29 Basic Operation of the Camcorder 29 Using the Touch Screen 30 Operating Modes 32 Using the Menus 34 First Time Settings 34 Setting the Date and Time 35 Changing the Language 35 Changing the Time Zone 36 Using a Memory Card 36 Memory Cards Compatible for Use with the Camcorder 38 Inserting and Removing a Memory Card 39 Selecting the Memory for the R...

Page 59: ...deo in Flexible Recording Mode 59 Selecting the Video Quality Recording Mode 60 Selecting the Frame Rate 61 Special Scene Recording Programs and Programmed AE 63 Cinema Mode Giving a Cinematic Look to your Recordings 64 Image Stabilization 65 Pre Recording 66 Face Detection 67 Touch Track 68 Video Snapshot 69 Digital Effects 70 Manual Exposure Adjustment 71 Manual Focus Adjustment 72 Tele macro 73...

Page 60: ...otos 107 Additional Functions 107 Taking Photos in Flexible Recording Mode 108 Selecting Photo Size 109 Slideshow External Connections 111 Terminals on the Camcorder 112 Connection Diagrams 114 Playback on a TV Screen 116 Saving and Sharing Your Recordings 116 Copying Recordings to a Memory Card 119 Saving Recordings on a Computer 122 Saving Movies onto Standard Definition Discs DVD 123 Copying Re...

Page 61: ...s 147 Appendix Onscreen Icons and Displays 152 Trouble 152 Troubleshooting 159 List of Messages 166 Do s and Don ts 166 Handling Precautions 170 Maintenance Others 171 Using the Camcorder Abroad 172 General Information 172 Accessories 173 Optional Accessories 176 Product Codes 177 Specifications 182 Index ...

Page 62: ...nce page number within this manual Text that applies only to the model s shown in the icon When you see the r icon you will need to refer also to the Photo Application Instruction Manual included as a PDF file in the supplied Camcorder Supplemental Disc to complete the operation The following terms are used in this manual When not specified as memory card or built in memory the term memory by itse...

Page 63: ...ode Operating modes FUNC 8 MENU 8 8 8 Self Timer 8 A On n 8 a Brackets are used to refer to control buttons and menu options you will touch on the screen and to other onscreen messages and displays indicates that a function is available in the operating mode indicated and indicates that the function is not available For a detailed explanation refer to Operating Modes 0 30 The names of physical but...

Page 64: ...wing accessories are supplied with the camcorder CA 110E including power cord in Asia XCA 110 Compact Power Adapter BP 110 Battery PackW XIFC 300PCU S USB Cable STV 250N Stereo Video CableW Yellow Red White plugs XHTC 100 S HDMI Cable Quick GuideW XStylus Pen ...

Page 65: ...tions Ver 351 Music Data Image Mix Data CD ROM referred to in this manual as Camcorder Supplemental Disc Instruction Manual The full version instruction manual of the camcorder this PDF file Photo Application Software for saving managing and printing photos Music data Music files that can be used as background music during playback These music files are for exclusive use with the supplied PIXELA s...

Page 66: ...TT INFO button 0 151 6 MIC terminal 0 79 7 USB terminal 0 111 114 8 HDMI OUT terminal 0 111 112 9 Memory card slot X 0 38 A q Memory card slot Y 0 38 A a Double memory card slot cover A s Terminal cover A d DC IN terminal 0 21 A f COMPONENT OUT terminal 0 111 113 A g AV OUT terminal 0 111 113 X headphones terminal 0 77 A h Strap mount 0 25 A j Grip belt 0 24 Left side view Right side view ...

Page 67: ... 0 75 A l Zoom lever 0 47 S q PHOTO button 0 43 107 S a ACCESS indicator 0 43 58 107 S s POWER button S d ON OFF CHG charge indicator Green ON Orange Standby 0 49 Red Charging 0 21 S f LCD touch screen 0 27 29 LCD panel Top view Front view ...

Page 68: ...0 52 S h START STOP button 0 43 58 S j Tripod socket 0 167 S k Serial number The serial number label is located on the battery compartment cover S l Battery compartment cover 0 21 D q Battery compartment 0 21 Bottom view Back view ...

Page 69: ...corder until the battery pack is com pletely exhausted Doing so will ensure that the remaining recording time will be displayed accurately For approximate charging times and recording playback times with a fully charged battery pack refer to the tables on page 173 1 Plug the compact power adapter into a power outlet For Asia only Connect the power cord to the compact power adapter 2 Connect the co...

Page 70: ...lens until you hear a click 6 Charging will start when the camcorder is turned off If the camcorder was on the green ON OFF CHG indicator will go out when you turn off the camcorder After a moment the ON OFF CHG indicator will start flashing in red battery pack charging The red ON OFF CHG indicator will go out when the battery pack is fully charged If the indicator flashes quickly refer to Trouble...

Page 71: ...e with this camcorder To prevent equipment breakdowns and excessive heating do not con nect the supplied compact power adapter to voltage converters for overseas travels or special power sources such as those on aircraft and ships DC AC inverters etc NOTES The battery pack will be charged only when the camcorder is off We recommend charging the battery pack in temperatures between 10 C and 30 C 50...

Page 72: ...Canada only The Lithium ion polymer battery that powers the product is recyclable Please call 1 800 8 BATTERY for information on how to recycle this battery Preparing the Accessories Grip Belt Fasten the grip belt Adjust the grip belt so that you can reach the zoom lever with your index finger and the g button with your thumb To remove the grip belt 1 Lift the padded handgrip s flap and detach the...

Page 73: ... strap Pass the attaching end of the wrist strap through the rear bracket on the cam corder thread the wrist strap through the loop and fasten You can also attach the wrist strap to the strap mount on the grip belt to use both for extra convenience and protection ...

Page 74: ...26 Preparations To attach an optional shoulder strap Pass the ends of the shoulder strap through the strap mount on the grip belt and adjust the length of the strap ...

Page 75: ...h the self timer NOTES About the LCD screen The screen is produced using extremely high pre cision manufacturing techniques with more than 99 99 of the pixels operating to specification Less than 0 01 of the pixels may occasion ally misfire or appear as black red blue or green dots This has no effect on the recorded image and does not constitute a malfunction LCD Backlight When recording in bright...

Page 76: ...ff the screen dimmer and return the LCD screen to its previous brightness setting NOTES The LCD backlight does not affect the brightness of the recordings Using the bright setting will shorten the effective usage time of the bat tery pack You can further adjust the brightness of the LCD screen with the 6 8 LCD Brightness setting or dim it with the 6 8 LCD Screen Dimmer setting to use in places whe...

Page 77: ...rt playing back a scene in an index screen to select a setting from the menus to select the subject whom the camcorder will recognize as the main subject of the scene etc Drag While applying pressure swipe your fin ger up and down or left and right across the screen Used to scroll menus to browse through index screen pages or to adjust slider controls like the volume IMPORTANT The camcorder uses a...

Page 78: ... recording video and photos Smart AUTO mode for beginners or if you just prefer not to bother with detailed camcorder settings and flexible recording mode which lets you change the camcorder s settings to your prefer ence Press the button to switch the camcorder to mode and press the button again to switch back to mode In either mode you can record movies by pressing g or take photos by pressing j...

Page 79: ... You can press S when the camcorder is off to turn it on directly in playback mode NOTES When switching to a playback mode the memory selected for playback will be the same currently used for recording Operating mode Onscreen icon Operation Press S Playing back movies 0 50 Press S touch b and then 2 Photos Viewing photos 0 103 ...

Page 80: ... and mode the FUNC panel shows a convenient over view of frequently used shooting functions Touch FUNC to access the FUNC panel and then touch the function you want to set or adjust You may need to drag your finger up and down the screen to find the control button of the desired function In and mode touch Edit to display a similar panel contain ing the various operations that are available and the...

Page 81: ... the setting you want to change into the orange selection bar Menu items not available appear grayed out When the desired menu item appears you can touch it to bring it down to the orange bar 5 When the desired menu item is inside the selection bar touch the orange frame on the right 6 Touch the desired option and touch a You can touch a to close the menu at any time ...

Page 82: ...same way 4 Touch Y M D M D Y or D M Y to select the date format you prefer 5 Touch 24H to use 24 hour clock or leave this control unchecked to use 12 hour clock AM PM 6 Touch OK to start the clock and close the setup screen NOTES When you do not use the camcorder for about 3 months the built in rechargeable lithium battery may discharge completely and the date and time setting may be lost In such ...

Page 83: ...one Change the time zone to match your location The default setting is New York 1 Open the Time Zone DST screen Only when performing the procedure in mode 2 Touch S to set the home time zone or V to set the time zone of your destination when you are traveling 3 Touch Z or O to set the desired time zone If necessary touch U to adjust for daylight saving time 4 Touch a to close the menu Operating mo...

Page 84: ...made by Panasonic Toshiba and SanDisk Depending on the memory card used it may not be possible to record movies NOTES About the SD Speed Class The SD Speed Class is a standard that indi cates the minimum guaranteed data transfer speed of SD SDHC SDXC memory cards When you buy a new memory card look for the Speed Class logo on the package We recommend using memory cards rated Speed Class 4 6 or 10 ...

Page 85: ...ger to write data on the memory and recording may stop Save your recordings and initialize the memory Eye Fi Cards This product is not guaranteed to support Eye Fi card functions including wireless transfer In case of an issue with an Eye Fi card please check with the card manufacturer Also note that an approval is required to use Eye Fi cards in many countries or regions Without approval use of t...

Page 86: ...it clicks To use the wireless communication features of an Eye Fi card insert it into memory card slot Y Be sure you understand the information provided in Eye Fi Cards 0 37 before using an Eye Fi card 4 Close the double memory card slot cover Do not force the cover closed if the memory card is not correctly inserted To remove the memory card Push the memory card once to release it When the memory...

Page 87: ... card When selecting the memory you can check the approximate available recording time based on currently used settings NOTES Select to record movies in the built in memory or memory card X if you later want to convert the movies to standard definition in order to upload them to the Web Operating modes FUNC 8 8 MENU 8 8 8 Rec Media for Movies or Rec Media for Photos 8 f built in memory 4 memory ca...

Page 88: ...th memory card slots When relay recording from memory card X memory card slot Y only 2 Activate the relay recording The approximate available recording time will now reflect the combined space in the memories used for relay recording NOTES You cannot use relay recording from the built in memory to memory card Y When using a single memory card be sure to insert it into memory card slot X There will...

Page 89: ...the camcorder until the initialization is completed 2 Initialize the memory 1 Only when performing the procedure in mode 2 Touch this option if you want to physically erase all the data rather than just clear the file allocation table of the memory 3 If you selected the Complete Initialization option you can touch Cancel to cancel the initialization while it is in progress All recordings will be e...

Page 90: ...transfer music files from the supplied Camcorder Supplemental Disc to a memory card after it is initialized For details refer to the Software Guide PDF file of the supplied software Mac OS users Use Finder to transfer music files from the MUSIC folder on the supplied Camcorder Supplemental Disc to a memory card after it is initialized Refer to About the music files 0 181 for the folder structure o...

Page 91: ... recording first to check that the camcorder is operating correctly Shooting Video and Taking Photos in Smart AUTO Mode With Smart AUTO mode you can take great looking videos and photos by letting the camcorder automatically adjust settings based on the recording situation 1 Turn on the camcorder By default movies and photos are recorded in the built in memory only or on memory card X You can sele...

Page 92: ...ator will flash as the photo is being recorded When you have finished recording 1 Make sure that the ACCESS indicator is off 2 Turn off the camcorder 3 Close the LCD panel About the Smart AUTO mode Only the following functions are available in this mode Zoom 0 47 Quick Start 0 49 Video snapshot 0 68 Image stabilization modes 0 64 Face detection 0 66 to get beautiful shots of people every time trac...

Page 93: ...O icons The icon in parentheses appears under backlight conditions When T appears in the icon this indicates that tele macro 0 72 has been activated When T appears in the icon this indicates that tele macro 0 72 has been activated Background color of the icon Bright gray Blue skies light blue Vivid colors green red Sunsets orange Subject People stationary People moving Subjects other than people s...

Page 94: ...e camcorder will shut off automatically to save power when it is powered by a battery pack and is left without any operation for 5 minutes Press x to turn on the camcorder When recording in bright places it may be difficult to use the LCD screen In such cases you can turn on the LCD backlight 0 27 or adjust the brightness of the LCD screen with the 6 8 LCD Bright ness setting Under certain conditi...

Page 95: ...g the 7 8 Zoom Type setting In mode Zoom Type will be set to Advanced A summary of the zoom types is given in the table below 1 When taking photos only optical zoom is available 2 24x when Image Stabilizer FUNC panel is set to P Dynamic There are two ways you can zoom in and out using the zoom lever on the camcorder or using the zoom controls on the touch screen Using the Zoom Lever Move the zoom ...

Page 96: ...rols NOTES Keep at least 1 m 3 3 ft away from the subject At full wide angle you can focus on a subject as close as 1 cm 0 39 in When using tele macro 0 72 and the camcorder is at full telephoto you can focus on a subject as close as 40 cm 1 3 ft When recording at maximum advanced zoom the video quality is equivalent to high definition In mode you can also set 7 8 8 Zoom Speed to one of three cons...

Page 97: ...HG indicator turns back green and the camcorder is ready to record IMPORTANT Do not disconnect the power source during standby mode while the ON OFF CHG indicator is lit in orange NOTES The camcorder will not enter standby mode if the LCD panel is closed while the ACCESS indicator is on or flashing or while a menu is being displayed The camcorder may also not enter standby mode if the LCD panel is...

Page 98: ... refer to Smart AUTO Mode 0 43 Basic Playback Playing Back the Video To play back scenes based on their rating see Playing Back Scenes by Rating 0 89 1 Press S 2 Open the date index screen if it is not displayed 3 Look for the scene you want to play back Move the zoom lever toward Q to show 15 scenes per page move it toward P to show 6 scenes per page Operating modes b 8 8 1 Date ...

Page 99: ...ur finger left for the next index page D Drag your finger right for the previous index page E Select a different index screen to read different content or from a different memory 0 54 F 3D Flip View 0 54 G Edit panel H Timeline 0 80 I Divider indicating a change of recording date While browsing through index pages a scroll bar will appear at the bottom of the screen for a few seconds When you have...

Page 100: ... c to increase the level of the original audio adjust toward b to increase the level of background music Set the level in the middle for an equal mix of both E Decorate scenes 0 97 F Touch anywhere else to hide the playback controls G Fast playback backward H Jump to the next scene I Fast playback forward Touch several times to increase the playback speed to approxi mately 5x 15x 60x the normal sp...

Page 101: ...er movies recorded on a memory card using another device NOTES Depending on the recording conditions you may notice brief stops in video or sound playback between scenes During fast slow playback you may notice some anomalies blocky video artifacts banding etc in the playback picture The speed indicated on the screen is approximate A Resume playback B Slow playback backward C Slow playback forward...

Page 102: ...nt to play back original scenes or photos on the memory card for example You can also select the memory from which you want to play back your recordings A Drag your finger up and down to browse through the scenes recorded in the displayed date B Drag your finger left to go to the next date with record ings C Touch the scene in the front to play it back D Currently selected recording date E Drag yo...

Page 103: ... Touch the tab of the desired memory built in memory only memory card X or memory card Y B Touch a control button to select the content you want to play back 1 1 Date Scenes in the date index screen are organized by recording date Gallery Scenes in the gallery screen are organized by various groups or stories 0 90 Touch Gallery and then the desired story 2 Photos Display the photo index screen u S...

Page 104: ...choose two methods to display scenes Touch 1 Date to display the date index screen which groups scenes by recording date Touch Gallery to dis play the gallery screen which organizes scenes by various groups or stories The gallery screen by default contains two groups that are divided as follows Unsorted For your regular scenes Video Snapshot For video snapshot scenes Drag your finger left and righ...

Page 105: ...al scenes cannot be recovered Save copies of important scenes before deleting them 0 116 Observe the following precautions while the ACCESS indicator is on or flashing while scenes are being deleted Do not open the double memory card slot cover Do not disconnect the power source or turn off the camcorder Do not change the camcorder s operating mode NOTES Deleting a scene from the gallery screen or...

Page 106: ... or on memory card X You can select the memory that will be used to record movies 0 39 2 Press g to begin recording Press g again to pause the recording Reviewing Your Recording You can play back the last scene recorded to check it The camcorder will play back the last 4 seconds of the scene but without sound IMPORTANT Observe the following precautions while the ACCESS indicator is on or flashing ...

Page 107: ...FXP mode for better movie quality select LP mode for longer recording times The following table gives approximate recording times NOTES Scenes recorded in MXP mode cannot be saved onto AVCHD discs Save such scenes onto Blu ray discs or use the supplied PIXELA s VideoBrowser to back up such scenes If you use PIXELA s Video Browser however scenes will be converted to FXP mode quality The camcorder u...

Page 108: ... memory contains about 70 MB of music files and 5 MB of image files 3 A single scene can be recorded continuously for 12 hours at that point the camcorder will stop for about 3 seconds before resuming recording Recording mode MXP1 FXP1 XP SP LP Memory 4 GB Memory card 20 min 30 min 40 min 1 hr 10 min 1 hr 30 min 8 GB Memory card Built in memory2 40 min 1 hr 1 hr 25 min 2 hr 20 min 3 hr 16 GB Memor...

Page 109: ...s To set the Programmed AE recording program select A Programmed AE instead and then touch a The rest of the procedure is not necessary C C 60i Standard 60 fields per second interlaced This is the default setting and is suitable for most situations o PF30 30 frames per second progressive Use this frame rate to easily edit your recordings for example to post them on the Web Using this frame rate vi...

Page 110: ... sports scenes such as tennis or golf q Night Scene To record nightscapes with lower noise ISnow To record in bright ski resorts without the subject being underexposed JBeach To record on a sunny beach without the subject being underexposed KSunset To record sunsets in vibrant colors p Low Light To record in low light situations LSpotlight To record spotlit scenes ...

Page 111: ... work as well as in other modes In such case adjust the focus manually M Fireworks To avoid camcorder blur blur due to the camcorder moving we recommend using a tripod When taking photos slower shutter speeds are used so blur is more likely to occur Stabilize the camcorder for example by mounting it on a tripod Cinema Mode Giving a Cinematic Look to your Recordings Give your recordings a cinematic...

Page 112: ...r may not work well on subjects with low contrast with a recurring repetitive pattern or without vertical lines When Image Stabilizer is set to P Dynamic if the background s movement does not appear natural select Q Standard or j Off Operating modes P Dynamic Compensates for a higher degree of camcorder shake such as when shooting while walking and is more effec tive as the zoom approaches full wi...

Page 113: ...der will not emit any notifi cation sounds The camcorder will not record the full 3 seconds prior to pressing g if the button was pressed within 3 seconds of having turned on pre recording or having finished the previous recording Any of the following actions will deactivate the pre recording function Leaving the camcorder without any operation for 5 minutes Pressing z Changing the camcorder s ope...

Page 114: ...ically select one person it determines is the main subject The main subject is indi cated by a white face detection frame and the camcorder will optimize the set tings for that person Other faces will have gray frames Touching a subject will activate Touch Track 0 67 NOTES The camcorder may mistakenly detect the faces of non human sub jects In such case turn face detection off In certain cases fac...

Page 115: ...he best results 1 Make sure face detection is activated 0 66 2 Point the camcorder at a moving subject and touch the subject on the touch screen A white double frame will appear around the subject and track it as it moves Touch Cancel z to remove the frame and cancel the tracking NOTES If there is more than one subject on the screen that have similar charac teristics such as color the camcorder mi...

Page 116: ...lue border appears on the screen Press z again to return to normal video recording mode 2 Press g By default the camcorder records for about 4 seconds the blue frame serves as a visual progress bar and then automatically returns to record pause mode You can change the length of video snapshot scenes to 2 or 8 seconds with the 8 8 Video Snapshot Length setting When the camcorder stops recording the...

Page 117: ...nly the picture but also the sound will fade in or out When you apply an effect the sound will be recorded normally Operating modes N Off Select this setting when you do not intend to use the dig ital effects 2 Black White Records movies and photos in black and white 3 Sepia Records movies and photos in sepia tones for an old look 0 Fade Trigger Once 6 Fade Trigger Always 1 Wipe Once 7 Wipe Always...

Page 118: ...orks 1 Open the exposure adjustment screen 2 Touch a subject that appears inside the e frame The Touch AE mark P will flash and the exposure will be adjusted automatically so the area you touched will be correctly exposed You have the option to further adjust the exposure manually as necessary The manual adjustment dial appears and the adjustment value is set at 0 Touch y to return the camcorder t...

Page 119: ... CHECK Adjust the zoom before you start the procedure 1 Open the manual focus screen 2 Touch a subject that appears inside the X frame The Touch AF mark P will flash and the focusing distance will be adjusted automatically You have the option to further adjust the focus manually as necessary You can touch 2 instead to adjust the focus manually without activating the Touch AF function The manual fo...

Page 120: ...il the focusing distance changes to V 4 Touch a to lock the focus at the selected distance During manual focus MF will appear on the screen NOTES While the optional Wide converter or Tele converter is attached the focusing distance displayed will be incorrect Tele macro You can take close up shots of nearby subjects by using tele macro You can create shots in which a small subject is in focus but ...

Page 121: ...ors under different lighting conditions so that white objects will always look truly white in your recordings POINTS TO CHECK Select a recording program other than the Special Scene recording pro grams When you select g Custom WB set the custom white balance with the follow ing procedure before touching a To set the custom white balance Point the camcorder at a white object so it fills the whole s...

Page 122: ...or sky sea or forest Under mercury lamps and certain types of fluorescent lights Self Timer n appears Repeat selecting B Off to turn off the self timer For movies In record pause mode press g The camcorder starts recording after a 10 second countdown The countdown appears on the screen Y Automatic The camcorder automatically sets the white bal ance for natural looking colors a Daylight To record o...

Page 123: ...r s operating mode Setting the camcorder to standby mode Audio Recording Level You can adjust the audio recording level of the built in or an external microphone You can display the audio level indicator while recording 1 Open the manual audio recording level adjustment screen The audio level indicator and current audio recording level will appear on the screen Touch z Automatic to return the camc...

Page 124: ...icator Usually the audio level indicator will be displayed only after activating the manual adjustment of the audio recording level You can choose to display it also when the audio level is adjusted automatically NOTES When the audio level meter reaches the red point 0 dB the sound may be distorted If the audio level is too high and the sound gets distorted activate the microphone attenuator with ...

Page 125: ...phones can be used also in mode but the function of the terminal can not be changed Change the setting in advance in mode Only when performing the procedure in mode J appears To adjust the volume during playback In mode and in mode during slideshow playback you can adjust the headphone s volume the same way you adjust the speaker s volume 0 52 Operating modes FUNC 8 8 MENU 8 6 8 AV Headphones 8 J ...

Page 126: ...ophone may pick up the sound of the camcorder s internal machinery In such case we recommend using an external microphone such as the optional WM V1 Wireless Microphone Using the WM V1 Wireless Microphone With the WM V1 Wireless Microphone you can record audio in a variety of situa tions After you affix the microphone unit to the subject sound is transmitted to the receiver unit connected to the c...

Page 127: ...Audio While Recording You can combine the sound recorded from the external audio source with the sound recorded from the built in microphone You can adjust the balance so that the sound recorded from one micro phone is a higher level than the sound recorded from the other micro phone Perform the following after connecting the external microphone or audio device to the MIC terminal External Audio F...

Page 128: ...very long scene you may want to start playing back the scene from a certain point You can use the movie timeline to break the scene to segments at fixed time intervals ranging from 6 seconds to 6 minutes 1 Open the date index screen 2 Open the scene s Timeline screen The Timeline screen appears The large thumbnail will show the first frame of the scene Below it the timeline ruler shows frames take...

Page 129: ...rag your finger left along the ruler to display the next 5 frames D Current scene Total number of scenes E Scene s recording mode and length F Recording date and time G Drag your finger right along the ruler to display the previ ous 5 frames H Currently selected interval between frames 6 sec 8 8 Desired interval 8 f ...

Page 130: ...sic The music files come pre installed in the built in memory POINTS TO CHECK To play back scenes stories or a slideshow of photos recorded on one of the memory cards you will need to transfer the music tracks to the corresponding memory card in advance For details refer to the Soft ware Guide PDF file of the supplied software 1 Open the date index screen gallery screen or photo index screen 2 Ope...

Page 131: ...story that contains the scenes to play back Drag your finger right left to bring the desired story to the front A Select the desired music track B Adjust toward 1 to increase the level of the original audio adjust toward b to increase the level of back ground music Set the level in the middle for an equal mix of both C Delete the music track selected D Listen to the music track selected Touch agai...

Page 132: ...und music by connecting an exter nal player POINTS TO CHECK You will need a commercially available audio cable with at least one mini stereo plug to connect to the MIC terminal on the camcorder the other end will depend on external player used 1 Open the date index screen gallery screen or photo index screen 2 Activate the external audio input 3 Connect the external player to the camcorder s MIC t...

Page 133: ...red video playback will resume automatically When you play back the slideshow linked to the external audio the photos will be displayed continuously until the music stops When the external audio input stops the slideshow will stop as well Playback with the video not linked to the external audio 5 Back in the index screen or gallery screen touch a scene or story to start the video playback In mode ...

Page 134: ...der on the supplied Camcorder Supplemental Disc to a memory card after it is initialized Refer to About the music files 0 181 for the folder structure of the memory card Transfer music files to the memory card that contains the recordings you want to play back with background music About video playback linked to the external player In some cases the video playback may not be correctly linked to th...

Page 135: ...audio level meter Touch the screen to display the playback controls Rating Scenes You can assign a rating to the scenes you record Later you can choose just the scenes of a particular rating to play back or edit Rating Scenes Right After Recording You can rate your scenes immediately after recording them Doing so will allow you to assign a rating while the scene is still fresh in your memory Opera...

Page 136: ...e story that contains the scenes to rate Drag your finger right left to bring the desired story to the front 2 Touch Scene List 3 When the desired scene appears in the orange bar touch the frame on the right side You can drag your finger up and down to browse through the scene list The Edit Scene screen will appear 4 Select the desired rating for the scene The selected rating mark will be highligh...

Page 137: ...nes by Rating You can play back scenes that have a particular rating 1 From the gallery screen select the story that contains the scenes to play back Drag your finger right left to bring the desired story to the front 2 Select a rating 3 Touch the story s thumbnail If the story does not contain scenes of the selected rating a message will be displayed Touch OK to return to the gallery screen Opera...

Page 138: ... from a particular event or trip Creating a New Story 1 Open the gallery screen 2 Create a new story Touch No to exit without creating a new story NOTES Including Unsorted and Video Snapshot a memory can contain a maximum of 100 stories Unsorted and Video Snapshot cannot be deleted Deleting Scenes and Stories from the Gallery You can delete scenes in the gallery that you no longer need When you de...

Page 139: ...een 3 Select a rating mark that corresponds to the rating of the scenes to delete The selected rating mark will be highlighted and the number of applicable scenes will appear If a story does not contain scenes of a particular rating the corresponding rating mark will be grayed out You can select multiple rating marks 4 Delete the scenes Touch Stop to interrupt the operation while it is in progress...

Page 140: ...corder Moving or Copying Scenes in the Gallery Move scenes in the gallery individually or by rating to play them back in the order of your choice You can also copy scenes to another story Note that you cannot move or copy scenes to Unsorted or Video Snapshot To move individual scenes 1 From the gallery screen select the story that contains the scenes to move Drag your finger right left to bring th...

Page 141: ...t is in progress After scenes are copied touch OK when the confirmation screen appears 8 Touch f To move scenes by rating You can move scenes of a particular rating from one story to another 1 From the gallery screen select the story that contains the scenes to move Drag your finger right left to bring the desired story to the front 2 Open the Move Story screen 3 Select a rating mark that correspo...

Page 142: ... Open the index screen that contains the scene from which you want to capture the video snapshot scene 2 Play back the desired scene 3 Press g to capture the video snapshot scene The camcorder captures the video snapshot scene for about 4 seconds the blue frame serves as a visual progress bar and then enters playback pause mode You can change the length of video snapshot scene you capture with the...

Page 143: ...scene will be captured starting from the beginning of the following scene During the playback of video snapshot scenes captured from a previ ously recorded movie you may notice some anomalies in the picture sound at the point where the playback switches to a new scene Capturing Photos You can capture a photo from a movie during playback The size of the captured photos will be 1920x1080 Please read...

Page 144: ...d touch it to start playing it back You can also divide a scene in a story 2 Pause the playback at the point where you want to divide the scene 3 Open the scene division screen 4 Bring the scene to a precise point if necessary During playback pause Touch A to play back the scene Touch F or E to jump a frame backward forward During playback Touch C to pause the playback Touch J or I for fast playba...

Page 145: ...e was cut The following scenes cannot be divided Video snapshot scenes and other scenes that are too short less than 3 seconds Scenes that were edited using the supplied software PIXELA s VideoBrowser and were then written back to the camcorder Scenes cannot be divided within 1 second from the beginning or the end of the scene Decorating Scenes Add a new level of enjoyment to scenes by decorating ...

Page 146: ...u can save the canvas However only one canvas can be saved per memory C Animated Stamps You can select animated stamps to include in your decoration You can place them anywhere on the canvas D Date and Time Adds the date and or time to the can vas You can then move it anywhere you like E Image mix Choose one of 27 different frames to add to the canvas and mix with live video This can be used in co...

Page 147: ... 3 Select white or black from Colors Alternatively you can touch and select a color from the displayed colors 4 Touch f The canvas appears on the screen 5 Draw on the canvas To clear the Pens and Stamps decorations 1 While the canvas is displayed touch 2 Touch Clear 8 Yes The Pens and Stamps decorations are cleared To save the Pens and Stamps decorations 1 While the canvas is displayed touch 2 Tou...

Page 148: ...th control buttons to display both the date and time You can also touch one of the three control buttons on the bottom to change how the date time is displayed places the date time in a dark frame displays the date time in white displays the date time in black 3 Touch the date or time and drag your finger to the desired location To use image mix 1 Touch You can touch one of the memory icons at the...

Page 149: ...ar to adjust the overall transparency of the image as necessary 7 Touch f to mix your image with live video Mixing Your Own Images with Live Video You can use images you make on your computer for the image mix Chroma Key function Make sure that the image you want to use has a blue or green area which will be replaced by the live video using Chroma Key mixing Refer to About the image files for the ...

Page 150: ...decorate scenes being played back in the same way that you decorate scenes being recorded Note that decorations added to a scene during playback will not be recorded with the scene However when you convert scenes to standard definition 0 125 the decora tions will be superimposed on the SD movies only 1 Play back the scene to decorate 2 Touch the screen to display the playback controls 3 Touch The ...

Page 151: ...ut basic photo shooting refer to Smart AUTO Mode 0 43 Basic Playback Viewing Photos 1 Press S 2 Open the Photos index screen 3 Look for the photo you want to play back Move the zoom lever toward Q to show 15 photos per page move it toward P to show 6 photos per page Operating modes b 8 8 2 Photos ...

Page 152: ...e recorded a large number of photos you can jump eas ily through the photos using the scroll bar 1 Touch the screen to display the playback controls 2 Jump through the photos using the scroll bar A Memory being read B Index screen currently displayed C Drag your finger left for the next index page D Drag your finger right for the previous index page E Select a different index screen to read differ...

Page 153: ...files may not be displayed correctly Images not recorded with this camcorder Images edited on or uploaded from a computer Images whose file names have been changed Deleting Photos You can delete those photos that you are not interested in keeping Deleting a Single Photo 1 In single photo view select the photo you want to delete 2 Touch the screen to display the playback controls 3 Delete the photo...

Page 154: ...pear on selected photos Touch a selected photo again to remove the checkmark You can also touch Remove All to remove all checkmarks 3 Touch Yes 8 OK Touch Stop to interrupt the operation while it is in progress Options IMPORTANT Be careful when deleting photos Deleted photos cannot be recovered Photos protected with another device cannot be deleted Select Deletes all photos that you select All Pho...

Page 155: ...tos 0 39 Please read the IMPORTANT section 0 108 before using an Eye Fi card 2 Press j halfway Once the focus is automatically adjusted h will turn green and one or more AF frames will appear 3 Press j fully The ACCESS indicator will flash as the photo is being recorded When you have finished recording 1 Make sure that the ACCESS indicator is off 2 Turn off the camcorder 3 Close the LCD panel Oper...

Page 156: ...y region of use See also Using an Eye Fi card 0 131 NOTES You cannot take photos when 8 8 Frame Rate is set to o PF30 or E PF24 Also you cannot take photos when digital zoom is activated light blue area on the zoom bar Selecting Photo Size You can select the size of photos by choosing the aspect ratio You can select F 2016x1512 or G 1920x1080 If you select G 1920x1080 the photo will be recorded in...

Page 157: ...hotos and even set it to music 1 Open the Photos index screen 2 Select the background music to use when playing back the photo slideshow 0 82 Slideshow set to a music track 3 Touch the screen to display the playback controls then touch A to play back the slideshow set to the selected music track Touch C to stop the slideshow Hide the playback controls if necessary Slideshow not linked to the exter...

Page 158: ...ing functions and features of the camcorder can be used either for shooting video or for taking photos The way to set and use them was already explained in detail so we refer you to the relevant page in the Video section Zoom 0 47 Quick Start 0 49 Recording programs 0 61 63 Face detection 0 66 Digital effects 0 69 Manual exposure adjustment 0 70 White balance 0 73 Self timer 0 74 ...

Page 159: ...nal Access Open the LCD panel The HDMI OUT terminal offers a high quality digital connection that combines audio and video in a single convenient cable 3 COMPONENT OUT Terminal Access Open the side terminal cover The component video terminal is for video only When you use connection B do not forget the audio connections using the AV OUT X terminal 4 AV OUT X Terminal Access Open the side terminal ...

Page 160: ...audio When you connect the camcorder to an HDTV equipped with an HDMI terminal you can enjoy video and audio playback at the highest quality The HDMI OUT terminal on the camcorder is for output only Do not connect it to an HDMI output terminal on an external device as this may damage the camcorder While the camcorder is connected to an HDTV using connection A there will be no video output from oth...

Page 161: ... Quality Standard definition Output only Connect to a standard TV or a VCR with audio video input terminals Change the following settings on the camcorder y z 8 TV Type according to the TV set widescreen or 4 3 if the TV cannot automatically detect and change the aspect ratio 6 8 AV Headphones to H AV White STV 250N Stereo Video Cable supplied Red Green Blue Red CTC 100 Component Cable optional Re...

Page 162: ...ith family and friends Playback on an HDTV using one of the high definition con nections will ensure the best playback quality 1 Turn off the camcorder and the TV 2 Connect the camcorder to the TV Refer to Connection Diagrams 0 112 and select the most appropriate connection for your TV 3 Turn on the connected TV On the TV select as the video input the same terminal to which you connected the camco...

Page 163: ...the connected HDTV Refer to the TV s instruction manual We recommend powering the camcorder using the compact power adapter Connection C When you play back your 16 9 movies on standard TV sets with a 4 3 aspect ratio the TV set will switch automatically to wide screen mode if it is compatible with the Video ID 1 system Otherwise change the aspect ratio of the TV manually ...

Page 164: ... before using an Eye Fi card POINTS TO CHECK Make sure the memory card to which you want to copy recordings is inserted into memory card slot Y Copying Scenes from the Date Index Screen When viewing the gallery on memory card Y copied scenes will be in Unsorted regardless of which story the original scenes are in 1 Open the index page in the date index screen that contains the scenes you want to c...

Page 165: ... bring the desired story to the front 2 Copy the scenes Touch Stop to interrupt the operation while it is in progress Copying a Single Photo 1 In single photo view select the photo you want to copy Check that you are viewing photos recorded in the built in memory only or on memory card X 2 Touch the screen to display the playback controls 3 Copy the photo 4 Drag your finger left right to select an...

Page 166: ...peration while it is in progress Options IMPORTANT Observe the following precautions while the ACCESS indicator is on or flashing Failing to do so may result in permanent data loss Do not open the double memory card slot cover Do not disconnect the power source or turn off the camcorder Do not change the camcorder s operating mode When copying photos onto an Eye Fi card in memory card slot Y pho t...

Page 167: ...e is limited make sure to save your recordings on a computer on a regular basis Carefully read the information in SDXC Memory Cards 0 37 before performing the procedure using recordings made on an SDXC memory card Saving Movies With the supplied PIXELA s Transfer Utility or VideoBrowser you can save scenes to a computer running Windows operating system If necessary video files previously saved on ...

Page 168: ...successfully established USB Connection appears on the screen 5 Computer Depending on the software you chose to install Transfer Utility or VideoBrowser will start up automatically Transfer Utility Click Video file import to start transferring files For details about using the software click Help to open the Software Guide PDF file VideoBrowser Click in the menu panel to start transferring files F...

Page 169: ...ve the memory cards Do not access change or delete any of the camcorder s folders or files directly from the computer as this may result in permanent data loss Always save your movies on the computer and restore files to the camcorder using only the supplied PIXELA s software Observe the following precautions while the ACCESS indicator is on or flashing Failing to do so may result in permanent dat...

Page 170: ...Windows or Eject function Mac OS to end the connec tion to the camcorder Disconnect the USB cable set the camcorder to mode and restore the connection You can select multiple stories when saving movies When the story is saved to the computer all of the scenes in a single story will be joined into one movie Saving Movies onto Standard Definition Discs DVD You can use the supplied PIXELA s VideoBrow...

Page 171: ...Make sure the external device is compatible with the type of memory card used Connecting 1 Power the camcorder using the compact power adapter 2 Open the date index screen or gallery screen 3 Connect the camcorder to the digital video recorder using the supplied USB cable Connection D Refer to Connection Diagrams 0 112 4 Camcorder Select the memory that contains the scenes you want to copy Select ...

Page 172: ... blank media and set the device to record pause mode 2 Turn on the camcorder and set it to mode We recommend powering the camcorder using the compact power adapter Verify that 6 8 AV Headphones is set to H AV 3 Camcorder Locate the scene you wish to copy and pause the playback shortly just before the desired scene 4 Camcorder Resume playback By default onscreen displays will be embedded in the out...

Page 173: ...ectly from the camcorder Refer to Eye Fi s home page for the latest information on compatible Web sites Installation See the Installation Guide for PIXELA s software Using the software Refer to the Software Guide PDF file of the supplied software Converting Scenes into Standard Definition from the Date Index Screen You can convert scenes on a specific date scenes you select or all scenes You can c...

Page 174: ... and touch OK if you agree 6 Touch Next 8 START Before touching Next you can touch 5 to change the conversion settings as described below Before touching START you can add decorations or adjust the audio balance Touch to decorate the scene 0 97 or to adjust the audio balance 0 52 Touch STOP to interrupt the operation while it is in progress 7 When the conversion is completed a confirmation screen ...

Page 175: ...s based on their rating to standard definition You can check converted scenes using the u SD Movies index screen 0 54 1 Power the camcorder using the compact power adapter 2 Make sure there is a memory card in slot Y with sufficient available space 3 From the gallery screen select the story that contains the scenes to convert Drag your finger right left to bring the desired story to the front 4 To...

Page 176: ...ic track before conversion 0 138 the background music will be included in the converted scene You can even adjust the balance between the audio levels of the original sound and the background music The time required to convert scenes is approximately equal to the total playback time of the converted scenes In most cases this is still faster than converting the scenes in the computer so we recommen...

Page 177: ...dard definition Connecting to the Computer and Uploading your Videos If you are connecting the camcorder to the computer immediately after the conversion described in the previous section start this procedure from step 3 below Otherwise start this procedure from the beginning 1 Power the camcorder using the compact power adapter 2 Connect the camcorder to the computer using the supplied USB cable ...

Page 178: ...upplied with your Eye Fi card and completed all the required configuration setup in advance Refer to the instruction manual of the Eye Fi card Please read the IMPORTANT section 0 131 before using an Eye Fi card 1 Insert your Eye Fi card into memory card slot Y and make sure there is sufficient available space on the memory card 2 Convert the desired movies 0 125 When the conversion is completed to...

Page 179: ...d as incomplete uploads About power saving Wireless communication drains the power of the battery pack faster than usual We recommend powering the camcorder using the compact power adapter While files are being uploaded wirelessly the camcorder s automatic power off function will be disabled The Eye Fi card cannot wirelessly communicate with the network in the following cases Furthermore wireless ...

Page 180: ... refer ence page are explained after the tables Underlined menu options indicate default values FUNC Panel FUNC Panel Recording Modes Control Button Setting options Function 0 MENU Open the menus z 33 Rec Programs A Programmed AE z 61 D Cine Mode z 63 F Portrait G Sports q Night Scene I Snow J Beach K Sunset p Low Light L Spotlight M Fireworks z 61 Decoration Pens and Stamps Animated Stamps J Date...

Page 181: ... y Manual Audio Level Indicator Toggle on or off z 75 Image Stabilizer P Dynamic Q Standard j Off z 64 O Digital Effects For movies N Off 2 Black White 3 Sepia 0 Fade Trigger Once 6 Fade Trigger Always 1 Wipe Once 7 Wipe Always z 69 For photos N Off 2 Black White 3 Sepia z d Pre REC A On B Off z 65 Review Recording Play back the last 4 seconds of the last movie recorded z 58 Control Button Setting...

Page 182: ...emory card B 7 tab Control Button Date Index Screen SD Movies Index Screen Playback Pause 0 Copy f97 Copy 497 date Select All Scenes 116 Convert HDUSD f97 Convert HDUSD 497 date Select All Scenes 125 Delete date Select All Scenes This Scene All Scenes This Scene 56 Divide z 96 ...

Page 183: ... in Scene List Screen Playback Pause 0 Copy f97 1 Copy 497 1 by scene rating 116 Convert HDUSD f97 1 Convert HDUSD 497 1 by scene rating 125 Delete or d by scene rating This Scene This Scene 56 Delete Story 2 z 56 Move Story by scene rating 93 Copy z 92 Move z 92 Divide z 96 Rating unrated 87 Control Button Photo Index Screen Single Photo View 0 Copy f97 Copy 497 Select All Photos z 117 Delete Sel...

Page 184: ...g options 0 Zoom Type Optical Advanced Digital 47 Zoom Speed I Variable J Speed 3 K Speed 2 L Speed 1 47 Focus Assistance A On B Off Face Detection Tracking A On o B Off 66 Auto Backlight Correction A On B Off 71 Auto Slow Shutter A On B Off Flicker Reduction B Off 50 Hz 60 Hz Fader Setting Black Screen White Screen Onscreen Markers B Off e Level White f Level Gray g Grid White h Grid Gray Wind Sc...

Page 185: ...grammed AE Fader Setting You can select whether the fader fades in and out in black or white Onscreen Markers You can display a grid or a horizontal line at the cen ter of the screen Use the markers as a reference to make sure your sub ject is framed correctly vertically and or horizontally Using the onscreen markers will not affect the recordings Wind Screen The camcorder automatically reduces th...

Page 186: ...y the picture in full and in the correct aspect ratio F Normal TV TV sets with 4 3 aspect ratio G Wide TV TV sets with 16 9 aspect ratio When the TV type is set to F Normal TV during the playback of video originally recorded with an aspect ratio of 16 9 the picture will not be displayed fullscreen Menu item Setting options 1 2 0 Select Music B Off A On When A On list of music tracks and Music Bala...

Page 187: ...s f built in memory 4 memory card X 7 memory card Y Relay Recording B off f94 f9497 497 4 memory card X 7 memory card Y Relay Recording B off 497 z 39 Recording Mode h High Quality 24 Mbps i High Quality 17 Mbps j High Quality 12 Mbps l Standard Play 7 Mbps k Long Play 5 Mbps z 59 Frame Rate C 60i Standard o PF30 E PF24 z Rec Media for Photos f built in memory 4 memory card X 7 memory card Y 4 mem...

Page 188: ...n memory indicates actually usable space It may be slightly smaller than the nominal built in memory capacity listed in the Specifications x v Color Uses a color space with an extended gamut to achieve deeper colors closer to real life Use this function to record video only when you intend to play back your recordings on an HDTV compatible with x v Color connected to the camcorder using the suppli...

Page 189: ... a new memory card b Continuous Photo numbers will continue from the number following that of the last photo recorded with the camcorder If the memory card you insert already contains a photo with a larger number a new photo will be assigned a number one higher than that of the last photo on the memory card We recommend using the b Continuous setting The photo number indicates the name and locatio...

Page 190: ...ar Melayu Nederlands Norsk Polski Português Suomi Svenska Türkçe z z z 35 LCD Brightness z z z LCD Screen Dimmer A On B Off z z z LCD Mirror Image A On B Off z AV Headphones 1 H AV J Headphones z z z 77 Volume 1 Speaker r z z 52 77 Headphone e z z z Notification Sounds N High Volume M Low Volume B Off z z z Autostart Decoration 1 A On B Off z 97 Power Saving Mode Auto Power Off B Off A On z z z Qu...

Page 191: ... A 7 Mem Card B Complete Initialization Toggle on or off Time Zone DST S home time zone or V travel time zone New York list of world time zones U DST adjustment z z z 35 Date Time Date Time z z z 34 Date Format Y M D M D Y D M Y Y year M month D day 24H Toggle on 24 hour clock or off 12 hour clock Battery Info z z z Control for HDMI 2 A On B Off z z z HDMI 1080p Output 2 A On B Off z z z HDMI Stat...

Page 192: ... Mirror Image When set to A On the image on the screen is inverted horizontally when the LCD panel is rotated toward the lens While this option is set to A On and the LCD panel is rotated toward the lens you cannot decorate the screen with Decoration Notification Sounds A beep will accompany some operations like turn ing on the camcorder the self timer countdown etc Autostart Decoration When set t...

Page 193: ...s Depending on the TV set additional settings may be required on the TV itself to activate the HDMI CEC function Refer to the TV s instruction manual Correct operation of the HDMI CEC function cannot be guaranteed even when connecting the camcorder to compatible TV sets If you cannot use the remote control of the TV set Control for HDMI to B Off and operate the camcorder directly The remote contro...

Page 194: ... the camcorder is powered with the compact power adapter if you leave it turned on without a memory card for more than 5 minutes To cancel the demo mode once it has started press any button or turn off the camcorder Firmware You can verify the current version of the camcorder s firm ware This menu option is usually unavailable ...

Page 195: ...O mode 0 43 3 Onscreen zoom controls 0 48 4 Operating mode 0 30 5 In record pause mode Total number of scenes 6 Memory operation 0 151 7 Image stabilizer 0 64 8 Remaining battery time 0 151 9 Zoom 0 47 A q Recording mode 0 59 A a Headphone output 0 77 A s Control button Start Stop video recording A d Face detection frame 0 66 A f Touch Track frame 0 67 ...

Page 196: ...r 0 75 S a Control button Last function used ZOOM in this case S s x v Color 0 140 S d While recording during playback Scene counter hours minutes seconds S f Digital effect 0 69 S g PF24 progressive frame rate 0 60 S h Remaining recording time 4 7 On memory card X or Y f In the built in memory 3 5 Relay recording 0 40 only S j Tele macro 0 72 S k Microphone attenuator 0 137 S l Wind screen off 0 ...

Page 197: ...ory D g Displays the aperture f stop and shutter speed used D h Focus and exposure lock 0 43 107 Playing Movies during playback D j Playback control buttons 0 50 D k Control button Open the Edit panel 0 135 D l External audio input 0 84 F q Eye Fi wireless communication 0 130 F a Scene number F s Data code 0 87 138 F d Volume and music balance 0 50 F f Decoration 0 97 ...

Page 198: ...Information Viewing Photos F g Control button Open the setup menus 0 136 F h Current photo Total number of photos F j Photo number 0 141 F k Photo jump 0 104 F l Slideshow 0 109 G q Switch to Photos index screen 0 103 ...

Page 199: ...be indicated accurately When the camcorder is off press R to display the charge status of a battery pack The Intelligent System will display the charge status as a percentage and the remaining recording time in minutes for 5 seconds If the battery pack is exhausted the battery information may not be displayed S h Remaining recording time When there is no more free space on the memory f End built i...

Page 200: ...4 F let the battery pack cool down before charging it Charge the battery pack in temperatures between 0 C and 40 C 32 F and 104 F The battery pack is faulty Replace the battery pack The camcorder cannot communicate with the battery pack attached Such battery packs can not be charged using this camcorder This can occur when attaching and attempting to charge a battery pack that is not recom mended ...

Page 201: ...not work on the subject Focus manually 0 71 The lens is dirty Clean the lens with a soft lens cleaning cloth 0 170 Never use tissue paper to clean the lens When a subject flits across in front of the lens the image appears slightly bent This is a phenomenon typical of CMOS image sensors When a subject crosses very quickly in front of the camcorder the image may seem slightly warped This is not a m...

Page 202: ... large number of scenes some operations may take longer than usual Save your recordings 0 119 and initialize the memory 0 41 Cannot capture a video snapshot scene from a movie You cannot capture video snapshot scenes from scenes recorded or edited using another device The memory is full Delete some recordings 0 56 105 to free some space When playing back scenes slideshow with background music the ...

Page 203: ...rder Remove and reinsert the memory card Initialize the memory card if the display does not change back to normal The memory card is full Replace the memory card or delete some recordings 0 56 105 to free some space on the memory card Even after stopping recording the ACCESS indicator does not go off The scene is being recorded in the memory This is not a malfunction The red ON OFF CHG indicator f...

Page 204: ...l persists disconnect the power source and press the RESET button to reset all the camcorder s settings to default values Video noise appears on screen Keep a distance between the camcorder and devices that emit strong electromagnetic fields plasma TVs cellular phones etc Horizontal bands appear on the screen This is a phenomenon typical of CMOS image sensors when recording under some types of flu...

Page 205: ... the Eye Fi card into memory card slot X Insert it into memory card slot Y 68 Eye Fi Communication is set to Off i appears onscreen Set it to Auto matic Opening the LCD panel may help when the wireless connection is not strong enough If certain conditions occur while uploading files such as the wireless connection getting too weak the camcorder may stop the wireless upload h appears onscreen Move ...

Page 206: ...upplied HTC 100 S HDMI Cable but HDMI CEC does not work cannot play back using the TV s remote control Disconnect the HTC 100 S HDMI cable and turn off the camcorder and the TV After a short while turn them on again and restore the connection 68 Control for HDMI is set to Off Set it to On HDMI CEC is not activated on the connected TV Activate this function on the TV Even with TV sets compatible wi...

Page 207: ...y 0 41 Built in memory writing error Attempt recovering the data This message will appear the next time you turn on the camcorder if power supply was acci dentally interrupted while the camcorder was writing to the built in memory Select Recover to try to recover the recordings Cannot access the built in memory There is a problem with the built in memory Contact a Canon Service Center Cannot commu...

Page 208: ...e able to play back scenes recorded or edited using another device and were then written back to the built in memory If a memory card was recorded on with another device and then the LOCK switch was set to prevent writing gallery information cannot be accessed correctly so playback is not possible from the gallery screen Play back scenes from the date index screen or change the position of the LOC...

Page 209: ...ngs 0 119 and initialize the memory card using the Complete Initialization option 0 41 If the problem persists use a different memory card Cannot record movies in the built in memory Initialize only using the camcorder The camcorder s built in memory was initialized using a computer Initialize the built in mem ory with this camcorder 0 41 Cannot record movies on this memory card Movies cannot be r...

Page 210: ...rd Number of scenes already at maximum The memory card already contains the maximum number of scenes 3 999 scenes no fur ther scenes can be copied onto the memory card Delete some scenes 0 56 to free some space Mem Card Unable to recognize the data The memory card contains scenes recorded in a different television system PAL or SECAM Play back the recordings in the memory card with the device orig...

Page 211: ...e are no photos to play back Have fun taking some photos 0 43 58 No scenes There are no scenes in the memory selected Have fun shooting some video 0 43 Not enough available space Delete some recordings on the memory card 0 56 105 or select the 3 Mbps bit rate for the conversion to SD Number of scenes already at maximum The maximum number of scenes 3 999 scenes has been reached Delete some scenes 0...

Page 212: ...ating for the operation This memory card contains scenes Delete all scenes to use relay recording Save your movies 0 119 if necessary and delete all the movies from the memory card 0 56 This photo cannot be displayed You may not be able to display photos taken with other devices or image files created or edited on a computer This scene was recorded using another device and cannot be copied Scenes ...

Page 213: ... the computer to safely end the connection The camcorder cannot be operated while it is not being powered by the compact power adapter and is connected to a computer with the supplied USB cable In addition scenes can not be written back and music files cannot be transferred to the camcorder To avoid corrupt ing the data in the camcorder s memory use the computer s Safely Remove Hardware function t...

Page 214: ...protective film on the touch screen The touch screen s operation is based on detecting applied pressure so you may not be able to correctly operate the touch screen with an additional protective layer Do not leave the camcorder in places subject to high temperatures like the inside of a car parked under direct sunlight or high humidity Do not use the camcorder near strong electromagnetic fields su...

Page 215: ...extensive use of fast zooms and panning can result in jittery scenes In extreme cases the playback of such scenes may result in visually induced motion sickness If you expe rience such a reaction stop the playback immediately and take a rest break as necessary Long term storage If you do not intend to use the camcorder for a long time store it in a place free of dust in low humidity and at tempera...

Page 216: ...ks For your safety battery packs that are not genuine Canon battery packs will not be charged even if you attach them to this camcorder or to the optional CG 110 Battery Charger We recommend using genuine Canon battery packs bearing the Intelligent System mark If you attach to the camcorder battery packs that are not genuine Canon battery packs will appear and the remaining battery time will not b...

Page 217: ... camcorder however it will discharge completely if you do not use the camcorder for about 3 months To recharge the built in lithium battery Connect the compact power adapter to the camcorder and leave it connected for 24 hours with the camcorder off Disposal When you delete movies or initialize the memory only the file allocation table is altered and stored data is not physically erased Take the n...

Page 218: ...n the temper ature changes suddenly Wipe it with a soft dry cloth Condensation Moving the camcorder rapidly between hot and cold temperatures may cause condensation water droplets to form on its internal surfaces Stop using the camcorder if condensation is detected Continued use may damage the camcorder Condensation may form in the following cases When the camcorder is moved quickly from cold to w...

Page 219: ...wer supply between 100 and 240 V AC 50 60 Hz Consult a Canon Service Center for information on plug adapters for overseas use Playback on a TV Screen You can only play back your recordings on TVs compatible with the NTSC system NTSC is used in the following regions countries Americas All of North America and Central America most Caribbean islands except in French territories like Guadeloupe and Ma...

Page 220: ...in more detail in the following pages 1 SS 600 SS 650 Shoulder Strap A d HTC 100 HDMI Cable 2 WS 20 Wrist Strap HTC 100 S HDMI Cable 3 Stylus Pen A f DTC 100 D Terminal Cable 6 CA 110 Compact Power Adapter A g CTC 100 Component Cable A a IFC 300PCU S USB Cable A h STV 250N Stereo Video Cable A s Memory card TV HDTV Digital video recorder Computer Card reader writer AVCHD discs Photo DVDs Computer ...

Page 221: ...acks It plugs directly into a power outlet without a cable Charging Recording and Playback Times The charging times given in the following table are approximate and vary according to charging conditions and initial charge of the battery pack Use of genuine Canon accessories is recommended This product is designed to achieve excellent performance when used with genuine Canon accessories Canon shall...

Page 222: ...7 TL H34 II Tele converter This Tele converter lens increases the focal length of the camcorder lens by a factor of 1 5 The image stabilizer is not as effective when the Tele converter is attached The minimum focusing distance at full telephoto with the TL H34 II is 0 9 m 3 ft Usage time Recording mode MXP FXP XP SP LP Recording maximum 80 min 80 min 85 min 85 min 85 min Recording typical 50 min 5...

Page 223: ...ith padded compartments and plenty of space for accessories A q WM V1 Wireless Microphone Reliably record rich sound even when shooting subjects at a distance The microphone is conveniently equipped with a clothing clip and the receiver can be attached to the camcorder s grip belt This mark identifies genuine Canon video accessories When you use Canon video equipment we recommend Canon brand acces...

Page 224: ...ional Accessories CG 110 Battery Charger 5073B002AA TL H34 II Tele converter 5069B001AA WD H34 II Wide converter 5070B001AA WM V1 Wireless Microphone 5068B002AA HTC 100 HDMI Cable 2384B001AA CTC 100 Component Cable 1719B001AA IFC 300PCU USB Cable 6906A001AA SS 650 Shoulder Strap 3123A001AA SS 600 Shoulder Strap 3122A001AA WS 20 Wrist Strap 3118A002AA SC 2000 Soft Carrying Case 9389A001AA ...

Page 225: ... memory 32 GB 8 GB SD SDHC SD High Capacity or SDXC SD eXtended Capacity memory card not included Maximum Recording Time 32 GB built in memory MXP mode 2 hr 55 min FXP mode 4 hr 10 min XP mode 5 hr 45 min SP mode 9 hr 35 min LP mode 12 hr 15 min 8 GB built in memory MXP mode 40 min FXP mode 1 hr XP mode 1 hr 25 min SP mode 2 hr 20 min LP mode 3 hr Commercially available 16 GB memory card MXP mode ...

Page 226: ... Manual focus Filter Diameter 34 mm Minimum Focusing Distance 1 m 3 3 ft 1 cm 0 39 in at full wide angle 40 cm 1 3 ft at full telephoto when tele macro is on White Balance Auto white balance Custom white balance or Preset white balance settings Daylight Tungsten Minimum Illumination 0 4 lx Low Light recording program Shutter speed at 1 2 5 lx Programmed AE recording program Shutter speed at 1 30 A...

Page 227: ...nce PB PR CB CR 350 mV 75 Ω 1080i D3 compatible output only HDMI OUT Terminal HDMI mini connector output only compatible with HDMI CEC and x v Color MIC Terminal 3 5 mm stereo minijack 57 dBV with 600 Ω microphone 5 kΩ or more Power Others Power supply rated 3 7 V DC battery pack 5 3 V DC compact power adapter Power consumption 2 5 W SP mode AF on LCD normal brightness Operating temperature 0 40 C...

Page 228: ... oz BP 110 Battery Pack Battery type Rechargeable lithium ion battery compatible with Intelligent System Rated voltage 3 7 V DC Operating temperature 0 40 C 32 104 F Battery capacity 1 120 mAh typical 3 9 Wh 1 050 mAh minimum Dimensions 33 x 10 x 51 mm 1 3 x 0 39 x 2 0 in Weight 28 g 0 99 oz Weight and dimensions are approximate Errors and omissions excepted The information in this manual is verif...

Page 229: ...ion The specification of the image files for the image mix function com patible with the camcorder are as follows Size 1920x1080 File type Baseline JPEG Color sampling 4 2 2 4 2 0 The music data WAV and image files JPG are saved in the mem ory under the following folder structure In the built in memory CANON MY_MUSIC MUSIC_01 WAV to MUSIC_99 WAV MUSIC_01 WAV to MUSIC_99 WAV CANON PRIVATE MY_MUSIC ...

Page 230: ...MPONENT OUT terminal 111 113 Condensation 170 Connections to external devices 112 Converting scenes to standard definition 125 Copying Movies 116 Photos 117 D Data code 87 138 Date and time 34 Decorating scenes 97 Deleting Movies 56 90 Photos 105 Digital effects 69 Dividing scenes 96 Drag touch operation 29 E Edit panel 32 134 Error messages 159 External microphone 79 Eye Fi card 130 F Face detect...

Page 231: ...07 Recording mode 59 Recording programs 61 63 Recording time 60 Relay recording 40 Reviewing recordings 58 S Saving recordings 116 Creating discs 122 Transferring to a computer 119 Using external video recorders 123 Selecting the memory for playback 54 for recording 39 Self timer 74 Setup menus 33 136 Slideshow 109 Smart AUTO mode 44 Snow recording program 62 Sports recording program 62 Spotlight ...

Page 232: ...184 Additional Information V Video snapshot 68 Volume 52 77 W White balance 73 Wide angle 47 Wind screen 137 Z Zoom 47 ...

Page 233: ...ive Canon USA shall have no responsibility under this limited warranty for use of the Equipment in conjunction with incompatible peripheral equipment and incompatible software In order to obtain warranty service contact the authorized Canon retail dealer from whom you purchased the Equipment or call the CANON INFORMATION CENTER AT 1 800 OK CANON You will be directed to the nearest service facility...

Page 234: ...D CAUSING THE ALLEGED DAMAGE WITHOUT LIMITING THE FOREGOING YOU ASSUME ALL RISK AND LIABILITY FOR LOSS DAMAGE OR INJURY TO YOU AND YOUR PROPERTY AND TO OTHERS AND THEIR PROPERTY ARISING OUT OF USE MISUSE OR INABILITY TO USE THE EQUIPMENT NOT CAUSED DIRECTLY BY THE NEGLIGENCE OF CANON USA SOME STATES DO NOT ALLOW THE EXCLUSION OR LIMITATION OF INCIDENTAL OR CONSEQUENTIAL DAMAGES SO THE ABOVE LIMITA...

Page 235: ... finish of the Equipment media nor does it apply to Equipment purchased outside Canada If the Equipment contains a hard disk drive Canon Canada recommends that data stored on that drive be duplicated or backed up to prevent its loss in the event of a failure or other malfunction of such drive TO OBTAIN WARRANTY SERVICE Ship your Equipment in its original carton box or equivalent properly packed fu...

Page 236: ...52 2666 Si vous avez des questions veuillez téléphoner 1 800 OK CANON 1 800 652 2666 sans frais au Canada seulement MÉXICO CANON MEXICANA S DE RL DE CV Blvd Manuel Ávila Camacho No 138 Piso 17 Col Lomas de Chapultepec C P 11000 México D F México CANON U S A INC NEW JERSEY OFFICE 100 Jamesburg Road Jamesburg NJ 08831 USA CENTRO Y CANON LATIN AMERICA INC SURAMÉRICA 703 Waterford Way Suite 400 Miami ...

Page 237: ......

Page 238: ... page Check also the VideoBrowser or Transfer Utility Software Guide a PDF file in the Manual English folder of the respective software CD ROM See What you can do with Transfer Utility or What you can do with VideoBrowser for available options and System requirements for the system requirements before deciding which software to install Adobe Reader 6 or later is required to view the PDF file Insta...

Page 239: ...sly saved movies back to the camcorder or to a memory card Transfer music files background music to amemory card Organize your video files by date or event Edit movies Create discs from your movies Convert movies to other formats for example to take them with you on your portable media player Play back discs created with VideoBrowser En 05 The icons on the left correspond to the buttons on VideoBr...

Page 240: ...r only the 12 digits Enter only the 12 digits back view VIXIA HF 830 I Ii SI I 1 2 3 4 5 6 7 8 9 0 1 2 bottom view VIXIA HF M40 HF M400 En 06 VIXIA HF 830 only Enter the serial number starting with the top row of 4 digits as 12 digits with no spaces or hyphens In the case of the example shown in the illustration enter the serial number as 012345678901 ...

Page 241: ...sh Europe United Kingdom Oeutschland France Espana 800 i 532 4865 toll free gebuhrenfrei numero vert appel gratuit lIamanda gratuita English Deutsch Fran ais Espanol Otber ountries in Europe 44 489 564 764 19 English Deutsch Fran ais Espariol Italiano Nederlands Asia Philippines 63 2 438 0090 I English China III 10800 163 0014 I5jI rt J3t PUB DIM 0987 000 CANON INC 2011 PRINTED IN CHINA IMPRIME EN...

Page 242: ......

Page 243: ......

Page 244: ......

Page 245: ...AL ASSISTANCE Register Now Register Your Camcorder Now And Receive Exclusive Benefits From Canon Includes Registration Information for USA and Canadian Residents For service and technical assistance on this product please call1 800 0K CANON 1 800 652 2666 or log onto www usa canon com support There is no charge to register for the benefits offered Product registration and benefits are limited to u...

Page 246: ...scope maintenant Rendez vous sur www canon ca enregistrement ou composez Ie 1 800 0K Canon 1 800 652 2666 PROFITEZ DES AVANTAGES DE L ENREGISTREMENT DE VOTRE PRODUIT Soyez informe automatiquement des mises aniveau de pilotes micrologiciels et logiciels Recevez des renseignements actualises sur les produits et les promotions de Canon Canada Inc Vous faites partie de nos clients privilegies Ace titr...

Page 247: ...nservez Ies dans vos dossiers Conservez certe carte de garantie avec votre facture La garantie s appliquedans Ie pays ou Ieproduitaete achete VeuiUez lire attentivement toute information portant sur la garantie Cette information se trouve dans Ie guide de I utilisateur I MODEL I SERIAL NO Date of Purchase MODELE N DE SERlE Date d achat Dealer s Name Nom de marchand Address Adresse Model DIGITAL VI...

Page 248: ...or French at www canon ca francais cs E mail support also available Telephone assistance from a Canon Canada Customer Care representative free of charge during regular business hours at 1 800 0K CANON 1 800 652 2666 Canon Canada Vous pouvez obtenir du soutien technique pour vos produits comme suit Soutien technique en anglais sur Internet awww canon ca english cs soutien par courriel egalement dis...

Reviews: