Step
Action
Information
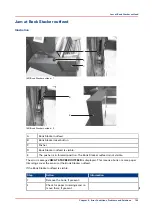
3
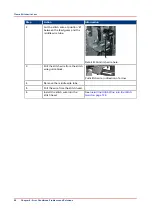
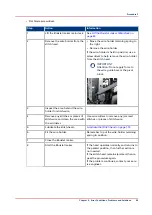
Loosen the trimmer infeed convey-
or.
The procedure can be seen from the top
of the machine.
Access to the parts is through the for-
mer-clamp mechanism.
Hold the shaft and push to the right,
against spring pressure to disengage the
shaft from the drive pin.
Lift the left hand end clear.
4
Remove the book, if one is found.
5
Remove any paper offcuts from the
trimmer infeed conveyor.
Look down through the former clamp.
Small pieces of paper trimmings can
cover the jam sensor and cause an error
message.
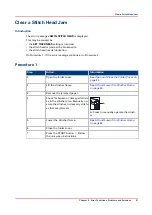
6
Fit the trimmer infeed conveyor.
Look down through the former clamp.
• Insert the right hand end of the shaft
into the bearing, against the spring
pressure.
• Rotate the trimmer infeed conveyor,
so that the green belts are vertical.
• Insert the left-hand end, so that the
shaft engages with the drive pin.
7
Fit the trim bin.
8
Close the Booklet maker main deck
and covers.
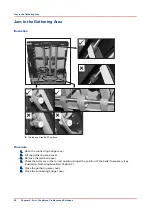
Jam before the Trimmer
92
Chapter 6 - Error Conditions, Problems and Solutions
Summary of Contents for Oce BLM550+
Page 1: ...Operation guide Océ BLM550 ...
Page 5: ...Chapter 1 Preface ...
Page 8: ...Notes for the reader 8 Chapter 1 Preface ...
Page 9: ...Chapter 2 Introduction to the Booklet maker ...
Page 17: ...Chapter 3 How to run the Booklet maker ...
Page 26: ...Run the job 26 Chapter 3 How to run the Booklet maker ...
Page 27: ...Chapter 4 The User Interface ...
Page 40: ...The MENU Window 40 Chapter 4 The User Interface ...
Page 41: ...Chapter 5 Standard Tasks ...
Page 59: ...Chapter 6 Error Conditions Problems and Solutions ...
Page 109: ...Chapter 7 Maintenance ...
Page 131: ...Appendix A Specifications ...
Page 134: ...Specifications 134 Appendix A Specifications ...
Page 135: ...Appendix B Declaration of Conformity ...
Page 137: ......


