35
2
Printing from the Multi-Purpose Tray
4
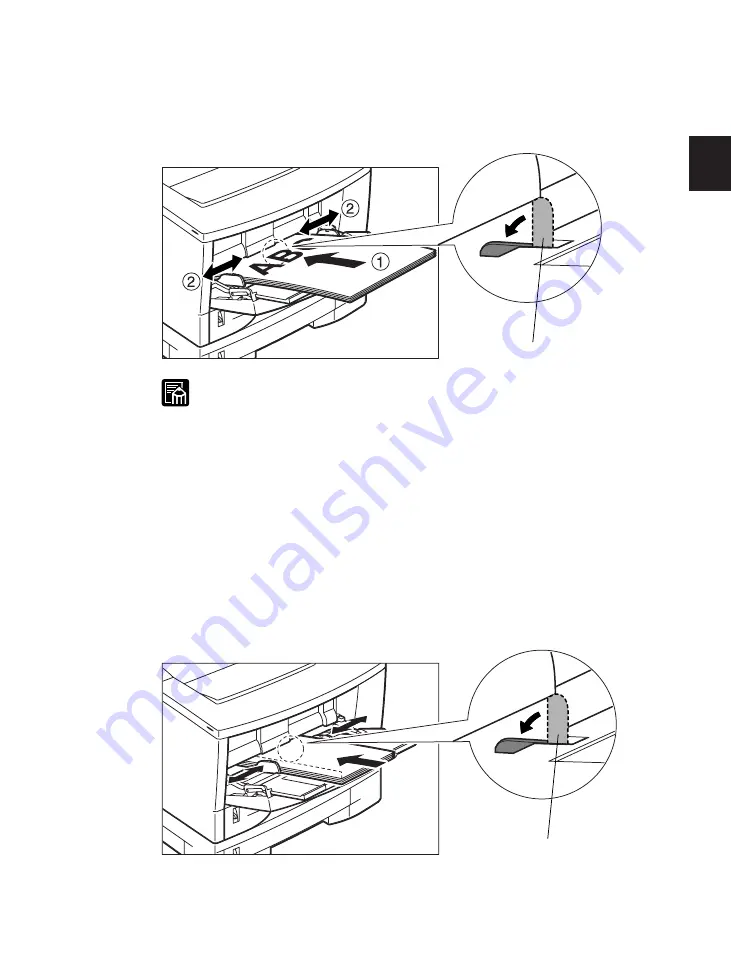
Insert the paper stack as far as it will go into the printer, with the print side facing up
and the top of the paper going into the printer first
q
. Adjust the paper guides to the
size of the paper
w
.
Paper sensor
• Make sure that the leading edge of the paper is inserted all the way into the
tray so that it is below the paper feed roller. The paper sensor for the tray
is located underneath the paper feed roller. Please note the following points
when loading small size paper in the tray. (If the paper is not loaded
correctly, the paper will not be detected by the printer and a message will
appear asking you to load paper in the tray.)
• Make sure that the paper guides are set correctly.
• Make sure that the paper is loaded correctly and that the leading edge is
fully inserted into the printer.
• Always insert paper into the Multi-Purpose tray with the side you want to
print on facing up and with the top as the leading edge. To avoid misfeeds
and paper jams, paper should be inserted into the tray with the narrow side
as the leading edge.
• Make sure that the paper sensor is push down by the paper. (The paper
sensor must be under the paper, not just touching the edge of the paper.)
Paper sensor
5
To avoid damaging the tray, close it when not in use. Remove and store any remaining
print media. Slide the extension trays in and close the tray.
Summary of Contents for LBP-1000
Page 86: ...78 MEMO ...
Page 95: ...87 4 q e w r y t i u o 2 1 0 Printing a Test Print Test print sample ...
Page 99: ...91 4 Printing the Font Lists PCL Font List sample q w e r t y u i o 0 1 ...
Page 102: ...94 MEMO ...
Page 110: ...102 Setting PostScript Printing Options Demo print start page t r q w e ...
Page 112: ...104 Setting PostScript Printing Options PS Font List ...
Page 114: ...106 MEMO ...
Page 167: ...159 Appendix 1 Typeface Samples PostScript option font samples ...
Page 168: ...160 Appendix 1 Typeface Samples ...
Page 172: ...164 Appendix 2 Symbol Sets Supported Fig A2 1 Roman 8 R8 Fig A2 2 ISO 8859 1 Latin 1 ...
Page 173: ...165 Appendix 2 Symbol Sets Supported Fig A2 3 ISO 8859 2 Latin 2 Fig A2 4 ISO 8859 9 Latin 5 ...
Page 175: ...167 Appendix 2 Symbol Sets Supported Fig A2 7 PC 850 Multilingual PM Fig A2 8 PC 852 Latin 2 ...
Page 176: ...168 Appendix 2 Symbol Sets Supported Fig A2 9 PC Turkish Fig A2 10 Windows Latin 1 ...
Page 177: ...169 Appendix 2 Symbol Sets Supported Fig A2 11 Windows Latin 2 Fig A2 12 Windows Latin 5 ...
Page 178: ...170 Appendix 2 Symbol Sets Supported Fig A2 13 Desk Top Fig A2 14 PS Text ...
Page 182: ...174 Appendix 2 Symbol Sets Supported Fig A2 21 PiFont Fig A2 22 Legal ...
Page 188: ...180 Appendix 2 Symbol Sets Supported Fig A2 33 PC 8 Greek Fig A2 34 OCR A PC 8GR PC 8L ...
Page 189: ...181 Appendix 2 Symbol Sets Supported Fig A2 35 OCR B Fig A2 36 3 of 9 Barcode ...
Page 190: ...182 Appendix 2 Symbol Sets Supported Fig A2 37 UPC EAN Barcode Fig A2 38 Code 128 Barcode ...
Page 191: ...183 Appendix 2 Symbol Sets Supported Fig A2 39 Interleaved 2 of 5 Barcode ...


