Canon L240 User Manual Download Page 20

2-6

Setting Up

Chapter 2

Making Connections

Connecting the Telephone Line Cord and External 
Devices

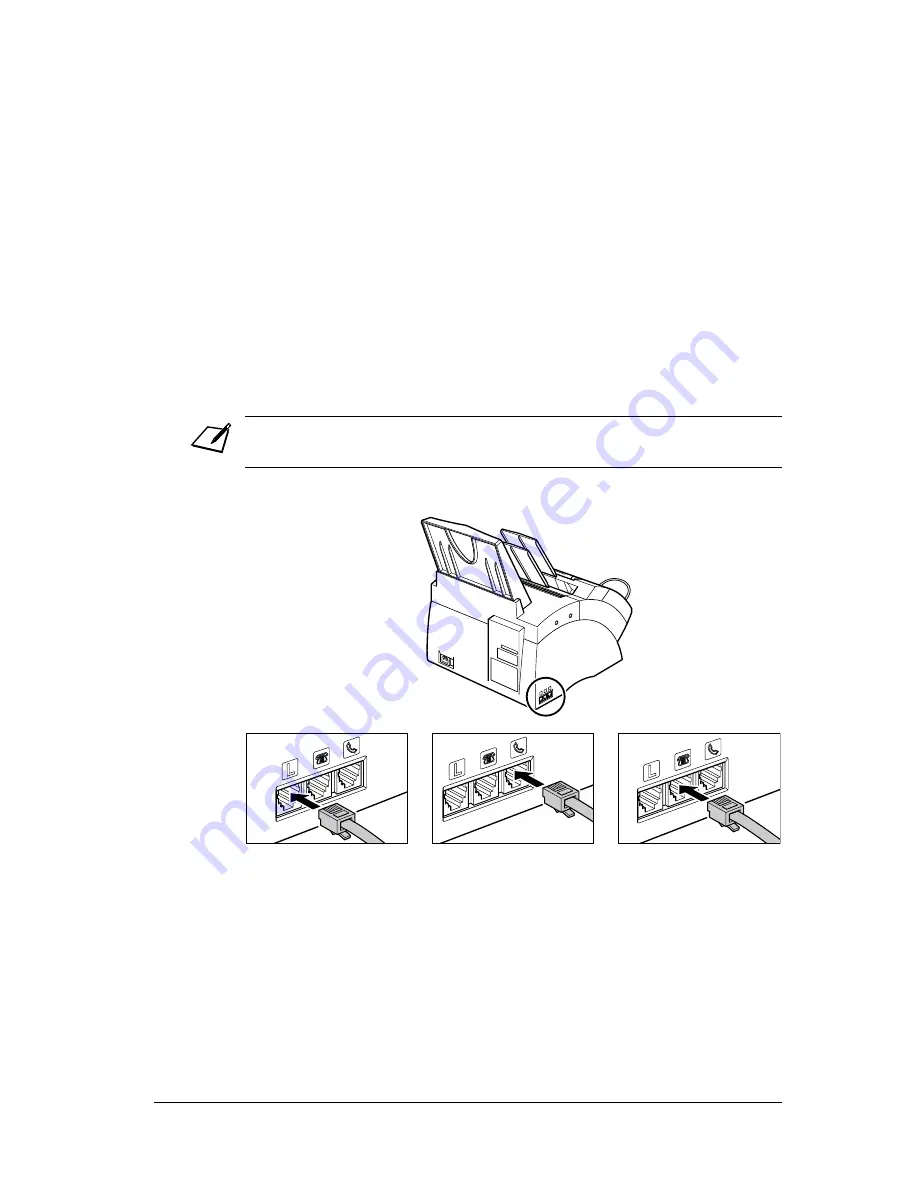
Your FAX has three jacks on the side for connection of the following:

Telephone line cord

Optional handset or telephone

Additional telephone, answering machine, or data modem

If you only have one telephone line and plan to use your FAX for receiving both faxes 
and voice calls, you will need to connect the optional handset, a telephone, or an 
answering machine to your unit.

Follow this procedure to connect the telephone line cord and external device(s):

Note

Be sure to connect any external device before using your FAX.

1

Connect the supplied 
telephone line cord to 
the 

L jack, then the 

other end to the 
telephone line jack on 
your wall.

2

Connect the optional 
handset or telephone 
cord to the 

h jack.

3

Connect the additional 
telephone, answering 
machine, or data modem 
cord to the 

t jack.

Summary of Contents for L240

Page 1: ...FAX L240 L290 User s Guide ...

Page 2: ...emarks or service marks of their respective owners This equipment conforms with the essential requirements of EC Directive 1999 5 EC We declare that this product conforms with the EMC requirements of EC Directive 1999 5 EC at nominal mains input 230V 50Hz although the rated input of the product is 200 240V 50 60Hz If you move to another EU country and are experiencing trouble please call the Canon...

Page 3: ...r This fax is classified as a Class 1 Laser Product under EN 60825 1 1994 200 240 V model The label shown below is attached to the laser scan unit on the fax This fax has been classified under EN60825 1 1994 and conforms to the following classes CLASS 1 LASER PRODUCT LASER KLASSE 1 APPAREIL A RAYONNEMENT LASER DE CLASSE 1 APPARECCHIO LASER DI CLASSE 1 PRODUCTO LASER DE CLASE 1 APARELHO A LASER DE ...

Page 4: ... Special Function Buttons 2 12 Installing the Toner Cartridge 2 13 Loading Paper 2 16 Testing the FAX 2 18 Chapter 3 Registering Information Guidelines for Entering Numbers Letters and Symbols 3 2 Correcting a Mistake 3 4 Registering Sender Information 3 5 What is Sender Information 3 5 Entering the Date and Time 3 6 Registering Your FAX Number and Name 3 6 Setting the Telephone Line Type 3 8 Dial...

Page 5: ... Dialling Lists 6 18 Chapter 7 Sending Faxes Preparing to Send a Fax 7 2 Documents You Can Fax 7 2 Setting the Scanning Resolution 7 2 Setting the Scanning Contrast 7 3 Dialling Methods 7 4 Sending Methods 7 5 Memory Sending 7 5 Manual Sending Via the Handset 7 6 Cancelling Sending 7 8 Redialling When the Line is Busy 7 9 Manual Redialling 7 9 Cancelling Manual Redialling 7 9 Automatic Redialling ...

Page 6: ...8 11 Chapter 9 Special Features Special Dialling 9 2 Entering Pauses in a Fax Telephone Number 9 2 Switching Temporarily to Tone Dialling 9 3 Confirming a Dial Tone 9 4 Dialling Through a Switchboard 9 4 Documents Stored in Memory 9 5 Printing a List of Documents Stored in Memory 9 5 Printing a Document Stored in Memory 9 6 Sending a Document Stored in Memory 9 7 Deleting a Document Stored in Memo...

Page 7: ...X s Exterior 12 2 Cleaning the FAX s Interior 12 3 Cleaning the Scanner Components 12 5 Replacing the Toner Cartridge 12 7 Chapter 13 Troubleshooting Clearing Jams 13 2 Jams in the ADF 13 2 Paper Jams 13 3 Jams in the Paper Delivery Slots 13 3 Jams Inside the Unit 13 3 LCD Messages 13 8 Paper Feeding Problems 13 13 Faxing Problems 13 13 Sending Problems 13 13 Receiving Problems 13 15 Copying Probl...

Page 8: ...dix A Specifications General Specifications A 2 Facsimile A 2 Copier A 3 Telephone A 3 Printer A 3 Appendix B FAX L290 Instructions Introduction B 2 Differences Between the FAX L290 and FAX L240 B 2 Using Your Documentation B 2 Unpacking the FAX L290 B 2 Connecting the FAX L290 to Your PC B 3 Print Media Requirements B 4 Printable Area B 4 Selecting Print Media B 5 Loading Envelopes B 6 Loading Tr...

Page 9: ...1 1 Introduction Chapter 1 Introduction Chapter 1 Introduction Type Conventions Used in This Guide 1 2 Customer Support 1 3 Important Safety Instructions 1 4 ...

Page 10: ...o set up or change A menu has a title which appears in the LCD TX RX NO Transaction number When you send or receive a document your FAX automatically assigns the document a unique transaction number A transaction number is a four digit number that will help you keep track of documents you send and receive TX Denotes Sending RX Denotes Receiving Ex Example of a message or setting displayed in the L...

Page 11: ...on in the LCD appears in this typeface USER SETTINGS Customer Support Your FAX is designed with the latest technology to provide trouble free operation If you encounter a problem with the unit s operation try to solve it by using the information in Chapter 13 If you cannot solve the problem or if you think your FAX needs servicing contact your local authorised Canon dealer or the Canon help line ...

Page 12: ...r openings on the FAX since they may touch dangerous voltage points or short out parts This could result in fire or electric shock Do not allow small objects such as pins paper clips or staples to fall into the FAX If something does fall into it unplug the unit immediately and contact your local authorised Canon dealer or the Canon help line To avoid spillage in or around the unit do not eat or dr...

Page 13: ...reme temperature changes and always stays between 10 and 32 5 C Make sure the area s relative humidity is always between 20 and 80 Keep the FAX away from direct sunlight as this can damage it If you have to place it near a window install heavy curtains or blinds Do not use the FAX near water Make sure that no wet or humid objects come into contact with the unit Do not use or store the FAX outdoors...

Page 14: ... unit where the cord will be walked on Make sure the cord is not knotted or kinked Power Supply During electrical storms disconnect the power cord from the power outlet Please note that any documents stored in the FAX s memory will be deleted when you unplug the unit Whenever you unplug the FAX wait at least five seconds before you plug it in again Do not plug the FAX into an uninterruptible power...

Page 15: ...g the FAX 2 5 Making Connections 2 6 Connecting the Telephone Line Cord and External Devices 2 6 Connecting the Power Cord 2 8 Setting the Language and Country 2 9 Main Components of the FAX 2 11 Operation Panel 2 12 Special Function Buttons 2 12 Installing the Toner Cartridge 2 13 Loading Paper 2 16 Testing the FAX 2 18 ...

Page 16: ...rton and packaging in case you need to transport the FAX in the future Make sure you have the following items POWER CORD TELEPHONE LINE CORD DOCUMENTATION PAPER LOADING WARNING LABEL DESTINATION LABELS Note The actual items may differ in shape and quantity from the one shown above Please note that the items included with your FAX may vary depending on the country of purchase MAIN UNIT FX 3 TONER C...

Page 17: ...ssing notify your local authorised Canon dealer or the Canon help line immediately Note Important Save your sales receipt for proof of purchase in case your unit requires warranty service If you have purchased the optional handset see Appendix C for the items included ...

Page 18: ...he future Note The actual shipping materials may differ in shape quantity and position from the ones shown above 1 Remove all shipping tapes from the FAX 2 Use both hands to gently open the operation panel it only opens partially Then remove the protective sheet from the ADF Close the operation panel by pressing it down from the centre until it locks into place ...

Page 19: ...to the left of the multi purpose tray 2 Insert the tabs on the paper rest into the slots on the unit 3 Slide the multi purpose tray cover over the paper rest 6 Insert the tabs on the othersupport tray into the corresponding slots above the ADF 5 Insert the tabs on one of the support trays into the correspondingslotsabove the face down dilivery slot 4 Insert the ends of the document support into th...

Page 20: ...receiving both faxes and voice calls you will need to connect the optional handset a telephone or an answering machine to your unit Follow this procedure to connect the telephone line cord and external device s Note Be sure to connect any external device before using your FAX 1 Connect the supplied telephone line cord to the Ljack then the other end to the telephone line jack on your wall 2 Connec...

Page 21: ...FAX be sure to set the correct receive mode Chapter 8 To connect an additional telephone as well as an answering machine connect the additional telephone to the answering machine and then the answering machine to your FAX If you connect a data modem to your FAX and you use it extensively or others access your PC frequently through the data modem you may want a dedicated telephone line for your dat...

Page 22: ...hird grounding pin This plug will only fit into a grounding type outlet This is a safety feature If you are unable to insert the plug into your outlet contact an electrician to replace the outlet Do not defeat the safety purpose of the grounding type plug by breaking off the third prong or using a 3 to 2 adaptor Do not plug the FAX into the same circuit as an appliance such as an air conditioner e...

Page 23: ...is procedure to set the language and country After connecting the power cord the display changes from to If COUNTRY SELECT does not appear after DATA ENTRY OK in step 3 If COUNTRY SELECT appears after DATA ENTRY OK in step 3 1 Press Set 2 Press or to select the preferred language for the LCD display 3 Press Set The FAX enters standby mode 4 Press Set 5 Press or to select the country where you are ...

Page 24: ...try these setting menus will not appear next time you connect the power cord 6 Press Set The FAX enters standby mode Note To check the settings made by the country selection you can print the p 14 2 You can change the language or country setting using the menu p 14 10 Ex ...

Page 25: ...LIVERY SLOT DOCUMENT GUIDES ADF AUTOMATIC DOCUMENT FEEDER OPERATION PANEL PAPER DELIVERY SELECTOR PAPER REST PAPER GUIDES MULTI PURPOSE TRAY LATCH FRONT COVER FACE UP DELIVERY SLOT DOCUMENT SUPPORT FX 3 TONER CARTRIDGE COMPARTMENT PAPER RELEASE LEVER TRANSFER CHARGING ROLLER DO NOT TOUCH FIXING ASSEMBLY FRONT COVER ...

Page 26: ... Redial Pause Button pp 7 9 9 2 Stop Button p 14 3 Numeric Buttons p 3 2 One Touch Speed Dialling Buttons pp 6 2 6 16 6 17 One Touch Speed Dial Panel Open the one touch speed dial panel to expose the special function buttons below SUPER Receive Mode Resolution Set R Coded Dial Redial Pause 21 22 23 24 Data Registration Button p 14 3 Delayed Transmission Button pp 7 14 7 16 7 17 Report Button pp 6 ...

Page 27: ...pen the bag until you are ready to install the toner cartridge in the unit Save the toner cartridge s protective bag in case you need to repack and transport the toner cartridge at a later date Do not store the toner cartridge in a salty atmosphere or where there are corrosive gases such as from aerosol sprays Do not remove the toner cartridge from the FAX unnecessarily Do not open the drum protec...

Page 28: ...ner cartridge from its protective bag Save the protective bag in case you need to repack the toner cartridge at a later date 4 Gently rock the toner cartridge from side to side a few times to distribute the toner evenly inside it Poor print quality may result if the toner is unequally distributed Caution Do not open the front cover without lifting the latch since this may damage your unit ...

Page 29: ...seal Use a firm even pull to avoid breaking the seal 6 Hold the toner cartridge by its handle and insert it into the FAX as far as it will go making sure that its tabs are aligned with the rails inside the unit Always hold the toner cartridge by its handle 7 Use both hands to close the front cover SIDE VIEW PULLWITHIN THIS RANGE PULLWITHIN THIS RANGE TOP VIEW ...

Page 30: ...per To prevent paper jams remove paper from this slot before the count reaches 50 Do not load paper while the FAX is printing Do not leave paper stacked in the multi purpose tray for long periods of time since it may bend or curl and cause problems Certain environmental conditions such as extreme temperatures or humidity can cause some paper to misfeed in the multi purpose tray If you have trouble...

Page 31: ...ay cover from the FAX 2 Prepare a stack of paper by tapping it on a flat surface to even its edges 3 Open the paper guides to the approximate width of the stack 4 Insert the stack into the multi purpose tray print side facing you and top edge first then adjust the paper guides to the width of the paper Make sure there are no gaps between the paper guides and the paper stack 1 2 2 ...

Page 32: ...ridge and loaded paper you can make sure the FAX is printing properly by making several copies of a document p 10 2 If you have problems printing see Chapter 13 5 Replace the multi purpose tray cover Be sure to replace this cover to prevent dust accumulating inside the unit 6 Adjust the paper delivery selector if necessary p 5 4 ...

Page 33: ...umbers Letters and Symbols 3 2 Correcting a Mistake 3 4 Registering Sender Information 3 5 What is Sender Information 3 5 Entering the Date and Time 3 6 Registering Your FAX Number and Name 3 6 Setting the Telephone Line Type 3 8 Dialling Through a Switchboard 3 9 Registering the R Button 3 9 Setting the Summer Time 3 11 ...

Page 34: ...r number refer to the table below to determine which numeric button to press for the character you want Note If you pause for more than 60 seconds between entering data the unit will automatically return to standby mode Button Uppercase Letter Mode A Lowercase Letter Mode a Number Mode 1 Uppercase Letter Mode A Lowercase Letter Mode a Number Mode 1 ...

Page 35: ...etters it contains If you are unsure which button to press for the letter you want see p 3 2 3 Continue entering other letters using the numeric buttons If the next letter you want to enter is under a different numeric button simply press that button until the letter you want appears or If the next letter you want to enter is under the same numeric button you pressed in step 2 press 2to move the c...

Page 36: ...g the numeric buttons Entering Symbols 1 Press repeatedly until the symbol you want appears 2 If you want to enter another symbol press 2to move the cursor to the right then press repeatedly until the symbol you want appears 1 Use Oor Pto move the cursor under the incorrect character 2 Press the numeric button that contains the correct letter to enter it over the incorrect character If you are uns...

Page 37: ...u send a fax the other party knows who sent it and when it was sent Below is an example of how your sender information would print on a fax sent from your unit To enter the sender information in your FAX follow the procedures on the following pages Date and time of transmission You can select if or is displayed before the number p 14 4 Your fax or telephone number Your name or company name Receive...

Page 38: ...r the correct day month year and time in this order Enter only the last two digits of the year Use the 24 hour format for the time e g 1 00 p m as 13 00 and precede single digits with a zero If you make a mistake press Clear and re enter the date and time 5 Press Set 6 Press Stop to return to standby mode 1 Open the one touch speed dial panel 2 Press Data Registration 3 Press Set twice DATA REGSTR...

Page 39: ...mistake press Clear and re enter the number 7 Press Set twice 8 Use the numeric buttons to enter your name or company name max 24 characters including spaces If you are unsure how to enter characters see p 3 2 If you make a mistake press Clear and re enter the name 9 Press Set 10 Press Stop to return to standby mode Note To check the sender information registered in your FAX you can print the USER...

Page 40: ...lephone line type setting 1 Open the one touch speed dial panel 2 Press Data Registration 3 Press Set twice 4 Use Nor Mto select TEL LINE TYPE 5 Press Set 6 Use Nor Mto select the telephone line type setting you want You can select from the following ROTARY PULSE For pulse dialling TOUCH TONE For tone dialling 7 Press Set 8 Press Stop to return to standby mode DATA REGSTRATION USER SETTINGS DATE T...

Page 41: ...ter the PBX access type and the outside line access number under the R button so that you only need to press this button before dialling the fax telephone number you want to reach See below for details Registering the R Button Follow this procedure to register the PBX access type and outside line access number under the R button 1 Open the one touch speed dial panel 2 Press Data Registration 3 Pre...

Page 42: ...ress Set 10 Press Stop to return to standby mode If you selected PREFIX in step 8 9 Press Set 10 Use the numeric buttons to enter the outside line access number max 19 digits 11 Press Redial Pause to enter a pause 12 Press Set 13 Press Stop to return to standby mode Ex Ex Ex Ex ...

Page 43: ...r time system and set the day and time when the summer time begins and ends 1 Open the one touch speed dial panel 2 Press Data Registration 3 Press Set 4 Use Nor Mto select 5 Press Set 6 Use Nor Mto select 7 Press Set 8 Use Nor Mto select the setting you want You can select from the following Enables the summer time Disables the summer time If you selected OFF in step 8 9 Press Set 10 Press Stop t...

Page 44: ...er time starts You can select from the following fourth or fifth week depending on the selected month 13 Press Set twice 14 Use Nor Mto select the day of the week on which the summer time starts 15 Press Set twice 16 Use the numeric buttons to enter the time at which the summer time compensation is made Use the 24 hour format for the time e g 2 00 p m as 14 00 and precede single digits with a zero...

Page 45: ...stering Information 17 Press Set three times 18 Use Nor Mand Set to select the month week day of the week and time when the summer time ends as in steps 10 to 16 for the settings e g and 19 Press Set 20 Press Stop to return to standby mode Ex Ex ...

Page 46: ...3 14 Registering Information Chapter 3 ...

Page 47: ...4 1 Document Handling Chapter 4 Document Handling Chapter 4 Document Handling Document Requirements 4 2 Scanned Area of a Document 4 2 Loading Documents 4 3 Adding Pages to the Document in the ADF 4 4 ...

Page 48: ...sending a document that you have printed from your FAX be sure to use face down delivery when printing that document p 5 4 Scanned Area of a Document One page document Multipage document of the same thickness and weight Size W u L Max 216 mm u Approx 1 m Min 148 u 105 mm Max 216 355 6 mm Min 148 u 105 mm Quantity 1 sheet Max 30 A4 or letter size sheets Max 10 legal size sheets Thickness 0 06 to 0 ...

Page 49: ...front edge is bevelled and insert the stack in the ADF 1 Adjust the document guides to the width of the document 2 Gently insert the top of the document face down in the ADF until you hear a beep Tap multipage documents on a flat surface to even the edges before inserting them in the ADF Note For a multipage document the pages are fed one by one from the bottom of the stack Wait until all pages of...

Page 50: ...g Pages to the Document in the ADF If you need to add pages to your document in the ADF wait until the last page starts feeding then load up to 30 additional pages 10 legal size The last and first page should overlap by about 2 5 cm 2 5 cm ...

Page 51: ...g Chapter 5 Paper Handling Paper Requirements 5 2 Printable Area 5 3 Selecting Paper for Your FAX 5 3 Loading Paper 5 3 Selecting Face Up or Face Down Paper Delivery 5 4 Changing the Paper Size Setting 5 7 Adjusting the Toner Saver Setting 5 9 ...

Page 52: ...per delivery is set correctly for the task you are performing p 5 4 Check that you have loaded the paper correctly in the multi purpose tray p 2 16 Paper Size Setting Size W K L Weight Quantity Min 92 4 K 127 mm Max 216 K 356 mm 64 90 g m2 1 sheet 64 105 g m2 Max stack height 10 mm Approx 100 sheets of 75 g m2 paper A4 210 K 297 mm 8 27 K 11 69 in LTR Letter 215 9 K 279 4 mm 8 5 K 1 in LGL Legal 2...

Page 53: ...arge quantities Store all paper wrapped and on a flat surface until ready to use Keep opened packs in their original packaging in a cool dry location Store paper at 18 24 C 40 60 relative humidity Loading Paper For instructions on loading paper in the multi purpose tray see p 2 16 Wrinkled or creased paper Curled or rolled paper Coated paper Torn paper Damp paper Onion skin or very thin paper High...

Page 54: ...rforming First the paper travels to the toner cartridge where a laser beam draws the print image on the drum which in turn applies toner to the paper The paper travels to the fixing assembly where the toner is fixed fused to the paper The paper then exits the FAX through the face up delivery slot front of the unit or the face down delivery slot top of the unit FACE DOWN DELIVERY FACE UP DELIVERY P...

Page 55: ... of paper To prevent paper jams remove paper from this slot before the count reaches 50 Make sure there is enough room for the paper to exit from the face up delivery slot Remove each sheet as it is delivered from this slot Never pull the paper as it comes out of the unit Choose paper delivery according to the task you are performing Select face up or face down delivery with the paper delivery sel...

Page 56: ...when copying or receiving a large number of pages In this case place the FAX near the edge of a table so that the pages can fall away from the unit and avoid blocking the face up delivery slot You may want to place a box below the FAX so that the pages can collect in it ...

Page 57: ... 1 Open the one touch speed dial panel 2 Press Data Registration 3 Press Set 4 Use or to select 5 Press Set 6 Use or to select 7 Press Set 8 Use or to select the paper size you want for the multi purpose tray You can select from the following Default For details on the paper sizes above see p 5 2 0 If you selected A4 LTR or LGL in step 8 9 Press Set 10 Press Stop to return to standby mode If you s...

Page 58: ...andling Chapter 5 10 Use or to select the custom paper size setting You can select from the following Default For details on the paper sizes above see p 5 2 11 Press Set 12 Press Stop to return to standby mode Ex ...

Page 59: ...to enable or disable the toner saver setting Note By enabling this setting print quality will be reduced For highest print quality disable this setting 1 Open the one touch speed dial panel 2 Press Data Registration 3 Press Set 4 Use or to select 5 Press Set 6 Use or to select 7 Press Set 8 Use or to select the setting you want You can select from the following Enable toner saving Disable toner sa...

Page 60: ...5 10 Paper Handling Chapter 5 ...

Page 61: ...6 2 Speed Dialling Methods 6 2 Registering One Touch Speed Dialling 6 3 Registering Coded Speed Dialling 6 8 Registering Group Dialling 6 13 Using Speed Dialling 6 16 Sending a Document With Speed Dialling 6 16 Making a Telephone Call With Speed Dialling 6 17 Printing Speed Dialling Lists 6 18 ...

Page 62: ...thods Your FAX offers the following speed dialling methods One Touch Speed Dialling p 6 3 Register a fax telephone number under a one touch speed dialling button so that you only have to press one button to dial that fax telephone number There are 24 one touch speed dialling buttons available for you to register fax telephone numbers Coded Speed Dialling p 6 8 Register a fax telephone number under...

Page 63: ...fax if you use memory sending p 7 5 set the transmission type for the fax number you have registered You can set a subaddress and or password if the other party s fax machine requires these settings Follow this procedure to register one touch speed dialling 1 Open the one touch speed dial panel 2 Press Data Registration 3 Use or to select TEL REGISTRATION 4 Press Set twice 5 Use or to select the o...

Page 64: ...e the entire number To cancel one touch speed dialling for the button you selected press Clear then Set Press Stop to return to standby mode The fax telephone number and name registered under that button will be deleted If you have already registered a number that you want to keep ignore this step 8 Press Set twice 9 Use the numeric buttons to enter a name for the one touch speed dialling button m...

Page 65: ...ss Stop to return to standby mode or To register the transmission type for the current button you are registering continue with the steps below 12 Press Set 13 Use or to select 14 Press Set twice 15 Use or to select the transmission type setting you want You can select from the following Normal transmission Choose this setting if you previously set and no longer want to send with this setting Tran...

Page 66: ...ou also need to register a subaddress password when polling a fax machine that requires these settings p 9 10 Continue with the steps below to register a subaddress password If you selected in step 15 16 Press Set 17 Press Stop to return to standby mode 16 Press Set twice 17 If a subaddress is required use the numeric buttons to enter it If a subaddress is not required ignore this step If you have...

Page 67: ... from step 5 or Press Stop to return to standby mode Note Use the destination labels provided with your FAX to label the one touch speed dialling buttons Stick the labels above each corresponding button To check your entries you can print a list of all the numbers and names registered for one touch speed dialling p 6 18 05 Ex 15 00 FaxOnly Ex ...

Page 68: ...ission type for the fax number you have registered You can set a subaddress and or password if the other party s fax machine requires these settings Follow this procedure to register coded speed dialling 1 Open the one touch speed dial panel 2 Press Data Registration 3 Use or to select TEL REGISTRATION 4 Press Set 5 Use or to select CODED SPEED DIAL 6 Press Set 7 Use or to select the coded speed d...

Page 69: ...vely press Clear to delete the entire number To cancel coded speed dialling for the code you selected press Clear then Set Press Stop to return to standby mode The fax telephone number and the name registered under that code will be deleted If you have already registered a number that you want to keep ignore this step 10 Press Set twice 11 Use the numeric buttons to enter a name for the coded spee...

Page 70: ... to return to standby mode or To register the transmission type for the current code you are registering continue with the steps below 14 Press Set 15 Use or to select 16 Press Set twice 17 Use or to select the transmission type setting you want You can select from the following Normal transmission Choose this setting if you previously set and no longer want to send with this setting Transmission ...

Page 71: ... using You also need to register a subaddress password when polling a fax machine that requires these settings p 9 10 Continue with the steps below to register a subaddress password If you selected in step 17 18 Press Set 19 Press Stop to return to standby mode 18 Press Set twice 19 If a subaddress is required use the numeric buttons to enter it If a subaddress is not required ignore this step If ...

Page 72: ...g codes repeat the procedure from step 7 or Press Stop to return to standby mode Note To check your entries you can print a list of all the numbers and names registered for coded speed dialling p 6 18 You may want to keep this list near your FAX to refer to it when dialling 02 Ex 15 00 FaxOnly Ex ...

Page 73: ...d dialling i e you cannot enter the fax numbers with the numeric buttons register a name for the group This name appears in speed dialling lists Follow this procedure to register group dialling 1 Open the one touch speed dial panel 2 Press Data Registration 3 Use or to select TEL REGISTRATION 4 Press Set 5 Use or to select GROUP DIAL 6 Press Set 7 Select a one touch speed dialling button or coded ...

Page 74: ...assigned to the number s you want to register in the group To enter a fax number registered for coded speed dialling Press Coded Dial then use the numeric buttons to enter the two digit code assigned to the number you want to register in the group Repeat for other codes The number registered under the button or code you enter appears You can also enter groups registered under buttons or codes In t...

Page 75: ...ress Set twice 11 Use the numeric buttons to enter a name for the group max 16 characters including spaces If you are unsure how to enter characters see p 3 2 If you have already registered a name that you want to keep ignore this step 12 Press Set 13 To continue registering other groups repeat the procedure from step 7 or Press Stop to return to standby mode Note If you registered groups under on...

Page 76: ... send or delete any documents you no longer need to be stored in memory p 9 5 2 Enter the one touch speed dialling button or coded speed dialling code assigned to the fax number or group you want to send to One touch speed dialling button Press the one touch speed dialling button you want Coded speed dialling code Press Coded Dial then use the numeric buttons to enter the two digit code you want I...

Page 77: ...elephone number you want to dial One touch speed dialling button Press the one touch speed dialling button you want Coded speed dialling code Press Coded Dial then use the numeric buttons to enter the two digit code you want If you make a mistake press Hook or hang up the handset and start again from step 2 NO TEL appears if no fax telephone number is assigned to the speed dialling button or code ...

Page 78: ...pages 1 Open the one touch speed dial panel 2 Press Report 3 Use or to select SPEED DIAL LIST 4 Press Set 5 Use or to select the list you want to print You can select from the following 1 TOUCH LIST CODED DIAL LIST 1 TOUCH DETAIL CODED DETAIL GROUP DIAL LIST 6 Press Set The FAX prints the list 6 Press Set 7 Select in what order you want the lists to be printed Press 6 to print the list with the de...

Page 79: ...D 1 TOUCH SPD DIAL LIST 2 01 CONNECTION TEL 905 795 1111 CONNECTION ID Canon CANADA TX TYPE REGULAR TX 03 CONNECTION TEL GROUP DIAL CONNECTION ID GROUP 2 04 CONNECTION TEL 2 50921 CONNECTION ID Canon ITALIA TX TYPE REGULAR TX 05 CONNECTION TEL 1 432 2060 CONNECTION ID Canon OPTICS TX TYPE PSWD SUBADD SUBADDRESS 1323 12 CONNECTION TEL 2 887 0166 CONNECTION ID Canon AUSTRALIA TX TYPE REGULAR TX 27 1...

Page 80: ...Canon DEUTSCH TX TYPE REGULAR TX 01 CONNECTION TEL 03 3758 2111 CONNECTION ID Canon TOKYO TX TYPE REGULAR TX 02 CONNECTION TEL 1 49 39 25 25 CONNECTION ID Canon FRANCE TX TYPE REGULAR TX 03 CONNECTION TEL 516p488 6700 CONNECTION ID Canon U S A TX TYPE REGULAR TX 21 CONNECTION TEL GROUP DIAL CONNECTION ID Canon GROUP 1 32 CONNECTION TEL 81 773 3173 CONNECTION ID Canon UK TX TYPE PSWD SUBADD SUBADDR...

Page 81: ... LIST 27 12 2002 17 23 FAX 123 4567 CANON 001 GROUP DIAL LIST 03 Canon GROUP 2 04 2 50921 Canon ITALIA 00 2131 1250 Canon DEUTSCH 02 1 49 39 25 25 Canon FRANCE 32 81 773 3173 Canon UK 21 Canon GROUP 1 01 905 795 1111 Canon CANADA 03 516p488 6700 Canon U S A ...

Page 82: ...6 22 Speed Dialling Chapter 6 ...

Page 83: ...nding 7 8 Redialling When the Line is Busy 7 9 Manual Redialling 7 9 Cancelling Manual Redialling 7 9 Automatic Redialling 7 9 What is Automatic Redialling 7 9 Cancelling Automatic Redialling 7 9 Setting the Options for Automatic Redialling 7 10 Sending the Same Document to Several Fax Numbers Sequential Broadcasting 7 12 Delayed Sending 7 14 Scanning a Document into Memory for Delayed Sending 7 1...

Page 84: ... scanned However please note that the new setting will only be effective from the next page scanned Follow this procedure to set the scanning resolution 1 Press Resolution to select the resolution setting you want You can select from the following FAX STANDARD Suitable for most text only documents FAX FINE Suitable for fine print documents FAX PHOTO Suitable for documents that contain images such ...

Page 85: ...nding and copying 1 Open the one touch speed dial panel 2 Press Data Registration 3 Press Set twice 4 Use or to select SCAN CONTRAST 5 Press Set 6 Use or to select the scanning contrast you want You can select from the following STANDARD Adequate for most documents DARKER Suitable for light documents LIGHTER Suitable for dark documents 7 Press Set 8 Press Stop to return to standby mode DATA REGSTR...

Page 86: ...peed dialling button 01 to 24 assigned to the fax number For details on registering and using one touch speed dialling see pp 6 3 6 16 Coded Speed Dialling Dial a fax number by pressing Coded Dial and entering the two digit code 00 to 99 assigned to the fax number For details on registering and using coded speed dialling see pp 6 8 6 16 Group Dialling Send a document to a predefined group of fax n...

Page 87: ...mately 256 pages fewer if the document contains many graphics or particularly dense text Follow this procedure to send a document using memory sending 1 Load the document face down in the ADF p 4 3 To adjust the resolution and contrast see pp 7 2 7 3 You may be unable to send if the memory used shown in the LCD is close to Use manual sending via the handset instead p 7 6 2 Dial the other party s f...

Page 88: ... 14 6 To cancel sending once dialling has started press Stop then T p 7 8 If the number you are calling is busy the FAX redials the number automatically after a few minutes p 7 9 Note You can register up to 20 different sending operations for memory sending The document is automatically deleted from memory after sending This occurs even if an error prevents complete transmission of the document No...

Page 89: ... will hear the other party s voice but they will not be able to hear you through the speaker Pick up the handset to talk to the other party 6 When you are ready to send your document ask the other party to press the start button on their fax machine 7 When you hear the high pitched signal of the other party s fax machine press Start Copy and hang up to begin sending the document Note If using the ...

Page 90: ...ROR TX REPORT p 11 4 1 Press Stop The FAX asks you to confirm that you want to cancel sending 2 Press 6 to cancel sending Sending is not cancelled until you press 6 If you change your mind and want to continue sending press To cancel transmission of a document waiting to be sent e g delayed sending between rediallings you will have to delete it from memory pp 7 17 9 9 The FAX prints an ERROR TX RE...

Page 91: ...o redial when AUTO REDIAL and the transaction number TX RX NO are displayed in the LCD The automatic redialling options allow you to customise the number of times the FAX redials as well as the time interval between redials You can also disable automatic redialling if you prefer the FAX not to do so If all automatic redialling attempts are unsuccessful the FAX cancels the transmission and prints a...

Page 92: ...ptions 2 Press Stop The FAX asks you to confirm that you want to cancel automatic redialling 3 Press 6 to cancel redialling Redialling is not cancelled until you press 6 If you change your mind and want to continue redialling press The FAX prints an ERROR TX REPORT p 11 4 1 Open the one touch speed dial panel 2 Press Data Registration 3 Press Set 4 Use or to select TX SETTINGS 5 Press Set 6 Use or...

Page 93: ... 9 Press Set 10 Press Stop to return to standby mode 9 Press Set twice 10 Use the numeric buttons to enter the number of times you want the FAX to redial You can select from 1 to 10 times 11 Press Set twice 12 Use the numeric buttons to enter the time interval between redials You can select from 2 to 99 minutes 13 Press Set 14 Press Stop to return to standby mode Ex Ex Ex Ex Ex Ex The selectable v...

Page 94: ...x numbers Note If you frequently send documents to the same group of fax numbers you can register these numbers for group dialling instead This will simplify dialling p 6 13 1 Load the document face down in the ADF p 4 3 To adjust the resolution and contrast see pp 7 2 7 3 You may be unable to send if the memory used shown in the LCD is close to To free up space in the FAX s memory print send or d...

Page 95: ...atically The FAX will first send the document to the one touch speed dialling destinations then the coded speed dialling destinations and finally to the destination dialled using regular dialling If you do not want the FAX to begin scanning automatically after a few seconds disable the TIME OUT setting p 14 6 To cancel sending once dialling has started press Stop then 6 Sending to all destinations...

Page 96: ...delayed sending correctly make sure the correct time is set on your FAX p 3 6 1 Load the document face down in the ADF p 4 3 To adjust the resolution and contrast see pp 7 2 7 3 You may be unable to scan if the memory used shown in the LCD is close to To free up space in the FAX s memory print send or delete any documents you no longer need to be stored in memory p 9 5 2 Open the one touch speed d...

Page 97: ...enter the correct destination When you have entered multiple fax numbers use or to scroll through the numbers to review the destinations 8 Press Start Copy to begin scanning the document into the FAX s memory When the preset time is reached the FAX sends the document to the destination s you specified in step 7 Note You can register up to 20 different delayed sending operations If the FAX s memory...

Page 98: ...or to select the transaction number of the document you want to print If you are unsure of the transaction number print the DOC MEMORY LIST p 9 5 A before the transaction number indicates that that document is being sent at that moment and can therefore not be selected Use Oor Pto display details of the transaction e g destination 6 Press Set 7 Press 6to print the first page only or press to print...

Page 99: ...MORY LIST p 9 5 A before the transaction number TX RX NO indicates that that document is being sent at that moment If you want to delete a document being sent follow the instructions in the LCD Use Oor Pto display details of the transaction e g destination 6 Press Set 7 Press 6to delete the document If you change your mind and want to keep the document in memory for delayed sending press 8 To cont...

Page 100: ...7 18 Sending Faxes Chapter 7 ...

Page 101: ...Tel Mode 8 5 Setting Fax Tel Mode 8 5 Setting the Options for Fax Tel Mode 8 6 Receiving Faxes Manually MANUAL MODE 8 8 Setting MANUAL MODE 8 8 Receiving a Fax Manually 8 8 Receiving With an Answering Machine ANS MACHINE MODE 8 10 Setting ANS MACHINE MODE 8 10 Using the FAX With an Answering Machine 8 10 Receiving While Performing Other Tasks 8 11 Receiving Faxes in Memory When a Problem Occurs 8 ...

Page 102: ...xes automatically and disconnects voice calls Separate telephone line for fax use only p 8 3 Fax Tel Mode Fax Tel The FAX automatically switches between fax and voice calls It receives faxes automatically and rings for voice calls Optional handset or telephone connected to the FAX p 8 5 MANUAL MODE Tel The FAX rings for every call whether a fax call or a voice call For a fax call you have to manua...

Page 103: ...de follow this procedure to set this mode 1 Press Receive Mode to select FAX ONLY MODE After a few seconds the LCD changes to this display 1 Open the one touch speed dial panel 2 Press Data Registration 3 Press Set 4 Use or to select RX SETTINGS 5 Press Set 6 Use or to select RX MODE 7 Press Set 8 Use or to select FAX ONLY MODE 9 Press Set 10 Press Stop to return to standby mode 15 00 FaxOnly FAX ...

Page 104: ...isplayed press Receive Mode to select FAX ONLY MODE After a few seconds the LCD returns to standby mode Note The FAX does not ring when it receives a fax call If you want to be alerted when a fax call is received connect the optional handset or a telephone to the FAX and enable the INCOMING RING setting p 14 7 You can also select the number of rings before the FAX answers RING COUNT p 14 7 15 00 F...

Page 105: ...de Note For this mode you need to connect the optional handset or a telephone to your FAX p 2 6 1 Open the one touch speed dial panel 2 Press Data Registration 3 Press Set 4 Use or to select 5 Press Set 6 Use or to select 7 Press Set 8 Use or to select 9 Press Set To set the options for Fax Tel Mode see the following pages 10 Press Stop to return to standby mode 11 Confirm that FaxTel is displayed...

Page 106: ...ll it responds according to the type of call as follows Type of call Telephone charges begin for the caller The FAX answers without ringing The document is received automatically Pick up the handset to talk The fax tone is detected and the FAX switches to receive mode The fax disconnects the call 4 18 Default setting Choose between default setting and Telephone Fax Fax The FAX starts ringing If yo...

Page 107: ... can select from 10 to 60 seconds See the previous page for details on this setting 6 Press Set twice 7 Use or to select the DEFAULT ACTION setting you want You can select from the following RECEIVE Switch to receive mode DISCONNECT Disconnect the call See the previous page for details on this setting 8 Press Set 9 Press Stop to return to standby mode RING START TIME 8SEC Ex 9SEC Ex 22SEC F T RING...

Page 108: ...ne is located away from your unit you can dial the remote receiving ID on the telephone to activate reception this is called Remote reception Setting MANUAL MODE Follow this procedure to set the receive mode to MANUAL MODE Receiving a Fax Manually Follow this procedure to receive a fax manually 1 Press Receive Mode to select MANUAL MODE After a few seconds the LCD changes to this display 1 Make su...

Page 109: ...f using the handset be sure to hang up after you press Start Copy on the FAX otherwise the call will be disconnected The FAX will alert you by beeping if the handset is not hung up properly Make sure the handset is seated properly in its cradle If you do not want the FAX to beep disable the OFFHOOK ALARM setting p 14 4 If you cannot activate reception from the telephone check that the REMOTE RXset...

Page 110: ...guidelines when using the FAX with an answering machine Set the answering machine to answer on the first or second ring When recording the outgoing message on the answering machine the entire message must be no longer than 15 seconds in the message tell your callers how to send a fax For example Hello I can t answer the phone right now but please leave a message after the beep If you would like to...

Page 111: ...nation of the message s and details on the action to take see p 13 8 Cancelling Receiving Follow this procedure if you want to stop receiving a fax before reception is completed Note The FAX s memory can store up to approximately 256 pages You can set the unit so that it does not store faxes in memory if a problem occurs during reception p 14 7 Once the problem is solved and the unit prints the re...

Page 112: ...8 12 Receiving Faxes Chapter 8 ...

Page 113: ...inting a Document Stored in Memory 9 6 Sending a Document Stored in Memory 9 7 Deleting a Document Stored in Memory 9 9 Polling 9 10 What is Polling 9 10 Polling Receiving 9 10 Polling Another Fax Machine 9 10 Cancelling Polling Receiving 9 12 Polling Sending 9 12 Setting Up the Polling Box 9 12 Scanning a Document into the Polling Box 9 15 Changing or Deleting the Polling Box Settings 9 15 Restri...

Page 114: ...er the number up to where a pause is necessary If you enter the wrong number press Clear then enter the correct number 2 Press Redial Pause to enter a pause A pause entered within a number p is two seconds long For a longer pause press Redial Pause again for another two second pause Alternatively you can change the length of the pause MID PAUSE SET p 14 6 3 Continue entering the rest of the fax te...

Page 115: ...the telephone number of the information service The FAX connects using the pulses required by your telephone line 3 When the recorded message of the information service answers press T 6 to switch to tone dialling When T 6 is pressed T is displayed in the LCD If you pressed Hook in step 1 you can pick up the handset if you need to talk to the other party 4 Use the numeric buttons to enter the numb...

Page 116: ...h a switchboard see p 3 9 1 When you come to the step that requires you to enter the fax telephone number use the numeric buttons to enter the number up to where dial tone detection is required 2 Open the one touch speed dial panel and press D T for dial tone detection A small dot indicates where the FAX will wait for the dial tone 3 Continue entering the rest of the fax telephone number with the ...

Page 117: ...number of a document in memory you can print it send it or delete it These procedures are described on the following pages Follow this procedure to print a list of documents stored in memory 1 Open the one touch speed dial panel 2 Press Memory Reference 3 Press Set The FAX prints the DOC MEMORY LIST DOC MEMORY LIST PRINTING REPORT 27 12 2002 21 53 FAX 123 4567 CANON 001 DOC MEMORY LIST TX RX NO MO...

Page 118: ... transaction number of the document you want to print If you are unsure of the transaction number print the DOC MEMORY LIST p 9 5 A before the transaction number indicates that that document is being sent at that moment and can therefore not be selected Use Oor Pto display details of the transaction e g destination 6 Press Set 7 Press 6to print the first page only or press to print all pages of th...

Page 119: ...MEMORY LIST p 9 5 A before the transaction number indicates that that document is being sent or printed at that moment and can therefore not be selected Use Oor Pto display details of the transaction e g destination 6 Press Set 7 Enter up to 125 fax numbers you want to send to using any of the following methods One touch speed dialling Press the one touch speed dialling button s you want Coded spe...

Page 120: ...Note If you enter a wrong destination press Clear then enter the correct destination To review the destinations entered use Nor Mto scroll through the numbers 8 Press Set to begin sending To cancel sending once dialling has started press Stop then 6 Sending to all the destinations you specified in step 7 will be cancelled You cannot cancel only one destination Ex ...

Page 121: ...that document is being sent at that moment If you want to delete a document being sent follow the instructions in the LCD Use Oor Pto display details of the transaction e g destination 6 Press Set If you are deleting a document stored in the polling box p 9 12 enter the password that restricts access to the polling box settings then press Set 7 Press 6to delete the document If you change your mind...

Page 122: ...the transmission cost of receiving a document Polling Another Fax Machine Before polling another fax machine be sure to read the following The FAX can only poll fax machines that support polling The document you want to retrieve must be ready to be polled on the other party s fax machine If necessary call the other party to check Call the other party and check if you require a subaddress and or pa...

Page 123: ...two digit code you want Repeat for other codes Be sure to press Coded Dial before each code Regular dialling Use the numeric buttons to enter the fax number you want then press Set You can only enter one fax number this way Note If you enter a wrong destination press Clear then enter the correct destination You cannot enter a subaddress password with regular dialling If you need to enter a subaddr...

Page 124: ... section explains how to set up the FAX s polling box so that you can scan a document into it for other fax machines to retrieve it Before setting up the polling box be sure to read the following You can set an ITU T standard password for the polling box to restrict being polled only by fax machines that have this exact password see the instructions that follow Make sure you contact the other part...

Page 125: ...ssword prevents unauthorised access to the polling box settings You will need to enter this password whenever you want to change or delete the polling box settings If you do not want to enter a password ignore this step 9 Press Set twice 10 Use the numeric buttons to enter a password max 20 digits including and spaces The fax machine s that will be polling your FAX must have this password register...

Page 126: ...Nor Mto select if the document remains in the FAX s memory after it is polled You can select from the following The document in the polling box is deleted after it is retrieved by one fax machine The document in the polling box remains in the polling box so that it can be retrieved by an unlimited number of fax machines 13 Press Set 14 Press Stop to return to standby mode Ex Ex ...

Page 127: ...re to change or delete the polling box settings Note You need to set up the polling box before you can scan a document into the polling box p 9 12 1 Load the document face down in the ADF p 4 3 To adjust the resolution and contrast see pp 7 2 7 3 You may be unable to scan if the memory used shown in the LCD is close to To free up space in the FAX s memory print send or delete any documents you no ...

Page 128: ...f you want to delete the polling box settings 7 Press Set If you registered a password to prevent unauthorised access to the polling box settings use the numeric buttons to enter it then press Set 8 Press Set 9 To change the polling box settings follow the procedure from step 6 on p 9 13 7 Press Set If you registered a password to prevent unauthorised access to the polling box settings use the num...

Page 129: ...o enable restriction of your FAX 1 Open the one touch speed dial panel 2 Press Data Registration 3 Press Set 4 Use Nor Mto select 5 Press Set three times 6 Use Nor Mto select 7 Press Set twice 8 Use the numeric buttons to enter a four digit password This password prevents unauthorised access to the setting that enables or disables restriction of your FAX If you do not want to enter a password igno...

Page 130: ... this procedure to cancel restriction of your FAX 10 Press Stop to return to standby mode 1 Open the one touch speed dial panel 2 Press Data Registration 3 Press Set 4 Use Nor Mto select 5 Press Set twice 6 Use the numeric buttons to enter the four digit password you registered when you enabled restriction If you did not register a password ignore this step 7 Press Set twice 8 Use Nor Mto select E...

Page 131: ...9 19 Special Features Chapter 9 Special Features Restriction of your FAX is now disabled Anyone can make calls or send faxes 9 Press Set 10 Press Stop to return to standby mode PASSWORD 15 00 FaxOnly Ex ...

Page 132: ...selected ON in step 8 1 Open the one touch speed dial panel 2 Press Data Registration 3 Press Set 4 Use Nor Mto select 5 Press Set 6 Use Nor Mto select 7 Press Set 8 Use Nor Mto select the setting you want You can select from the following Enable restriction Disable restriction 9 Press Set twice 10 Use Nor Mto select the restriction type setting you want You can select from the following To allow ...

Page 133: ... Chapter 9 Special Features If you selected OFF in step 8 11 Press Set 12 Press Stop to return to the standby mode 9 Press Set 10 Press Stop to return to standby mode DATE SETUP 15 00 FaxOnly Ex DATE SETUP 15 00 FaxOnly Ex ...

Page 134: ...9 22 Special Features Chapter 9 ...

Page 135: ...10 1 Copying Chapter 10 Copying Chapter 10 Copying Documents You Can Copy 10 2 Making Copies 10 2 Making a Quick Single Copy 10 3 ...

Page 136: ...d the document face down in the ADF p 4 3 To adjust the contrast see p 7 3 3 Press Start Copy 4 Press Resolution to select the resolution setting you want You can select from the following Suitable for most text documents Suitable for documents that contain photographs 5 Open the one touch speed dial panel 6 To make a reduced copy of your document use or to select the reduction percentage you want...

Page 137: ... press Stop You may then need to open the operation panel to remove the document from the ADF p 13 2 Note You will be unable to make multiple copies if MEMORY FULL appears in the LCD Print send or delete any documents stored in memory to free up space in the FAX s memory p 9 5 then start again Also if you are copying multiple pages with many graphics separate the pages into smaller stacks or make ...

Page 138: ...10 4 Copying Chapter 10 ...

Page 139: ...s and Lists Chapter 11 Reports and Lists Chapter 11 Reports and Lists Summary of Reports and Lists 11 2 ACTIVITY REPORT 11 3 TX Transmission REPORT 11 4 MULTI TX RX Transaction REPORT 11 5 RX Reception REPORT 11 5 ...

Page 140: ...port to remind you of the contents of the document p 11 4 p 14 5 RX Reception REPORT Prints after reception of a document You can enable or disable this feature or set the FAX to print a report only when an error occurs p 11 5 p 14 5 MULTI TX RX Transaction REPORT Prints after sending the same document to several fax numbers or after polling multiple fax numbers in one operation p 11 5 DOC MEMORY ...

Page 141: ...27 12 13 43 905 795 1111 Canon CANADA 5001 AUTO RX ECM 1 OK 00 33 27 12 13 45 905 795 1111 Canon CANADA 0001 POLLING RX ECM 0 OK 00 00 0 STOP 27 12 13 51 03 3758 2111 Canon TOKYO 0002 B CAST ECM 3 OK 01 18 27 12 13 53 2 887 0166 Canon AUSTRALIA 0002 B CAST ECM 3 OK 01 18 27 12 14 10 905 795 1111 Canon CANADA 5002 AUTO RX ECM 1 OK 00 18 27 12 14 16 2 887 0166 Canon AUSTRALIA 5003 AUTO RX ECM 4 OK 0...

Page 142: ...ISSION OK TX RX NO CONNECTION TEL SUBADDRESS 0003 1 432 2060 TX RX NO CONNECTION TEL SUBADDRESS CONNECTION ID ST TIME USAGE T PGS SENT RESULT 0004 Canon EUROPA 27 12 14 59 00 18 1 NG 20 545 8545 OK TRANSMISSION SUCCESSFUL NG SOME OR NO PAGES SENT NUMBER OF PAGES SENT TRANSMISSION DURATION TRANSMISSION TIME IF YOU ENABLE THE SETTING p 14 5 THE FIRST PAGE OF THE FAX WILL PRINT ON THE REPORT TO REMIN...

Page 143: ...If you set the FAX to print a report an RX REPORT similar to the one below will be printed 27 12 2002 17 23 FAX 123 4567 CANON 001 MULTI TX RX REPORT TX RX NO 0054 PGS 1 TX RX INCOMPLETE ______ TRANSACTION OK 01 905 795 1111 Canon CANADA 01 03 3758 2111 Canon TOKYO 02 1 49 39 25 25 Canon FRANCE ERROR INFORMATION ______ 27 12 2002 15 02 FAX 123 4567 CANON 001 RX REPORT TX RX NO CONNECTION TEL SUBAD...

Page 144: ...11 6 Reports and Lists Chapter 11 ...

Page 145: ...nance Chapter 12 Maintenance Chapter 12 Maintenance Periodic Cleaning 12 2 Cleaning the FAX s Exterior 12 2 Cleaning the FAX s Interior 12 3 Cleaning the Scanner Components 12 5 Replacing the Toner Cartridge 12 7 ...

Page 146: ...t use tissue paper paper towels or similar materials for cleaning they can stick to the components or generate static charges Cleaning the FAX s Exterior Follow this procedure to clean the FAX s outer casing Caution Never use volatile liquids such as thinners benzene acetone or any other chemical cleaner to clean the interior of the FAX these can damage the unit s components 1 Disconnect the power...

Page 147: ... toner cartridge to light place it in its protective bag or wrap it in a thick cloth 4 Use a clean soft dry lint free cloth to remove any toner or paper debris from the unit s interior shaded area in the illustration Caution Do not open the front cover without lifting the latch since this may damage your unit HANDLE DO NOT TOUCH THE FIXING ASSEMBLY DO NOT TOUCH THE BLACK TRANSFER CHARGING ROLLER C...

Page 148: ...ridge Hold the toner cartridge by its handle and insert it into the FAX as far as it will go making sure that its tabs are aligned with the rails inside the unit Always hold the toner cartridge by its handle 6 Use both hands to close the front cover 7 Reconnect the power cord ...

Page 149: ...h a clean soft lint free cloth moistened with water then wipe with a clean soft dry lint free cloth 4 Clean the underside of the operation panel shaded area in the illustration Dirt and dust particles that collect on the underside of the operation panel affect the quality of the documents you copy or send SEPARATION ROLLER SCANNING GLASS WHITE SHEET SEPARATION GUIDE Note If the scanner components ...

Page 150: ...s surrounding the separation roller shaded area in the the illustration 6 When you are finished close the operation panel by pressing it down from the centre Be sure to close the operation panel until it locks into place or the unit will not function properly 7 Reconnect the power cord SEPARATION ROLLER ...

Page 151: ...d Before replacing the toner cartridge follow this procedure to distribute the toner evenly If after following the procedure above remains in the LCD or print quality does not improve follow this procedure to replace the toner cartridge 1 Remove the toner cartridge from the FAX steps 1 to 4 below 2 Gently rock the toner cartridge from side to side a few times to distribute the toner evenly inside ...

Page 152: ... toner cartridge from its protective bag Save the protective bag in case you need to repack the toner cartridge at a later date 6 Gently rock the toner cartridge from side to side a few times to distribute the toner evenly inside it Poor print quality may result if the toner is unequally distributed 7 Place and support the toner cartridge on a flat clean surface then gently pull on the plastic tab...

Page 153: ...Hold the toner cartridge by its handle and insert it into the FAX as far as it will go making sure that its tabs are aligned with the rails inside the unit Always hold the toner cartridge by its handle 9 Use both hands to close the front cover ...

Page 154: ...12 10 Maintenance Chapter 12 ...

Page 155: ...s in the Paper Delivery Slots 13 3 Jams Inside the Unit 13 3 LCD Messages 13 8 Paper Feeding Problems 13 13 Faxing Problems 13 13 Sending Problems 13 13 Receiving Problems 13 15 Copying Problems 13 17 Telephone Problems 13 18 Printing Problems 13 18 General Problems 13 20 If You Cannot Solve a Problem 13 21 If a Power Cut Occurs 13 22 ...

Page 156: ...ument out without opening the operation panel since you may tear or smudge the document 3 While holding the operation panel open remove the document Pull it gently in either direction If a multipage document is loaded remove the entire document from the ADF 4 When you are finished close the operation panel by pressing it down from the centre Be sure to close the operation panel until it locks into...

Page 157: ... Follow this procedure to clear a paper jam inside the unit Note You do not need to unplug the FAX when clearing paper jams 1 Gently pull any jammed paper out of the unit as shown 2 Remove the paper stack from the multi purpose tray and reload it p 2 16 Note If the paper jam occurred while a fax was being received into the FAX s memory that fax will print automatically when the jam is cleared Note...

Page 158: ...e bag or wrap it in a thick cloth 3 Move the paper release lever back HANDLE Caution The fixing assembly becomes extremely hot when the unit is in use Be very careful not to touch it so as to avoid injury Be careful not to touch the transfer charging roller since this adversely affects print quality DO NOT TOUCH THE FIXING ASSEMBLY DO NOT TOUCH THE BLACK TRANSFER CHARGING ...

Page 159: ...to jam again The toner on the paper will not have been fixed to the paper yet so remove the jammed paper carefully to avoid soiling the inside of the unit Loose toner powder inside the unit may adversely affect print quality Loose toner powder can soil any surface protect yourself and your work area Remove immediately any toner powder from yourself or your clothing with cold water 4 Locate the pap...

Page 160: ...xing assembly Pass the jammed paper under the roller Use both hands to carefully pull out the jammed paper Do this carefully to prevent tearing the jammed paper If you do tear it be sure to remove any torn pieces from the unit since these will cause paper to jam again 2 2 1 DO NOT TOUCH THE FIXING ASSEMBLY Caution The fixing assembly becomes extremely hot when the unit is in use Be very careful no...

Page 161: ...ndle 6 Move the paper release lever forward 7 Use both hands to close the front cover 8 Reload paper in the multi purpose tray p 2 16 Note If you are experiencing repeated paper jams it may be due to the paper you are using Tap the paper on a flat surface before stacking it in the multi purpose tray Check that the paper you are using meets the requirements for your unit p 5 2 Make sure you have co...

Page 162: ...fax machine is not working Contact the other party and have them check their fax machine The other party is not using a G3 fax machine Contact the other party to check that they are using a G3 fax machine The telephone line type setting on your unit is incorrect Set your unit for your telephone line type p 3 8 The receiving fax machine did not answer within 55 seconds after all automatic rediallin...

Page 163: ...chine Make sure the subaddress and or password match the settings on the other party s fax machine p 9 10 008 No subaddress and or password has been entered on the other party s machine or the subaddress and or password do not match the settings on your unit Contact the other party to enter the correct subaddress and or password CHECK PRINTER The toner cartridge may be defective Reinstall the tone...

Page 164: ...our local lines are in good condition ECM RX p 14 7 ECM TX The unit is sending a fax using Error Correction Mode ECM Sending with ECM may take longer than normal transmissions Turn off ECM if you need to transmit quickly or if you know your local lines are in good condition ECM TX p 14 6 LOAD PAPER The multi purpose tray is empty Load paper in the multi purpose tray p 2 16 then press Stop MEMORY F...

Page 165: ...dialling button or coded speed dialling code Chapter 6 You entered an invalid number Enter a valid number 084 You attempted to poll a fax machine with a password but the other party has not set a password or their fax machine does not support polling with a password Contact the other party to check their settings If their fax machine does not support polling with a password delete the password you...

Page 166: ... registered pp 6 3 6 8 9 10 080 You attempted to send a document with a subaddress but the other party s fax machine does not support reception with a subaddress Contact the other party to check their settings If their fax machine does not support reception with a subaddress delete the subaddress you have registered pp 6 3 6 8 You pressed Stop to cancel a transaction nnnn The number shown nnnn is ...

Page 167: ...y one type of paper Make sure you load paper that meets the requirements for the FAX p 5 2 Let the paper run out before refilling the multi purpose tray Avoid mixing new stock with paper already loaded Repeated paper jams occur The paper you are using may be causing the jams Make sure you load paper that meets the requirements for the FAX p 5 2 Faxing Problems Sending Problems Cannot send a fax Th...

Page 168: ...e may not be a G3 fax machine Make sure the receiving fax machine is compatible with your FAX which is a G3 fax machine The subaddress and or password are incorrect If you registered a subaddress password under a speed dialling button or code make sure they match the other party s settings Faxes sent from the FAX are spotted or dirty The receiving fax machine may not be working properly Check the ...

Page 169: ...PORT and check for an error code p 11 3 The multi purpose tray may be empty Make sure paper is loaded in the multi purpose tray p 2 16 The telephone line cord may not be connected properly Make sure it is connected properly p 2 6 No automatic switching between telephone and fax calls The FAX may not be set to switch automatically between telephone and fax calls For the FAX to switch automatically ...

Page 170: ...t meets the requirements for the FAX p 5 2 The other party s fax machine may not be functioning properly The sending fax machine usually determines the fax s quality Contact the other party and have them check that the scanning components of their fax machine are clean Error Correction Mode ECM may be disabled Make sure ECM is on ECM RX p 14 7 Faxes do not print The toner cartridge may not be inst...

Page 171: ...machine may not be functioning properly Contact the other party and have them check that their fax machine is functioning properly Copying Problems Cannot make copies The document may not be loaded correctly Make sure the document is loaded correctly in the ADF p 4 3 Make sure the operation panel is closed The document may not meet the requirements for the FAX Make sure you load documents that mee...

Page 172: ...t the power cord is plugged securely into the FAX and into the wall outlet p 2 8 If the unit is plugged into a power strip make sure the power strip is plugged in and turned on The optional handset or telephone cord may be defective Check the cord by substituting with another cord Printing Problems Alarm light is lit and the FAX beeps while printing The FAX may have a paper jam Clear the paper jam...

Page 173: ...urpose tray p 2 16 Make sure the paper delivery slots are clear Paper jams occur You may not be using the correct paper delivery slot Select the correct paper delivery slot p 5 4 Printout is not clear You may not be using the correct paper type Make sure you load paper that meets the requirements for the FAX p 5 2 You may be printing on the wrong side of the paper Some papers have a right side for...

Page 174: ...r Check the power cord by substituting with another or by using a voltmeter to test it for continuity Nothing appears in the LCD The power cord may not be plugged in securely Check that the power cord is plugged securely into the FAX and into the wall outlet p 2 8 If the unit is plugged into a power strip make sure the power strip is plugged in and turned on If the LCD remains blank unplug the uni...

Page 175: ...d to contact Canon directly make sure you have the following information Product name FAX L240 or FAX L290 Serial number The serial number is on the label located at the back of the unit Place of purchase Nature of problem Steps you have taken to solve the problem and the results Note Attempting to repair the FAX yourself may void the limited warranty Caution If the FAX makes strange noises emits ...

Page 176: ...When power is restored the FAX automatically prints a MEMORY CLEAR REPORT that lists the documents that were deleted from memory as a result of the power cut Note If the toner cartridge is empty or there is no paper in the multi purpose tray when power is restored the LCD displays or In these cases the will not be printed even after the toner cartridge is replaced or paper is loaded 27 12 2002 16 ...

Page 177: ...anding the Menu System 14 2 Printing a List to Check the Current Settings 14 2 Accessing the Menus 14 3 USER SETTINGS Menu 14 4 REPORT SETTINGS Menu 14 5 TX Transmission SETTINGS Menu 14 6 RX Reception SETTINGS Menu 14 7 PRINTER SETTINGS Menu 14 8 POLLING BOX Menu 14 9 SYSTEM SETTINGS Menu 14 10 ...

Page 178: ...ormation p 3 5 Follow this procedure to print the USER S DATA LIST The sender information is shown at the beginning of the list The current settings of the FAX are listed after this 1 Open the one touch speed dial panel 2 Press Report 3 Use Nor Mto select USER DATA LIST 4 Press Set The FAX prints the USER S DATA LIST ACTIVITY REPORT USER DATA LIST PRINTING REPORT 27 12 2002 17 23 FAX 123 4567 CANO...

Page 179: ... menu you selected 6 Refer to the appropriate table following pages and use these guidelines to select and register settings Use Nor Mto scroll through the settings To register a setting or access sub settings press Set To return to a previous level press Data Registration For your settings to be registered be sure to press Set after making a selection or entering information If at any stage you w...

Page 180: ...e area p 3 5 OUTSIDE IMAGE INSIDE IMAGE TELEPHONE MARK Selects the prefix for the unit number p 3 5 FAX TEL SCAN CONTRAST Selects the scanning contrast p 7 3 STANDARD DARKER LIGHTER OFFHOOK ALARM Enables disables the off hook alarm that alerts you that the handset is not seated properly in its cradle ON OFF VOLUME CONTROL Sets the volume of the FAX sounds CALLING VOLUME Selects the ring volume whe...

Page 181: ...ission error occurs Prints a report every time you send a document No report is printed PRINT ERROR ONLY OUTPUT YES OUTPUT NO PRINT WITH IMAGE If you select or above this setting enables disables printing of the first page of the fax under the report ON OFF RX REPORT Enables disables automatic printing of an RX reception REPORT p 11 5 No report is printed Prints a report only when a reception erro...

Page 182: ...in a fax telephone number with the Redial Pause button 2 SEC 1 to 15 AUTO REDIAL Enables disables automatic redialling if the other party s line is busy on the first attempt p 7 9 ON OFF REDIAL TIMES Selects the number of redial attempts 2 TIMES 1 to 10 REDIAL INTERVAL Selects the time interval between redial attempts 2 MIN 2 to 99 TIME OUT Enables disables automatic scanning of documents after th...

Page 183: ...ins receiving 2 TIMES 1 to 99 MAN AUTO SWITCH When the receive mode is set to this setting determines if the FAX switches to fax receive mode after it rings for a specified time OFF ON F T RING TIME If you select above this setting selects the length of time the FAX rings before switching to fax receive mode 15 SEC 1 to 99 REMOTE RX Enables disables remote receiving ON OFF REMOTE RX ID If you sele...

Page 184: ...ect the direction of the reduction VERTICAL ONLY HORIZ VERTICAL PAPER SIZE Selects the size of the paper loaded in the multi purpose tray p 5 7 A4 LTR LGL If you select you can select additional sub settings p 5 7 CUSTOM ECONOMY PRT Enables disables economy printing p 5 9 OFF ON TONER SUPPLY LOW Selects whether the FAX continues printing when toner level is low displayed in the LCD Stops printing ...

Page 185: ...p 9 12 Enters the name for the polling box Enters a password to restrict access to the polling box settings to Enters a standard ITU T password Selects whether the document is deleted from memory once it is polled or continues to be stored in memory ON Document is deleted from memory after it is polled OFF Document remains in memory after it is polled Changes the polling box settings p 9 15 Enters...

Page 186: ...les restriction of the FAX p 9 17 Enables disables restriction of the FAX to make calls and send faxes Enters a password to restrict access to the LOCK PHONE setting to Restricts reception of faxes to the numbers registered for speed dialling on your FAX p 9 20 If you select ON you can select additional sub settings Selects the date format displayed in the LCD and printed on the faxes you send Sel...

Page 187: ...itch the selectable settings and the default settings to suit the selected country p 2 9 UK GERMANY FRANCE ITALY SPAIN HOLLAND DENMARK NORWAY SWEDEN FINLAND AUSTRIA BELGIUM SWITZERLAND PORTUGAL IRELAND GREECE LUXEMBOURG HUNGARY CZECH RUSSIA SLOVENIA SOUTH AFRICA OTHERS SUMMER TIME Sets the summer time p 3 11 If you select ON you can select additional sub settings OFF ON Setting Description Sub Set...

Page 188: ...14 12 Summary of Settings Chapter 14 ...

Page 189: ...A 1 Specifications Appendix A Specifications Appendix A Specifications General Specifications A 2 Facsimile A 2 Copier A 3 Telephone A 3 Printer A 3 ...

Page 190: ...pacity 4p 5 2 Printable Area 4p 5 3 Scanned Area 4p 4 2 Facsimile Applicable Line Public Switched Telephone Network PSTN Compatibility G3 Data Compressing System MH MR MMR Modem Type Fax modem Modem Speed 33600 31200 28800 26400 24000 21600 19200 16800 14400 12000 9600 7200 4800 2400 bps Automatic fallback Transmission Speed Approx 3 seconds page at 33 6 Kbps ECM MMR transmitting from memory Scann...

Page 191: ...e Default ID 25 Non ring reception ECM deactivation Network switch ACTIVITY REPORT after every 20 transactions Non delivery report TTI Transmit Terminal Identification Copier Scanning Resolution Direct Copy 400 K 300 dpi Memory Copy 200 K 300 dpi Printing Resolution 600 K 600 dpi Reduction 70 80 90 Copy Speed Approx 6 pages minute No of Copies Max 99 copies Telephone Connection Optional handset te...

Page 192: ...A 4 Specifications Appendix A ...

Page 193: ...ions Introduction B 2 Differences Between the FAX L290 and FAX L240 B 2 Using Your Documentation B 2 Unpacking the FAX L290 B 2 Connecting the FAX L290 to Your PC B 3 Print Media Requirements B 4 Printable Area B 4 Selecting Print Media B 5 Loading Envelopes B 6 Loading Transparencies B 7 ...

Page 194: ...rovides detailed information on how to set up operate maintain and troubleshoot your FAX Printer Driver Guide This guide included in the CD ROM describes how to use your FAX to print from within your PC s WindowsD environment Unpacking the FAX L290 Unpack your FAX as described on page 2 2 The items included are exactly the same as for the FAX L240 except that your unit also includes the software n...

Page 195: ...ou can purchase the cable from your local authorised Canon dealer Follow this procedure to connect the USB cable Note Make sure your PC is running Microsoft Windows0 98 Me or Windows0 2000 XP preinstalled by a computer manufacturer on purchase The USB port operation also needs to be assured by the manufacturer Connect the USB cable to the FAX and PC during software installation to ensure proper op...

Page 196: ...er handling loading paper and selecting paper delivery Printable Area The shaded area shows the printable area of European DL size envelopes Print Media Size Quantity Envelopes European DL 220 K 110 mm 8 66 K 4 33 in 7 envelopes U S Commercial No 10 241 3 K 104 1 mm 9 5 K 4 1 in 7 envelopes Transparencies A4 Letter 1 sheet Note For the printable area of paper see Chapter 5 FEED DIRECTION MAX 4 mm ...

Page 197: ... embossed paper Envelopes with peel off sealing strips Envelopes with letters enclosed You may be able to load other size envelopes than those listed on the previous page However Canon cannot guarantee consistent performance on these Transparencies Use only special laser printer transparencies Note For paper guidelines see Chapter 5 Note When printing on envelopes be sure to use face up delivery p...

Page 198: ...he folds crisp Press all the way around the envelopes to remove any curls and expel air from inside the envelopes Also press firmly on the area that corresponds to the edges of the back flap Remove any curling from the envelopes by holding the edges diagonally and bending them gently Run a pen or other rounded object along the back flaps to flatten them The flaps should not bulge more than 5 mm 2 ...

Page 199: ... as for paper For details see p 2 16 3 Insert the stack into the multi purpose tray print side facing you then adjust the paper guides to the width of the stack 4 Replace the multi purpose tray cover Be sure to replace this cover to prevent dust accumulating inside the unit 5 Adjust the paper delivery selector to face up delivery For details see p 5 4 2 2 1 ...

Page 200: ...B 8 FAX L290 Instructions Appendix B ...

Page 201: ...C 1 Options Appendix C Options Appendix C Options Optional Handset C 2 Package Contents C 2 Attaching the Handset to Your FAX C 3 Maintaining Your Handset C 4 ...

Page 202: ...e damaged or missing notify your local authorised Canon dealer or the Canon help line immediately Note Please note that the shape of your handset may differ from the one shown in this section However both handsets have exactly the same functions and performance HANDSET CRADLE HANDSET SCREWS WITH PLUGS 2 SCREWS Not used with your FAX RINGER VOLUME SWITCH Use a pen or other pointed object to select ...

Page 203: ...o the holes on the unit If you have difficulty inserting the plugs turn the unit so that the left side is facing you and the right side is against a wall You can now insert the plugs without the unit moving 4 Use your finger to push the screws into the plugs If you have difficulty use a cross point screwdriver to push the screws all the way into the plugs Do not screw them in as the screws may bre...

Page 204: ...ion be sure to follow these guidelines Do not leave your handset exposed to direct sunlight Do not install your handset in hot or humid conditions Do not spray aerosol polishes on your handset since they may enter the holes on your handset and cause damage Use a damp cloth to clean your handset ...

Page 205: ...e 13 8 Button See individual button names C CALLING VOLUME setting 14 4 Cancelling polling receiving 9 12 receiving 8 11 redialling 7 9 7 10 restriction of your FAX 9 18 9 19 sending 7 8 Cartridge See Toner cartridge CHANGE CARTRIDGE message 12 7 13 9 CHANGE DATA setting 9 16 14 9 CHECK COVER message 13 9 CHECK DOCUMENT message 13 2 13 9 CHECK PAPER SIZE message 13 9 CHECK POLLING ID message 13 9 ...

Page 206: ...ded speed dialling See Coded speed dialling group dialling See Group dialling methods 7 4 one touch speed dialling See One touch speed dialling regular 7 4 special 9 2 to 9 4 speed See Speed dialling switching temporarily to tone 9 3 through switchboard 3 9 3 10 DISPLAY LANGUAGE setting 2 9 14 10 DOC MEMORY LIST description 11 2 printing 9 5 sample 9 5 setting 9 5 DOC TOO LONG message 13 10 Docume...

Page 207: ...14 4 L Label destination 2 2 6 7 6 15 paper loading warning 2 2 2 5 Latch 2 11 LCD 2 12 definition 1 2 messages 13 8 to 13 12 See also individual message names Letter mode lowercase 3 2 3 3 uppercase 3 2 3 3 Letters entering 3 2 3 3 Lever paper release 2 11 13 4 LGL setting 5 2 5 7 14 8 Light Alarm 2 12 LINE MONITOR VOL setting 14 4 Lists See also individual list names summary 11 2 LOAD PAPER mess...

Page 208: ... printable area 5 3 quantity 5 2 release lever 2 11 13 4 requirements 5 2 5 3 rest 2 2 2 5 2 11 selecting 5 3 size setting 5 2 5 7 5 8 weight 5 2 Paper delivery face down 5 4 5 5 face up 5 4 5 5 5 6 selecting 5 4 to 5 6 selector 2 11 5 5 slot jams in 13 3 PAPER SIZE setting 5 7 14 8 Password for polling box setting 9 12 to 9 14 for polling receiving 9 10 registering for coded speed dialling 6 8 to...

Page 209: ...12 6 18 11 3 14 2 REPORT SETTINGS menu 14 3 14 5 Reports See also individual report names summary 11 2 Resolution button 2 12 7 2 10 2 copying setting 10 2 sending setting 7 2 Rest paper 2 2 2 5 2 11 Restricting reception 9 20 use of FAX 9 17 to 9 19 RING COUNT setting 14 7 RING START TIME setting 8 6 8 7 R KEY SETTING 3 9 14 4 Roller transfer charging 2 11 ROTARY PULSE setting 3 8 14 4 RX definit...

Page 210: ...NE TYPE setting 3 8 14 4 Telecom FaxAbility 8 2 Telephone connecting 2 6 2 7 making call with speed dialling 6 17 problems 13 18 TELEPHONE MARK setting 14 4 Telephone line cord 2 2 2 6 type setting 3 8 Telstra FaxStream Duet 8 2 Testing FAX 2 18 Thickness document 4 2 Time entering 3 6 sending at preset See Delayed sending TIME OUT setting 14 6 Timer sending See Delayed sending Tone dialling setti...

Page 211: ... 1 2 1 3 V VERTICAL ONLY setting 14 8 Volume ALARM VOLUME setting 14 4 CALLING VOLUME setting 14 4 KEYPAD VOLUME setting 14 4 LINE MONITOR VOL setting 14 4 VOLUME CONTROL setting 14 4 VOLUME CONTROL setting 14 4 W Weight document 4 2 paper 5 2 unit 1 5 ...

Page 212: ...I 8 ...

Reviews: