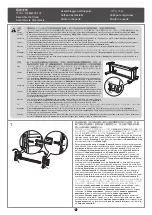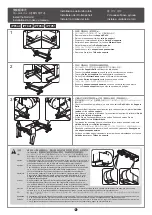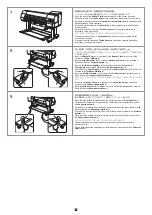
[スタンド下ステー]を[スタンドレッグ
L
]と[スタンドレッグ
R
]に、
[六角レ
ンチ]を使用して、各
4
本の
M
4
六角ビスでしっかりと固定します。
•
使用
[
内六角扳手
]
,
各用
4
只
M
4
六角螺丝,
将
[
支架下撑条
]
牢固地固定在
[
支
架支脚
L
]
和
[
支架支脚
R
]
上。
•
• Secure the
Bottom Stand Stay
to the
Stand Leg L
and
Stand Leg R
using four
M4 hex screws on each side by the
Allen Wrench
.
•
[ 스탠드 하단 스테이 ] 를 [ 스탠드 레그 L] 과 [ 스탠드 레그 R] 에 [6 각 렌치 ] 를
사용하여 각각 4 개의 M4 6 각 나사로 단단히 고정합니다 .
При помощи четырех шестигранных винтов M4 с каждой стороны прикрепите
ножку подставки L
и
ножку подставки R
к
нижнему держателю подставки
,
используя
универсальный гаечный ключ
.
•
• Fixez le
Support inférieur du socle
à la
Jambe L du socle
et à la
Jambe R du
socle
en serrant quatre vis hexagonales M4 sur chaque côté à l’aide de la
Clef Allen
.
• Fissare il
Tirante inferiore del Supporto
alla
Gamba del supporto L
e alla
Gamba del
supporto R
utilizzando quattro viti esagonali M4 su ciascun lato strette con la
Chiave a brugola
.
• Sichern Sie die
Untere Gestellstütze
an dem
Gestellbein-L
und an dem
Gestellbein-R
,
indem Sie einen
Inbus-schlüssel
mit vier M4-Sechskantschrauben auf jeder Seite verwenden.
• Fije el
Pie inferior del soporte
a la
Pata del soporte L
y la
Pata del soporte R
utilizando la
Llave Allen
y cuatro tornillos hexagonales M4 a cada lado.
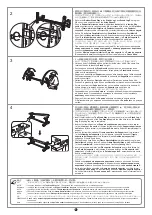
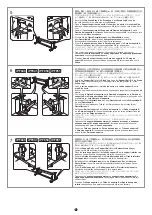
[スタンド上ステー]の左側を[スタンドレッグ
L
]の側面の穴(
a
)に差し込み、
[ス
タンド上ステー]の右側を[スタンドレッグ
R
]の側面の穴(
b
)に突き当たるま
で差し込みます。
•
将
[
支架上撑条
]
的左侧插入
[
支架支脚
L
]
侧面的孔
(
a
)
,将
[
支架上撑条
]
的
右侧插入
[
支架支脚
R
]
侧面的孔
(
b
)
,插到底。
•
•
Insert the left end of the
Top Stand Stay
into the side hole (a) on the
Stand Leg L
,
and insert the right end of the
Top Stand Stay
into the side hole (b) on the
Stand
Leg R
, pushing the stay in completely.
•
[ 스탠드 상단 스테이 ] 왼쪽을 [ 스탠드 레그 L] 의 측면 구멍 (a) 에 끼워 넣고 , [ 스
탠드상단 스테이 ] 오른쪽을 [ 스탠드 레그 R] 의 측면 구멍 (b) 에 닿을 때까지 끼
워 넣습니다 .
Левый конец
верхнего держателя подставки
вставьте до конца в боковое
отверстие (a) на
ножке подставки L
, а правый конец
верхнего держателя
подставки
вставьте до конца в боковое отверстие (b) на
ножке подставки R
.
•
•
Insérez l’extrémité gauche du
Support supérieur du socle
dans l’orifice latéral
(a) de la
Jambe L du socle
, et insérez l’extrémité droite du
Support supérieur du
socle
dans l’orifice latéral (b) de la
Jambe R du socle
. Enfoncez complètement le
support.
•
Inserire l’estremità sinistra del
Tirante superiore del Supporto
nel foro laterale
(a) della
Gamba del supporto L
, quindi inserire l’estremità destra del
Tirante
superiore del Supporto
nel foro laterale (b) della
Gamba del supporto R
,
spingendo il tirante fino in fondo.
• Führen Sie das linke Ende der
Obere Gestellstütze
in die Seitenbohrung (a) des
Gestellbein-L
und das rechte Ende der
Obere Gestellstütze
in die Seitenbohrung
(b) des
Gestellbein-R
, und drücken Sie das Gestell vollständig hinein.
•
Inserte el extremo izquierdo del
Pie superior del soporte
en el orificio lateral (a)
de la
Pata del soporte L
e introduzca el extremo derecho del
Pie superior del
soporte
en el orificio lateral (b) de la
Pata del soporte R
, empujando el pie hacia
dentro completamente.
2
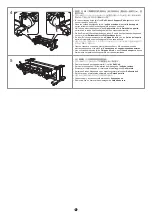
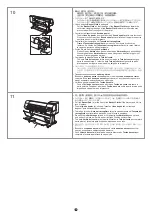
人で[スタンド]を左右から持ち、左右同時に[スタンド]を起こします。
•
2
人抓着
[
支架
]
的左右侧,同时立起
[
支架
]
。
•
• Hold one end of the
Stand
while a partner holds the other end. At the same time,
rotate both ends to stand the
Stand
upright.
•
2 명이 [ 스탠드 ] 의 양쪽을 잡고 동시에 [ 스탠드 ] 를 세웁니다 .
Удерживайте один конец
подставки
, в то время как ваш помощник удерживает
ее другой конец. Одновременно переверните оба конца, чтобы поставить
подставку
в вертикальное положение.
•
•
Soutenez une extrémité du
Stand/socle
pendant que l’un de vos partenaires
soutient l’autre extrémité. Simultanément, faites pivoter le
Stand/socle
des deux
côtés pour le mettre debout.
•
Reggere un’estremità del
Supporto
mentre un’altra persona regge l’altra estremità.
Contemporaneamente ruotare entrambe le estremità del
Supporto
per metterlo in
posizione verticale.
• Halten Sie ein Ende des
Gestells
, während Ihr Partner das andere Ende hält.
Drehen Sie gleichzeitig beide Enden des
Gestells
, um dieses aufrecht hinzustellen.
• Sujete un extremo del
Soporte
mientras un compañero sujeta el otro extremo. Al
mismo tiempo, gire ambos extremos del
Soporte
para ponerlo de pie.
[スタンド上ステー]は、
L
側から差し込んでください。
R
側には一定の位置までしか差し込むことができません。
メモ
R
emar
q
ue
N
OT
E
메모
N
OT
A
Hin
w
eis
N
OT
A
Insert the left end of the
Top Stand Stay
first. The right end can only be pushed in to a restricted position.
[ 스탠드 상단 스테이 ] 는 왼쪽 (L) 에서부터 끼우십시오 . 오른쪽 (R) 에서는 일정한 위치까지만 끼울 수 있게 되어 있어 왼쪽을 끼워 넣을 여유가 확보되지 않습니다 .
•
备注
请从
L
侧插入
[
支架上撑条
]
。
R
侧只能插入到一定位置。
•
•
Insérez d’abord l’extrémité gauche du
Support supérieur du socle
. L’extrémité droite ne peut être enfoncée que dans une position restreinte.
•
Inserire per prima l’estremità sinistra del
Tirante superiore del Supporto
. L’estremità destra può essere spinta solo in una posizione limitata.
•
Führen Sie zuerst das linke Ende der
Obere Gestellstütze
ein. Das rechte Ende kann nur bis zu einer eingeschränkten Position eingedrückt werden.
•
Inserte el extremo izquierdo del
Pie superior del soporte
en primer lugar. El extremo derecho sólo puede empujarse en una posición restringida.
•
•
Левый конец
верхнего держателя подставки
вставляйте в первую очередь. Правый конец может быть установлен лишь в строго определенное
положение.
•
ПРИМЕЧАНИЕ
• Prenda o
Apoio do suporte inferior
à
Perna do suporte L
e à
Perna do suporte
R
usando quatro parafusos hexagonais M4 em cada lado com a
Chave Allen
.
•
Segure uma extremidade do
Suporte
enquanto um parceiro segura a outra.
Simultaneamente, gire ambas as extremidades até que o
Suporte
fique na posição
vertical.
•
Insira a extremidade esquerda do
Apoio do suporte superior
no orifício lateral
(a) da
Perna do suporte L
e a extremidade direita do
Apoio do suporte superior
no orifício lateral (b) da
Perna do suporte R
, pressionando o apoio totalmente até
encaixá-lo.
Nota
Insira a extremidade esquerda do
Apoio do suporte superior
primeiro. A extremidade direita só pode ser encaixada em uma posição limitada.
•
2
4
a
b


