background image

9-4

Troubleshooting

Chapter 9

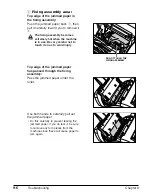
2

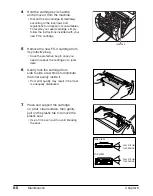
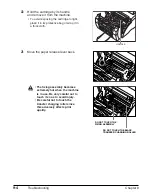
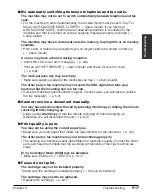
Hold the cartridge by its handle
and remove it from the machine.

• To avoid exposing the cartridge to light,

place it in its protective bag or wrap it in
a thick cloth.

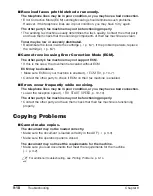
3

Move the paper release lever back.

c

• The fixing assembly becomes

extremely hot when the machine
is in use. Be very careful not to
touch it so as to avoid injury.

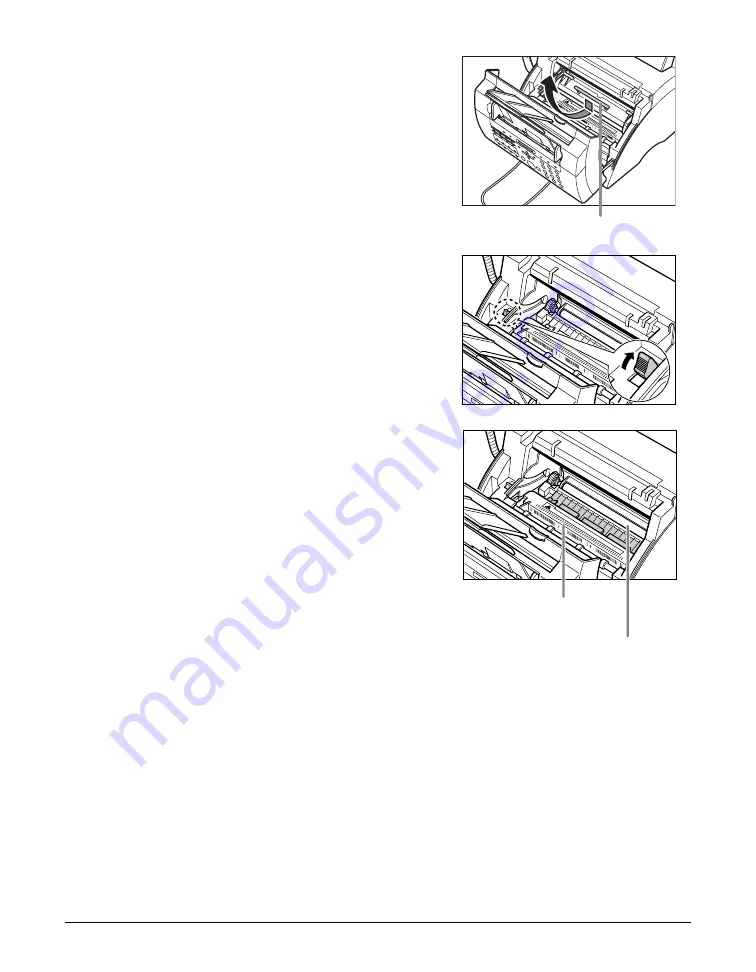
• Be careful not to touch the

transfer charging roller since
this adversely affects print
quality.

DO NOT TOUCH THE BLACK 
TRANSFER CHARGING ROLLER

DO NOT TOUCH THE 
FIXING ASSEMBLY

HANDLE

Summary of Contents for FAXPHONE L80

Page 1: ...ano 8 20097 San Donato Milanese MI Italy CANON LATIN AMERICA INC 703 Waterford Way Suite 400 Miami Florida 33126 U S A CANON AUSTRALIA PTY LTD 1 Thomas Holt Drive North Ryde Sydney N S W 2113 Australi...

Page 2: ...sked questions www usa canon com consumer Free technical support Monday Saturday excluding holidays for products still under warranty 1 800 828 4040 Technical support for products no longer under warr...

Page 3: ...ty cards Further Canon U S A reserves the right to make changes in the specifications of the products described in this guide at any time without notice and without obligation to notify any person of...

Page 4: ...the basic operation of all functions of your machine This guide included as a PDF file in the FAXPHONE L80 printer driver software CD ROM includes comprehensive instructions on functions that can be p...

Page 5: ...onal explanations Reading these is highly recommended 1 p n nn Indicates a page number where additional information can be found 1 Set Up Refer to the Set Up Instructions for more details Instructions...

Page 6: ...machine on top of a carpet or rug which has long pile The threads may get inside the machine and cause a fire Do not block or cover the ventilation port or any openings on the machine with objects as...

Page 7: ...type of power source indicated on the machine s label or a fire electrical shock or malfunction may occur If you are not sure of the type of power available consult your local power company Do not al...

Page 8: ...nto the machine If the machine has been exposed to rain or water If the machine does not operate normally when you have followed the instructions in the guides included with your machine Adjust only t...

Page 9: ...water or other liquids such as glasses vases or pot plants If water etc does spill inside the machine immediately disconnect the power cord and contact the retailer Do not touch the internal electric...

Page 10: ...s or insignias Internal revenue stamps canceled or Selective service or draft papers uncanceled Checks or drafts issued by governmental Bonds or other certificates of indebtedness agencies Stock certi...

Page 11: ...pment This equipment is designed to be connected to the telephone network or premises wiring using a compatible modular jack which is Part 68 compliant See Installation instructions for details The Ri...

Page 12: ...ccur in a particular installation If this equipment does cause harmful interference to radio or television reception which can be determined by turning the equipment off and on the user is encouraged...

Page 13: ...e a regular voice grade line or equivalent Use one line per machine DDD DIRECT DISTANCE DIAL LINE or IDDD INTERNATIONAL DIRECT DISTANCE DIAL LINE IF YOU COMMUNICATE OVERSEAS nCanon recommends an indiv...

Page 14: ...ay give the telecommunications company cause to request the user to disconnect the equipment Users should ensure for their own protection that the electrical ground connections of the power utility te...

Page 15: ...Print Media Documents 3 2 Document Requirements 3 2 Scanned Area of a Document 3 2 Loading Documents 3 3 Print Media 3 4 Print Media Requirements 3 4 Printable Areas 3 5 Selecting Print Media 3 6 Loa...

Page 16: ...ance Periodic Cleaning 8 2 Cleaning the Machine s Exterior 8 2 Cleaning the Machine s Interior 8 2 Cleaning the Scanner Components 8 5 Replacing the FX 3 Cartridge 8 7 Chapter 9 Troubleshooting Cleari...

Page 17: ...e Current Settings 10 2 Accessing the Menus 10 3 USER SETTINGS Menu 10 4 REPORT SETTINGS Menu 10 5 TX Transmission SETTINGS Menu 10 6 RX Reception SETTINGS Menu 10 7 PRINTER SETTINGS Menu 10 8 POLLING...

Page 18: ...xviii Preface...

Page 19: ...Chapter 1 Introduction 1 1 Introduction Chapter 1 Introduction...

Page 20: ...nhanced definition in faxed photos Error Correction Mode ECM to reduce transmission errors when sending to or receiving from fax machines with ECM capability Automatic dialing and broadcasting one tou...

Page 21: ...ume of the handset HI LO or OFF SUPPORT TRAYS MULTI PURPOSE TRAY COVER ADF AUTOMATIC DOCUMENT FEEDER DOCUMENT GUIDES OPERATION PANEL PAPER DELIVERY SELECTOR DOCUMENT SUPPORT FACE UP DELIVERY SLOT FRON...

Page 22: ...utton Function Button Special Function Buttons 01 02 03 04 05 06 07 08 09 Data Registration Delayed Transmission Memory Reference Receive Mode Polling Report Space 10 11 12 13 14 15 GHI JKL MNO ABC DE...

Page 23: ...Chapter 2 Registering Information 2 1 Registering Information Chapter 2 Registering Information...

Page 24: ...ore than 60 seconds between entering data the machine will automatically return to standby mode Changing Between Number Mode and Letter Mode Press T to select number mode 1 or letter mode A Number mod...

Page 25: ...ter you want appears or If the next letter you want to enter is under the same numeric button you pressed in step 2 press to move the cursor to the right Then press that same numeric button repeatedly...

Page 26: ...vidual characters 1 Use or to move the cursor under the incorrect character 2 Press the numeric button that contains the correct letter to enter it over the incorrect character If you are unsure which...

Page 27: ...inted in small type at the top of each page This information is called the Sender information or the Transmit Terminal Identification TTI You must register your details in your machine so that wheneve...

Page 28: ...for the time e g 1 00 p m as 13 00 and precede single digits with a zero If you make a mistake press Clear and re enter the date and time You can also use or to move the cursor under the incorrect nu...

Page 29: ...to enter characters see p 2 2 If you make a mistake press Clear and re enter the name You can also use or to move the cursor under the incorrect letter and enter the correct letter 9 Press Set 10 Pres...

Page 30: ...ine is factory set to operate for tone dialing TOUCH TONE setting If you need to change this setting for pulse dialing ROTARY PULSE setting follow this procedure 1 Press Function 2 Press Data Registra...

Page 31: ...Chapter 3 Documents and Print Media 3 1 Documents and Print Media Chapter 3 Documents and Print Media...

Page 32: ...y of the following Wrinkled or creased paper Carbon paper or carbon backed paper Curled or rolled paper Coated paper Torn paper Onion skin or thin paper Remove all fasteners staples paper clips etc be...

Page 33: ...en adjust the document guides to the width of the document w Tap multipage documents on a flat surface to even the edges before inserting them in the ADF The document is now ready for scanning n For a...

Page 34: ...rming 1 p 3 7 Check that you have loaded the print media correctly in the multi purpose tray 1User s Guide 3 6 5 in 92 127 mm 8 5 14 in 216 356 mm 8 5 11 in 216 279 mm 8 5 14 in 216 356 mm 8 3 11 7 in...

Page 35: ...r 3 Envelope The shaded area shows the printable area of U S Commercial No 10 size envelopes U S Commercial No 10 MAX 0 39 MAX 10 mm MAX 0 16 MAX 4 mm MAX 0 16 MAX 4 mm MAX 0 16 MAX 4 mm FEED DIRECTIO...

Page 36: ...opes with diagonal seams and flaps To prevent jams in the multi purpose tray do not use the following Envelopes with windows holes perforations cutouts and double flaps Envelopes made with special coa...

Page 37: ...paper delivery selector before printing The face down delivery slot can hold up to approximately 50 sheets of paper To prevent paper jams remove paper from this slot before 50 sheets print out Never p...

Page 38: ...y with the paper delivery selector c When using face up delivery you must remove each sheet as it is delivered Failure to do this may cause jams in the face up delivery slot and result in damage to yo...

Page 39: ...Set 4 Use or to select PRINTER SETTINGS 5 Press Set 6 Use or to select PAPER SIZE 7 Press Set 8 Use or to select the paper size you want for the multi purpose tray You can select from the following LT...

Page 40: ...3 10 Documents and Print Media Chapter 3 11 Press Set 12 Press Stop Reset to return to standby mode 12 26 FaxTel ECONOMY PRT...

Page 41: ...Chapter 4 Sending Faxes 4 1 Sending Faxes Chapter 4 Sending Faxes...

Page 42: ...ote that the new setting will only be effective from the next page scanned Follow this procedure to set the scanning resolution 1 Press Image Quality repeatedly until the resolution setting you want i...

Page 43: ...ast for sending and copying 1 Press Function 2 Press Data Registration 3 Press Set twice 4 Use or to select SCAN CONTRAST 5 Press Set 6 Use or to select the scanning contrast you want You can select f...

Page 44: ...fewer if the document contains many graphics or particularly dense text Follow this procedure to send a document using memory sending 1 Load the document face down in the ADF 1 p 3 3 To adjust the res...

Page 45: ...etting 1 p 10 6 To cancel sending once dialing has started press Stop Reset then T If the number you are calling is busy your machine redials the number automatically after a few minutes 1 User s Guid...

Page 46: ...One Touch Speed Dialing 2 p 4 7 Register a fax telephone number under a one touch speed dialing button so that you only have to press one button to dial that fax telephone number There are 15 one tou...

Page 47: ...number If a one touch speed dialing button has already been registered the number registered under that button appears If a group is already registered under a one touch speed dialing button GROUP DIA...

Page 48: ...ing spaces If you are unsure how to enter characters see p 2 2 If you have already registered a name that you want to keep ignore this step 10 Press Set 11 This completes the basic one touch speed dia...

Page 49: ...s registered on the other party s fax machine Contact the other party to check their settings When sending with a subaddress password the other party s fax machine receives the fax only if your subadd...

Page 50: ...ress Set 21 To continue registering other one touch speed dialing buttons repeat the procedure from step 5 or Press Stop Reset to return to standby mode n Use the destination labels provided with your...

Page 51: ...Use or to select the coded speed dialing code 00 to 99 under which you want to register the fax telephone number Alternatively press Coded Dial and use the numeric buttons to enter the code If a code...

Page 52: ...continue registering other coded speed dialing codes press Set twice and repeat the procedure from step 7 or To end registering coded speed dialing codes press Stop Reset to return to standby mode or...

Page 53: ...the following REGULAR TX Normal transmission PSWD SUBADDRESS Transmission with a subaddress and or password For details see p 4 9 If you selected REGULAR TX in step 17 18 Press Set 19 Press Stop Rese...

Page 54: ...ed dialing button or coded speed dialing code assigned to the fax number or group you want to send to One touch speed dialing button Press the one touch speed dialing button you want Coded speed diali...

Page 55: ...Chapter 5 Receiving Faxes 5 1 Receiving Faxes Chapter 5 Receiving Faxes...

Page 56: ...lls The machine rings for every call whether a fax call or a voice call For a fax call you have to manually activate reception of a fax The machine answers all calls as fax calls It receives faxes aut...

Page 57: ...re Manual is displayed in the LCD 2 Make sure you have connected the handset or extension telephone to your machine 1 Set Up Instructions 3 When you hear the handset or extension telephone ring pick u...

Page 58: ...properly Make sure the handset is seated properly in its cradle If you do not want the machine to beep disable the OFFHOOK ALARM setting 1 p 10 4 If you cannot activate reception from the extension te...

Page 59: ...Chapter 6 Copying 6 1 Copying Chapter 6 Copying...

Page 60: ...ADF 1 p 3 3 To adjust the contrast see p 4 3 Currently used memory Standby to scan 3 Press Start Copy 4 Press Image Quality repeatedly until the resolution setting you want is displayed You can selec...

Page 61: ...gin copying To cancel copying press Stop Reset You may then need to open the operation panel to remove the document from the ADF 1 p 9 2 n You will be unable to make multiple copies if MEMORY FULL app...

Page 62: ...6 4 Copying Chapter 6...

Page 63: ...Chapter 7 Installing Printer Driver 7 1 Installing Printer Driver Chapter 7 Installing Printer Driver...

Page 64: ...s Me Windows 2000 or Windows XP USB Port Computer Processor Windows 98 A 90 megahertz MHz Pentium processor or higher Windows Me A 150 MHz Pentium processor or higher Windows 2000 A 133 MHz Pentium pr...

Page 65: ...rientation Instructions for printing a document can vary somewhat for different Windows applications Therefore for detailed instructions see the user documentation for the specific application from wh...

Page 66: ...ave the settings as a print profile and reuse the profile as needed The following instructions summarize the general procedures for changing printer settings based on your version of Windows For detai...

Page 67: ...Quality tab specify the desired printer settings 4 To accept the changes and close the dialog box click OK To accept the changes and leave the dialog box open click Apply To cancel the changes and ret...

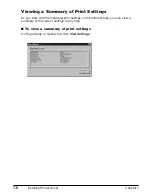
Page 68: ...ing a Summary of Print Settings As you work with the individual print settings on the different tabs you can view a summary of the current settings at any time To view a summary of print settings On P...

Page 69: ...Chapter 8 Maintenance 8 1 Maintenance Chapter 8 Maintenance...

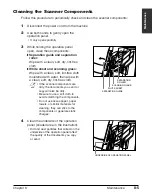
Page 70: ...al cleaner to clean the interior of the machine these can damage the machine s components Cleaning the Machine s Exterior Follow this procedure to clean the machine s outer casing 1 Disconnect the pow...

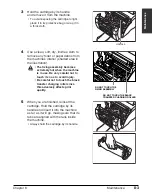
Page 71: ...ng assembly becomes extremely hot when the machine is in use Be very careful not to touch it so as to avoid injury Be careful not to touch the black transfer charging roller since this adversely affec...

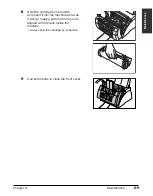
Page 72: ...8 4 Maintenance Chapter 8 6 Use both hands to close the front cover 7 Reconnect the power cord...

Page 73: ...t lint free cloth moistened with water then wipe with a clean soft dry lint free cloth n If the scanner components are dirty the documents you send or copy will also be dirty Be sure to use a soft clo...

Page 74: ...surrounding the separation roller shaded area in the illustration 6 When you are finished close the operation panel by pressing it down from the center Be sure to close the operation panel until it l...

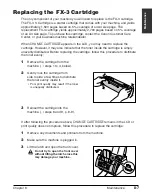
Page 75: ...e toner inside the cartridge is simply unevenly distributed Before replacing the cartridge follow this procedure to distribute the toner evenly 1 Remove the cartridge from the machine 1 steps 1 to 4 b...

Page 76: ...cartridge from its protective bag Save the protective bag in case you need to repack the cartridge at a later date 6 Gently rock the cartridge from side to side a few times to distribute the toner ev...

Page 77: ...Hold the cartridge by its handle and insert it into the machine as far as it will go making sure that its tabs are aligned with the rails inside the machine Always hold the cartridge by its handle 9...

Page 78: ...8 10 Maintenance Chapter 8...

Page 79: ...Chapter 9 Troubleshooting 9 1 Troubleshooting Chapter 9 Troubleshooting...

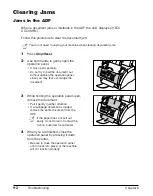
Page 80: ...to pull the document out without opening the operation panel since you may tear or smudge the document 3 While holding the operation panel open remove the document Pull it gently in either direction I...

Page 81: ...g your machine when clearing paper jams 1 Gently pull any jammed paper out of the machine as shown 2 Remove the paper stack from the multi purpose tray and reload it 1 Set Up Instructions nIf the pape...

Page 82: ...wrap it in a thick cloth 3 Move the paper release lever back c The fixing assembly becomes extremely hot when the machine is in use Be very careful not to touch it so as to avoid injury Be careful no...

Page 83: ...e to remove any torn pieces from the machine since these will cause paper to jam again The toner on the paper will not have been fixed to the paper yet so remove the jammed paper carefully to avoid so...

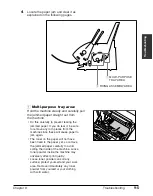
Page 84: ...machine is in use Be very careful not to touch it so as to avoid injury Top edge of the jammed paper has passed through the fixing assembly Pass the jammed paper under the roller Use both hands to car...

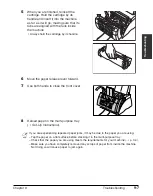
Page 85: ...aper release lever forward 7 Use both hands to close the front cover 8 Reload paper in the multi purpose tray 1 Set Up Instructions nIf you are experiencing repeated paper jams it may be due to the pa...

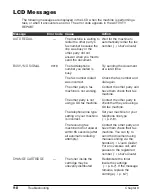
Page 86: ...o automatically redial the fax number 1 User s Guide Try sending the document at a later time Check the fax number and dial again Contact the other party and have them check their fax machine Contact...

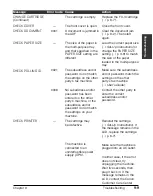
Page 87: ...uninterruptible power supply UPS Replace the FX 3 cartridge 1 p 8 7 Close the front cover Clear the document jam 1 p 9 2 Then start again Load the correct paper size 1 Set Up Instructions or change t...

Page 88: ...settings Change your settings if necessary 1 pp 4 7 4 11 Clear the paper jam 1 p 9 3 then reload paper in the multi purpose tray 1 Set Up Instructions Use a copier to make a reduced copy of the docume...

Page 89: ...r fax machine does not support polling with a password Print any documents you no longer need to be stored in memory 1 User s Guide Then start again Divide the document and send each part separately T...

Page 90: ...er shown nnnn is a unique identification number assigned to the document you are sending or receiving The machine is sending a document and its memory is full Contact the other party to check their se...

Page 91: ...n the multi purpose tray Load only one type of print media Make sure you load print media that meets the requirements for the machine 1 p 3 4 Let the print media run out before refilling the multi pur...

Page 92: ...oaded correctly in the multi purpose tray 1 User s Guide Printout is skewed The print media may not be loaded correctly Make sure the print media is loaded correctly in the multi purpose tray 1 User s...

Page 93: ...ocuments being sent from memory Allow time for those documents to finish sending An error may have occurred during sending Print an ACTIVITY REPORT 1 User s Guide and check for an error code 1 p 9 8 T...

Page 94: ...are Center Receiving Problems Cannot receive a fax automatically The machine may not be set to receive automatically For the machine to receive faxes automatically the receive mode must be set to FAX...

Page 95: ...other party s fax machine may not send the CNG signal that tells your machine that the incoming call is a fax call Some fax machines cannot send this signal In such cases you will have to receive the...

Page 96: ...s fax machine may not support ECM If this is the case the document is received without ECM ECM may be disabled Make sure ECM on your machine is enabled 1 ECM RX p 10 7 Contact the other party to chec...

Page 97: ...nstallation of the printer driver During the installation you may be unable to continue beyond the dialog box prompting you to connect the USB cable to your port If you cannot continue the system is u...

Page 98: ...ices click the device and press the Delete key If you are unable to remove the device disconnect the power cord from the printer to turn it off and then reconnect the power cord 3 Disconnect the USB c...

Page 99: ...stallation disk and then click OK You need to check your Windows application settings To determine if your Windows application settings may be the problem print a test page with your printer driver To...

Page 100: ...or dot matrix printers will not look smooth when printed by your high resolution printer Choose another font Make sure you install an outline font manager such as Adobe Type Manager or Bitstream Facel...

Page 101: ...ot be supplying power Check the power cord by substituting with another or by using a voltmeter to test it for continuity Nothing appears in the LCD The power cord may not be plugged in securely Check...

Page 102: ...ited warranty c If the machine makes strange noises emits smoke or strange smells unplug it immediately and contact the Canon Customer Care Center Do not attempt to disassemble or repair the machine y...

Page 103: ...h the extension telephone connected to your machine When power is restored your machine automatically prints a MEMORY CLEAR REPORT that lists the documents that were deleted from memory as a result of...

Page 104: ...9 26 Troubleshooting Chapter 9...

Page 105: ...Chapter 10 Summary of Settings 10 1 Summary of Settings Chapter 10 Summary of Settings...

Page 106: ...sender information 1 p 2 5 Follow this procedure to print the USER S DATA LIST 1 Press Function 2 Press Report 3 Use or to select USER DATA LIST 4 Press Set The machine prints the USER S DATA LIST Th...

Page 107: ...ed 6 Refer to the appropriate table 1 following pages and use these guidelines to select and register settings Use or to scroll through the settings To register a setting or access sub settings press...

Page 108: ...Selects the prefix for the machine number 1 p 2 5 Selects the scanning contrast 1 p 4 3 Enables disables the off hook alarm that alerts you that the handset is not seated properly in its cradle Sets t...

Page 109: ...the first page of the fax under the report Enables disables automatic printing of an RX reception REPORT 1 User s Guide OUTPUT NO No report is printed PRINT ERROR ONLY Prints a report only when a rece...

Page 110: ...of redial attempts Selects the time interval between redial attempts Enables disables automatic scanning of documents after the fax number is entered ON Scanning begins automatically five seconds aft...

Page 111: ...s for a specified time If you select ON above this setting selects the length of time the machine rings before switching to fax receive mode Enables disables remote receiving If you select ON above th...

Page 112: ...CHANGE CARTRIDGE displayed in the LCD RX TO MEMORY Stops printing and received faxes are stored in memory KEEP PRINTING Ignores the warning and keeps printing the entire document This setting is conv...

Page 113: ...ment is deleted from memory once it is polled or continues to be stored in memory ON Document is deleted from memory after it is polled OFF Document remains in memory after it is polled Changes the po...

Page 114: ...of the LCD messages settings and reports Selects the speed at which the machine starts transmitting Selects the speed at which the machine starts receiving Sets the daylight saving time 1 User s Guide...

Page 115: ...Appendix Specifications A 1 Specifications Appendix Specifications...

Page 116: ...onsumption Max Approx 660 W Standby Approx 3 5 W Weight Approx 22 lb 10 kg With components attached Dimensions A 2 Specifications Appendix 22 8 578 mm 14 6 372 mm 15 8 401 mm 17 5 445 mm 15 8 401 mm 1...

Page 117: ...nt Specifications Printing Method Laser beam printing Paper Handling Automatic feed Print Media Size and Weight 1 p 3 4 Recommended Print Media 1 p 3 6 Print Speed Approx 6 pages minute Print Width Ma...

Page 118: ...s mm 15 4 lines mm Dialing Automatic dialing One touch speed dialing 15 destinations Coded speed dialing 100 destinations Group dialing Max 114 destinations Directory dialing with Directory button Reg...

Page 119: ...GE message 8 7 9 8 9 9 CHANGE DATA setting 10 9 CHECK COVER message 9 9 CHECK DOCUMENT message 9 2 9 9 CHECK PAPER SIZE message 9 9 CHECK POLLING ID message 9 9 CHECK PRINTER message 9 9 CHK SUBADDR P...

Page 120: ...ing 10 7 E ECM RX message 9 10 setting 10 7 ECM TX message 9 10 setting 10 6 ECONOMY PRT setting 10 8 Envelopes printable area 3 5 requirements 3 4 selecting 3 6 ERASE AFTER TX setting 10 9 F F T RING...

Page 121: ...l menu names accessing 10 3 definition v system understanding 10 2 10 3 Messages See LCD messages MID PAUSE SET setting 10 6 Mistake correcting 2 4 Multi purpose tray 1 3 capacity 3 4 cover 1 3 N NO R...

Page 122: ...setting 10 7 Roller transfer charging 1 3 ROTARY PULSE setting 2 8 10 4 RX Reception SETTINGS menu 10 3 10 7 RX CALL LEVEL setting 10 4 RX MODE setting 10 7 RX PAGE FOOTER setting 10 7 RX REDUCTION se...

Page 123: ...etting 10 8 TOUCH TONE setting 2 8 10 4 Transfer charging roller 1 3 Transparencies requirements 3 4 selecting 3 6 Tray multi purpose 1 3 multi purpose cover 1 3 support 1 3 TTI POSITION setting 10 4...

Page 124: ...ano 8 20097 San Donato Milanese MI Italy CANON LATIN AMERICA INC 703 Waterford Way Suite 400 Miami Florida 33126 U S A CANON AUSTRALIA PTY LTD 1 Thomas Holt Drive North Ryde Sydney N S W 2113 Australi...

Reviews: