background image

14

Chapter 1

Before Printing

„

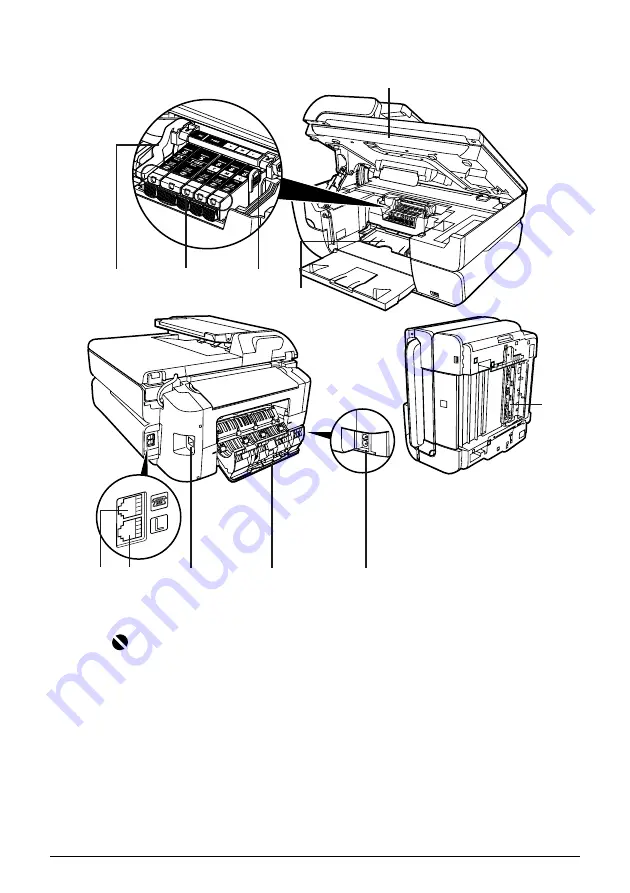
Rear View and Interior

(17) Print Head Lock Lever

Used to fix the Print Head.

(18) Ink Lamp

Lights or flashes red to indicate the status of the ink tank. You can check the status of 
each ink tank according to the way its lamp flashes. See 

“Ink Lamps” on page 15

.

(19) Print Head Holder

Used to install a Print Head.

(20) Scanning Unit (Printer Cover)

This is the unit used to scan documents. Open this unit when replacing the ink tanks, or 
clearing jammed paper.

(21) Inner Cover

Open this cover when replacing the ink tanks, or clearing jammed paper.

Important

Do not pull up this lever after installing the Print Head.

(20)

(17)

(18)

(19)

(21)

(27) (26)

(25)

(22)

(24)

(23)

Summary of Contents for 0580B002

Page 1: ... L5T 1P7 Canada Canon Latin America Inc 703 Waterford Way Suite 400 Miami FL 33126 U S A Canon Mexicana Boulevard Manuel Avila Camacho No 138 PB y Pisos 15 16 y 17 Colonia Lomas de Chapultepec Delegación Miguel Hidalgo CP 11000 Mexico D F User s Guide User s Guide QT5 0210 V02 ENG The following ink tanks are compatible with this machine For details on ink tank replacement refer to Replacing Ink Ta...

Page 2: ... your product s war ranty period For more information and updated program specifics please visit our web site at www canontechsupport com Support program specifics are subject to change without notice Ordering Information For additional supplies use the following descriptions and order numbers Description Order Ink Tanks CLI 8 BK 0620B002 CLI 8 C 0621B002 CLI 8 M 0622B002 CLI 8 Y 0623B002 PGI 5 BK...

Page 3: ...nowing When to Replace Ink Tank 99 Replacing Ink Tanks 99 When Printing Becomes Faint or Colors are Incorrect 103 Printing the Nozzle Check Pattern 104 Print Head Cleaning 105 Print Head Deep Cleaning 106 Aligning the Print Head Automatically 106 Cleaning Your Machine 107 9 Troubleshooting 111 If the Power Disconnects Unexpectedly 113 An Error Message is Displayed on the LCD 113 Cannot See the Dis...

Page 4: ...2 Customer Technical Supports 167 Users in New Zealand 168 Index 169 ...

Page 5: ... for energy efficiency All information regarding non Canon products was compiled from publicly available information No representation is made regarding the accuracy thereof Super G3 is a phrase used to describe the new generation of fax machines that use ITU T V 34 standard 33 6 Kbps modems Super G3 High Speed Fax machines allow transmission time of approximately 3 seconds per page which results ...

Page 6: ...tarting to use the machine After following instructions in the Easy Setup Instructions read this guide for instructions on printing from your computer direct photo printing from selected digital cameras copying faxing and scanning Refer to these guides as needed for full instructions on some of the more advanced features Printer Driver Guide Refer to this guide for full instructions on setting the...

Page 7: ...of the type of power available consult your local power company The shape of the plug and outlet may vary depending on the country of purchase Do not allow the power cord to be near objects that emit heat The outer cover of the power cord may melt resulting in fire or electrical shock Never use the machine if the power cord is bundled or knotted Knots in the cord may result in fire or electrical s...

Page 8: ...inches 15 cm from electric products equipped with fluorescent lighting If you place it near to them the machine may malfunction as a result of the noise emitted by the fluorescent lighting When turning OFF the power be sure to press ON OFF and confirm that the Alarm Lamp has shut off If you pull the power plug out of the wall outlet while the Alarm Lamp is lit or flashing the Print Head is not pro...

Page 9: ... 50 60 Hz depending on local electrical requirements Do not plug the machine into the same circuit as appliances such as an air conditioner television or copier These devices generate electrical noise which may interfere with your machine s operation Whenever you turn OFF the power and unplug the machine wait at least one minute before you plug it in again Use only the power cord that came with th...

Page 10: ...be careful not to get ink on your hands or clothing If ink gets on your hands or clothing wash them soon in running water If you use hot water the ink may adhere and become difficult to remove After printing do not touch the electrical contacts of the Print Head They will be hot and may result in burns or electrical shock Do not subject the machine to strong physical shock or vibration This can da...

Page 11: ...ONS When using your telephone equipment basic safety precautions should always be followed to reduce the risk of fire electric shock and injury to persons including the following 1 Do not use this product near water for example near a bath tub wash bowl kitchen sink or laundry tub in a wet basement or near a swimming pool 2 Avoid using this product during an electrical storm There may be a remote ...

Page 12: ...on to these warnings Caution Indicates a caution concerning operations that may lead to injury to persons or damage to property if not performed correctly In order to use the machine safely always pay attention to these cautions Important Indicates operational warnings and restrictions Be certain to read these items to operate the machine correctly and to avoid damage to the machine Note Indicates...

Page 13: ...n z Paper money z Money orders z Certificates of deposit z Postage stamps canceled or uncanceled z Identifying badges or insignias z Selective service or draft papers z Checks or drafts issued by governmental agencies z Motor vehicle licenses and certificates of title z Traveler s checks z Food stamps z Passports z Immigration papers z Internal revenue stamps canceled or uncanceled z Bonds or othe...

Page 14: ...l it stops 5 Paper Guide When loading paper ensure that the left edge just touches this guide To move the Paper Guide pinch the knob and slide in the appropriate direction 6 Auto Sheet Feeder Load paper here before printing Paper feeds automatically one sheet at a time 7 Cover Guide Align the right side of the paper to this guide 8 Document Tray Open this tray to load a document Once loaded the do...

Page 15: ...utput to this tray It opens automatically when copying or printing is started If it is closed press the Open Button 13 Operation Panel Used to change the settings or operate the machine See Operation Panel Name and Functions on page 16 14 Platen Glass Used to load a document to be processed 15 Open Button Press this button to open the Paper Output Tray 16 Cassette Load paper to be used regularly h...

Page 16: ... to the way its lamp flashes See Ink Lamps on page 15 19 Print Head Holder Used to install a Print Head 20 Scanning Unit Printer Cover This is the unit used to scan documents Open this unit when replacing the ink tanks or clearing jammed paper 21 Inner Cover Open this cover when replacing the ink tanks or clearing jammed paper Important Do not pull up this lever after installing the Print Head 20 ...

Page 17: ... to the computer or the computer is in the sleep mode or standby mode do not disconnect and connect the USB cable Note z For information on how to install the Print Head and ink tanks refer to the Easy Setup Instructions Ink Lamps z You can check the status of each ink tank according to the way its lamp flashes On The machine is ready to print Slow flashing about three seconds Ink is low Prepare a...

Page 18: ...y and fax intensity 8 Enlarge Reduce Sets the reduction or enlargement ratio for copying 9 LCD Liquid Crystal Display Displays messages menu selections and the operation status 10 Menu Displays menus to configure copy fax or machine settings 11 Numeric Buttons Enters numerical values such as the number of copies as well as fax telephone numbers and characters 12 Redial Pause Redials the last diale...

Page 19: ...utton is pressed during printing the machine aborts printing Resets the settings for the number of copies for the ratio of reduction enlargement for the intensity and on 1 SPECIAL COPY Also enables you to return to the standby screen after you set some menus 19 Color Starts color copying or faxing 20 Black Starts black white copying or faxing 21 Paper Sets the page size and media type for copying ...

Page 20: ...lows Note If preparatory operations above are not yet finished follow the Easy Setup Instructions to complete them Note z If the Alarm Lamp lights or flashes orange and an error message is displayed on the LCD see An Error Message is Displayed on the LCD on page 113 z The machine goes into the Power Saver Mode if not operated for the specified time the default is 5 minutes See Setting the Power Sa...

Page 21: ...t these requirements Loading Documents Load documents that you want to copy fax or scan on the Platen Glass or in the ADF Platen Glass ADF Document type z Special types of paper z Photographs z Book z Documents that are not suitable for the ADF Multipage documents of the same size thickness and weight Size W x L Max 8 5 x 11 7 216 x 297 mm Max 8 5 x 14 0 216 x 356 mm Min 5 8 x 5 8 148 x 148 mm Qua...

Page 22: ...ntly close the Document Cover Note z Make sure any glue ink correction fluid or the like is completely dry before loading the document z Remove all staples paper clips and the likes before loading the document Note z The machine cannot scan the area within about 0 08 2 mm from the rear edge and within about 0 08 2 mm from the left edge of the Platen Glass z You can also scan in originals that are ...

Page 23: ... document width 2 Note z Set a document on the Platen Glass if you want to scan it at optimum quality z The area range within 0 08 2 mm from the top edge of document cannot be printed since the machine cannot scan it z Do not load the following types of documents in the ADF They will jam Wrinkled or creased paper Curled paper Torn paper Paper with holes Carbon paper or carbon backed paper Surface ...

Page 24: ...W 201 0 51 13 mm A4 Letter 0 51 13 mm A4 Letter Plain Paper Glossy Photo Paper GP 401 10 sheets A4 Letter 20 sheets 4 x 6 101 6 x 152 4 mm Credit Card 10 sheets A4 Letter 20 sheets 4 x 6 101 6 x 152 4 mm Not supported Credit Card 5 Glossy Photo Paper Glossy Photo Paper Everyday Use GP 501 10 sheets A4 20 sheets 4 x 6 101 6 x 152 4 mm 10 sheets A4 20 sheets 4 x 6 101 6 x 152 4 mm Glossy Photo Paper...

Page 25: ...postcards z Postcards affixed with photos or stickers z Envelopes with double flaps z Envelopes with sticker flaps Photo Paper Plus Semi gloss 3 SG 101 10 sheets A4 Letter 20 sheets 4 x 6 101 6 x 152 4 mm 10 sheets A4 Letter 20 sheets 4 x 6 101 6 x 152 4 mm Photo Paper Plus Glossy Photo Paper Pro 3 PR 101 10 sheets A4 Letter 20 sheets 4 x 6 101 6 x 152 4 mm 10 sheets A4 Letter 20 sheets 4 x 6 101 ...

Page 26: ... not touch the print surface until the ink is dry approx 30 minutes Colors in dark images may appear indistinct at first but will become clearer after approx 30 minutes z Images may become smudged if you place them in an album before the ink is completely dry It is recommended that you allow the ink to dry for 24 hours z Do not attempt to dry the ink with a hair dryer or by exposing printouts to d...

Page 27: ...out of paper the paper source automatically switches to the other one This is useful for printing onto a large volume of paper Note z For information on page size media type and paper support load limit for Auto Sheet Feeder or Cassette see Recommended Paper and Requirements on page 22 z For information on the printer driver settings refer to the Printer Driver Guide Important z When printing from...

Page 28: ...cally 6 Press OK 7 Press Stop Reset Changing the Paper Source Before printing confirm that the location where you have loaded paper is selected as a paper source Press Feed Switch to change the paper source Note For information on page size media type and paper support load limit for the Auto Sheet Feeder or Cassette see Recommended Paper and Requirements on page 22 ON Switches the paper source au...

Page 29: ...aper source with the printer driver when printing from the computer For details refer to the Printer Driver Guide Important Load plain paper A4 letter or legal size when receiving faxes Note For detailed information on the specialty media Canon provides for use with its various printers see Recommended Paper and Requirements on page 22 Note z Align the edges of paper neatly before loading Loading ...

Page 30: ... that the Auto Sheet Feeder Lamp A lights 3 Load the paper 1 Load the paper into the Auto Sheet Feeder with the print side face up 2 Align the paper stack to the Cover Guide on the right side of the Paper Support 3 Pinch the Paper Guide and slide it against the left side of the paper stack Note You can also select the paper source with the printer driver For details refer to the Printer Driver Gui...

Page 31: ...aper to half approx 0 2 5 mm in height z Remove the printed sheets from the Paper Output Tray before the count reaches 50 z Do not touch the printed surfaces until the ink dries For specific drying times refer to the instructions packaged with your media Important z Envelopes can be used only when printing from a computer z Do not use envelopes with embossed or treated surfaces a double flap press...

Page 32: ...Guide on the right side of the Paper Support 2 Pinch the Paper Guide and slide it against the left side of the paper stack Note A maximum of 10 envelopes can be loaded at once Note z Fold the envelope flap shut A z Printing direction B Important Cutting plain paper to 4 x 6 101 6 x 152 4 mm 5 x 7 127 0 x 177 8 mm or 2 13 x 3 39 54 0 x 86 0 mm Credit Card size for a trial printing can cause paper j...

Page 33: ...ndows on page 84 or Printing with Macintosh on page 86 Loading the Print Media in the Cassette Depending on page size and media type some paper must always be loaded in the Auto Sheet Feeder If you intend to use only the Cassette check any usage restrictions in advance See Recommended Paper and Requirements on page 22 Important Always load paper in portrait orientation A Loading paper in landscape...

Page 34: ...ad plain paper A4 or letter size when receiving faxes Note z Load legal size paper in the Auto Sheet Feeder since it cannot be loaded into the Cassette z For detailed information on the specialty media Canon provides for use with its various printers refer to Recommended Paper and Requirements on page 22 Note z Align the edges of paper neatly before loading Loading paper without aligning the edges...

Page 35: ...Important Do not load the paper beyond this Load Limit Mark A Note z You can use general copy paper or Canon s Super White Paper SW 201 z You can load up to 150 sheets of plain paper 17 lb 64 gsm 0 51 13 mm in height in the Cassette However do not stack more than 50 sheets in the Paper Output Tray z Do not touch the printed surfaces until the ink dries For specific drying times refer to the instru...

Page 36: ... also select the paper source with the printer driver For details refer to the Printer Driver Guide Important z Envelopes can be used only when printing from a computer z Do not use envelopes with embossed or treated surfaces a double flap pressure seals or sticker flaps z Select either DL Env or Comm Env 10 according to the envelope size you are using z If the print image is upside down when prin...

Page 37: ...de face down Note Fold the envelope flap shut A Note Printing direction B Important z Do not leave photo paper such as Photo Paper Pro in the Cassette for a long time This may cause paper discoloration due to natural aging z If you are using photo paper such as Photo Paper Pro and have loaded them in the Cassette the printout may have roller traces on the print surface To avoid this load paper in ...

Page 38: ...omputer select the page size of the loaded paper from Page Size in the printer driver For a detailed description of the printer driver settings see Printing with Windows on page 84 or Printing with Macintosh on page 86 Note z Load the paper lengthways regardless of the direction of the document z You can load up to 20 sheets of 4 x 6 sized paper or up to 10 sheets of 5 x 7 sized paper Important Al...

Page 39: ...rinting photographs See Recommended Paper and Requirements on page 22 Note The asterisk on the LCD indicates the current setting Note Some of these are not available depending on the country of purchase Note In order to obtain optimal quality print results when copying photographs use Canon recommended Photo Paper Pro or Photo Paper Plus Glossy For details on media see Recommended Paper and Requir...

Page 40: ...per Everyda y Use GP 501 10 sheets A4 10 sheets A4 A4 GLOSSY 20 sheets 4 x 6 101 6 x 152 4 mm 20 sheets 4 x 6 101 6 x 152 4 mm 4x6 101 6x152 4 Matte Photo Paper MP 101 10 sheets A4 Letter 10 sheets A4 Letter A4 8 5x11 LTR MATT PHOTO 20 sheets 4 x 6 101 6 x 152 4 mm 20 sheets 4 x 6 101 6 x 152 4 mm 4x6 101 6x152 4 Photo Paper Plus Glossy 2 PP 101 10 sheets A4 Letter 5 x 7 127 0 x 177 8 mm 10 sheets...

Page 41: ...garding the printer driver setting for media type see Recommended Paper and Requirements on page 22 z When using plain paper 17 lb 64 gsm up to 150 sheets 0 51 13 mm in height can be loaded in the Auto Sheet Feeder and Cassette respectively ...

Page 42: ... copying 1 Check the page size and media type A Ratio of Reduction Enlargement B Page Size C Print Quality D Number of Copies E Media Type F Intensity 2 Use or to specify the number of copies Note Press Feed Switch so that the Auto Sheet Feeder Lamp lights when loading paper in the Auto Sheet Feeder and the Cassette Lamp lights when loading paper in the Cassette Note For information on the types a...

Page 43: ...K 3 Use or to select the preset ratio 25 70 86 100 115 141 400 z Pressing decreases the copy ratio and pressing increases the ratio z Press and hold down or to quickly advance through the ratios 4 Press OK z Using Custom Copy Ratios Zoom In addition to making reduction and enlargement decisions using preset copy ratios you can use customized 1 decrement increment 1 Press Enlarge Reduce Note For in...

Page 44: ...ntensity Exposure intensity is the degree of difference between light and dark Increasing the exposure setting further blackens dark areas and whitens bright areas Conversely decreasing the exposure setting reduces the difference between bright and dark areas You can adjust the exposure between five gradations 1 Press Exposure 2 Use or to select the MANUAL ADJUST or AUTO ADJUST A 3 Press OK Note T...

Page 45: ...Short side stapling Procedure 1 Press Two Sided to select STAPLE SIDE 2 Use or to select LONG SIDE STAPLE or SHORT SIDE STAPLE Note When AUTO ADJUST A is selected the document loaded in the ADF cannot be scanned STANDARD Suitable for text only documents HIGH Suitable for photographs FAST Suitable for high speed copying at a lower image quality Note z When using FAST if the quality is not as good a...

Page 46: ...ent is scanned in Note When you copy the second sheet of document press the same Start button Black or Color as the first operation after loading the second sheet on the Platen Glass Note z The ADF is not available for scanning two sided documents at a stretch z This function cannot be used in conjunction with FIT TO PAGE under ENLARGE REDUCE or other copy functions z If you perform black white co...

Page 47: ...es to Fit onto a Single Page 2 on 1 copy on page 45 4 ON 1 See Copying Four Pages to Fit onto a Single Page 4 on 1 copy on page 46 STICKER COPY See Creating Stickers Sticker copy on page 47 BORDERLESS COPY See Copying without Borders Borderless copy on page 48 IMAGE REPEAT See Repeating an Image on a Page Image repeat on page 49 COLLATED COPY See Making Multiple Copies of an Entire Document Collat...

Page 48: ... the Platen Glass and press Start If you do not need more scanning press OK z When the document was loaded in the ADF The machine starts scanning in the next sheet of document automatically after one sheet of document is scanned in Copying Four Pages to Fit onto a Single Page 4 on 1 copy This feature enables you to copy four documents onto a single sheet of paper by reducing each image Four differ...

Page 49: ...ass and press Start If you do not need more scanning press OK z When the document was loaded in the ADF The machine starts scanning in the next sheet of document automatically after one sheet of document is scanned in Creating Stickers Sticker copy You can easily make stickers from 4 x 6 101 6 x 152 4 mm photos or graphics using Canon Photo Stickers Note You cannot specify ENLARGE REDUCE for this ...

Page 50: ...black white copying Copying without Borders Borderless copy This feature enables you to copy color images so that they fill the entire page without borders Note This function cannot be used in conjunction with other copy functions Note The document loaded in the ADF cannot be scanned Note z You cannot specify the page size media type ENLARGE REDUCE or AUTO ADJUST A as the intensity when using this...

Page 51: ... copy an image multiple times onto a single page You can set the machine to automatically select the number of times it repeats the image or you can specify the number Note The document loaded in the ADF cannot be scanned Note z The copied image may need to be enlarged to fit onto the selected page size when making borderless copies Some cropping may occur z You can use this feature only when the ...

Page 52: ...go to step 5 5 Use or to set the vertical repeats 1 to 4 6 Press OK 7 Use or to set the horizontal repeats 1 to 4 8 Press OK 9 Specify the page size and media type See Changing the Page Size and Media Type on page 37 10 Specify the necessary items See Changing the Copy Settings on page 41 Note When AUTO is selected the document loaded in the ADF cannot be scanned Note C CARD cannot be selected for...

Page 53: ... the reduction enlargement ratio z The size of the documents to copy should be no larger than one division of the paper For example if you copy four documents at the same size their sizes must be one fourth of the page size or smaller Note z This function cannot be used in conjunction with other special copyings z Load the document in the ADF when using this function z Using this function might ca...

Page 54: ... and media type See Changing the Page Size and Media Type on page 37 5 Specify the necessary items See Changing the Copy Settings on page 41 6 Press Color for color copying or Black for black white copying Note You cannot select FIT TO PAGE as the copy ratio and AUTO ADJUST A as the intensity ...

Page 55: ...f photos from a digital still camera camcorder or mobile phone without the need to use a computer z It is possible to specify which images to print and various print settings from the operation panel of your camera or mobile phone z Canon Bubble Jet Direct allows you to print photos from a Canon Bubble Jet Direct compatible PictBridge incompatible digital camera or digital video camcorder without ...

Page 56: ... the digital device connected to the machine it is advisable to use the AC adapter supplied with the device If you use the device battery be sure to charge it fully Note The Print Head cannot be aligned using the controls of the digital device If the Print Head alignment is not yet performed execute automatic Print Head alignment see Aligning the Print Head Automatically on page 106 Note Depending...

Page 57: ...printing mode that can be set on a PictBridge compliant device connected to the machine Confirming or Changing the Device Settings To change the page size or media type operate the device to select the PictBridge print setup mode and confirm or change the settings The settings below can be changed by pressing DEVICE SETTINGS in Menu on this machine when a PictBridge compliant device is connected H...

Page 58: ...odel About Image Data Format for Printing This machine accepts images taken with a camera compatible with the Design rule for Camera File System and PNG files Exif 2 21 compliant About Paper size and Paper type When the Default selections based on the machine setting is selected the machine operates based on the SIZE and the TYPE settings made using the controls of the machine The following sizes ...

Page 59: ...elected for some models A4 8 5 x 11 Letter 3 4 Photo Photo Paper Plus Glossy Photo Paper Plus Semi gloss Glossy Photo Paper Fast Photo Photo Paper Pro A4 3 4 Photo Glossy Photo Paper Everyday Use 5 4 x 8 6 cm Credit Card Photo Glossy Photo Paper Note z When printing onto Photo Stickers PS 101 16 up use the following settings 1 Select the Auto Sheet Feeder as the paper source For details see Loadin...

Page 60: ...ng with their limitations when connected to this machine Media Types for Digital Camera When you connect a digital camera you can use the following media Note z Never disconnect the USB cable during printing z When disconnecting the USB cable between the PictBridge compliant device and machine follow the instructions given in the device s instruction manual z Controls of the device cannot be used ...

Page 61: ...image displayed in the single display mode or in the index display mode You can print specified numbers of images or make an index print by editing the DPOF Images other than Exif may not be index printed For the images taken with an ExifPrint compatible digital camera the ExifPrint function can be used If date printing is set from the digital camera the date when the photograph was taken is to be...

Page 62: ...hine cannot send receive faxes if the connection is incorrect Connect the machine correctly z Connecting to the Telephone Line z Connecting to an Analog Line A Telephone line analog z Connecting to an ADSL B Asymmetric Digital Subscriber Line C Splitter D ADSL modem splitter may be built in to the modem E Computer For details on ADSL connection and settings see the manual supplied with your ADSL m...

Page 63: ...cting a Telephone or Answering Machine via a Computer J Computer K Telephone or answering machine z Connecting a Telephone or Answering Machine Directly L Telephone or answering machine For Users In The UK If the connector of the external device cannot be connected to the jack on the machine you will need to purchase a B T adapter to connect as follows Connect the external device line to the B T a...

Page 64: ...Sender Information You can register sender information Transmit Terminal Identification TTI in your machine so that your name or company name your fax telephone number and the date and time of transmission are printed in small type at the top of each page to be received Thus whenever you send a fax from this machine the recipient receiving the fax knows who sent it and when it was sent Below is an...

Page 65: ...r and Name Sender Information on page 64 z Three formats of date are available For details on the date format settings see DATE DISPLAY on page 93 Note z When your machine is connected to a computer with the MP driver installed even if the date and time are entered from the Operation Panel of the machine the date and time will be read from your computer every time you start the computer turn the m...

Page 66: ...ss OK 7 Press OK 8 Use the numeric buttons to enter your name max 24 characters including spaces 9 Press OK 10 Press Stop Reset Note For details on how to enter or delete numbers see Guidelines for Entering Numbers Letters and Symbols on page 68 Note For details on how to enter or delete characters see Guidelines for Entering Numbers Letters and Symbols on page 68 Note You can print the USER S DAT...

Page 67: ...ou want to register max 60 digits 40 digits for Korea including spaces 6 Press OK two times 7 Use the numeric buttons to enter a name for the coded speed dialing code max 16 characters including spaces 8 Press OK The CODED DIAL REGIST screen is displayed to enter the next number z If you continue registering coded speed dialing codes repeat the procedure from step 4 z If not go to step 9 9 Press S...

Page 68: ... to 4 under Registering Coded Speed Dialing 2 Press and hold to delete the registered number 3 Press OK 4 Press Stop Reset The name will automatically be deleted when you delete the number Printing the CODED SPEED DIAL TELEPHONE NO LIST You can print a list of the recipients registered for coded speed dialing You may want to keep the list near your machine to refer to it when dialing 1 Press FAX t...

Page 69: ...s 1 Press FAX then press Menu 2 Use or to select USER SETTINGS then press OK 3 Use or to select SUMMER TIME SET then press OK 4 Use or to select ON or OFF z If you select OFF go to step 21 z If you select ON go to step 5 5 Press OK three times 6 Use or to select the month when summer time starts 7 Press OK two times 8 Use or to select the week when summer time starts FIRST WEEK SECOND WEEK THIRD W...

Page 70: ...se or to select the day of the week when summer time ends 19 Press OK two times 20 Use the numeric buttons to enter the time in 24 hour format when summer time ends Precede single digit with a zero 21 Press OK 22 Press Stop Reset Guidelines for Entering Numbers Letters and Symbols 1 Press to switch to uppercase letter mode A lowercase letter mode a or number mode 1 You can see what mode you are in...

Page 71: ...odels with lowercase letter mode SP indicates a space Models without lowercase letter mode Note Lowercase letter mode a may not be available depending on the country of purchase Button Uppercase letter mode Lowercase letter mode Number mode 1 1 2 ABCÅÄÁÀÃÂÆÇ abcåäáàãâæç 2 3 DEFËÉÈÊ defëéèê 3 4 GH I Ï Í Ì Î gh i ï í ì î 4 5 JKL jkl 5 6 MNOÑØÖÓÒÕÔ mnoñøöóòõô 6 7 PQRSÞ pqrsþ 7 8 TUVÜÚÙÛ tuvüúùû 8 9 W...

Page 72: ...gistered for coded dial speed dialing See Printing the CODED SPEED DIAL TELEPHONE NO LIST on page 66 USER S DATA LIST Lists the current settings of your machine and the registered sender information See USER S DATA LIST on page 71 MEMORY LIST Lists the documents currently stored in the machine s memory See Printing the MEMORY LIST on page 76 TX Transmission REPORT Prints after transmission of a do...

Page 73: ...sending a document You can set the machine to print every time it sends a document or only when an error occurs Alternatively you can disable printing of a report RX REPORT Your machine can print an RX reception REPORT after receiving a document You can set the machine to print every time it receives a document or only when an error occurs Alternatively you can disable printing of a report Sending...

Page 74: ...t Color sending is available only when the recipient s fax machine supports color faxing Step 1 Load the document or photograph you want to send on the Platen Glass or in the ADF Step 2 Adjust the fax resolution and scan contrast See Before Sending Faxes on page 72 Step 3 Dial the recipient s number using the numeric buttons or coded speed dialing See How to Use Coded Speed Dialing on page 75 Step...

Page 75: ...three methods of sending faxes z Memory sending z Manual sending z Sending from your computer This section explains how to use these methods z Sending from Your Machine Memory Sending 1 Load the document on the Platen Glass or in the ADF 2 Press FAX 3 Adjust the settings for your document as necessary STANDARD Suitable for text only documents FINE Suitable for fine print documents PHOTO Suitable f...

Page 76: ...scan contrast see Adjusting the Scan Contrast on page 73 Note For details on how to use coded speed dialing see How to Use Coded Speed Dialing on page 75 Important If you do not press the same button you pressed in step 5 the machine does not start scanning Important Color sending is available only when the recipient s fax machine supports color faxing Note z To cancel sending before sending a fax...

Page 77: ...ing Then hang up the handset z Sending Faxes from Your Computer With your machine connected to your computer you can send faxes from the computer For details refer to the FAX Driver Guide How to Use Coded Speed Dialing Pre registering fax numbers in coded speed dials enables you to dial them by just pressing Coded Dial and entering a two digit code 1 Press Coded Dial Note For details on how to loa...

Page 78: ...is specified Documents Stored in Memory z Printing the MEMORY LIST The machine can print a list of documents stored in memory MEMORY LIST showing the transaction number TX RX NO transaction mode recipient name number of pages date and transmission time of each document This will help you select a document in memory you wish to delete or print 1 Press FAX then press Menu Note z For details on memor...

Page 79: ...ep 5 z If you select DELETE DOCUMENT 1 Press OK 2 Use or to select the transaction number TX RX NO of the document you want to delete or enter the number using the numeric buttons 3 Press OK 4 Use to select YES to delete document or use to select NO not to delete the document 5 Press OK 6 To delete another document return to branch step 2 or to finish deleting go to step 5 5 Press Stop Reset z Che...

Page 80: ...chine is connected through a PBX or other telephone switching system you have to dial the outside line access number first and then the number of the party you are calling z Sending Receiving Using ECM This machine is set to send receive faxes in ECM Error Correction Mode Checking the sending and receiving condition at the sending end and the receiving end respectively ECM automatically corrects e...

Page 81: ...alls by the call ring patterns Network Switch This setting is not available in some countries and regions NETWORK SWITCH Note z You have to connect a telephone to the External Device Jack when you set MANUAL MODE FAX TEL AUTO SW NETWORK SWITCH or DRPD z You have to connect an answering machine to the External Device Jack when you set ANS MACHINE MODE Important z Load legal size paper in the Auto S...

Page 82: ...nted after about three minutes automatically If you want to print the received faxes immediately press FAX z When you receive a fax call The machine will receive the fax automatically z When you receive a voice call You will not be able to answer the call Note The telephone does not ring when it receives a fax call If you want it to ring connect a telephone to your machine and enable the INCOMING ...

Page 83: ...machine from a remote telephone the security code for this function may be the same as the remote receiving ID If so make sure you change the machine s remote receiving ID to make it distinct from the answering machine s security code See REMOTE RX on page 96 z If the paper is not set on the sending side your machine will go into the reception standby mode z When you receive a fax call First the a...

Page 84: ...etting the Receive Mode 1 Press FAX then press Menu 2 Press OK 3 Use or to select the receive mode Note For details on the FAX TEL AUTO SW settings see FAX TEL AUTO SW on page 95 z When you receive a fax call The machine will ring according to the ring pattern you have chosen and receive the fax automatically z When you receive a voice call The telephone will ring according to the ring pattern you...

Page 85: ... If You Want to Receive Voice Messages on Your Answering Machine and Receive Faxes Automatically on page 81 FAX TEL AUTO SW See If You Want to Receive Faxes Automatically as well as Voice Calls on page 81 DRPD See If You Have Subscribed to a Distinctive Ring Pattern Detection DRPD Service with Your Telephone Company US and Canada only on page 82 NETWORK SWITCH See If You Want Your Machine to Autom...

Page 86: ... the printer properties dialog box 1 Select Print from the application software s File menu The Print dialog box opens 2 Ensure that your machine is selected Note z Menu and command names may differ between application softwares and more steps may be required For details refer to the documentation for each application software you use z The steps described in this section are for printing in Windo...

Page 87: ...ct the type of media loaded in the machine 2 Ensure that Paper Feed Switch is selected from Paper Source 3 Specify the print quality and other settings in Print Quality or Color Intensity 4 Click OK The Printing Preferences screen is closed Note If another name of the machine is selected click the name of the machine to use Note For print settings refer to the Printer Driver Guide 2 3 1 2 3 4 ...

Page 88: ...lp to view the Printer Driver Guide Instructions is only displayed when the Printer Driver Guide is installed z Selecting the Preview before printing check box displays a preview screen that allows you to confirm the selected printing effects and how your document will look when printed Some application softwares do not have a preview function Note z You can cancel a print job in progress by simpl...

Page 89: ... Setup dialog box opens 2 Select MP530 from Format for 3 Select the desired page size from Paper Size 4 Click OK 6 Specify the required settings 1 Select Print from the application software s File menu The Print dialog box opens 2 Select Quality Media from the pop up menu 3 Select the desired media type from Media Type 4 Ensure that Paper Feed Switch is selected from Paper Source 5 Select the prin...

Page 90: ...ng mainly of text Detailed Setting Select to fine tune the Print Quality and Halftoning settings z For details about other printer driver functions click to view the Printer Driver Guide If the Printer Driver Guide is not installed the Printer Driver Guide is not displayed even if is clicked z Clicking Preview displays a preview screen that allows you to confirm the selected printing effects and h...

Page 91: ...he requirements for an original to set on the Platen Glass or in the ADF For details see Document Requirements on page 19 z Is the machine connected to your computer correctly Make sure your machine and computer are correctly connected with the USB cable Scanning Methods Scanning Using the MP Navigator Using the MP Navigator you can scan process and save documents to your computer On the Windows d...

Page 92: ...he application software you are using Note z If you performed the Custom Install and only installed the MP Driver and MP Navigator these application software were not installed and thus cannot be launched To launch any of the above application software from MP Navigator perform the Custom Install once again to install them z ScanSoft OmniPage SE does not support Windows 98 first edition z You can ...

Page 93: ...played 2 Use or to select the menu then press OK Example select EXTENDED AMOUNT 4 Change the settings 1 Use or to select the setting item then press OK Example select SMALL PRINT SETTINGS QUIET MODE Use this function if you want to reduce the operation noise such as when printing at night PREVENT ABRASION Use this setting only if the print surface becomes smudged Important z The printing speed may...

Page 94: ...rtant Be sure to revert this setting to OFF after printing since it may result in lower print quality Note If you set LARGE for this function the area of the image extending off the paper becomes larger Important z This function only works when both paper sources are loaded with paper of the same size and type z When printing from a computer you need to set this feature with the printer driver For...

Page 95: ...DED DIAL REGIST z CODED DIAL REGIST Registers coded speed dialing USER SETTINGS z DATE TIME SETTING Sets the current date and time z DATE DISPLAY Selects the date format displayed on the LCD and printed on faxes you send Three date formats are available YYYY MM DD MM DD YYYY and DD MM YYYY z SUMMER TIME SET PRINT 1ST PAGE ONLY You can select pages to be printed Select YES to print only the first p...

Page 96: ...machine z ACTIVITY REPORT Sets whether to print the ACTIVITY REPORT automatically after every 20 transactions TX SETTINGS z ECM TX START DATE TIME Sets the date and time that summer time starts SET MONTH SET WEEK SET DAY OF WEEK SET SHIFT TIME Specify the month Specify the week Specify the day of the week Specify the 24 hours END DATE TIME Sets the date and time that summer time ends SET MONTH SET...

Page 97: ...ettings z DRPD FAX RNG PAT If you select DRPD as the receive mode select the ring pattern for the machine This setting is only available in US and Canada z INCOMING RING If you select FAX TEL AUTO SW DRPD or FAX ONLY MODE as the receive mode enables disables ringing for fax calls A telephone must be connected to your machine for ringing to occur REDIAL TIMES If you select ON as AUTO REDIAL enables...

Page 98: ...report only when a print error occurred or every time you receive a fax OTHERS AUDIBLE TONES Selects the volume z KEYPAD VOLUME Selects the beep volume when pressing the buttons on the Operation Panel z ALARM VOLUME Selects the alarm volume PWR SAVE SETTING Specifies the time to switch the machine to the Power Saver mode COUNTRY SELECT Selects the country where you are using your machine This sett...

Page 99: ...Chapter 7 97 Changing the Machine Settings SAVE CONFIG Saves the settings for the Settings screen LOAD CONFIG Loads the settings for the Settings screen that were saved ...

Page 100: ...hes slowly about three seconds Prepare a new ink tank Repeats When ink has run out The ink lamp flashes fast about one second Replace it with a new ink tank Repeats If an error message is displayed on the LCD an ink tank error has occurred and the machine cannot continue to print See An Error Message is Displayed on the LCD on page 113 Black CLI 8BK Magenta CLI 8M Black PGI 5BK Cyan CLI 8C Yellow ...

Page 101: ... steps 1 Ensure that the machine is on 2 Raise the Scanning Unit Printer Cover until it stops The Paper Output Tray will open automatically and the Print Head Holder moves to the center Note Should missing characters or white streaks appear despite sufficient ink levels see When Printing Becomes Faint or Colors are Incorrect on page 103 Note It s recommended that the tank should be replaced with a...

Page 102: ... the tab A and remove the ink tank whose lamp is flashing red fast Do not touch the Print Head Lock Lever B Remove only the ink tank Important If the Scanning Unit Printer Cover is left open for more than 10 minutes the Print Head Holder moves to the right Close and reopen the Scanning Unit Printer Cover to return the Print Head Holder to the center A ...

Page 103: ... hole C Then remove the film B 2 Remove the orange protective cap D from the bottom of the ink tank and discard it Important z Handle ink tanks carefully to avoid staining clothing or the surrounding area z Discard empty ink tanks according to the local laws and regulations regarding disposal of consumables Note Be sure to replace ink tanks one by one when replacing more than one ink tank A B F E ...

Page 104: ...able to print z Do not squeeze the side of ink tanks F as this may cause the ink to leak out and stain your clothes and hands z Do not re attach the protective cap D once you have removed it z Do not touch the open ink port E once the protective cap is removed as this may prevent the ink from being ejected properly z Ink on the removed protective cap may stain your clothes and hands z Ensure that ...

Page 105: ...el z When you start printing after replacing the ink tank the machine executes Print Head cleaning automatically Do not perform any other operations until the Print Head cleaning finishes Note Before printing the nozzle check pattern or cleaning the Print Head check the following Open the Scanning Unit Printer Cover and make sure that all the ink tanks click into place and then their lamps light r...

Page 106: ...r on page 22 2 Use Feed Switch to select the paper source where you have loaded paper 3 Printing the nozzle check pattern 1 Press COPY 2 Press Menu repeatedly to select 4 MAINTENANCE Step 1 See Printing the Nozzle Check Pattern on page 104 After Print Head cleaning print the nozzle check pattern If missing lines or white stripes appear Step 2 See Print Head Cleaning on page 105 If the problem rema...

Page 107: ...g lines or white stripes appear in the nozzle check pattern This unclogs the nozzles to restore the Print Head condition Note that cleaning the Print Head causes waste ink to be absorbed in the waste ink absorber Cleaning the Print Head consumes ink so perform Print Head cleaning only when necessary 1 Ensure that the machine is on 2 Start the Print Head cleaning 1 Press COPY 2 Press Menu repeatedl...

Page 108: ...t the nozzle check pattern to verify that the Print Head nozzles are clean See Printing the Nozzle Check Pattern on page 104 When one specific color only does not print see Replacing an Ink Tank on page 98 2 If the problem remains make sure that ink remains in the ink tank Then turn off the machine s power for at least 24 hours and perform deep cleaning of the Print Head again 3 If the problem sti...

Page 109: ... a clean soft lint free cloth moistened with water Then wipe with a clean soft dry lint free cloth making sure not to leave any residue especially on the Platen Glass If you have trouble getting the scanning area clean wipe with diluted mild detergent for dish washing Note z The Cassette does not feed paper for aligning the Print Head Load paper in the Auto Sheet Feeder z Ensure that the Inner Cov...

Page 110: ... the rollers so perform this only when necessary 1 Press ON OFF to turn on the machine then remove any paper from the Auto Sheet Feeder and Cassette See Turning on the Machine on page 18 2 Use Feed Switch to select the paper source to clean 3 Clean the paper feed rollers 1 Press COPY 2 Press Menu repeatedly to select 4 MAINTENANCE 3 Use or to select ROLLER CLEANING then press OK The paper feed rol...

Page 111: ...terior of the machine becomes dirty paper printed onto by the machine may get dirty so we recommend performing cleaning regularly 1 Press ON OFF to turn on the machine then remove any paper from the Auto Sheet Feeder See Turning on the Machine on page 18 2 Press the Open button to open the Paper Output Tray and open up and set the extension by pressing down the hollow on the front side 3 Prepare a...

Page 112: ...e may be stained Clean them up See Cleaning the ADF on page 108 Cleaning the Protrusions inside the Machine If protrusions inside the machine are stained wipe ink off the protrusions using a swab or the like Important z Even if the Cassette is selected as the paper source paper will be fed from the Auto Sheet Feeder z Do not perform any other operation while the bottom plate is being cleaned ...

Page 113: ...t Work on page 137 z When You Connect to a Computer Running Windows XP the Screen Shows the Warning Message This device can perform faster or High SPEED USB Device Plugged into non High SPEED USB Hub on page 137 z Problems Receiving Faxes on page 138 z Cannot Receive a Fax Cannot Print a Fax on page 138 z Cannot Receive Faxes Automatically on page 139 z Machine Does Not Switch Automatically betwee...

Page 114: ...anning from the machine s operation panel on page 145 z Scanned image is slanted although document is set properly on page 145 z Scanned image is rotated although document is set properly on page 145 z An Error Message Appears on the Screen on page 146 z Service Error 5100 is Displayed on page 146 z Writing Error Output Error Communication Error on page 146 z When an Error is Displayed Regarding A...

Page 115: ...ur telephone type An Error Message is Displayed on the LCD An error message is displayed on the LCD take the corresponding countermeasure described below Message Action CANNOT SCAN FROM ADF The document is loaded in the ADF when applying FIT TO PAGE in Enlarge Reduce and STICKER COPY and BORDERLESS COPY in 1 SPECIAL COPY Load the document on the Platen Glass when copying with FIT TO PAGE in Enlarg...

Page 116: ...e the Print Head Canon shall not be liable for any machine malfunction or damage caused by refilled ink tanks If you want to continue printing with the refilled ink tank installed press and hold the Stop Reset for at least 5 seconds and then release it Using refilled ink tanks are memorized This operation will release the function for detecting the remaining ink level CHECK INK U140 U043 Possible ...

Page 117: ... After resolving the error make sure that the document you are loading meets the machine s requirements before redoing the operation See Document Requirements on page 19 DUPLEX UNIT JAM The Duplexing Transport Unit is jammed Clear the paper jam Then load paper in the Auto Sheet Feeder or the Cassette then press OK HEAD ALIGNMENT ERROR z A4 Letter sized paper is not loaded on the Auto Sheet Feeder ...

Page 118: ...enables you to resolve the error when sending faxes before printing out received data After you press Stop Reset to resolve the error ensure to press FAX in order to print out data remained in memory MEMORY IS FULL The machine s memory is full because you tried to copy too many pages at once or a very detailed document Divide the document and copy each part separately The machine s memory is full ...

Page 119: ...cted 3 Press Menu repeatedly to display the Maintenance screen 4 Use or to select ALIGN PRINT HEAD then press OK The Print Head alignment pattern is printed 5 Check the printed patterns and use or to input the number of the pattern in column A that has the least noticeable streaks 6 Press OK to move the cursor to column B and then use or to input the number of the pattern that has the least notice...

Page 120: ...the number Try dialing again after waiting for a moment NO TONE DETECTED The telephone line cable with a modular plug is not plugged in properly or DIAL TONE DETECT is set to ON Make sure that the cable is plugged in properly and resend the fax after a while If you still cannot send the fax set DIAL TONE DETECT to OFF NO RX PAPER The other party s fax machine is out of paper or its memory is full ...

Page 121: ...ter printing has finished The machine may be damaged if printing is continued under the ink out condition Note If multiple ink lamps are flashing check how fast they flash Fast flashing about one second indicates the ink is empty Slow flashing about three seconds indicates ink is low For details on different flashing speeds see Getting the Ink Level Information on page 98 Ink tank is not fully ins...

Page 122: ...en the printer properties dialog box 2 On the Main tab click High for the Print Quality setting When you cannot choose the High setting or when the print quality does not improve select Custom click Set and then adjust the Quality bar for higher print quality 1 Open the Print dialog box 2 Select Quality Media from the pop up menu and then click Detailed Setting 3 Drag the Print Quality slide bar t...

Page 123: ...been printing continuously over a long period If so the Print Head will overheat To protect the Print Head printing will stop temporarily and resume after a period of time Interrupt printing when appropriate turn OFF the machine and wait at least 15 minutes Caution The area around the Print Head may become extremely hot Do not under any circumstances touch it You are printing high resolution docum...

Page 124: ...uplex Printing Margin from the pop up menu 2 Select Automatic Duplex Printing and select Use reduced printing in Print Area Cause Action The document is not loaded correctly Check that the document is loaded correctly on the Platen Glass or in the ADF See Loading Documents on page 19 The quality Print quality displayed on the LCD is not suitable for the document Set the image quality suitable for ...

Page 125: ...ay and open up and set the extension by pressing down the hollow on the front side 3 Place the only one sheet of A4 Letter size plain paper in landscape horizontally fold it in half 4 Unfold the paper and load the paper in the Auto Sheet Feeder with the inverted V edge down 5 Use or to select BOTTOM CLEANING from the MAINTENANCE and press OK The paper that is loaded in the machine will feed throug...

Page 126: ...en open up and set the Paper Output Tray Extension completely by pressing down the hollow on the front side 6 Load three or more sheets of A4 Letter sized plain paper lengthways in the paper source you selected in step 2 7 Repeat steps 3 three times The paper that is loaded in the machine will feed through the machine and be ejected If there are no signs of improvement after performing three times...

Page 127: ... click Send 4 Click OK when the confirmation message appears 1 Open the Canon IJ Printer Utility dialog box 2 Select Custom Settings from the pop up menu 3 Select Prevent paper abrasion Note Clear the Prevent paper abrasion check box once printing is complete When Prevent paper abrasion is selected in the printer properties dialog box Windows or selected from Custom Settings in the Canon IJ Printe...

Page 128: ...ad in the portrait orientation regardless of the print direction of the Auto Sheet Feeder or Cassette Ensure that paper is loaded correctly Slide the Paper Guides against the paper stack The paper stack exceeds the capacity of the Auto Sheet Feeder The paper cannot be fed normally depending on its media type or your environment where the temperature and humidity are high or low In that case reduce...

Page 129: ...nning Unit Printer Cover and remove it Be careful not to touch the components inside the machine at this time After removing all paper close the Scanning Unit Printer Cover turn the machine off and turn it back on z If you cannot pull the paper out turn the machine off and turn it back on The paper will be ejected automatically 2 Reload the paper into the machine and press OK z If you have turned ...

Page 130: ... Rear Cover 4 If you could not extract the paper in step 2 remove the Cassette 5 Slowly pull the jammed paper out 6 If any paper is sticking out of the Cassette reload the paper in the Cassette 7 Insert the Cassette into the machine again and press the OK on the machine If you have turned off and on the machine in step 2 you will need to retry printing because this operation cancels any print jobs...

Page 131: ...he Auto Sheet Feeder if necessary 5 Insert the Cassette into the machine 6 Press the OK on the machine If you cannot remove the paper or if the paper tears inside the machine or if the paper jam error continues after removing the paper contact the Canon Customer Care Center Landscape Credit Card sized paper jams inside the machine You cannot load Credit Card sized paper in the landscape orientatio...

Page 132: ...zed paper in four push it in until it hits the jammed paper then pull out the paper folded in four 3 Close the Rear Cover then press ON OFF of the machine to turn on the power Wait until the jammed paper is automatically ejected If you cannot remove the jammed paper or the error still persists contact the Canon Customer Care Center Cause Action Document jams in the ADF Document Tray Remove the doc...

Page 133: ...er release lever A then remove the jammed page from under the roller to the Feeder Cover side 5 Pull out the jammed document from the ADF If the document cannot be pulled out with ease follow the procedure from step 2 under Document jams in the ADF inner side on page 132 Cause Action A ...

Page 134: ...either too high or too low In this case reduce the number of document pages to approximately half of the loading capacity See Document Requirements on page 19 If the document still jams use the Platen Glass instead Document jams in the ADF inner side Remove the document according to the following procedure 1 Follow steps 1 to 3 under Document jams in the ADF Document Tray on page 130 2 Open the Do...

Page 135: ...printing takes a long time or if it takes too much time to send data This may stop printing In such cases disconnect the cable between the machine and the camera and reconnect the cable between the machine and the camera Then turn the camera on if it does not automatically turn on If the problem is still unresolved select some other photo and check if it can be printed or not z Some PictBridge com...

Page 136: ...Print Head according to the Easy Setup Instructions If the Print Head has already been installed remove the Print Head and reinstall it If the error still remains the Print Head may be defective Contact the Canon Customer Care Center Waste tank ink absorber full This error message indicates that the waste ink absorber is nearly full The machine has a built in waste ink absorber to hold the ink use...

Page 137: ...Slow flashing about three seconds indicates ink is low For details on different flashing speeds see Knowing When to Replace Ink Tank on page 99 z Some ink tanks are not installed in place or more than one ink tanks of the same color are installed Confirm that the ink tanks are installed in the appropriate positions See Replacing Ink Tanks on page 99 Ink error No ink The ink tank that was once empt...

Page 138: ...inserted into the drive Click Start select My Computer and then double click the CD ROM icon For non Windows XP users open the My Computer window and then double click the CD ROM icon Double click the CD ROM icon on your desktop to start installation If the CD ROM icon is not displayed on the desktop there is a problem with the CD ROM Contact the Canon Customer Care Center You have a defective Set...

Page 139: ...1 1 In this case the machine operates properly but printing speed may slow down due to communication speed Check the following to ensure that your computer environment supports USB 2 0 Hi Speed connection z The USB port on your computer supports USB 2 0 Hi Speed connection z Both the USB cable and USB hub support USB 2 0 Hi Speed connection Be sure to use a certified USB 2 0 Hi Speed cable You are...

Page 140: ...A4 LTR or LGL is loaded If a paper size other than A4 LTR or LGL is loaded in the configured paper source incoming faxes are not printed and are stored in memory Change the paper in the configured paper source to A4 LTR or LGL size then press OK on the machine Load legal size paper in the Auto Sheet Feeder The receive mode is incorrect Check the receive mode of your machine then specify the receiv...

Page 141: ...NET SW 2 ANSMODE or FAX TEL There will be no automatic switching between voice and fax calls unless the receive mode is set to DRPD 1 NETWORK SWITCH 2 ANS MACHINE MODE or FAX TEL AUTO SW If the receive mode is ANS MACHINE MODE connect an answering machine to the machine see the Easy Setup Instructions and check that a message plays back when the answering machine answers Cause Action ECM RX is set...

Page 142: ...Coded Speed Dialing on page 65 There was an error during transmission z Check the LCD for an error message See Fax Related Messages on page 118 z Print the ACTIVITY REPORT and check for an error See Printing the ACTIVITY REPORT on page 71 Cannot hear the dial tone Check that the telephone line is correctly connected to the proper jack If so there is a problem with your telephone line Contact your ...

Page 143: ... transmission start speed may correct the error Cause Action The telephone line is not correctly connected Check that the telephone line is correctly connected Refer to the Easy Setup Instructions The telephone line type is not set correctly Make sure the machine is set for the correct telephone line type See Setting the Telephone Line Type on page 62 Cause Action The power cord the telephone line...

Page 144: ... An error message appears and the ScanGear MP window fails to appear z Reattaching the USB cable Be sure to use a certified USB 2 0 Hi Speed cable You are recommended to use the cable no longer than 3 meters 9 8 feet z If a USB hub is used for the connection do not use it Attach the cable to a USB port on the computer itself not the hub z Attach the USB cable to a different USB port on the compute...

Page 145: ...early if the image is too small Set the view mode to 100 Moiré appears Set Descreen to ON in the Image Settings section of the Advanced Mode of ScanGear MP Note Moiré may appear when you scan digital photo prints Inappropriate display settings Set your display settings on your computer to Medium 16 bit or higher In the Start menu click Control Panel then Appearance and Themes and then Display and ...

Page 146: ...als z A maximum of 10 originals can be scanned at once z If an original is slightly crooked on the Platen Glass within 10 degrees of true the image is automatically straightened z The Multi Scan function only works with rectangular originals such as photos z Originals that are not rectangular irregularly shaped close cropped photos cannot be detected correctly z Originals must be at least as large...

Page 147: ...as PageManager and change the file name extension when saving the image Refer to the on screen manual for each application software for the detailed procedures Cause Action The original may not be scanned correctly when Document Size is set to Auto Detect Set the Document Size to the actual size of the original and scan it again If the size you need cannot be set scan to a larger size and trim it ...

Page 148: ...driver to change the paper source If this error Paper is not loaded is ignored for a certain period of time an additional message may be displayed Printer port setting does not match the interface connected to the machine Check the printer port settings 1 Click Start and select Control Panel Printers and Other Hardware and then Printers and Faxes For non Windows XP click Start select Settings and ...

Page 149: ... 7 127 0 x 177 8 mm Check that the page size of the loaded paper is correct Note To print on both sides of the page manually follow the procedure below On the Page Setup tab clear the Automatic check box Then try printing again The manual duplex printing function cannot be used Cause Action The machine is not ready Ensure that the lamp on the Operation Panel lights If the lamp on the Operation Pan...

Page 150: ...heck box 3 If MP530 is not displayed click to add a printer If MP530 is not displayed install the MP Drivers again referring to the Easy Setup Instructions for the operation Cause Action The waste ink absorber is almost full Ink used for cleaning is absorbed in a waste ink absorber placed in the machine Press OK to cancel the error so that you can continue printing Once the waste ink absorber beco...

Page 151: ...m necessary operations for connection referring to the instruction manual supplied with the PictBridge compliant device and then connect the cable again If the error is still unresolved there is a possibility that you are using a digital camera or digital video camcorder that is not supported by this machine Use a digital camera or digital video camcorder compatible with this machine Cause Action ...

Page 152: ...tried to solve the problem and what happened Note If the machine emits any unusual sound smoke or odor turn it off immediately Unplug the power cord from the outlet and contact the Canon Customer Care Center Never attempt to repair or disassemble the machine yourself ...

Page 153: ...rintable area outside of the recommended printing area print quality or paper feeding accuracy may go down Size Printable Area width x height A5 5 6 x 7 9 141 2 x 202 0 mm A4 8 0 x 11 4 203 2 x 289 0 mm B5 6 9 x 9 8 175 2 x 249 0 mm 5 x 7 127 0 x 177 8 mm 4 7 x 6 7 120 2 x 169 8 mm 4 x 6 101 6 x 152 4 mm 3 7 x 5 7 94 8 x 144 4 mm 4 x 8 101 6 x 203 2 mm 3 7 x 7 8 94 8 x 195 2 mm 2 13 x 3 39 54 0 x ...

Page 154: ...r Plus Semi gloss SG 101 and Matte Photo Paper MP 101 selection of Borderless Printing enables you to make prints with no margins However Borderless Printing may reduce the print quality on the top and bottom edges of the paper or cause it to become smudged Printable area Recommended printing area Size Printable Area width x height European DL 7 5 x 4 1 190 5 x 10³ 2 mm US Com 10 8 3 x 3 9 211 8 x...

Page 155: ...ll of the installed On screen Manuals from your computer If the On screen Manuals have been installed all of them will be deleted collectively 1 Click the Start and select All Programs or Programs Canon MP530 Manual and then Uninstall 2 Click OK when the confirmation message appears When the message prompting you to restart your computer is displayed click OK to restart your computer Note z Micros...

Page 156: ...porting Machine When relocating the machine or storing the machine for a long period of time pack the machine using the original packing materials If you do not have the original packing materials pack the machine carefully using protective material and place inside a sturdy box Caution Do not transport or store the machine on a slant vertically or upside down as the ink may leak from the machine ...

Page 157: ...d interface is upwardly compatible with USB Full Speed USB 1 1 it can be used at USB Full Speed USB 1 1 Acoustic noise level Approx 34 5 dB A in the highest print quality mode Operating environment Temperature 5 to 35 C 41 to 95 F Humidity 10 to 90 RH no condensation Storage environment Temperature 0 to 40 C 32 to 104 F Humidity 5 to 95 RH no condensation Power supply AC 110 240 V 50 60 Hz Power c...

Page 158: ...M MMR transmitting from memory Based on ITU T No 1 chart for US specifications and Canon FAX Standard chart No 1 for others both in standard mode or Canon FAX Standard chart No1 standard mode Color Approx 1 minute 20 seconds page at 33 6 Kbps ECM JPEG transmitting from memory Based on Canon COLOR FAX TEST SHEET Scanning image processing Halftones 256 levels of gray Density adjustment 3 levels Memo...

Page 159: ...4 Plain Paper A4 Letter 5 4 x 8 6 cm Credit Card Glossy Photo Paper Card Size 1 Canon brand sticker Printing on this paper is available only when the Layout function on your camera has a 16 up option See Recommended Paper and Requirements on page 22 2 If using a Canon PictBridge compatible camera you can select it Paper type Default Selections based on the machine setting Photo Photo Paper Plus Gl...

Page 160: ...ber of copies select images print special characters date Scan Specifications Platen Glass Compatibility TWAIN WIA Windows XP Maximum document size A4 Letter 8 5 x 11 7 216 x 297 mm Scanning resolution 1200 dpi x 2400 dpi optical 19200 dpi x 19200 dpi enhanced Scanning image processing Halftones 256 levels of gray Color 16 777 216 colors Minimum System Requirements 1 2 Interface Operating System P...

Page 161: ...4 G5 256 MB 500 MB Mac OS X v 10 2 8 v 10 3 PowerPC G3 G4 G5 128 MB 500 MB Additional System Requirements for On screen Manuals z Browser Windows HTML Help Viewer Microsoft Internet Explorer 5 0 or later must be installed The On screen Manual may not be displayed properly depending on your operating system or Internet Explorer version We recommend that you keep your system up to date with Windows ...

Page 162: ...f this equipment is a label that contains among other information a product identifier in the format US AAAEQ TXXXX If requested this number must be provided to the telephone company The REN is used to determine the number of devices that may be connected to a telephone line Excessive RENs on a telephone line may result in the devices not ringing in response to an incoming call In most but not all...

Page 163: ...er However if advance notice is not possible the telephone company will notify the customer as soon as possible Also the customer will be advised of his her right to file a complaint with the FCC if he she believes it is necessary In order to program this information into your machine you should complete the procedure to register your name unit s telephone number time and date FCC Notice Model Num...

Page 164: ...ul interference to radio or television reception which can be determined by turning the equipment off and on the user is encouraged to try to correct the interference by one or more of the following measures Reorient or relocate the receiving antenna Increase the separation between the equipment and receiver Connect the equipment into an outlet on a circuit different from that to which the receive...

Page 165: ...t and software that may be distributed with the Product are sold as is and without warranty of any kind by Canon USA including any implied warranty regarding merchantability or fitness for a particular purpose and all such warranties are disclaimed The sole warranty if any with respect to such non Canon brand items is given by the manufacturer or producer thereof This limited warranty covers all d...

Page 166: ... answers to frequently asked questions www canontechsupport com z Toll free live technical support Monday Saturday excluding holidays at 1 800 828 4040 z Telephone Device for the Deaf TDD 1 866 251 3752 z Repair or Exchange Service Options In the event service is required for the Product during the limited warranty period Canon USA offers two hardware support options Authorized Service Facility Ca...

Page 167: ... limited warranty NOTE THAT BY USING THIS SERVICE YOU WILL KEEP THE REPLACEMENT PRODUCT THAT IS SENT TO YOU CANON USA WILL RETAIN THE DEFECTIVE PRODUCT THAT YOU ORIGINALLY PURCHASED WHICH SHALL BECOME THE PROPERTY OF CANON USA InstantExchange warranty program service is available only during the express limited warranty period for your Product and only in the continental United States Alaska and H...

Page 168: ... Industry Canada terminal Specifications Avis Le présent matériel est conforme aux spécifications techniques applicables d Industrie Canada Before installing this equipment users should ensure that it is permitted to be connected to the facilities of the local telecommunications company The equipment must also be installed using an acceptable method of connection In some cases the company s inside...

Page 169: ...non Canada Inc offers a full range of customer technical support options z For interactive troubleshooting e mail technical support the latest driver downloads and answers to frequently asked questions www canon ca z Free live technical support Mon Fri 9am 8pm EST excluding holidays for products still under warranty 1 800 OK CANON z The location of the authorized service facility nearest you 1 800...

Page 170: ...tible with all of Telecom s network services Telepermitted equipment only may be connected to the auxiliary telephone port The auxiliary telephone port is not specifically designed for 3 wire connected equipment 3 wire connected equipment might not respond to incoming ringing when attached to this port The automatic calling functions of this equipment must not be used to cause a nuisance to other ...

Page 171: ...on 1 copy 45 4 on 1 copy 46 47 auto adjust 42 borderless copy 48 collated copy 51 fit to page 42 image repeat 49 intensity 40 preset ratio 41 reducing or enlarging 41 sticker copy 47 two sided copy 43 zoom 41 Cover Guide 12 D Date entering 63 Direct Print Port 13 Document Cover 12 Document Guides 12 Document Output Slot 12 Document Tray 12 Duplexing Transport Unit 15 E Enlarge Reduce button 16 Ent...

Page 172: ...15 Receiving Faxes 78 canceling receiving 83 memory receiving 83 paper size and type 79 receive modes 80 Redial Pause button 16 Redialing 76 Registering sender information 62 Registering Speed Dials coded speed dialing 65 Replacing Ink Tanks 99 Reports and Lists 70 Routine Maintenance 98 Replacing Ink Tanks 99 RX Reception REPORT 70 printing 71 S Safety Precautions 5 SCAN button 16 Scan contrast a...

Page 173: ...171 Index TX Transmission REPORT 70 printing 71 U USB Port 15 USER S DATA LIST 70 printing 71 ...

Page 174: ...terials related to such distribution and use acknowledge that the software was developed at Cygnus Support Inc Cygnus Support Inc may not be used to endorse or promote products derived from this software without specific prior written permission THIS SOFTWARE IS PROVIDED AS IS AND WITHOUT ANY EXPRESS OR IMPLIED WARRANTIES INCLUDING WITHOUT LIMITATION THE IMPLIED WARRANTIES OF MERCHANTABILITY AND F...

Page 175: ... your product s war ranty period For more information and updated program specifics please visit our web site at www canontechsupport com Support program specifics are subject to change without notice Ordering Information For additional supplies use the following descriptions and order numbers Description Order Ink Tanks CLI 8 BK 0620B002 CLI 8 C 0621B002 CLI 8 M 0622B002 CLI 8 Y 0623B002 PGI 5 BK...

Page 176: ... L5T 1P7 Canada Canon Latin America Inc 703 Waterford Way Suite 400 Miami FL 33126 U S A Canon Mexicana Boulevard Manuel Avila Camacho No 138 PB y Pisos 15 16 y 17 Colonia Lomas de Chapultepec Delegación Miguel Hidalgo CP 11000 Mexico D F User s Guide User s Guide QT5 0210 V02 ENG The following ink tanks are compatible with this machine For details on ink tank replacement refer to Replacing Ink Ta...

Reviews: