Cambridge Air Solutions
42
S-Series Technical Manual
INSTALLATION INSTRUCTIONS
S-SERIES UPTURN
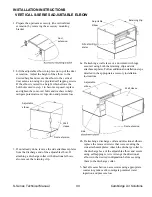
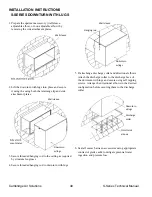
1. Prepare the upturn by removing the nuts and washers
from the threaded PEM studs on the front face of the
upturn.
2. Lift the upturn into place on top of the 4’ stand,
being sure to catch the lip of the upturn on the unit’s
retaining clip. Replace the washers and nuts removed
from step 1 onto the threaded PEM studs now inside
of the unit and tighten securely.
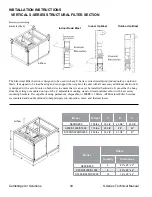
3. Remove the accessory mounting brackets on the
upturn in preparation to attach the duct extension.
4. Lift the duct extension into place and secure it with
the accessory mounting brackets removed in the
previous step.
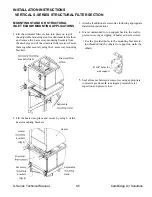
5. It is recommended to run support back to the wall to
prevent swaying or tipping of heater and accessories.
Use the provided mounting brackets to run threaded
rod (by others) to support on walls (by others).
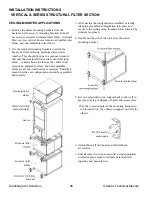
6. Seal all seams between accessories using appropriate
contractor grade caulk to mitigate potential water
ingestion and pressure loss.
Upturn
Upturn
Heater
4’ horizontal stand
Heater
Upturn
brackets
Upturn
Duct extension
Heater
brackets
Ø 5/8” holes for
wall support
Upturn
Upturn
Heater
4’ horizontal stand
Heater
Upturn
brackets
Upturn
Duct extension
Heater
brackets
Ø 5/8” holes for
wall support
Upturn
Upturn
Heater
4’ horizontal stand
Heater
Upturn
brackets
Upturn
Duct extension
Heater
brackets
Ø 5/8” holes for
wall support
Upturn
Upturn
Heater
4’ horizontal stand
Heater
Upturn
brackets
Upturn
Duct extension
Heater
brackets
Ø 5/8” holes for
wall support
Upturn
Upturn
Heater
4’ horizontal stand
Heater
Upturn
brackets
Upturn
Duct extension
Heater
brackets
Ø 5/8” holes for
wall support

