background image

19

Quick Start Guide

18

BUGERA TRIREC INFINIUM

BUGERA TRIREC INFINIUM Getting started

(EN)  

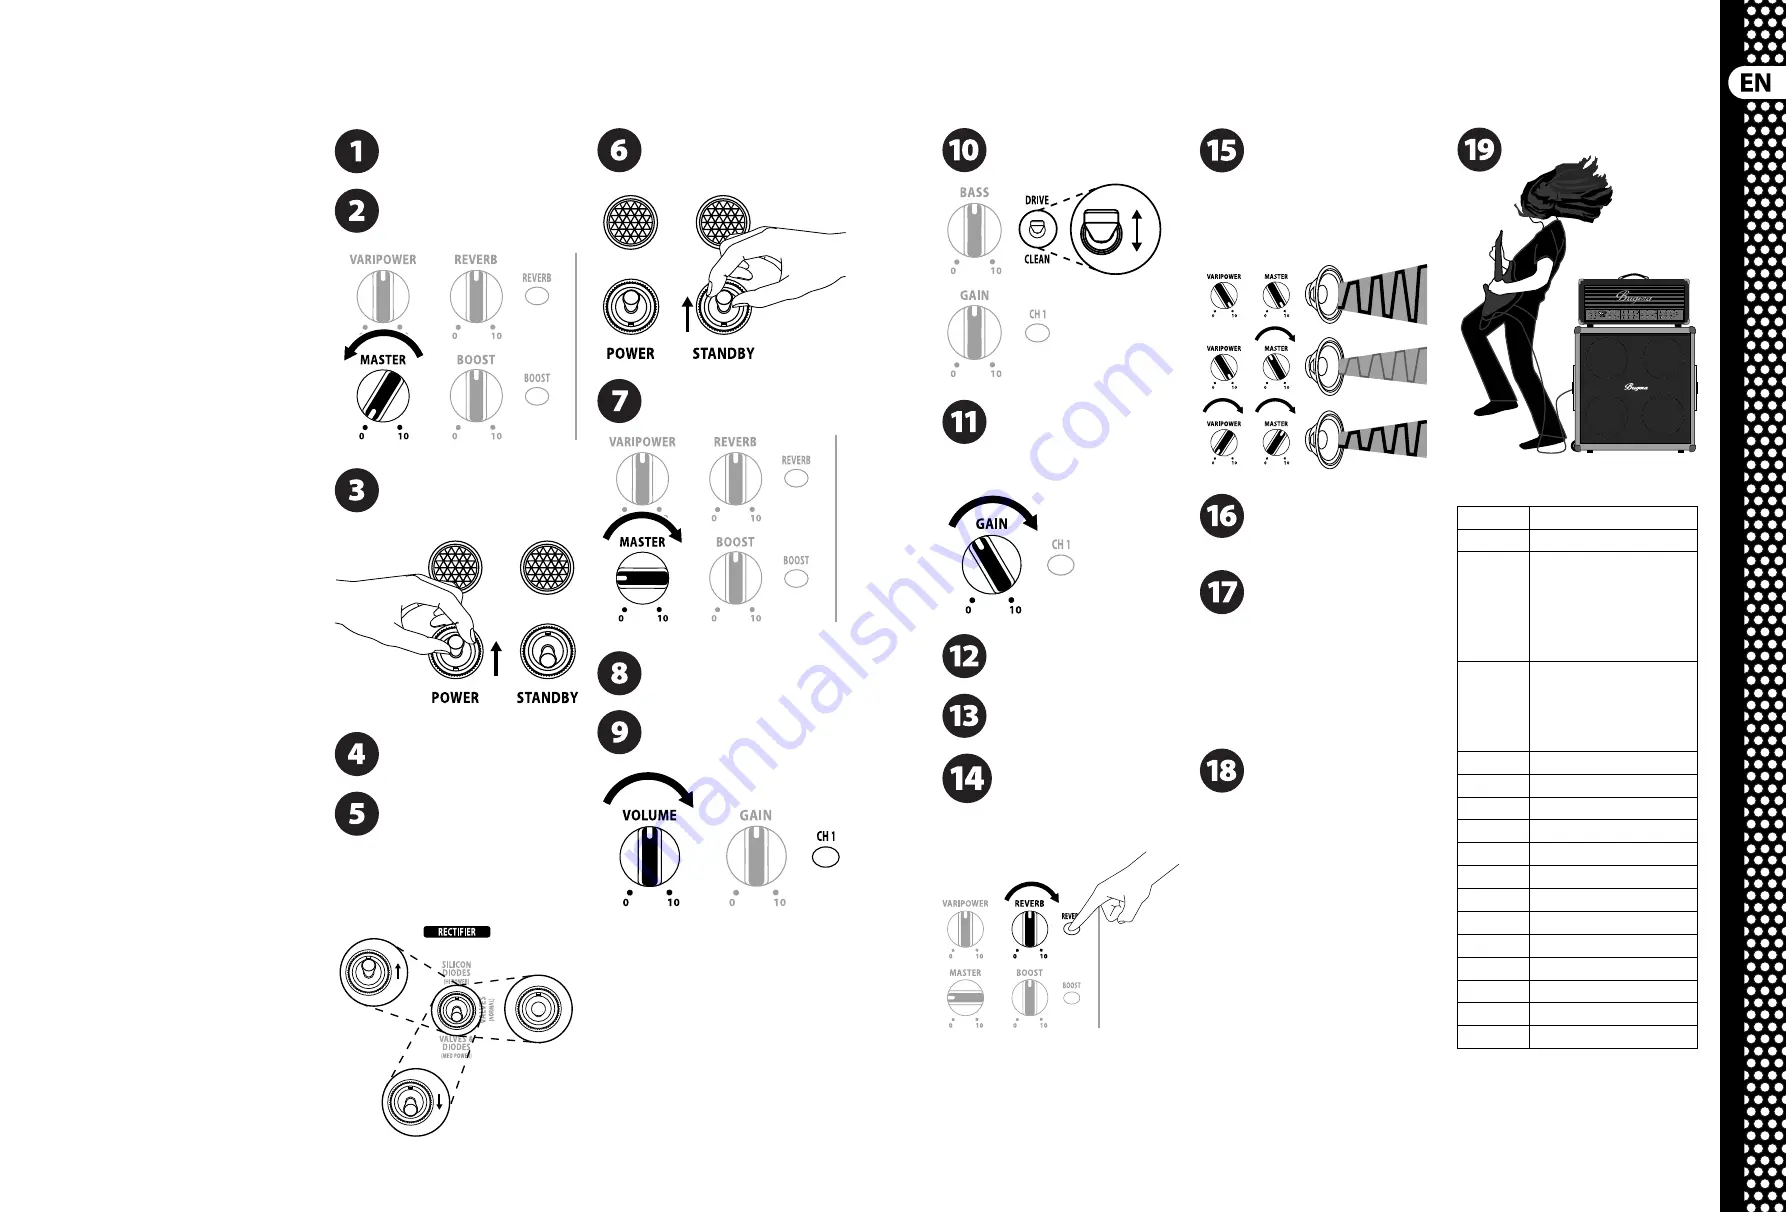
Step 3: Getting 
started

Make all appropriate audio and power 
connections to the TRIREC. Leave the 
power for all devices off !

Turn the MASTER knob all the way down.

Leaving the STANDBY switch in the down/
off  position, fl ip the POWER switch up to 
turn the amp on.

Turn on any other devices connected to 
the amp.

Select the RECTIFIER setting on the back 
panel. Silicon diodes have the highest 
power output and tightest bass response, 

while rectifi er valves have a lower output but 
produce a touch-response that many guitarists 
prefer. A combination of the two can also 
be selected.

After the POWER switch has been engaged 
for at least one minute, fl ip the STANDBY 
switch up.

Turn the MASTER knob up to the 9:00 
position to start.

Select one of the 3 channels using 
the CHANNEL buttons or the 
FSB106A footswitch.

Turn the VOLUME knob up half way on the 
selected channel.

Select the basic tonal character using the 
channel’s MODE switch.

Adjust the amount of distortion using the 
GAIN knob. Depending on EQ and volume 
settings, too much gain can 

cause feedback.

Adjust the equalization using the TREBLE, 
MID, BASS and PRESENCE knobs.

Repeat steps 8-12 for the other channels. 
Use  each channel's VOLUME knob to 
balance the output levels between them.

Engage the REVERB function and adjust 
the amount of desired eff ect. To reset 
the Reverb to default settings, press the 
REVERB button within the fi rst few 

seconds of powering the amp on. 

Adjust the VARIPOWER knob 
counterclockwise to achieve power valve 
saturation at lower volume settings. Turn 

the VARIPOWER knob fully clockwise when no 
power reduction is required. This setting allows the 
MASTER volume knob to operate normally and 
produce the maximum output.

Engage the BOOST function and adjust 
the BOOST knob to achieve the desired 
amount of volume boost for solo sections 

during a performance.

If using eff ects in the FX LOOP, set the 
ASSIGN knob to ON if you want the loop 
constantly active, or REMOTE if you want 

to control the on/off  status with the FSB106A 
footswitch. The CHANNEL setting allows you to 
continually control the loop via footswitch, 
but saves the on/off  status of the FX LOOP, 
BOOST and REVERB (including Decay and Send 
levels) for each channel. If you are not using the 
FX LOOP, set the ASSIGN knob to OFF.

Adjust the SEND and LEVEL knobs to 
achieve an optimal FX LOOP signal level 
going to the processor and returning to 

the amp. Make sure the volume level is consistent 
when turning the FX LOOP on and off .

Rock out and have fun!

MIDI Implementation

CC12

FX LOOP (x00, x01)

CC13

BOOST (x00, x01)

CC75

REVERB DECAY (0-7)

Stored per channel when FX LOOP 
ASSIGN is “Channel”

Default DECAY setting is 3

Note: changing DECAY resets 
REVERB SEND to 127

CC91

REVERB SEND (continuous, 0-127)

Stored per channel when FX LOOP 
ASSIGN is “Channel”

Reset to default REVERB SEND (127) 
by pressing REVERB during power up

CC120

MUTE

PGM 001

CH 1

PGM 002

CH 2

PGM 003

CH 3

PGM 011

CH 1 + BOOST off 

PGM 012

CH 2 + BOOST off 

PGM 013

CH 3 + BOOST off 

PGM 021

CH 1 + BOOST on

PGM 022

CH 2 + BOOST on

PGM 023

CH 3 + BOOST on

Default MIDI channel = 1

Hold one of the FSB106A footswitches 1-6 
during power up to select the 
MIDI channel 01-06 accordingly. 

Summary of Contents for Trirec Infinium Amplifier

Page 1: ...Quick Start Guide BUGERA TRIREC INFINIUM 100 Watt 3 Channel Tube Amplifier Head with INFINIUM Tube Life Multiplier Tri Mode Rectifier Reverb and VARIPOWER ...

Page 2: ...instalaciónomodificacióndebe serrealizadaúnicamenteporuntécnicocualificado Atención Altatensión Peligrodemuerte Inclusodespuésdeapagarelamplificador puedenexistirtensionesdehasta500VDCenelinterior delamplificador Paraevitarchoqueseléctricosfatales noretirelastapassuperiorotraseradelaparato Nohay partesenelinteriordelaparatoquepuedanserreparadas porelusuario Lasreparacionesdebenserllevadasacabo exc...

Page 3: ...Group consultezlesiteInternetmusic group com warranty Vorsicht DiemitdemSymbolmarkierten AnschlüsseführensovielSpannung dassdieGefahreinesStromschlagsbesteht VerwendenSienurhochwertige professionelle Lautsprecherkabelmitvorinstallierten6 35mm MONO KlinkensteckernoderLautsprecherstecker mitDrehverriegelung AlleanderenInstallationen oderModifikationensolltennurvonqualifiziertem Fachpersonalausgeführ...

Page 4: ...igueestedispositivoduranteastrovoadas ouquandonãoforutilizadodurantelongosperíodos detempo 14 Qualquertipodereparaçãodevesersempre efectuadoporpessoalqualificado Énecessáriauma reparaçãosemprequeaunidadetiversidodealguma formadanificada comoporexemplo nocasodocabo dealimentaçãooufichaseencontraremdanificados naeventualidadedelíquidotersidoderramadoou objectosteremcaídoparadentrododispositivo nocas...

Page 5: ...dommagé inspectez immédiatement le produit Si l appareil est endommagé ne nous le renvoyez PAS notifiez immédiatement votre revendeur et le transporteur Dans le cas contraire nous ne pourrons pas remplacer ou réparer le produit Utilisez toujours le boîtier d origine pour éviter tout dommage lors du stockage ou du transport Assurez vous que les enfants ne puissent pas jouer avec le produit ou son e...

Page 6: ...GERA V55 FSB106A BUGERA 412F BK MIDI Switcher RM600 Rotary Machine FX2000 Multi FX Processor 16Ω 4Ω 8Ω FCB1010 MIDI Controller BUGERA 412H BK 16 Ω T LOUDSPEAKERS T 16 Ω 8 Ω 4 Ω 16 Ω X 8 Ω X 4 Ω X 16 Ω 16 Ω 16 Ω 8 Ω 8 Ω 8 Ω Speaker Impedance Chart Tabla de impedancias de altavoz Tableau d impédance des haut parleurs Lautsprecherimpedanz Tabelle Tabela de Impedância de Alto falantes WARNING Improper...

Page 7: ...tting for a highly dynamic crunch tone 14 LINE OUT knob adjusts the level of the OUTPUT jack for use with a slave amp 15 IMPEDANCE switch selects between 4 8 and 16 Ohms 16 ASSIGN knob allows the following options ON The FX LOOP is always active CHANNEL The FX LOOP REVERB and BOOST on off status are stored for each channel and recalled each time the channel is selected REMOTE The FX LOOP is turned...

Page 8: ... permiten que las funciones del FSB106A sean disparadas desde un controlador MIDI exterior 1 L interrupteur POWER place l ampli sous et hors tension 2 L interrupteur STANDBY coupe la sortie de l ampli et économise les lampes 3 Le bouton VARIPOWER vous permet de régler la puissance de sortie maximum et d obtenir à faible puissance la compression et le Sustain habituellement obtenus en poussant le v...

Page 9: ...Schritt 3 23 MIDI IN und MIDI THRU Buchsen zum Steuern der FSB106A Funktionen mit einem externen MIDI Controller 1 O botão POWER liga e desliga o amplificador 2 O botão STANDBY coloca a saída do seu amplificador em modo mute e preserva suas válvulas 3 O botão VARIPOWER ajusta a capacidade de potência de saída máxima possibilitando compressão e sustentação que são comumente associadas à saturação d...

Page 10: ...ing the amp on Adjust the VARIPOWER knob counterclockwise to achieve power valve saturation at lower volume settings Turn the VARIPOWER knob fully clockwise when no power reduction is required This setting allows the MASTER volume knob to operate normally and produce the maximum output Engage the BOOST function and adjust the BOOST knob to achieve the desired amount of volume boost for solo sectio...

Page 11: ...iciar la reverb a sus valores por defecto pulse el botón REVERB unos segundos después de encender el amplificador Ajuste el mando VARIPOWER hacia la izquierda si quiere conseguir una saturación de válvulas de potencia a valores de volumen bajos Gírelo a la derecha cuando no quiera ninguna reducción de potencia Este ajuste permite que el mando de volumen MASTER sea usado con normalidad y que produz...

Page 12: ...ivant la mise sous tension de l amplificateur Tournez le bouton VARIPOWER vers la droite pour obtenir le son type de saturation des lampes à faible volume Réglez le bouton VARIPOWER au maximum lorsque vous n avez pas besoin de réduire la puissance de sortie Ceci vous permet d utiliser normalement le bouton MASTER et d obtenir le niveau de sortie maximal Activez le BOOST et réglez le bouton BOOST p...

Page 13: ...te innerhalb der ersten Sekunden nach dem Einschalten des Verstärkers Drehen Sie den VARIPOWER Regler nach links um auch bei niedriger Lautstärke eine Sättigung der Leistungsröhren zu erreichen Drehen Sie den VARIPOWER Regler ganz nach rechts wenn die Ausgangsleistung nicht verringert werden soll Bei dieser Einstellung kann der MASTER Volume Regler seine normale Aufgabe erfüllen und die maximale A...

Page 14: ...segundos quando estiver ligando o amplificador Ajuste o botão VARIPOWER no sentido anti horário para obter saturação da válvula de potência a volumes mais baixos Gire o botão VARIPOWER no sentido horário completamente quando nenhuma redução de potência for requerida Este ajuste permite que o botão de volume MASTER opere normalmente e produza o máximo de saída Ligue a função BOOST e ajuste o botão ...

Page 15: ...iza de forma continua el bias de la válvula de salida para asegurarle un rendimiento optimo y un sonido consistente incluso conforme las válvulas van envejeciendo Cuando una válvula de salida deba ser sustituida el piloto de emparejamiento de la válvula en el panel trasero se iluminara permanentemente Este circuito monitoriza cada valvula de forma individual lo que hace que no sea necesario compra...

Page 16: ...tändig die Vorspannung der Endstufenröhren und garantiert dadurch optimale Leistung sowie gleichbleibende Klangqualität Auf diesem Wege kann die Lebenserwartung der Endstufenröhren um ein Vielfaches erhöht werden Falls eine Röhre dennoch einmal ausgetauscht werden muss leuchtet die entsprechende LED auf der Rückseite permanent DadieINFINIUM SchaltungjedeEndstufenröhre einzelnüberwacht istesnichtme...

Page 17: ... potência de saída a corrente em repouso e o campo elétrico efetivo na válvula Isto permite reduzir continuamente a capacidade de potência do estágio de saída de mais de 100 Watts decrescendo até poucos Watts Enquanto mantém o som do pré amplificador exatamente o mesmo o poderoso estágio de saída TRIREC INFINIUM agora tem um desempenho igual ao de um pequena conjunto de prática completamente valvu...

Page 18: ...quirióesteaparato Encasodeque nopuedalocalizaruncomercioBUGERAenlascercanías tambiénpuedeponerseencontactoconcualquierade nuestrosdistribuidoresoempresassubsidiariasque aparecendentrodelasecciónWHERETOBUYdela páginawebbehringer com 3 Conexiones de corriente Antesde enchufaresteaparatoaunasalidadecorriente asegúresedequedichasalidaseadelvoltajeadecuado parasumodeloconcreto Encasodequedebasustituir ...

Page 19: ......

Reviews: