Name
Description
View
View
Icons: Displays icons.
Details: Displays the hostname, product name, workgroup,
IP address, subnet mask, and default gateway.
Sort by
If you have multiple Buffalo NAS devices on the network,
you may choose to display them in order of hostname,
product name, workgroup, IP address, subnet mask, or
default gateway.
Browse
*
Opens the Buffalo NAS device’s shared folders.
Refresh
Searches for the Buffalo NAS devices on the network again.
Right-click your
device’s icon to show
these menus.
Browse Shares
Opens the Buffalo NAS device’s shared folders.
Open Remote Desktop
Opens Windows Storage Server in remote desktop.
Properties
Opens the properties page that lets you configure the
Buffalo NAS device’s IP address or open Windows Storage
Server in remote desktop.
Create Desktop Shortcut
Creates a desktop shortcut to the Buffalo NAS device’s
shared folders.
*Click on the Buffalo NAS device’s icon to display these options.
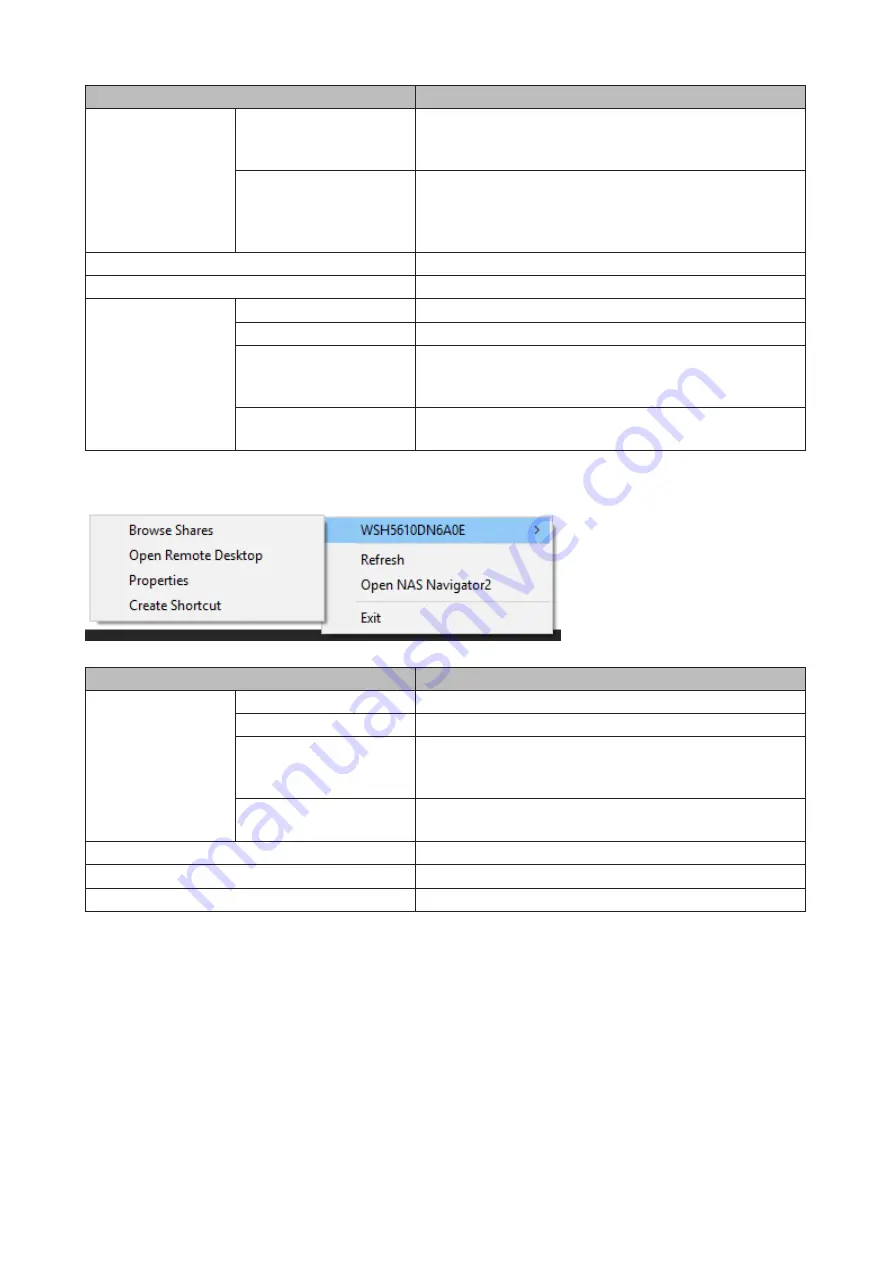
When NAS Navigator2 is closed, right-click the NAS Navigator2 icon in the system tray for the following options.
Name
Description
Buffalo NAS device
name
Browse Shares
Opens the Buffalo NAS device’s shared folders.
Open Remote Desktop
Opens Windows Storage Server in remote desktop.
Properties
Opens the properties page that lets you configure the
Buffalo NAS device’s IP address or open Windows Storage
Server in remote desktop.
Create Shortcut
Creates a desktop shortcut to the Buffalo NAS device’s
shared folders.
Refresh
Searches for the Buffalo NAS devices on the network again.
Open NAS Navigator2
Opens the NAS Navigator2 window.
Exit
Exits NAS Navigator2.
The following tasks may be performed from the Buffalo NAS device’s properties page.
92
Summary of Contents for TeraStation WSS WSH5010N6
Page 25: ...5 Select Custom and click Next 6 Click Add Items 24...
Page 26: ...7 Select the backup source folders or drives and click OK 8 Click Next 25...
Page 27: ...9 Specify the schedule to run the backup and click Next 26...
Page 31: ...5 Select the date when a data backup occurred and click Next 30...
Page 38: ...3 From the Computer Name tab click Change 4 Select Domain enter a domain name and click OK 37...
Page 43: ...3 Enter a hostname for the namespace server and click Next 42...
Page 44: ...4 Enter a name for the namespace and click Next 43...
Page 49: ...4 Enter a name for the replication group and click Next 48...
Page 51: ...7 Click Next 50...
Page 52: ...8 Select Full mesh and click Next 51...
Page 54: ...10Select the device as the primary member and click Next 53...
Page 55: ...11Click Add 12Select the folder as the replication source and click OK 54...
Page 56: ...13Click Next 55...
Page 57: ...14Click Edit 56...
Page 58: ...15Select Enabled and select the folder as the replication destination then click OK 57...
Page 59: ...16Click Next 58...
Page 60: ...17Click Create 59...
Page 69: ...3 Double click Remote Desktop Users 4 Click Add 5 Click Advanced 6 Click Find Now 68...
Page 70: ...7 Select the user to be added as a group member and click OK 8 Click OK then click OK again 69...
Page 72: ...4 Enter a group name and click Add 5 Click Advanced 6 Click Find Now 71...


