background image

Wa r n i n g

D O   N OT

touch  the  gold  contact  area  of  the  print

cartridge  or  the  nozzles.

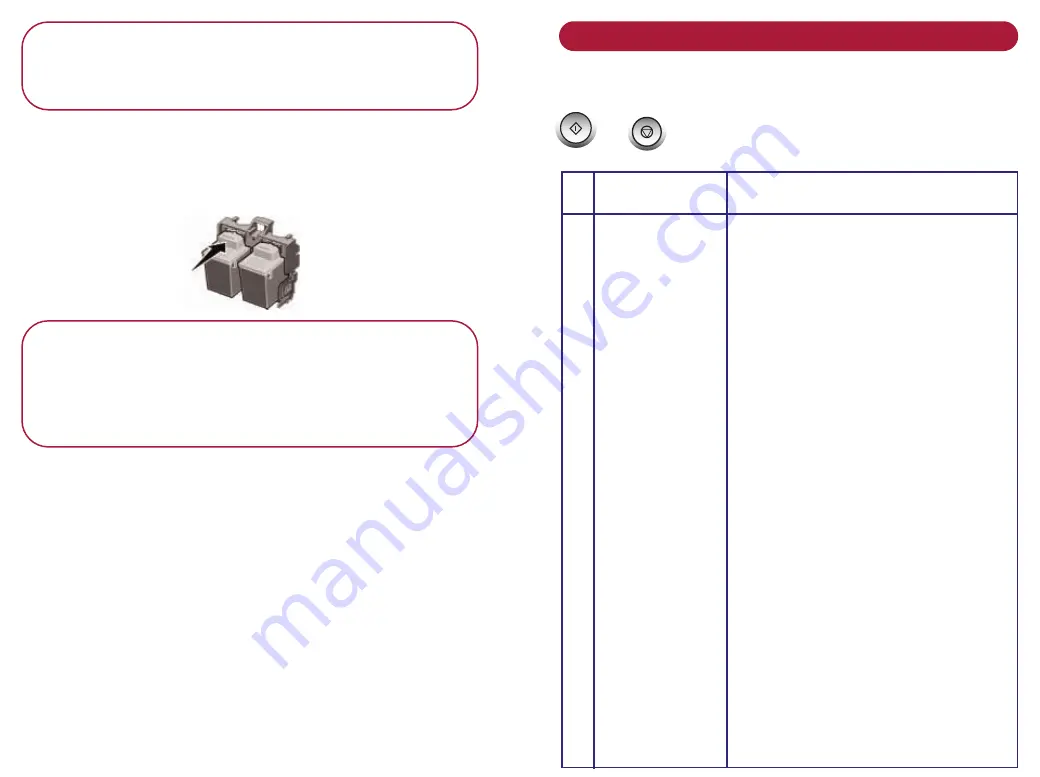
Insert  the  print  cartridge  into  the  print  cartridge  carrier.

Push  back  firmly  on  the  cartridge  until  it  snaps  securely

into  place.

I m p o r t a n t

The  cartridges  must  be  put  in  the  correct  position.

Black  Cartridge  on  right  side.

Colour  Cartridge  on  left  side.

Photo  Cartridge  replaces  Black  on  right  side.

Close  the  front  cover.

Ink cartridge maintenance

At  the  BT  MultiJet  3000  control  panel:

Answer  the  questions  on  the

display  using  the 

S t a r t / Ye s

and 

S t o p / N o

buttons.

Yes

STA

RT

No

STO

P

Display

Press  Yes  or  No  as  appropriate

1

Left  Color?

Is  the  colour  cartridge  in  the  left 
hand  carrier?

2

Check  Left

Open  front  cover  and  place  colour 

Cart

cartridge  in  the  left  hand  carrier.

3

New  Color?

Is  the  cartridge  new?  Press  No  if 
you  are  replacing  a  cartridge  that 
has  just  been  removed
for  cleaning.

4

Right  Black?

Is  the  black  cartridge  in  the  right 
hand  carrier?

5

New  Black?

Is  the  cartridge  new?  Press  No  if 
you  are  replacing  a  cartridge  that 
has  just  been  removed
for  cleaning.

6

Right  Photo?

Is  the  photo  cartridge  in  the  right 
hand  carrier?

7

Check  Right

Open  front  cover  and  place  black 

Cart

or  photo  cartridge  in  the  right 
hand  carrier.

8

New  Photo?

Is  the  cartridge  new?  Press  No  if 
you  are  replacing  a  cartridge  that 
has  just  been  removed  for 
cleaning.

Summary of Contents for MULTIJET 3000

Page 1: ...Enabling fax email after installation Upgrading your software Uninstalling your software Copying Operating the copier Setting up from your PC Printing Setting up and using your printer Paper options...

Page 2: ...ument to text ready for editing Fax Using your PC modem and the software provided you can send and receive faxed documents Email Using your PC modem and email account you can attach scanned images to...

Page 3: ...and scanner lock Scanner cover Open to scan Control panel Paper tray catches Press down on the catches to open the paper tray so you can adjust paper width load envelops or clear paper jams Printed d...

Page 4: ...or scan job Answers YES to questions asked in the display Scan Press to determine the destination of the scanned image Press and hold to align or clean inkjet cartridges Colour Black Selects colour CL...

Page 5: ...At a glance back view USB socket Connects the USB cable to your PC Power input socket...

Page 6: ...ur Ink Cartridge Black Ink Cartridge Mains cable Power Supply Adapter USB cable For your records It may help to record the following information in case you need to contact the Helpline Date of purcha...

Page 7: ...eaners to clean the machine Do not attempt to service the machine or lubricate moving parts yourself Do not expose to direct sunlight Do not stand your machine on carpets or other surfaces which gener...

Page 8: ...UNLOCK SCANNER You must turn the power off before unlocking the scanner 2 Connect the mains power and USB cable to the BT MultiJet 3000 If the BT MultiJet 3000 does not autostart press the Power butt...

Page 9: ...e left hand side Close the front compartment cover 5 Align the cartridges Your BT MultiJet 3000 automatically prints an alignment page Under each group A B C D on the page select the alignment number...

Page 10: ...software on your PC Features include Print from your PC Scan images to your PC Scan documents to email or word processing programs Scan pictures for the Internet Send or receive faxes The CD contains...

Page 11: ...in Unimessage Pro even if these are already associated in Windows with the Dial Up Network If installing Unimessage Pro for use with a network When using Unimessage Pro on a network with a separate fi...

Page 12: ...essage Pro Device Wizard that will guide you step by step through set up and configuration Please note Depending on your system some of the screens shown in this guide may not be exactly the same as t...

Page 13: ...SMPT server name If this is the same name as your POP3 server select Both then click Next At the next screen click No then Next The following screen will show the same server name for both SMPT and PO...

Page 14: ...ice from list of supported devices Click Next 6 Click Next 7 Unimessage Pro has checked the ports and may have found one or more devices Click on the device normally shown as a modem that you want to...

Page 15: ...accept the recommended set up select Typical then click Next 10 If this screen is displayed select the type of modem you have If you are not sure it is more likely to be Class 1 Check the specificatio...

Page 16: ...enter the code number here If you need a pause anywhere in the dialling prefix enter to give a pause of about one second Click Next Please note You can enter a forward slash at the start of a fax numb...

Page 17: ...ck Next 15 Your Dial up Networking name will normally be displayed If you have more than one Dial up Networking connection click Next until the name you want is displayed Enter the user name and passw...

Page 18: ...change this if required The minimum check interval is every 15 minutes When you have made the settings you want click Next When the next screen is displayed click Next 19 You can change the name if r...

Page 19: ...ge First make sure your modem is connected to the telephone line On the Welcome screen click the New Message button In the message dialogue screen that opens Click in the To box and enter a telephone...

Page 20: ...fax only start at step 18 1 Open the Welcome screen 2 Click Browse Folders You first need to set up your email account and servers 3 Click Set Up 4 Click Email 5 Click the Accounts tab 6 Click Add 7...

Page 21: ...d or fax 18 Click Devices in the left hand column The Devices folder is displayed 19 If you already have a device shown click on it to highlight it 20 Click on the to log it off 21 Click on the New De...

Page 22: ...looks for the device then 25 If more than one device is shown select the device you want Click Next 26 Click Yes if you want to be able to send and receive faxes Click Next 27 Enter any system device...

Page 23: ...have normally Class 1 Click Next 29 Select Tone Click Next 30 If you need to dial a number to get an outside line or are connected to a switchboard enter the access code in the Preamble box Click Next...

Page 24: ...ayed If you have more than one Dial up Networking connection click Next until the name you want is displayed Enter the user name and password you use for internet access Make sure the SMPT and POP3 bo...

Page 25: ...he Unimessage logo at the top of the list then click Properties 39 Click the Devices tab 40 Click on the Email and or Fax boxes to insert ticks 41 Click OK 42 Click OK 43 Now close down Unimessage and...

Page 26: ...il enter you POP3 account name and password the ones you use for receiving mail 12 Click OK The Email setup screen is shown 13 Click the Ser vers tab 14 Click Add Unimessage Pro can receive email mess...

Page 27: ...18 Click Devices in the left hand column The Devices folder is displayed 19 Click on the device to highlight it 20 Click on the to log it off Click on the New Devices 21 Select No then Next...

Page 28: ...22 Select the second option down Yes look for then click Next 23 Click Next The software looks for the device then 24 If more than one device is shown select the device you want Click Next...

Page 29: ...ect Yes here Click Next 26 Enter any system device name you want if you previously had a device configured use a name that is noticeably different to the previous one e g NEW Click Next 27 If this scr...

Page 30: ...Next 31 To be able to send and receive emails click Yes then Next 32 You now need to set up your Dial up Networking connection Your Dial up Networking name will normally be displayed If you have more...

Page 31: ...d one Click on it to highlight it then click on the DELETE ICON You now need to set up the start up routine so that the new modem is made active when you open Unimessage 35 Click Set Up 36 Click Progr...

Page 32: ...39 Click on the Email and Fax boxes to insert ticks 40 Click OK 41 Click OK 42 Now close down Unimessage and then restart it to enable the new settings...

Page 33: ...he Welcome screen 2 Click Browse Folders 3 Click Devices in the left hand column The Devices folder is displayed 4 Click on the device to highlight it 5 Click on the to log it off 6 Click on the New D...

Page 34: ...8 Select the second option down Yes look for then click Next 9 Click Next The software looks for the device then 10 If more than one device is shown select the device you want Click Next...

Page 35: ...ice name you want if you previously had a device configured use a name that is noticeably different to the previous one e g NEW Click Next 13 If this screen is shown choose Class 1 or Class 2 you need...

Page 36: ...lick Yes if you already have email set up from your original installation you must still select Yes here Click Next 18 You now need to set up your Dial up Networking connection Your Dial up Networking...

Page 37: ...the old one Click on it to highlight it then click on the You now need to set up the start up routine so that the new modem is made active when you open Unimessage 21 Click Set Up 22 Click Program 23...

Page 38: ...25 Click on the Fax and Email boxes to insert ticks 26 Click OK 27 Click OK 28 Now close down Unimessage and then restart it to enable the new settings...

Page 39: ...your usual way On the Upgrade page click on the Upgrade button indicated to start the upgrade process Or for more details visit http www unimessage co uk or contact your local Wordcraft International...

Page 40: ...hen Unimessage Pro has collected sufficient information it will create a shortcut to start Unimessage Pro which it will then run Please note Additional devices can be defined clicking on File then New...

Page 41: ...e Pro is installed the default suggested recommended Register the location of its components and install any Windows updates that are required Restart Windows Unimessage Pro will continue the installa...

Page 42: ...from the LAN while the Windows Dial Up Networking connection is established To avoid this Display the properties for Windows Dial Up Networking click the Ser ver Types tab then click de select for the...

Page 43: ...documents Place your document face down on the glass in the corner along the left and back edges Close the top cover Copying bulky objects When copying items such as a book you can remove the BT Mult...

Page 44: ...have not scanned or copied any documents within the previous 30 minutes there is a delay of about 50 seconds while the scanner warms up To set the paper size Your BT MultiJet 3000 is pre set to scan A...

Page 45: ...djust buttons to decrease or increase the size Each press of the button changes the zoom by 1 Hold the button down to adjust the size in steps of 10 Press Start or select another option Press Stop to...

Page 46: ...are Click the Unimessage Pro icon to open the Welcome menu Press the Set up button The Scan Settings Utility screen is displayed Click the To Copy Settings button Select the default settings you want...

Page 47: ...o cartridge Using the Printer Control Program The Control Program lets you monitor the job status install align or clean cartridges or change other options To open the Control Program The control prog...

Page 48: ...lick on the appropriate tabs to make changes to the Paper or Document Quality 1 General Allows you to add a separator page Lets you print a test page 2 Details We recommend you keep the default settin...

Page 49: ...e printer banner paper Then bring the unattached edge of the first page over the Note Make sure you select printer and into the sheet feeder Banner or A4 Banner paper The paper guide is against the si...

Page 50: ...the best possible photo quality print with a photo and colour cartridge combination in your printer When printing photos remove each photo as it exits from the printer and allow it to dry before stack...

Page 51: ...ove the BT MultiJet 3000 cover Lift the top cover until it is vertical Pull the cover gently upward until it comes out of the hinge slots at the back When you have completed your scan replace the cove...

Page 52: ...cuments using the buttons on your BT MultiJet 3000 At your BT MultiJet 3000 Load the document in the scanner Press the SCAN button until the LCD display shows the Macro command you want Press Start Pl...

Page 53: ...e a preview scan of your image Once the preview is complete you can move and size the dotted line around the image to select the exact area you wish to scan Click Scan The image will be received by Un...

Page 54: ...s usually adequate for all but the smallest print 24 bit colour and high resolution images can be very large over 40 megabytes for each file and additional PC memory may be required to manipulate the...

Page 55: ...of files and use the search engine to find them quickly later on Route incoming messages with easy wizard style Routing Rules Convert scanned documents or received faxes into text with the Optical Cha...

Page 56: ...on a single PC if the volume of messages requires it On a network Unimessage Pro supports multiple devices of different types as well as multiple users however the devices themselves should not be co...

Page 57: ...iJet 3000 from your PC screen Scan Image Lets you scan documents or images into your PC from your BT MultiJet 3000 Set up Allows you to choose the default settings for scanning and copying on your BT...

Page 58: ...ons If UniMonitor is closed you can restart it by clicking Start Programs Unimessage Pro and then UniMonitor Browse folders Click the Browse Folders button on the Welcome screen to display the browser...

Page 59: ...Welcome menu reappears If you do not want the Welcome menu displayed Click Setup select Program click the Application tab and remove the tick from the Show welcome screen option by clicking on it Then...

Page 60: ...lity now go to Enabling email and fax after installation Email servers POP3 and SMTP Email messages are received from mailboxes on POP3 email servers and sent via SMTP email servers Email accounts The...

Page 61: ...POP3 email servers is available If no such device is available email messages will remain in the Outbox unsent and no email messages will be received Sending faxes and emails The message editor screen...

Page 62: ...how the name in italics using a blue font right click on the name to select which of the matches you want to send the message to To cancel a fax or email which is in the process of being sent In the B...

Page 63: ...your usual Windows application Microsoft Word for example Print it with the Unimessage Pro printer When the Unimessage Pro Message Editor appears Click the FAX shortcut in the file bar at the bottom o...

Page 64: ...e Include objects on page check box Click OK Your new cover sheet should then be available in Unimessage Pro Sent log When you try to send a message Unimessage Pro will record details of each attempt...

Page 65: ...recipient in the Phonebook Ensure your phonebook is set up for sending colour faxes Either print your document to the Unimessage Pro colour printer or attach a colour image file to a new Unimessage P...

Page 66: ...on of the Unimessage Pro Viewer from the following Internet Website which they can then use to decode the WBF attachment Wordcraft International Ltd http www wordcraft co uk download home htm and clic...

Page 67: ...om when Unimessage Pro next restarts Please note You can set your BT MultiJet 3000 to automatically print faxes after they have been received to the PC see Routing Rules When a message is received On...

Page 68: ...tely from the message right click the shortcut for the attachment Select Save as then enter the name you want and click OK Please note If you edit a received message or any attachment to a received me...

Page 69: ...t received fax messages into text ready for editing You can also define an OCR auto detection scheme by opening the Setup menu and clicking OCR that you can apply as part of the User Routing Rule This...

Page 70: ...screen To store new entries to your Phonebook Open the Browse Folders screen Click Phonebook in the folder tree Click New Contact icon Enter the contact details you want Use the Options tab to select...

Page 71: ...e received fax but it may take longer to send On will send in any one job any black and white pages as black and white and any colour pages as colour This is the optimum setting that will send fax mes...

Page 72: ...se these when you print to the Unimessage Pro printer follow the commands you set and remove the commands text from the document before sending it Commands must be entered in the Commands font at 12 p...

Page 73: ...ge Pro folder Unimessage Pro only stores a link to the file and document properties for the file The file itself is not copied into the Unimessage Pro folder and will be opened from its original locat...

Page 74: ...rds in the Match a message list or select from the list of previous searches in the Search History Click OK to start searching The results of the search are displayed Right click on entries in the Fin...

Page 75: ...rint cartridge is Purchase a new color colour print cartridge running out of ink Black Ink low The Black print cartridge is Replace a new black print cartridge running out of ink Photo Ink Low The pho...

Page 76: ...an macros not been set on the PC Memor y Full Current job s is using Wait until some of the pages have completed printing before copying up the memory more pages PC Not Available You have initiated a...

Page 77: ...all the driver Has the BT MultiJet 3000 has been set to the default printer Try printing a nozzle test page Check that the paper is not jammed You cannot make any copies Check that the ink cartridges...

Page 78: ...uality is not satisfactory you may need to align your print cartridges or clean the print nozzles A Test page can be printed from Print Properties or the Control Program Installing or replacing print...

Page 79: ...P Display Press Yes or No as appropriate 1 Left Color Is the colour cartridge in the left hand carrier 2 Check Left Open front cover and place colour Cart cartridge in the left hand carrier 3 New Col...

Page 80: ...es The alignment page is printed Important If you have installed a new cartridge an alignment page is printed automatically It is important you follow this procedure for the best quality printing The...

Page 81: ...rol Program via Start Settings Printers right click MJ3 printer icon and select MJ3 Control Program Click on Cartridges tab Select Clean Print Nozzles The nozzle test page is printed Compare the diago...

Page 82: ...r which will damage the print control circuits Preser ving print cartridges To ensure the longest life from your print cartridges and optimum performance from your BT MultiJet 3000 Keep a new print ca...

Page 83: ...ply 1 1 The Helpline will require the customer to provide details of where the BT MultiJet 3000 was purchased and method of payment 1 2 If the BT MultiJet 3000 was purchased within 28 days a brand new...

Page 84: ...change of the BT MultiJet 3000 or the repair and return of the original BT MultiJet 3000 7 Excluded from this guarantee are accessories consummables e g ink cartridge 8 This guarantee applies to the o...

Page 85: ...sed on a PC with a faster processor or with more RAM If you are using other applications on your PC at the same time as Unimessage Pro a faster processor and additional RAM are highly recommended Scan...

Page 86: ...econds From 2nd copy about 39 seconds page Black 1st copy about 37seconds From 2nd copy about 16seconds page PC I F USB AC Adapter Input 220 240v Output 30v Power Consumption Copy max 33W Power on sta...

Page 87: ...nal Limited to do so Use of the software in a computer service business network time sharing interactive cable television or multiple CPU arrangement except in respect of users licensed by Wordcraft I...

Page 88: ...business interruption lost or damaged data or any other loss arising out of the installation of use of or inability to use this software product Wordcraft International Limited shall not be responsib...

Page 89: ...Sleep mode Stop copying Delayed sending of faxes and emails Set a time for sending Set delete change settings in the Outbox Distribution lists Send message to list Embedded commands Set embedded comma...

Page 90: ...on BT MultiJet 3000 Software Set Up Wizard Help Cannot copy Error messages Paper jam Printer does not print Poor print quality Key features On screen help Paper jam Phonebook Add entry when sending fa...

Page 91: ...pplication Scan from PC into Unimessage Pro Scan multiple pages into Unimessage Pro Set up from PC Set scan macros Sending faxes and emails Attaching files to faxes and emails Cancel sending Fax cover...

Reviews: