


> Load Photo or Photo L Paper in Photo Bypass Tray
Load Photo or Photo L Paper in Photo Bypass Tray
Related Models
: MFC-J680DW/MFC-J880DW/MFC-J885DW
Use the photo bypass tray, which is located on the top of the output paper tray cover, to print on Photo (4" x
6")/(10 x 15 cm) or Photo L (3.5" x 5")/(89 x 127 mm) size paper.
•
In Canada, the photo bypass tray is called the photo paper tray.
•
When you use the photo bypass tray, you do not have to remove the paper from the tray beneath it.
•
If the
[Check Paper]
setting is set to
[On]
and you pull the paper tray out of the machine, a message
appears on the LCD asking if you want to change the paper type and paper size. Change the Paper Size and
Paper Type settings if needed, following the on-screen instructions.
•
Load only one size and type of paper in the paper tray at a time.
•
When you load a different paper size in the tray, you must change the Paper Size setting in the machine or
the paper size setting on your computer.
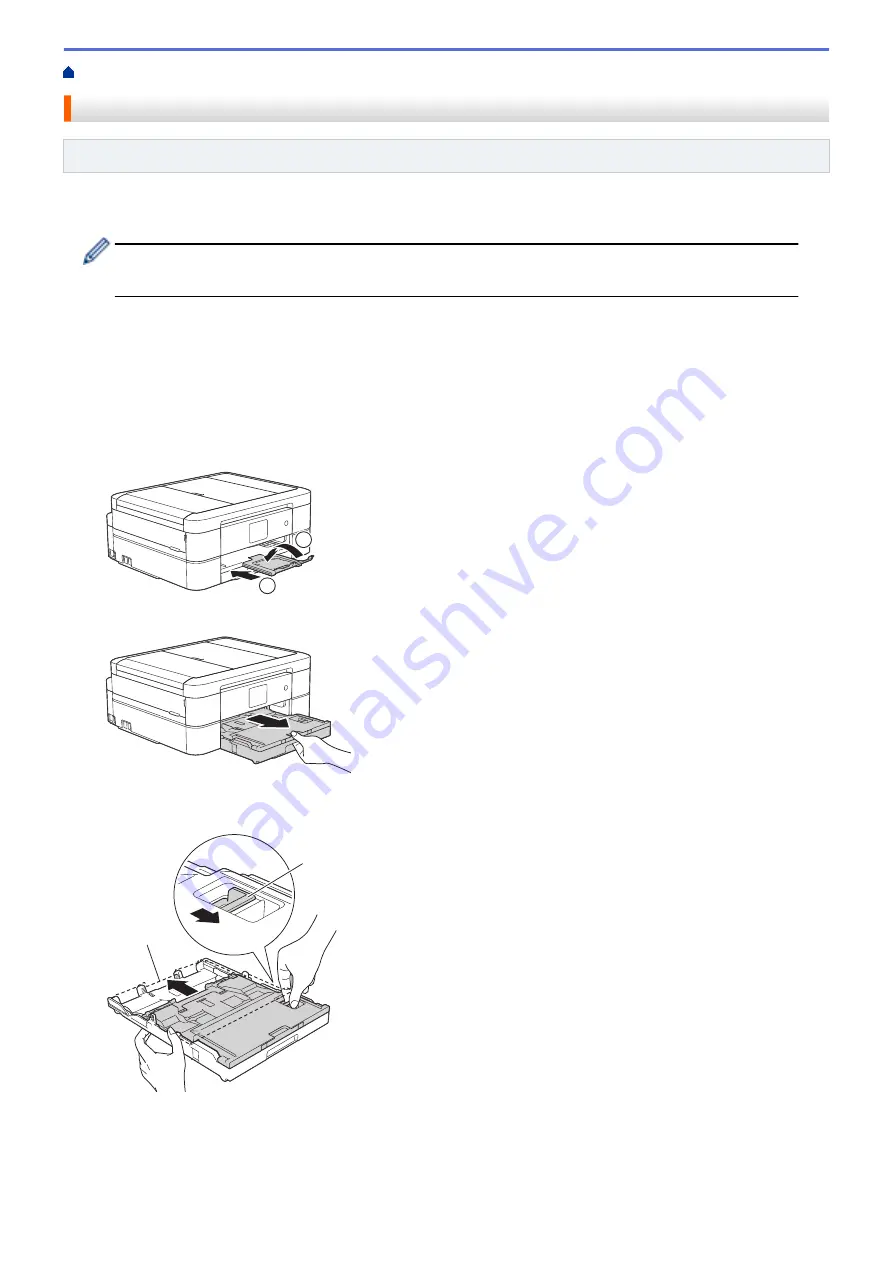
1. If the paper support flap (1) is open, close it, and then close the paper support (2).
2
1
2. Pull the paper tray completely out of the machine.
3. Press the blue photo bypass tray release button (1) and slide whole the output paper tray cover forward until
it locks into the photo printing position (2).
1
2
4. Load up to 20 sheets of Photo or Photo L paper in the photo bypass tray with the printing surface
face down
.
Loading more than 20 sheets of photo paper may cause paper jams.
43
Summary of Contents for Airprint MFC-J460DW
Page 32: ...Home Paper Handling Paper Handling Load Paper Load Documents 26 ...
Page 51: ... Paper Handling and Printing Problems 45 ...
Page 59: ... Paper Handling and Printing Problems 53 ...
Page 72: ... Copy a Document Error and Maintenance Messages Telephone and Fax problems Other Problems 66 ...
Page 74: ... Other Problems 68 ...
Page 76: ...Home Print Print Print from Your Computer Windows Print from Your Computer Macintosh 70 ...
Page 79: ... Print Settings Windows 73 ...
Page 99: ... Change the Default Print Settings Windows 93 ...
Page 123: ...Related Information Save Scanned Data to a Memory Card or USB Flash Drive 117 ...
Page 125: ...Related Information Scan Using the Scan Button on Your Brother Machine 119 ...
Page 178: ...Related Information Scan from Your Computer Windows WIA Driver Settings Windows 172 ...
Page 309: ...Related Information Distinctive Ring Choose the Correct Receive Mode 303 ...
Page 326: ...Related Information Fax Reports 320 ...
Page 333: ...Related Information PC FAX Overview Windows 327 ...
Page 433: ...Related Information Mobile Web Connect 427 ...
Page 448: ...Related Information ControlCenter4 Windows 442 ...
Page 521: ...Related Information Clean Your Brother Machine Telephone and Fax problems Other Problems 515 ...
Page 528: ...Related Information Clean Your Brother Machine 522 ...
Page 531: ...Related Information Clean Your Brother Machine Paper Handling and Printing Problems 525 ...
Page 551: ... Replace the Ink Cartridges 545 ...
Page 563: ... Set Your Station ID 557 ...


