UTILITY STITCHES
76
Zigzag Stitches
■
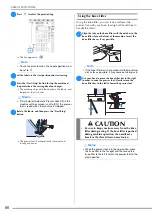
Cord Guide Bobbin Cover (Using a Zigzag
Stitch)
a
Remove the bobbin cover from the machine (page 40).
b
Thread the gimp thread through the hole in the cord
guide bobbin cover from top to bottom. Position the
thread in the notch at the back of the cord guide
bobbin cover.
c
Snap the cord guide bobbin cover into place, making
sure that the gimp thread can be fed freely.
*
Make sure there are no restrictions when feeding the
thread.
d
Set the zigzag width from 2.0-2.5 mm (approx. 1/16 -
3/32 inch).
e
Attach presser foot “N”.
f
Position the fabric right side up on top of the cord and
place the cord to the rear of the machine under the
presser foot.
g
Lower the presser foot and start sewing to make a
decorative finish.
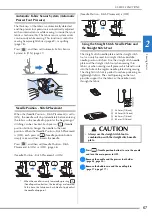
Overcasting
Sew overcasting stitches along the edges of cut fabric to
prevent them from fraying.
■
Using Overcasting Foot “G”
a
Select a stitch.
b
Attach overcasting foot “G”.
c
Position the fabric with the edge of the fabric against
the guide of the presser foot, and then lower the
presser foot lever.
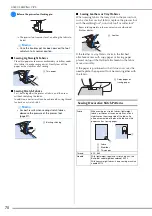
d
Rotate the handwheel toward you (counterclockwise).
Check that the needle does not touch the presser foot.
e
Sew with the edge of the fabric against the presser foot
guide.
1
Notch
2
Gimp thread
1
Fabric (right side)
2
Gimp thread
a
b
a
b
Memo
• For details on stitch patterns, refer to “STITCH
SETTING CHART” on page 194.
CAUTION
• When using overcasting foot “G”, be sure
select a stitch that can be used with
overcasting foot “G”. If you sew with the
incorrect stitch, the needle may hit the presser
foot, bending the needle or damaging the
presser foot.
1
Guide
1
The needle should
not touch the
center bar
1
Needle drop point
G
a
1
Summary of Contents for 882-W70
Page 2: ......
Page 12: ...CONTENTS 10 ...
Page 56: ...CHANGING THE PRESSER FOOT 54 ...
Page 57: ...Chapter 2 Sewing Basics ...
Page 73: ...Chapter 3 Various Stitches ...
Page 106: ...MY CUSTOM STITCH 104 ...
Page 107: ...Chapter 4 Basic Embroidery ...
Page 141: ...Chapter 5 Advanced Embroidery ...
Page 156: ...EMBROIDERY APPLICATIONS 154 ...
Page 157: ...Chapter 6 My Design Center ...
Page 176: ...STIPPLING 174 ...
Page 177: ...Chapter 7 Appendix ...
Page 193: ...ERROR MESSAGES 191 Appendix 7 ...
Page 205: ......
Page 206: ......
Page 207: ......
Page 208: ......
Page 209: ......
Page 210: ......
Page 211: ......


