


UTILITY STITCHES
V
ar
ious
St
itc
he
s
73
3
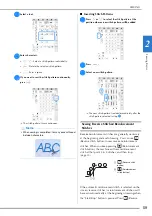
For stitches with a middle (center) needle position
(Stitch width: 3.5 mm)
1
Seam
2
Presser foot
3
Inches
4
Bobbin cover (with mark)
5
5/8 inch (approx. 1.6 cm)
■
Basting
a
Select
and attach presser foot “J”.
b
Keep pressing
(Reverse stitch button) or
(Reinforcement stitch button) to sew 4 stitches of
reinforcement stitches, then press “Start/Stop” button
to continue sewing.
c
When sewing is finished, sew reinforcement stitches,
and then cut the threads to a generous length.
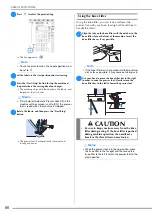
■
Dart Seam
a
Select
and attach presser foot “J”.
b
Sew a reverse stitch at the beginning of the dart and
then sew from the wide end to the other end without
stretching the fabric.
1
Basting
c
Cut the thread at the end leaving 5 cm (approx. 2
inches), and then tie both ends together.
*
Do not sew a reverse stitch at the end.
d
Insert the ends of the thread into the dart with a hand
sewing needle.
e
Iron the dart to one side so that it is flat.
Memo
• Before sewing, pull up the bobbin thread, align it
with the upper thread, and then pull them to the
back of the machine. (page 41) For clean stitching,
hold these thread ends when starting to sew.
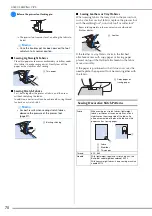
• You can set the stitch length between 5 mm
(approx. 3/16 inch) and 30 mm (approx. 1-3/16
inches).
1
Between 5 mm (approx. 3/16 inch) and 30 mm
(approx.1-3/16 inches)
Summary of Contents for 882-W70
Page 2: ......
Page 12: ...CONTENTS 10 ...
Page 56: ...CHANGING THE PRESSER FOOT 54 ...
Page 57: ...Chapter 2 Sewing Basics ...
Page 73: ...Chapter 3 Various Stitches ...
Page 106: ...MY CUSTOM STITCH 104 ...
Page 107: ...Chapter 4 Basic Embroidery ...
Page 141: ...Chapter 5 Advanced Embroidery ...
Page 156: ...EMBROIDERY APPLICATIONS 154 ...
Page 157: ...Chapter 6 My Design Center ...
Page 176: ...STIPPLING 174 ...
Page 177: ...Chapter 7 Appendix ...
Page 193: ...ERROR MESSAGES 191 Appendix 7 ...
Page 205: ......
Page 206: ......
Page 207: ......
Page 208: ......
Page 209: ......
Page 210: ......
Page 211: ......