


VARIOUS EMBROIDERING FUNCTIONS
142
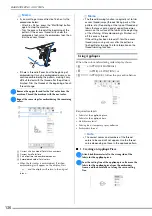
f
Fuse or stick a piece of stabilizer to the back of the felt
or denim fabric to be used as the appliqué piece.
g
Hoop the fabric for the appliqué piece in the
embroidery frame, attach the embroidery frame to the
machine, and then start embroidering.
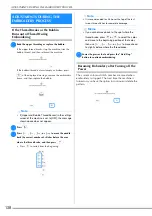
h
After the pattern is embroidered, thread the machine
with the thread for the cutting line, and then sew the
cutting line (APPLIQUE MATERIAL).
i
Remove the fabric for the appliqué piece from the
embroidery frame, and then carefully cut along the
stitching. After cutting, carefully remove all of the
cutting line thread.
j
Use two layers of adhesive water soluble stabilizer
material with their sticky sides together, and then hoop
them in the embroidery frame.
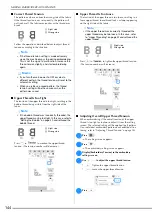
k
Thread the machine with the thread for the outline,
and then sew the placement line for the appliqué
position (APPLIQUE POSITION).
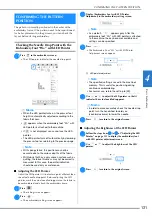
1
Pattern placement line
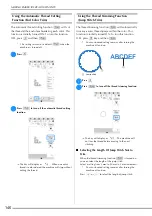
l
Use two-sided stabilizer material, and paste the
appliqué piece so that it aligns with the placement line.
m
With the machine threaded using the thread for the
outline from step
k
, embroider the outline
(APPLIQUE).
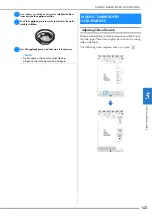
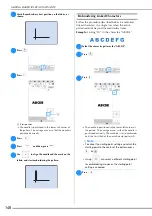
n
After embroidering is finished, remove the stabilizer
material from the embroidery frame.
1
Cutting line for appliqué
Memo
• We recommend using thread for the cutting line
that is closest to the color of the fabric.
Note
• Depending on the pattern density and fabric used,
there may be shrinking of the pattern, or the
appliqué may be misaligned with the placement
line. We recommend cutting slightly outside of the
cutting line. Do not cut inside the cutting line,
otherwise the appliqué fabric will not be caught by
the appliqué stitch.
• When using patterns that are vertically and
horizontally symmetrical, use a chalk pencil to
indicate the pattern orientation before cutting it out.
a
Note
• If water soluble stabilizer is used, it is not
necessary to remove the stabilizer material after
sewing the appliqué outline. To reduce shrinkage
of the pattern, we recommend using water soluble
stabilizer.
• Put together two layers of water soluble stabilizer,
otherwise the stabilizer material may tear during
embroidering.
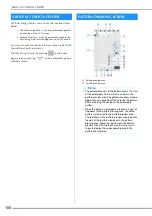
1
Outline of appliqué
piece
Note
• Since glue may become attached to the presser
foot, needle or needle plate, clean off any glue after
finishing embroidering the appliqué pattern.
a
a
Summary of Contents for 882-W70
Page 2: ......
Page 12: ...CONTENTS 10 ...
Page 56: ...CHANGING THE PRESSER FOOT 54 ...
Page 57: ...Chapter 2 Sewing Basics ...
Page 73: ...Chapter 3 Various Stitches ...
Page 106: ...MY CUSTOM STITCH 104 ...
Page 107: ...Chapter 4 Basic Embroidery ...
Page 141: ...Chapter 5 Advanced Embroidery ...
Page 156: ...EMBROIDERY APPLICATIONS 154 ...
Page 157: ...Chapter 6 My Design Center ...
Page 176: ...STIPPLING 174 ...
Page 177: ...Chapter 7 Appendix ...
Page 193: ...ERROR MESSAGES 191 Appendix 7 ...
Page 205: ......
Page 206: ......
Page 207: ......
Page 208: ......
Page 209: ......
Page 210: ......
Page 211: ......